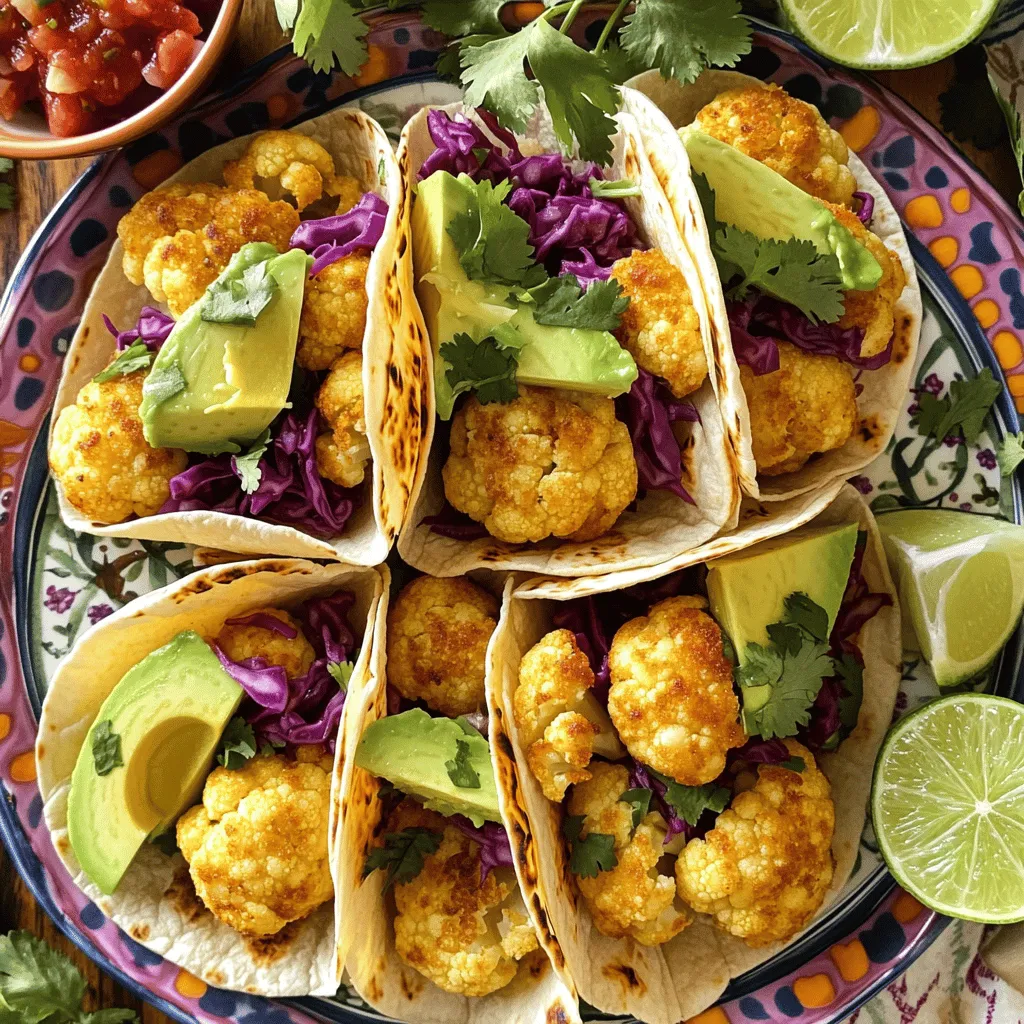
Crispy Cauliflower Tacos Flavorful and Healthy Delight

Looking for a tasty, healthy dish? Try my crispy cauliflower tacos! They pack a big flavor punch while being light and satisfying. With just a few ingredients, you can create a meal that’s crunchy and savory. Perfect for lunch, dinner, or a fun family taco night, this recipe lets you enjoy a guilt-free treat. Let’s dive into the fresh ingredients you’ll need and how to make them!
Ingredients
Key Ingredients
For these crispy cauliflower tacos, you’ll need the following:
– 1 head of cauliflower, cut into bite-sized florets
– 1 cup breadcrumbs (preferably panko)
– 1 cup all-purpose flour
– 1 cup plant-based milk (or regular milk)
– 1 teaspoon smoked paprika
– 1 teaspoon garlic powder
– 1 teaspoon onion powder
– 1/2 teaspoon cayenne pepper (adjust to taste)
– Salt and pepper to taste
These ingredients create a tasty and crunchy coating for the cauliflower. The spices add depth and warmth.
Fresh Additions
To make your tacos truly vibrant, gather these fresh toppings:
– Corn tortillas for serving
– 1 avocado, sliced
– 1 cup shredded red cabbage
– Fresh cilantro, for garnish
– Lime wedges, for serving
The corn tortillas hold the crispy cauliflower well. The avocado adds creaminess, while cabbage gives a nice crunch.
Nutritional Information
Each serving of crispy cauliflower tacos has about:
– Calories: 300
– Total Fat: 10g
– Protein: 7g
– Fiber: 8g
These tacos offer a balanced meal with good fiber and healthy fats. Enjoying them can help you feel satisfied and energized. For the full recipe, check the link.
Step-by-Step Instructions
Preparation
– Preheat your oven to 425°F (220°C).
– Line a baking sheet with parchment paper.
This step is crucial. Preheating helps to ensure your cauliflower cooks evenly. Parchment paper keeps the florets from sticking. You want them crispy, not glued to the pan!
Setting Up the Breading Station
– Set up three bowls: one with flour, one with plant-based milk, and one with breadcrumbs mixed with spices.
You need to organize your space. Place the flour in the first bowl. In the second, pour the plant-based milk. Mix breadcrumbs, smoked paprika, garlic powder, onion powder, cayenne pepper, salt, and pepper in the last bowl. This setup speeds up the coating process.
Coating and Baking
– Dip each cauliflower floret in the flour first, then in the milk, and finally coat it in the breadcrumb mixture.
– Place the coated florets on the baking sheet.
Make sure each piece is well-coated. This is where the magic happens. The flour helps the milk stick, and the breadcrumbs create that perfect crunch.
– Bake the cauliflower for 25-30 minutes, flipping halfway through.
Flipping is key for even crispiness. You’ll know they’re done when they look golden brown. If you want an extra crunch, broil them for a minute at the end.
Remember to check out the Full Recipe for more tips!
Tips & Tricks
Enhancing Flavor
To make your crispy cauliflower tacos more delicious, try adding spices like cumin or coriander. A splash of lime juice in the flour mix can give a tangy note. You can also marinate the cauliflower in taco seasoning for extra depth. Another idea is to mix in some nutritional yeast with the breadcrumbs for a cheesy flavor without the dairy.
Ensuring Crispiness
Crispiness is key for these tacos. Make sure each cauliflower floret gets an even coating of flour, milk, and breadcrumbs. This helps create a barrier that keeps moisture out. Avoid overcrowding the baking sheet; leave space between florets for air circulation. Flip the cauliflower halfway through baking to ensure even crispiness on all sides.
Presentation Ideas
Serve your tacos on a bright, colorful plate. This makes them pop visually. Garnish with fresh cilantro and lime wedges for a fresh touch. You can also add a small bowl of salsa or hot sauce on the side for dipping. For extra flair, stack the tacos slightly and sprinkle some sesame seeds on top for crunch.
Variations
Dietary Adjustments
For those needing gluten-free options, use gluten-free flour and gluten-free breadcrumbs. These swaps ensure you can enjoy crispy cauliflower tacos without worry. For dairy-free substitutes, plant-based milk works just as well as regular milk. This milk keeps the batter light and airy. Always check the labels to confirm they meet your dietary needs.
Customization Ideas
You can change up the toppings to suit your taste. Try adding roasted peppers, corn, or diced tomatoes for a fresh twist. Different salsas can bring new flavors too. Mango salsa adds sweetness, while tomatillo salsa gives a zesty kick. Explore various toppings to make these tacos your own.
Serving Suggestions
Pair your tacos with a side of black beans or a fresh salad. These sides add nutrition and balance to your meal. For drinks, consider a light beer or a refreshing agua fresca. These options complement the flavors of your tacos beautifully. You can enjoy a complete meal that’s both tasty and satisfying. For the full recipe, check out the detailed instructions above!
Storage Info
Storing Leftovers
To keep your tacos fresh, store any leftovers in an airtight container. Place the crispy cauliflower in one container and the tortillas in another. This way, the tortillas won’t get soggy. You can refrigerate the components for up to three days. If you want to keep them longer, you can freeze the cauliflower. Just make sure it cools down before freezing.
Reheating Techniques
When reheating, aim to restore that lovely crunch. Preheat your oven to 400°F (200°C). Place the cauliflower on a baking sheet and heat for about 10 minutes. Avoid the microwave, as it makes the cauliflower soft. For tortillas, warm them on a dry skillet over medium heat for about 30 seconds on each side. This will bring back their flavor and texture.
Shelf Life
The crispy cauliflower will last in the fridge for about three days. If frozen, you can keep it for about a month. The tortillas are best used within a week if stored in the fridge. After that, they may dry out. For the best taste, eat the tacos within three days of making them. Try to keep everything separate until you are ready to enjoy your meal.
FAQs
Can I use frozen cauliflower for this recipe?
Yes, you can use frozen cauliflower. Just keep a few things in mind. First, thaw the cauliflower completely. This step helps to avoid excess moisture. Drain any water after thawing. Pat the florets dry with a clean towel. This makes sure they get crispy when baked. Use the same coating process as fresh cauliflower. Frozen florets may need a few extra minutes to bake. Check for a golden brown color to know they are done.
What to serve with crispy cauliflower tacos?
These tacos pair well with many sides. Consider serving them with a fresh salad. A simple cabbage slaw adds crunch and flavor. You could also serve rice or quinoa for a filling meal. Black beans or refried beans can add protein. For a refreshing drink, try a limeade or iced tea. These drinks enhance the meal nicely.
Can the recipe be made ahead of time?
Yes, you can prepare these tacos ahead of time. You can bread the cauliflower and store it in the fridge. Just keep it in an airtight container. Bake just before serving to keep it crispy. You can also assemble the tacos ahead. Store each component separately. This way, the tortillas stay fresh. Enjoy them warm or at room temperature. For more details on the full recipe, check out the complete instructions.
This blog post guides you through making delicious crispy cauliflower tacos. We covered key ingredients, step-by-step instructions, and tips for the perfect crunch. Explore dietary variations and storage methods to keep your tacos fresh.
Remember, cooking is about finding what you love. Use this recipe as a base to add your flair. Enjoy crafting a tasty meal that satisfies your cravings and impresses others. Happy cooking!

. To start, grab a large mixing bowl. Open the can of black beans, rinse, and drain them. Use a fork or potato masher to mash the beans. Aim for a mostly smooth texture but leave some chunks for bite. Next, add the cooked quinoa, breadcrumbs, and chopped red onion. Toss in the finely chopped bell pepper, minced garlic, and spices: chili powder, cumin, smoked paprika, salt, and pepper. Finally, squeeze in the lime juice. Mix everything until it feels well combined. If the mixture is too wet, sprinkle in more breadcrumbs until it can hold its shape. Once your mixture is ready, divide it into four equal parts. Shape each part into a patty that is about one inch thick. Heat olive oil in a non-stick skillet over medium heat. When the oil is hot, carefully place the patties in the skillet. Cook each side for about 4-5 minutes. Look for a golden brown color and ensure they are heated through. This step gives the burgers a nice crispy edge. Now it's time to serve your spicy black bean burgers! Place each patty on a hamburger bun. Top with your favorite ingredients, like avocado slices, lettuce, tomato, and spicy mayo. For a beautiful plate, pair the burgers with sweet potato fries or a mixed greens salad. The colors will look great together and make your meal even more appetizing. For the full recipe, check the details above. To get the best texture, mash your black beans well. Leave some chunks for that hearty bite. Add cooked quinoa to bind everything together. Use breadcrumbs or oat flour for a firmer patty. If the mix feels too wet, just add more breadcrumbs. This helps the burgers hold their shape. Want more heat? Try adding chopped jalapeños or a dash of cayenne pepper. You can also mix in some hot sauce or sriracha for an extra kick. Don’t forget to taste as you go! Adjust the spices until you get the flavor you want. Fresh herbs like cilantro can brighten up the taste too. Store cooked burgers in an airtight container. They will stay fresh for about three days in the fridge. To reheat, use the skillet on medium heat. Cook for about three minutes on each side. You can also microwave them for a quicker option; just cover them to keep moisture. If you want longer storage, freeze the uncooked patties. They’ll last up to three months in the freezer. Enjoy them anytime with the full recipe! {{image_2}} You can swap black beans for other beans. Chickpeas or kidney beans work well. Each bean brings a unique flavor and texture. For example, chickpeas add a nutty taste. Kidney beans give a softer bite. Just mash them like you do with black beans. Follow the same recipe steps for great results. Want more nutrition? Add grains or veggies to your burger mix. Cooked brown rice or farro can boost fiber. You can also mix in grated carrots or zucchini. These add moisture and flavor. Just remember to squeeze out excess water from veggies. This keeps your burger from getting too wet. Experimenting with spices can change your burger game. Try adding smoked chipotle for heat. Or mix in fresh herbs like cilantro or parsley. For a Mediterranean twist, add oregano and feta cheese. These spices and herbs change the flavor and make it exciting. Don't be afraid to get creative with what you have! For the full recipe, check out the detailed steps above. To keep your cooked spicy black bean burgers fresh, let them cool first. Place them in an airtight container. Store them in the fridge for up to three days. This helps maintain their flavor and texture. Freezing your burgers is a great option for meal prep. After they cool, wrap each burger in plastic wrap. Then, place them in a freezer-safe bag. They can last up to three months in the freezer. When you’re ready to eat, just thaw them in the fridge overnight. Use glass or BPA-free plastic containers for best results. These containers seal tightly and prevent air from entering. This keeps your burgers from drying out. If you’re freezing, look for heavy-duty freezer bags. They help protect against freezer burn. To make your Spicy Black Bean Burgers stick, you need the right balance. Start by mashing the black beans well. Leave some chunks for texture. Mix in breadcrumbs or oat flour. This helps hold the burgers together. If the mix feels too wet, add more breadcrumbs. You want a moldable consistency. This simple trick ensures your burgers stay intact while cooking. You can serve many tasty sides with Spicy Black Bean Burgers. Here are some great options: - Sweet potato fries - Mixed greens salad - Coleslaw - Grilled vegetables - Corn on the cob These sides add color and flavor to your meal. They also complement the burgers well. Feel free to mix and match to find what you like best! Yes, you can bake black bean burgers! Baking is a healthier option. Preheat your oven to 375°F (190°C). Line a baking sheet with parchment paper. Place the shaped patties on it. Bake for about 20-25 minutes. Flip them halfway for even cooking. You’ll still get a nice texture without frying. This method works well and keeps the burgers light! To sum up, we explored how to make tasty spicy black bean burgers. We looked at key ingredients, cooking steps, and tips for the perfect texture. You can try fun variations and learn how to store leftovers. These burgers are easy to tweak for your tastes. They are delicious and healthy. Enjoy making them your own, and share with friends!](http://dailydishly.com/wp-content/uploads/2025/06/bb742c5e-0c76-419c-af3f-f1da08f0abd3-768x768.webp)