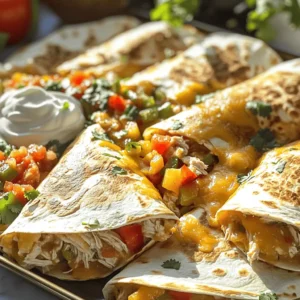
Cheesy Sheet Pan Chicken Quesadillas Simple Delight

Get ready for a flavor explosion with my Cheesy Sheet Pan Chicken Quesadillas! This simple delight brings you melty cheese, tender chicken, and fresh veggies—all baked on one sheet. Whether you’re feeding a crowd or just craving comfort food, these quesadillas are a game changer. Discover the easy steps to make them crispy and delicious every time. Dive in, and let’s whip up a tasty dish the whole family will love!
Ingredients
List of Main Ingredients
– 2 cups cooked chicken, shredded
– 1 cup shredded cheddar cheese
– 1 cup shredded Monterey Jack cheese
– 1 cup bell peppers, diced
– 1 small red onion, diced
Additional Flavoring Ingredients
– 1 can diced tomatoes with green chilies
– Ground spices: cumin, garlic powder, onion powder, paprika, cayenne pepper
Tortillas and Garnish
– 8 large flour tortillas
– Olive oil and fresh cilantro
– Serving options: sour cream and salsa
Gathering the right ingredients is key for tasty cheesy sheet pan chicken quesadillas. Start with cooked chicken. You can use leftover roast chicken or store-bought rotisserie chicken.
Next, cheese is important. Cheddar gives a sharp flavor. Monterey Jack adds creaminess. Together, they melt beautifully.
Add diced bell peppers and onions for crunch. They bring color and freshness. The diced tomatoes with green chilies add a nice kick.
For spices, cumin, garlic powder, onion powder, paprika, and cayenne pepper bring all the flavors together. Adjust the cayenne if you want less heat.
You will also need large flour tortillas. They hold the filling well and provide a great base.
Finally, add olive oil to make the top crispy. Fresh cilantro brightens the dish. Pair with sour cream and salsa for extra flavor.
You’ll find the full recipe for cheesy sheet pan chicken quesadillas in this article. Enjoy making this delicious dish!
Step-by-Step Instructions
Prepping the Oven and Baking Sheet
– Preheat your oven to 400°F (200°C).
– Line a large baking sheet with parchment paper.
Start with these simple steps. Preheating the oven makes sure your quesadillas cook evenly. Using parchment paper helps with easy cleanup. No one likes a messy kitchen!
Mixing the Filling
– Combine shredded chicken and cheeses with vegetables and spices.
In a big bowl, mix the shredded chicken with cheddar and Monterey Jack cheeses. Add in the diced bell peppers, red onion, and the can of diced tomatoes. Sprinkle in ground cumin, garlic powder, onion powder, paprika, and cayenne pepper if you like heat. Don’t forget salt and pepper! Stir until everything is well blended. This filling is the star of your dish.
Assembling the Quesadillas
– Layer tortillas and spread filling.
– Brush tops with olive oil before baking.
On your lined baking sheet, lay down four tortillas. They can overlap a little. Spread the chicken and cheese mixture over them. Leave a small border around the edges. Top with the remaining tortillas. Press down gently to help them stick together. Brush the tops with olive oil for a golden finish. This step adds flavor and helps them crisp up.
Baking and Serving
– Bake for 15-20 minutes until golden.
– Slice and garnish before serving.
Slide the baking sheet into the oven. Bake the quesadillas for 15 to 20 minutes. Look for a golden brown color on top. The cheese should be bubbly. Once done, let them cool for a few minutes before slicing. Use a sharp knife or pizza cutter for clean cuts. Garnish with fresh cilantro. Serve with sour cream and salsa for extra flavor. Enjoy your cheesy sheet pan chicken quesadillas! For the full recipe, check the earlier section.
Tips & Tricks
Achieving the Perfect Crispy Quesadilla
To get a golden, crispy quesadilla, brush the top with olive oil. This small step makes a big difference. The oil helps the tortillas crisp up nicely in the oven. Bake your quesadillas at 400°F for 15 to 20 minutes. Keep an eye on them to avoid burning. You want a nice golden color and bubbly cheese.
Spice Level Adjustments
Do you like heat? You can easily adjust the spice level. Add diced jalapeños to the filling for a fresh kick. If you prefer, splash in some hot sauce while mixing the chicken and cheese. Start with a small amount, and taste as you go. This way, everyone can enjoy their quesadilla at their own heat level.
Ingredient Substitutions
Don’t have all the ingredients? No problem! You can switch out the cheese for your favorites. Try pepper jack or gouda for a twist. If you don’t have flour tortillas, corn tortillas work well too. You can also use leftover proteins, like beef or turkey. Toss in any veggies you have on hand. This flexibility keeps the recipe fun and fresh. For the full recipe, check the main article.

Variations
Vegetarian Option
You can make a great vegetarian version of these quesadillas. Start by using black beans instead of chicken. Black beans add protein and a nice texture. You can also toss in more veggies like zucchini, corn, or spinach. These additions give your dish color and flavor. Don’t forget to keep the cheese! It helps tie everything together.
Different Meat Options
If you want a change, try using beef or shrimp instead of chicken. For beef, ground meat works well. Brown it first, then mix it with the other ingredients. For shrimp, use cooked shrimp and chop it into pieces. Both options add a different taste to the quesadilla. You can even mix meats for variety.
Flavor Profiles
Let’s talk about cheese! While cheddar and Monterey Jack are classic choices, you can explore others. Try pepper jack for a spicy kick. Or, use feta for a tangy twist. You can also add spices like taco seasoning or smoked paprika. These changes create exciting new flavor profiles. Experimenting with cheese and spices can make each meal unique.
For the Full Recipe, feel free to check it out for more details!
Storage Info
Proper Storage Techniques
To store your cheesy sheet pan chicken quesadillas, use airtight containers. This keeps them fresh and tasty. Let them cool down before storing. If you put them away hot, they may get soggy. You can keep them in the fridge for up to three days. If you want to enjoy them later, think about freezing!
Reheating Instructions
Reheating quesadillas is easy and quick. I recommend using an oven or a stovetop. For the oven, preheat to 350°F. Place the quesadillas on a baking sheet and heat for about 10 minutes. If you prefer a stovetop, heat a non-stick pan over medium heat. Cook each side for about 2-3 minutes. This keeps them crispy and delicious.
Freezing Guidelines
To freeze your quesadillas, wrap each one in plastic wrap. Then, place them in a freezer-safe bag. They will stay good for about three months. When you want to eat them, take them out and let them thaw overnight in the fridge. You can then reheat them using the methods mentioned above. Enjoy your tasty treat anytime!
FAQs
Can I make these quesadillas ahead of time?
Yes, you can! Prepare the quesadilla filling a day in advance. Store it in an airtight container in the fridge. You can also assemble the quesadillas and keep them in the fridge. Just cover them tightly with plastic wrap or foil. When you’re ready to eat, bake them straight from the fridge. Just add a few extra minutes to the baking time.
What can I serve with cheesy sheet pan chicken quesadillas?
These quesadillas pair well with many sides. Try serving them with:
– Fresh guacamole
– Crispy tortilla chips
– Mexican rice
– Black beans
– A simple green salad
– Corn salsa
These sides add flavor and color to your meal. They also help balance the richness of the quesadillas.
How can I ensure my quesadillas are fully cooked?
To check if your quesadillas are ready, look for a golden-brown color on top. The cheese should be bubbly and melted inside. Use a sharp knife to cut a piece. If it feels hot and the cheese has melted, it’s done! If not, bake for a few more minutes. Keep an eye on them to avoid burning.
You made delicious cheesy sheet pan chicken quesadillas. You learned about key ingredients, like chicken, cheese, and peppers. We covered step-by-step instructions for mixing and baking. Tips helped you perfect the crispy texture and spice level. There are options for veggie lovers and those who prefer different meats. Remember to store leftovers properly for later. Enjoy your tasty creations, and don’t forget to share them with friends!

![To make Chicken and Cheese Enchiladas Casserole, you need the right ingredients. Here they are: - 2 cups cooked chicken, shredded - 1 can (15 oz) black beans, rinsed and drained - 1 cup frozen corn - 1 can (10 oz) enchilada sauce (red or green) - 2 cups shredded cheese (cheddar and Monterey Jack mix) - 8 corn tortillas - 1 small red onion, diced - 1 teaspoon ground cumin - 1 teaspoon chili powder - Salt and pepper to taste - Fresh cilantro, for garnish - Sliced jalapeños, for garnish (optional) Each ingredient serves a purpose. The chicken adds protein, while the beans and corn provide fiber. The enchilada sauce gives a rich flavor. The cheese melts beautifully, creating a creamy texture. Tortillas hold it all together. Don't forget the spices! They bring warmth and depth to the dish. Using fresh ingredients makes a big difference. Fresh cilantro adds color and bright flavor. If you want a kick, sliced jalapeños can spice things up. For a full guide on making this dish, check the Full Recipe. - Preheat the oven to 350°F (175°C). - In a large bowl, mix the cooked chicken, black beans, corn, half the enchilada sauce, cumin, chili powder, diced onion, salt, and pepper. Stir it well. This mix gives your casserole a great flavor. - Take a 9x13 inch baking dish and spread a thin layer of the remaining enchilada sauce on the bottom. - Place 4 corn tortillas over the sauce. Overlap them slightly. This helps keep everything together. - Spoon half of your chicken and bean mix over the tortillas. Then sprinkle half of the cheese on top. - Repeat this with another layer of tortillas, the rest of the chicken mixture, and the remaining cheese. - End with a final layer of tortillas and drizzle any remaining enchilada sauce on top. This keeps the dish moist. - Cover the baking dish with aluminum foil. Bake in the preheated oven for 20 minutes. - After 20 minutes, remove the foil. Bake for an extra 10-15 minutes. This lets the cheese get bubbly and golden brown. - Once done, take it out and let it sit for about 5 minutes before slicing. This helps it hold its shape. - For the full recipe, check the detailed instructions above. To make shredding chicken easy, use two forks. Hold one fork in each hand. Pull the chicken apart in opposite directions. This method works great and saves time. You can also use a stand mixer with a paddle attachment. Just place the cooked chicken in the bowl and mix on low speed. To prevent soggy tortillas, lightly fry them in oil first. This step makes them crisp and adds flavor. You can also warm them in the oven for a few minutes. This keeps them from getting too soft when layered in the casserole. For a great side dish, serve Mexican rice or refried beans. These pair nicely with the creamy casserole. You can also add a fresh green salad on the side. A simple salad with lettuce, tomatoes, and avocado adds freshness. To enhance your casserole's look, garnish with fresh cilantro and jalapeño slices. These colorful toppings add a nice touch. A drizzle of extra enchilada sauce can also make it pop. You can serve the casserole on individual plates for a nice presentation. For the full recipe, check out the Chicken and Cheese Enchiladas Casserole section above. {{image_2}} If you have leftover ingredients, use them! You can swap cooked chicken for shredded beef or even pork. If you have extra veggies, toss in bell peppers or zucchini for added color and nutrients. You can also switch the black beans for pinto beans or kidney beans. They add a nice texture and flavor. For a twist, try chickpeas for a protein boost. Adjust the spice levels to fit your taste. Use mild chili powder for a gentle heat or add cayenne pepper for a kick. You can also mix in diced green chiles for extra flavor without too much heat. If you want a meatless version, skip the chicken and add more beans. You can use lentils or quinoa for protein. Toss in spinach or kale for a healthy touch. Enjoy the variety! For the full recipe, check out the [Full Recipe]. To keep your Chicken and Cheese Enchiladas Casserole fresh, store it in an airtight container in the fridge. It will last for about 3 to 4 days. If you want to keep it longer, freeze it. Wrap it well in plastic wrap and aluminum foil. It can last in the freezer for up to 3 months. Just remember to label it with the date. When you're ready to enjoy leftovers, preheat your oven to 350°F (175°C). Place the casserole in an oven-safe dish. Cover it with aluminum foil to keep it moist. Bake for about 20 minutes. If you prefer to use a microwave, slice a portion and place it on a microwave-safe plate. Heat it for 1-2 minutes, checking often. Make sure it is hot throughout. Avoid overheating, as it can make the dish dry. For the best taste, use the oven when possible. How can I make Chicken and Cheese Enchiladas Casserole gluten-free? To make this casserole gluten-free, use corn tortillas. Check that your enchilada sauce is gluten-free too. Many brands offer gluten-free options. Can I prepare this casserole in advance? Yes, you can prepare it a day ahead. Assemble the casserole, then cover and refrigerate. Bake it just before serving. What are the best sides to serve with Chicken and Cheese Enchiladas Casserole? Some great sides include refried beans, Mexican rice, or a fresh salad. These add color and flavor to your meal. Is it possible to add more vegetables to the recipe? Absolutely! You can add bell peppers, zucchini, or spinach. Just chop them small and mix them in with the chicken. Can I use other types of cheese besides cheddar and Monterey Jack? Yes, feel free to experiment! You can use pepper jack for spice or even queso fresco for a creamy touch. This post covered the tasty Chicken and Cheese Enchiladas Casserole. We looked at the main ingredients, steps to create it, tips to perfect it, and storage methods. You can customize this dish easily with varied ingredients or toppings. Remember, cooking should be fun and creative. I hope you enjoy making this hearty casserole as much as I do. Happy cooking!](http://dailydishly.com/wp-content/uploads/2025/06/88aadb9b-53ae-4392-a371-8958c664e0d2-768x768.webp)
![- 4 chicken thighs, bone-in and skin-on - 1/4 cup honey - 4 cloves garlic, minced - 2 tablespoons soy sauce (or tamari for gluten-free) - 1 tablespoon apple cider vinegar - 1 tablespoon olive oil - 1 teaspoon grated fresh ginger - 1/2 teaspoon black pepper - Chopped green onions - Sesame seeds The main ingredients in this dish are simple yet powerful. Chicken thighs offer rich flavor and juicy texture. Honey adds sweetness that balances the savory notes. Garlic brings a punch that enhances every bite. The additional ingredients work together to create a delicious marinade. Soy sauce adds umami depth, while apple cider vinegar brings brightness. Olive oil helps keep the chicken moist during cooking. For seasoning, fresh ginger adds warmth. Black pepper gives a slight kick. The green onions and sesame seeds make for a lovely garnish, adding color and crunch. You can find the complete process in the Full Recipe. These ingredients blend to create a honey garlic glaze that makes this chicken dish truly special. Preparing the marinade To start, grab a medium bowl. Whisk together the honey, minced garlic, soy sauce, apple cider vinegar, olive oil, grated ginger, black pepper, and a small pinch of salt. Mix until all ingredients blend well. This sauce will give your chicken a sweet and savory flavor. Marinating the chicken Next, take your chicken thighs and place them in a zip-lock bag or shallow dish. Pour the marinade over the chicken, making sure each piece gets coated. Seal the bag or cover the dish. Refrigerate for at least one hour. For deeper flavor, marinate overnight. Preheating the oven While the chicken marinates, preheat your oven to 400°F (200°C). A hot oven helps the chicken cook evenly and crisp the skin. Baking the chicken After marinating, remove the chicken from the marinade. Don’t throw the marinade away; you will use it later. Place the chicken thighs skin side up on a baking tray lined with parchment paper. Bake in the preheated oven for 30-35 minutes. The chicken is ready when it reaches an internal temperature of 165°F (74°C) and the skin is crispy. Cooking the sauce While your chicken bakes, pour the reserved marinade into a small saucepan. Heat it over medium heat. Let it simmer for about 5-7 minutes until it thickens slightly. This will be your delicious glaze. Glazing and serving When the chicken is done, brush the thickened glaze over the thighs. Return the tray to the oven for another 5 minutes to caramelize the glaze. Once done, remove and sprinkle with chopped green onions and sesame seeds. Let the chicken rest for a few minutes before serving. Enjoy your Honey Garlic Glazed Chicken Thighs! For the full recipe, check the earlier section. - The best time to marinate chicken thighs is at least one hour. For deeper flavor, marinate overnight. - Use a zip-lock bag for even coating. Squeeze out air to let the marinade soak in well. - To get crispy skin, bake the chicken thighs skin side up. This allows the fat to render and crisp up. - Check the internal temperature with a meat thermometer. It should reach 165°F (74°C) for safe eating. - Pair your honey garlic glazed chicken with steamed rice or roasted vegetables. - For a nice look, garnish with chopped green onions and sesame seeds. This adds color and crunch. For the full recipe, refer to the instructions above. Enjoy your cooking! {{image_2}} You can switch up the protein in this dish. Chicken breast works well if you want less fat. For a plant-based option, try tofu. Just press it to remove excess water and cut it into cubes. You can also change the sweetener. If you want a lower sugar option, use maple syrup or agave nectar. These alternatives blend nicely with the other flavors. Make this dish even better by adding spices or herbs. Try ginger or chili flakes for a kick. Fresh herbs like cilantro or basil can bring a nice twist too. You can also play with acids. Lime juice adds a bright flavor, while balsamic vinegar gives a sweet tang. Try adding a splash during cooking for a new taste. Grilling the chicken gives it a smoky flavor. Just marinate as usual and grill over medium heat. It takes about 20 minutes, and you’ll get nice grill marks. If you own an Instant Pot, you can use it for this recipe too. Cook the marinated chicken on high for 10 minutes, then let it naturally release. This method keeps the chicken super juicy. For the full recipe, check out the complete instructions and details. To keep your honey garlic glazed chicken thighs fresh, store them in the fridge. Place the cooked chicken in an airtight container. It can last up to 3 days in the refrigerator. If you want to store it longer, consider freezing it. Wrap the chicken tightly in plastic wrap, then place it in a freezer-safe bag. This way, it can stay good for up to 3 months. When it's time to enjoy leftovers, reheating can be simple. The best way to reheat is in the oven. Set your oven to 350°F (175°C). Place the chicken on a baking sheet and cover it with foil. This helps keep the chicken moist. Heat it for about 15-20 minutes or until it's warm. You can also use a microwave, but use a lower power setting to avoid drying it out. Cover the chicken with a damp paper towel to keep moisture in. You can store your honey garlic glazed chicken thighs safely for a few days. In the fridge, they stay good for 3 days. In the freezer, they last for 3 months. Signs of spoilage include a strange smell, changes in color, or a slimy texture. Always check before eating to stay safe. For more details on how to make this dish, check the Full Recipe. Can I use boneless chicken thighs? Yes, you can use boneless chicken thighs. They will cook faster than bone-in thighs. Check the internal temperature to ensure they reach 165°F (74°C). How to make the glaze thicker? To thicken the glaze, simmer it longer. Cook it on medium heat until it reduces and becomes syrupy. You can also add a cornstarch slurry for extra thickness. How to make it gluten-free? Use tamari instead of soy sauce. Tamari is a gluten-free option that tastes great. Can I add vegetables to the dish? Yes, you can add vegetables. Try bell peppers, broccoli, or carrots. Toss them on the baking tray with the chicken. How many servings does this recipe yield? This recipe makes four servings. It’s perfect for a small family meal. Can I double the recipe for a larger group? Yes, you can double the recipe. Just ensure your baking tray has enough space. You may need to adjust cooking time slightly. For the complete recipe, check out the [Full Recipe]. This recipe uses simple ingredients like chicken thighs, honey, and garlic. You learned how to prepare and cook tasty chicken with an easy glaze. I shared tips to help with marinating and cooking for the best results. Feel free to explore variations and enjoy leftovers too. Try different flavors and cooking methods. Cooking should be fun and personal. Use your taste to create amazing meals. Enjoy making this dish with friends and family!](http://dailydishly.com/wp-content/uploads/2025/07/b9cba3e0-ee7f-4dbf-9eac-9b8411a1c4fd-768x768.webp)
![To make the sweet potato and black bean enchiladas, gather the following ingredients: - 2 medium sweet potatoes, peeled and diced - 1 can (15 oz) black beans, rinsed and drained - 1 cup corn kernels (fresh, frozen, or canned) - 1 teaspoon cumin - 1 teaspoon smoked paprika - ½ teaspoon chili powder - Salt and pepper to taste - 1 cup shredded cheddar cheese (or a vegan alternative) - 8 large tortillas (corn or flour) - 1 cup enchilada sauce (store-bought or homemade) - 2 tablespoons olive oil - Fresh cilantro and avocado slices for garnish These ingredients create a colorful and tasty meal. Sweet potatoes bring natural sweetness and nutrition. Black beans add protein and fiber, making these enchiladas hearty. Corn gives a nice crunch, while spices add depth. You can use different types of cheese to fit your taste. Also, consider adding more veggies like spinach or bell peppers for extra flavor. The enchilada sauce can be homemade or store-bought, depending on your time. Be sure to prep your ingredients before you start cooking. This makes the assembly easy and quick. For the full recipe, check out the instructions I provided earlier. Enjoy creating a dish that is both satisfying and fun to eat! To start, I cook the sweet potatoes. I peel and dice them into small cubes. Then, I boil water in a medium pot. Once boiling, I add the sweet potato cubes. I cook them for about 10 minutes, or until they are tender. After that, I drain them and mash them slightly with a fork. I like to leave some chunks for texture. Next, I flavor the sweet potato mixture. In a large bowl, I combine the mashed sweet potatoes with black beans, corn, cumin, smoked paprika, chili powder, salt, and pepper. I mix it well until everything combines. This mixture is full of flavor and nutrition. Now, I begin assembling the enchiladas. I spread ½ cup of enchilada sauce on the bottom of a 9x13 inch baking dish. This step helps keep the enchiladas from sticking. I take a tortilla and place it on a flat surface. I add about ¼ cup of the sweet potato and black bean mixture down the center. I sprinkle a little cheese on top. Then, I roll the tortilla tightly and place it seam-side down in the baking dish. I repeat this process until I use all the tortillas and filling. It's time to bake the enchiladas. I cover the dish with foil and bake them for 20 minutes. This keeps them moist while cooking. After 20 minutes, I remove the foil and bake for another 10 minutes. This last step makes the cheese bubbly and slightly golden. Once baked, I let the enchiladas cool for a few minutes. They are ready to be served. You can garnish them with fresh cilantro and avocado slices for extra flavor. For the full recipe, refer to the provided instructions. Choosing the right tortillas is key. I prefer using corn tortillas for a classic taste. They hold the filling well and get soft in the oven. If you like flour tortillas, they work too. Just warm them up first to make them more flexible. For cheese melting tips, choose a cheese that melts easily. Cheddar is a great option. You can mix it with Monterey Jack for a creamier texture. To help your cheese melt better, cover the enchiladas with foil while baking. This traps steam and keeps the cheese gooey. Preparing the filling in advance is a great time-saver. You can cook the sweet potatoes and mix them with the beans and spices the day before. Just store it in the fridge until you are ready to assemble. When it comes to storing assembled enchiladas, cover them tightly with plastic wrap or foil. You can keep them in the fridge for up to two days. If you want to freeze them, do so before baking. Just wrap them well and they can last up to three months. When you're ready to eat, bake them straight from the freezer; just add some extra time for cooking. For the full recipe, check out the Sweet Potato & Black Bean Enchiladas . {{image_2}} For a vegan twist, skip the cheese. Use a vegan cheese substitute. Nutritional yeast also adds a cheesy flavor. Instead of regular enchilada sauce, choose a vegan option or make your own. You can add more veggies, too. Try bell peppers, zucchini, or spinach for extra nutrition. These additions make the dish colorful and tasty. Want more heat? Add diced jalapeños to the filling. You can also increase the chili powder. If you prefer milder flavors, use less chili powder. Swap it for smoked paprika for a smoky taste without the heat. Try adding cumin or coriander for added depth. These spices can bring new flavors to your enchiladas. Making your own enchilada sauce is easy and fun. Combine tomatoes, onions, and spices for a fresh taste. You can also try green sauce for a zesty change. If you're short on time, store-bought sauces work well too. Just pick a brand you like. Experimenting with different sauces can really change the dish. For the full recipe and detailed instructions, check out the [Full Recipe]. To store leftover enchiladas, let them cool down first. Place them in an airtight container. This keeps them fresh for up to three days. When storing, try not to stack them. This helps avoid breaking the tortillas. You can also cover them with plastic wrap before sealing the container. To freeze enchiladas, wrap them well in foil or plastic wrap. You can also use a freezer-safe container. They will stay good for about three months. When you want to eat them, take them out and thaw overnight in the fridge. To reheat, bake them in the oven at 350°F (175°C) for about 25 minutes. You can also add a bit of sauce to keep them moist. Enjoy them like they are fresh! For the full recipe, check out Sweet Potato & Black Bean Enchiladas. Yes, you can use other beans in this recipe. Some great options include: - Pinto beans - Kidney beans - Chickpeas - White beans These beans add unique flavors and textures. Just make sure to rinse and drain them well. Each type of bean offers a different taste, so feel free to experiment! To make these enchiladas gluten-free, choose the right tortillas. You can use: - Corn tortillas - Gluten-free flour tortillas Both options work well. Make sure to check the labels for any gluten-containing ingredients. Gluten-free tortillas hold the filling nicely, giving you that perfect bite. When serving enchiladas, consider these tasty sides: - Mexican rice - Refried beans - A fresh salad - Guacamole - Salsa These sides enhance the meal and add more flavor. Enjoy your enchiladas with your favorite accompaniments for a complete dining experience. For the full recipe, check out the details above! This guide covered making tasty enchiladas with sweet potatoes, black beans, and spices. You learned how to prepare and assemble, plus tips for the best results. Keep your enchiladas fresh with proper storage or freeze them for later. Explore variations to suit your taste. Enjoy these dishes with your favorite sides. Now you’re ready to create delicious enchiladas anytime!](http://dailydishly.com/wp-content/uploads/2025/06/7d965e75-a030-40f0-bb8d-330850614dc3-768x768.webp)