Cheesy Sheet Pan Chicken Quesadillas Easy Dinner Delight
![- 2 cups cooked chicken, shredded - 1 cup shredded cheddar cheese - 1 cup shredded Monterey Jack cheese - 1/2 cup cream cheese, softened - 1/4 cup sour cream The star of this dish is cooked chicken. I love using rotisserie chicken for its ease and flavor. You can shred it quickly. Next, we have the cheeses. Cheddar adds a nice sharpness, and Monterey Jack brings creaminess. Cream cheese and sour cream add richness and help bind everything together. - 1 medium red bell pepper, diced - 1 medium green bell pepper, diced - 1 small red onion, finely chopped For the veggies, I pick bright bell peppers and a red onion. They add color and crunch. Dicing these finely helps them mix well into the filling. You can use other peppers if you like. Feel free to experiment! - 1 tablespoon taco seasoning - 8 large flour tortillas Taco seasoning gives the quesadillas a zesty kick. It’s easy to make your own or buy it pre-made. The tortillas hold all the goodness together. I recommend large flour tortillas for a sturdy base. You can find the full recipe with all the steps right here: [Full Recipe]. Shredding the chicken Start by shredding 2 cups of cooked chicken. I often use rotisserie chicken for this. It saves time and adds great flavor. Use two forks to pull apart the meat into bite-sized pieces. Preparing the vegetables Next, chop up your veggies. Dice 1 medium red bell pepper and 1 medium green bell pepper. Finely chop 1 small red onion. These veggies add color and crunch. Set them aside for later. Layering the filling In a large bowl, mix the shredded chicken with cheese, cream cheese, sour cream, and the chopped veggies. Add 1 tablespoon of taco seasoning to bring it all together. Stir until everything combines well. Creating the quesadilla stacks Lay out 4 large flour tortillas on a flat surface. Spread the chicken filling evenly over each tortilla. Make sure to cover the edges for a tasty bite. Place another tortilla on top of each filled tortilla. Preheating the oven Preheat your oven to 400°F (200°C). This will ensure the quesadillas cook evenly and get that nice golden color. Time and temperature for baking Line a large baking sheet with parchment paper. Carefully transfer the quesadilla stacks to the sheet. Brush the tops with 1 tablespoon of olive oil. Bake for 15-20 minutes until golden brown and the cheese melts. For the full process, check out the Full Recipe. To achieve the right crunch, use high-quality tortillas. Flour tortillas are soft and easy to handle. They also crisp up nicely in the oven. Brush the tops with olive oil before baking. This helps them brown evenly. Bake until golden brown, about 15 to 20 minutes. Let the quesadillas cool for a few minutes. This helps the filling set a bit before you cut them. If you want to mix it up, you can change the protein. Shredded beef or pork works great too. You can even try black beans for a vegetarian option. For cheese, feel free to switch to pepper jack for some heat. You can also use gouda or feta for a different flavor. Just make sure to keep the same amount of cheese. Serve your quesadillas with salsa and guacamole for a fresh touch. You can also add sour cream for extra creaminess. Fresh cilantro makes a great garnish. It adds a pop of color and flavor. Try adding some pickled jalapeños for a spicy kick. These simple sides make your meal even better. Want more ideas? Check out the Full Recipe for more tips! {{image_2}} You can easily change up the taste of your cheesy sheet pan chicken quesadillas. Start by adding spices or herbs. A pinch of cumin or smoked paprika can give a warm, smoky flavor. Fresh herbs like cilantro or parsley add brightness. Try garlic powder for a bold kick. These simple additions can make your dish stand out. Not everyone loves chicken, and that’s okay! You can swap the chicken for beans or veggies. Black beans or pinto beans work great as a protein. Use mushrooms, zucchini, or even spinach for a fresh twist. These vegetarian alternatives are healthy and tasty. You’ll get a whole new dish while keeping it easy and fun. Tortillas don’t have to be boring. You can mix it up by using different types. Try corn tortillas for a gluten-free option. Whole wheat tortillas add extra fiber. You can even use flavored tortillas, like spinach or sun-dried tomato, to add color and taste. These fun twists keep your meal exciting while still being simple to prepare. For the full recipe, be sure to check out the complete details! To keep your cheesy sheet pan chicken quesadillas fresh, store them in an airtight container. Let them cool completely before sealing. This helps prevent sogginess. You can keep them in the fridge for about 3 to 4 days. If you want to enjoy them later, make sure to label the container with the date. If you want to freeze your quesadillas, it’s best to do this before baking. After assembling the quesadillas, wrap each one tightly in plastic wrap. Place the wrapped quesadillas in a freezer bag or container. They can last for up to 3 months in the freezer. When you’re ready to eat, thaw them in the fridge overnight before baking. The best way to reheat quesadillas is in the oven. Preheat your oven to 350°F (175°C). Place the quesadillas on a baking sheet and heat for about 10-15 minutes, or until warm and crisp. You can also use a skillet on the stove. Just heat over medium heat for about 3-4 minutes on each side. This keeps the quesadilla crispy. Avoid using a microwave, as it can make them soggy. Yes, you can use frozen chicken. To thaw it quickly, place the chicken in a sealed bag. Then, submerge the bag in cold water for about 30 minutes. Change the water every 10 minutes to speed up the process. Once thawed, cook the chicken fully before using it in your quesadillas. To make gluten-free quesadillas, use gluten-free tortillas. Many brands offer good options made from corn or rice. Always check the package to ensure they meet your needs. You can find these tortillas at most grocery stores. Quesadillas taste great with many dips. Consider serving them with salsa, guacamole, or sour cream. You can also try a zesty cheese dip for an extra treat. Each dip adds a fun flavor that enhances your meal. Yes, you can make quesadillas ahead of time. Assemble them and store them in the fridge for a day. You can also freeze them for longer storage. Just remember to use parchment paper between layers to keep them from sticking. When ready to eat, just bake them directly from the fridge or freezer. Enjoy your easy dinner delight! For the full recipe, check out the earlier section. In this blog post, I shared how to make delicious quesadillas. We covered the key ingredients like cooked chicken, cheeses, and vibrant veggies. You learned to prep, assemble, and bake your quesadillas perfectly. I also shared tips for crunch, substitutions, and serving ideas. Always remember, you can switch ingredients to suit your taste. Enjoy experimenting with flavors and textures. With these steps, you’ll create satisfying quesadillas that everyone will love. Happy cooking!](http://dailydishly.com/wp-content/uploads/2025/07/9e515845-1856-4bb5-82ee-80ca33afd87d.webp)
If you’re looking for a quick and tasty dinner, look no further! Cheesy Sheet Pan Chicken Quesadillas are your go-to meal. With cooked chicken, fresh veggies, and gooey cheese, you’ll have a flavor-packed dish in no time. Plus, you can bake multiple quesadillas at once for the whole family! Join me as we dive into easy steps to create this delicious dinner delight. Your weeknight meals are about to get a whole lot better!
Ingredients
Main ingredients
– 2 cups cooked chicken, shredded
– 1 cup shredded cheddar cheese
– 1 cup shredded Monterey Jack cheese
– 1/2 cup cream cheese, softened
– 1/4 cup sour cream
The star of this dish is cooked chicken. I love using rotisserie chicken for its ease and flavor. You can shred it quickly. Next, we have the cheeses. Cheddar adds a nice sharpness, and Monterey Jack brings creaminess. Cream cheese and sour cream add richness and help bind everything together.
Vegetables
– 1 medium red bell pepper, diced
– 1 medium green bell pepper, diced
– 1 small red onion, finely chopped
For the veggies, I pick bright bell peppers and a red onion. They add color and crunch. Dicing these finely helps them mix well into the filling. You can use other peppers if you like. Feel free to experiment!
Seasonings and additional items
– 1 tablespoon taco seasoning
– 8 large flour tortillas
Taco seasoning gives the quesadillas a zesty kick. It’s easy to make your own or buy it pre-made. The tortillas hold all the goodness together. I recommend large flour tortillas for a sturdy base.
You can find the full recipe with all the steps right here: [Full Recipe].
Step-by-Step Instructions
Prepping the ingredients
Shredding the chicken
Start by shredding 2 cups of cooked chicken. I often use rotisserie chicken for this. It saves time and adds great flavor. Use two forks to pull apart the meat into bite-sized pieces.
Preparing the vegetables
Next, chop up your veggies. Dice 1 medium red bell pepper and 1 medium green bell pepper. Finely chop 1 small red onion. These veggies add color and crunch. Set them aside for later.
Assembling the quesadillas
Layering the filling
In a large bowl, mix the shredded chicken with cheese, cream cheese, sour cream, and the chopped veggies. Add 1 tablespoon of taco seasoning to bring it all together. Stir until everything combines well.
Creating the quesadilla stacks
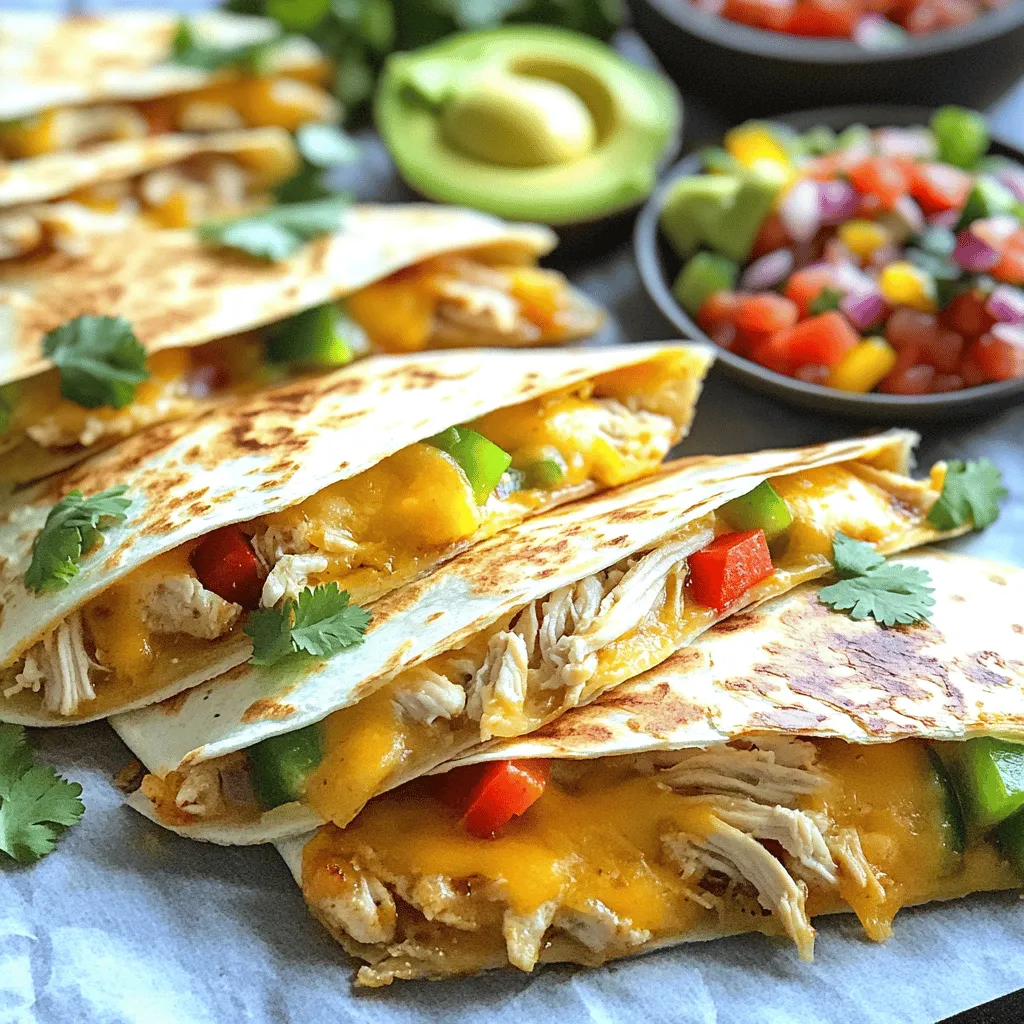
Lay out 4 large flour tortillas on a flat surface. Spread the chicken filling evenly over each tortilla. Make sure to cover the edges for a tasty bite. Place another tortilla on top of each filled tortilla.
Baking instructions
Preheating the oven
Preheat your oven to 400°F (200°C). This will ensure the quesadillas cook evenly and get that nice golden color.
Time and temperature for baking
Line a large baking sheet with parchment paper. Carefully transfer the quesadilla stacks to the sheet. Brush the tops with 1 tablespoon of olive oil. Bake for 15-20 minutes until golden brown and the cheese melts.
For the full process, check out the Full Recipe.
Tips & Tricks
Perfecting the quesadilla
To achieve the right crunch, use high-quality tortillas. Flour tortillas are soft and easy to handle. They also crisp up nicely in the oven. Brush the tops with olive oil before baking. This helps them brown evenly. Bake until golden brown, about 15 to 20 minutes. Let the quesadillas cool for a few minutes. This helps the filling set a bit before you cut them.
Ingredient substitutions
If you want to mix it up, you can change the protein. Shredded beef or pork works great too. You can even try black beans for a vegetarian option. For cheese, feel free to switch to pepper jack for some heat. You can also use gouda or feta for a different flavor. Just make sure to keep the same amount of cheese.
Serving suggestions
Serve your quesadillas with salsa and guacamole for a fresh touch. You can also add sour cream for extra creaminess. Fresh cilantro makes a great garnish. It adds a pop of color and flavor. Try adding some pickled jalapeños for a spicy kick. These simple sides make your meal even better. Want more ideas? Check out the Full Recipe for more tips!
Variations
Flavorful options
You can easily change up the taste of your cheesy sheet pan chicken quesadillas. Start by adding spices or herbs. A pinch of cumin or smoked paprika can give a warm, smoky flavor. Fresh herbs like cilantro or parsley add brightness. Try garlic powder for a bold kick. These simple additions can make your dish stand out.
Different fillings
Not everyone loves chicken, and that’s okay! You can swap the chicken for beans or veggies. Black beans or pinto beans work great as a protein. Use mushrooms, zucchini, or even spinach for a fresh twist. These vegetarian alternatives are healthy and tasty. You’ll get a whole new dish while keeping it easy and fun.
Fun twists
Tortillas don’t have to be boring. You can mix it up by using different types. Try corn tortillas for a gluten-free option. Whole wheat tortillas add extra fiber. You can even use flavored tortillas, like spinach or sun-dried tomato, to add color and taste. These fun twists keep your meal exciting while still being simple to prepare.
For the full recipe, be sure to check out the complete details!
Storage Info
Short-term storage
To keep your cheesy sheet pan chicken quesadillas fresh, store them in an airtight container. Let them cool completely before sealing. This helps prevent sogginess. You can keep them in the fridge for about 3 to 4 days. If you want to enjoy them later, make sure to label the container with the date.
Freezing instructions
If you want to freeze your quesadillas, it’s best to do this before baking. After assembling the quesadillas, wrap each one tightly in plastic wrap. Place the wrapped quesadillas in a freezer bag or container. They can last for up to 3 months in the freezer. When you’re ready to eat, thaw them in the fridge overnight before baking.
Reheating methods
The best way to reheat quesadillas is in the oven. Preheat your oven to 350°F (175°C). Place the quesadillas on a baking sheet and heat for about 10-15 minutes, or until warm and crisp. You can also use a skillet on the stove. Just heat over medium heat for about 3-4 minutes on each side. This keeps the quesadilla crispy. Avoid using a microwave, as it can make them soggy.
FAQs
Can I use frozen chicken?
Yes, you can use frozen chicken. To thaw it quickly, place the chicken in a sealed bag. Then, submerge the bag in cold water for about 30 minutes. Change the water every 10 minutes to speed up the process. Once thawed, cook the chicken fully before using it in your quesadillas.
How can I make these quesadillas gluten-free?
To make gluten-free quesadillas, use gluten-free tortillas. Many brands offer good options made from corn or rice. Always check the package to ensure they meet your needs. You can find these tortillas at most grocery stores.
What dips pair well with quesadillas?
Quesadillas taste great with many dips. Consider serving them with salsa, guacamole, or sour cream. You can also try a zesty cheese dip for an extra treat. Each dip adds a fun flavor that enhances your meal.
Is it possible to make them ahead of time?
Yes, you can make quesadillas ahead of time. Assemble them and store them in the fridge for a day. You can also freeze them for longer storage. Just remember to use parchment paper between layers to keep them from sticking. When ready to eat, just bake them directly from the fridge or freezer. Enjoy your easy dinner delight! For the full recipe, check out the earlier section.
In this blog post, I shared how to make delicious quesadillas. We covered the key ingredients like cooked chicken, cheeses, and vibrant veggies. You learned to prep, assemble, and bake your quesadillas perfectly. I also shared tips for crunch, substitutions, and serving ideas.
Always remember, you can switch ingredients to suit your taste. Enjoy experimenting with flavors and textures. With these steps, you’ll create satisfying quesadillas that everyone will love. Happy cooking!
![- 2 cups cooked chicken, shredded - 1 cup shredded cheddar cheese - 1 cup shredded Monterey Jack cheese - 1/2 cup cream cheese, softened - 1/4 cup sour cream The star of this dish is cooked chicken. I love using rotisserie chicken for its ease and flavor. You can shred it quickly. Next, we have the cheeses. Cheddar adds a nice sharpness, and Monterey Jack brings creaminess. Cream cheese and sour cream add richness and help bind everything together. - 1 medium red bell pepper, diced - 1 medium green bell pepper, diced - 1 small red onion, finely chopped For the veggies, I pick bright bell peppers and a red onion. They add color and crunch. Dicing these finely helps them mix well into the filling. You can use other peppers if you like. Feel free to experiment! - 1 tablespoon taco seasoning - 8 large flour tortillas Taco seasoning gives the quesadillas a zesty kick. It’s easy to make your own or buy it pre-made. The tortillas hold all the goodness together. I recommend large flour tortillas for a sturdy base. You can find the full recipe with all the steps right here: [Full Recipe]. Shredding the chicken Start by shredding 2 cups of cooked chicken. I often use rotisserie chicken for this. It saves time and adds great flavor. Use two forks to pull apart the meat into bite-sized pieces. Preparing the vegetables Next, chop up your veggies. Dice 1 medium red bell pepper and 1 medium green bell pepper. Finely chop 1 small red onion. These veggies add color and crunch. Set them aside for later. Layering the filling In a large bowl, mix the shredded chicken with cheese, cream cheese, sour cream, and the chopped veggies. Add 1 tablespoon of taco seasoning to bring it all together. Stir until everything combines well. Creating the quesadilla stacks Lay out 4 large flour tortillas on a flat surface. Spread the chicken filling evenly over each tortilla. Make sure to cover the edges for a tasty bite. Place another tortilla on top of each filled tortilla. Preheating the oven Preheat your oven to 400°F (200°C). This will ensure the quesadillas cook evenly and get that nice golden color. Time and temperature for baking Line a large baking sheet with parchment paper. Carefully transfer the quesadilla stacks to the sheet. Brush the tops with 1 tablespoon of olive oil. Bake for 15-20 minutes until golden brown and the cheese melts. For the full process, check out the Full Recipe. To achieve the right crunch, use high-quality tortillas. Flour tortillas are soft and easy to handle. They also crisp up nicely in the oven. Brush the tops with olive oil before baking. This helps them brown evenly. Bake until golden brown, about 15 to 20 minutes. Let the quesadillas cool for a few minutes. This helps the filling set a bit before you cut them. If you want to mix it up, you can change the protein. Shredded beef or pork works great too. You can even try black beans for a vegetarian option. For cheese, feel free to switch to pepper jack for some heat. You can also use gouda or feta for a different flavor. Just make sure to keep the same amount of cheese. Serve your quesadillas with salsa and guacamole for a fresh touch. You can also add sour cream for extra creaminess. Fresh cilantro makes a great garnish. It adds a pop of color and flavor. Try adding some pickled jalapeños for a spicy kick. These simple sides make your meal even better. Want more ideas? Check out the Full Recipe for more tips! {{image_2}} You can easily change up the taste of your cheesy sheet pan chicken quesadillas. Start by adding spices or herbs. A pinch of cumin or smoked paprika can give a warm, smoky flavor. Fresh herbs like cilantro or parsley add brightness. Try garlic powder for a bold kick. These simple additions can make your dish stand out. Not everyone loves chicken, and that’s okay! You can swap the chicken for beans or veggies. Black beans or pinto beans work great as a protein. Use mushrooms, zucchini, or even spinach for a fresh twist. These vegetarian alternatives are healthy and tasty. You’ll get a whole new dish while keeping it easy and fun. Tortillas don’t have to be boring. You can mix it up by using different types. Try corn tortillas for a gluten-free option. Whole wheat tortillas add extra fiber. You can even use flavored tortillas, like spinach or sun-dried tomato, to add color and taste. These fun twists keep your meal exciting while still being simple to prepare. For the full recipe, be sure to check out the complete details! To keep your cheesy sheet pan chicken quesadillas fresh, store them in an airtight container. Let them cool completely before sealing. This helps prevent sogginess. You can keep them in the fridge for about 3 to 4 days. If you want to enjoy them later, make sure to label the container with the date. If you want to freeze your quesadillas, it’s best to do this before baking. After assembling the quesadillas, wrap each one tightly in plastic wrap. Place the wrapped quesadillas in a freezer bag or container. They can last for up to 3 months in the freezer. When you’re ready to eat, thaw them in the fridge overnight before baking. The best way to reheat quesadillas is in the oven. Preheat your oven to 350°F (175°C). Place the quesadillas on a baking sheet and heat for about 10-15 minutes, or until warm and crisp. You can also use a skillet on the stove. Just heat over medium heat for about 3-4 minutes on each side. This keeps the quesadilla crispy. Avoid using a microwave, as it can make them soggy. Yes, you can use frozen chicken. To thaw it quickly, place the chicken in a sealed bag. Then, submerge the bag in cold water for about 30 minutes. Change the water every 10 minutes to speed up the process. Once thawed, cook the chicken fully before using it in your quesadillas. To make gluten-free quesadillas, use gluten-free tortillas. Many brands offer good options made from corn or rice. Always check the package to ensure they meet your needs. You can find these tortillas at most grocery stores. Quesadillas taste great with many dips. Consider serving them with salsa, guacamole, or sour cream. You can also try a zesty cheese dip for an extra treat. Each dip adds a fun flavor that enhances your meal. Yes, you can make quesadillas ahead of time. Assemble them and store them in the fridge for a day. You can also freeze them for longer storage. Just remember to use parchment paper between layers to keep them from sticking. When ready to eat, just bake them directly from the fridge or freezer. Enjoy your easy dinner delight! For the full recipe, check out the earlier section. In this blog post, I shared how to make delicious quesadillas. We covered the key ingredients like cooked chicken, cheeses, and vibrant veggies. You learned to prep, assemble, and bake your quesadillas perfectly. I also shared tips for crunch, substitutions, and serving ideas. Always remember, you can switch ingredients to suit your taste. Enjoy experimenting with flavors and textures. With these steps, you’ll create satisfying quesadillas that everyone will love. Happy cooking!](http://dailydishly.com/wp-content/uploads/2025/07/9e515845-1856-4bb5-82ee-80ca33afd87d-300x300.webp)

![For the best garlic butter steak bites, I recommend using sirloin steak. Sirloin is tender and flavorful, making it perfect for this dish. Cut the steak into 1-inch cubes. This size cooks quickly and evenly. Make sure to pat the steak dry with paper towels. This step removes moisture and helps achieve a nice sear. The flavors come alive with fresh herbs. I use 1 teaspoon of fresh rosemary and 1 teaspoon of fresh thyme. You can also use dried herbs if you prefer. Just use half the amount. Don't forget salt and pepper! Season the steak well on all sides to enhance its natural taste. You’ll need 4 tablespoons of unsalted butter and 5 cloves of minced garlic. The butter adds richness, and the garlic brings a wonderful aroma. Finally, garnish with fresh parsley for a pop of color. This simple ingredient list makes the garlic butter steak bites shine. For the full recipe, check out the [Full Recipe]. First, you need to prepare the steak. Take 1 lb of sirloin and cut it into 1-inch cubes. Pat these cubes dry with paper towels. This step helps to make a great sear. Now, season the cubes with salt and pepper on all sides. Use enough seasoning, so the flavor shines through. Next, heat a large skillet over medium-high heat. Add 2 tablespoons of unsalted butter. Wait until the butter is foamy and starts to brown. Then, add half of the steak cubes to the skillet. Sear the steak bites for about 2-3 minutes on each side. Look for a nice brown color. Once done, take them out and set them aside. Repeat for the other half, adding more butter if needed. Now it's time to bring it all together. Lower the heat to medium-low and return all the steak bites to the skillet. Add 5 minced garlic cloves, 1 teaspoon of chopped fresh rosemary, and 1 teaspoon of chopped fresh thyme. Cook for 1-2 minutes while stirring often. You want the garlic to be fragrant but not burnt. Finally, remove the skillet from heat. Stir in the last tablespoon of butter until it melts and mixes well with the steak bites. Adjust the seasoning if needed. Garnish with chopped fresh parsley before you serve. For a complete guide, check the Full Recipe. To get a great sear, start with dry steak cubes. Patting them dry helps. Next, heat your skillet until it’s hot. Add butter when the skillet is ready and foamy. Place the steak cubes in the skillet without crowding them. This allows each piece to brown well. Cook for about 2-3 minutes on each side. Look for a nice brown color. This gives you that tasty crust. To boost the flavor, use fresh herbs like rosemary and thyme. Chop them finely and add them to the skillet with garlic. The garlic adds a lovely aroma. You can also add a splash of Worcestershire sauce for extra depth. Adjust salt and pepper to your taste. Don’t forget to garnish with fresh parsley before serving. This adds a pop of color and freshness. Cooking steak bites to the right temperature is key. For medium-rare, aim for about 130°F. Use a meat thermometer to check. If you prefer medium, go for 140°F. Remember, the steak will keep cooking after you take it off the heat. Let it rest for a few minutes. This helps the juices settle. Enjoy your garlic butter steak bites with the perfect doneness! For the complete recipe, check out the [Full Recipe]. {{image_2}} You can use many cuts of steak for this dish. Sirloin is great, but try ribeye for more flavor. Tenderloin offers a soft bite, while flank steak gives a nice chew. Each cut brings a unique texture and taste. Just remember, adjust the cooking time based on the cut. Thicker cuts need longer cooking, while thinner ones cook faster. The seasonings can change the taste of garlic butter steak bites. Want a spicy kick? Add red pepper flakes or smoked paprika. For a sweeter touch, try a bit of honey or brown sugar. You can swap out rosemary and thyme for herbs like oregano or basil. Each herb adds its own twist, so feel free to experiment. If you want a vegetarian version, use mushrooms instead of steak. Portobello or cremini mushrooms work well. They soak up the garlic butter and give a rich flavor. You can also use tofu or tempeh for plant-based protein. Just make sure to press out any extra water before cooking. This helps them get crispy and tasty. For the full recipe, check out the Garlic Butter Steak Bites section. Store leftover garlic butter steak bites in an airtight container. Make sure they cool first. They will last for 3 to 4 days in the fridge. If you plan to eat them later, try to separate them from the sauce. This keeps the steak from getting too soggy. To reheat, place the steak bites in a skillet over low heat. Add a splash of beef broth or water to keep them moist. Stir often for about 5 minutes until heated through. You can also use a microwave. Heat in short bursts, about 30 seconds each, checking often. You can freeze garlic butter steak bites for up to 3 months. Place them in a freezer-safe container. Make sure to label the container with the date. When you’re ready to eat, thaw them in the fridge overnight. Reheat as mentioned above for the best taste. If you want the full recipe, check the link for more details! It takes about 20 minutes to cook garlic butter steak bites. The prep time is 10 minutes, and cooking takes around 10 minutes. You want to sear the steak for about 2-3 minutes on each side. This gives it a nice brown color. Adjust the time for more doneness if needed. Yes, you can use frozen steak, but it needs to be thawed first. Thaw the steak overnight in the fridge for best results. This keeps the meat juicy and tender. If you hurry, you can use the microwave to defrost it. Just be careful to avoid cooking the edges. Garlic butter steak bites go well with many sides. Try these options: - Sautéed vegetables - Mashed potatoes - Rice pilaf - Crispy roasted potatoes - Fresh salad These sides add flavor and balance to your meal. Feel free to mix and match! For the full recipe, check the earlier section. In this blog post, we covered how to make garlic butter steak bites. We discussed choosing the right meat and using tasty herbs. I shared step-by-step instructions for getting that perfect sear and mixing in garlic butter. We also looked at tips to enhance flavors and suggested variations for different diets. Remember to store leftovers properly and reheat them well. Now you have all the tools to enjoy this simple dish. Cooking is fun, so try it out!](http://dailydishly.com/wp-content/uploads/2025/06/daf37226-e56f-491f-87e9-6665894a306e-768x768.webp)