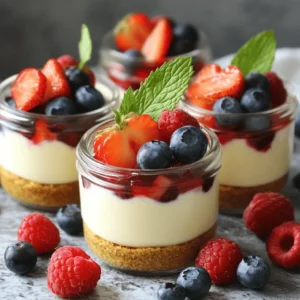
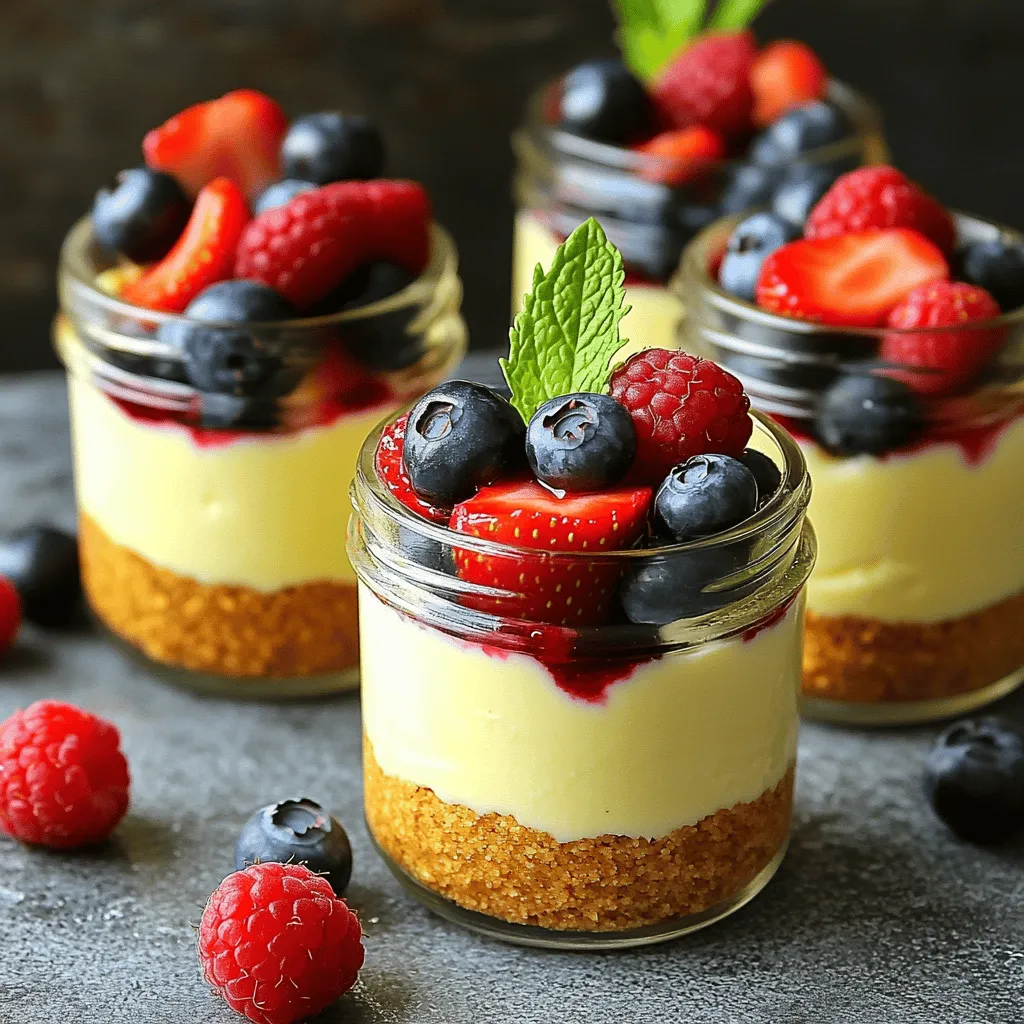
No-Bake Cheesecake Jars Easy and Delicious Dessert
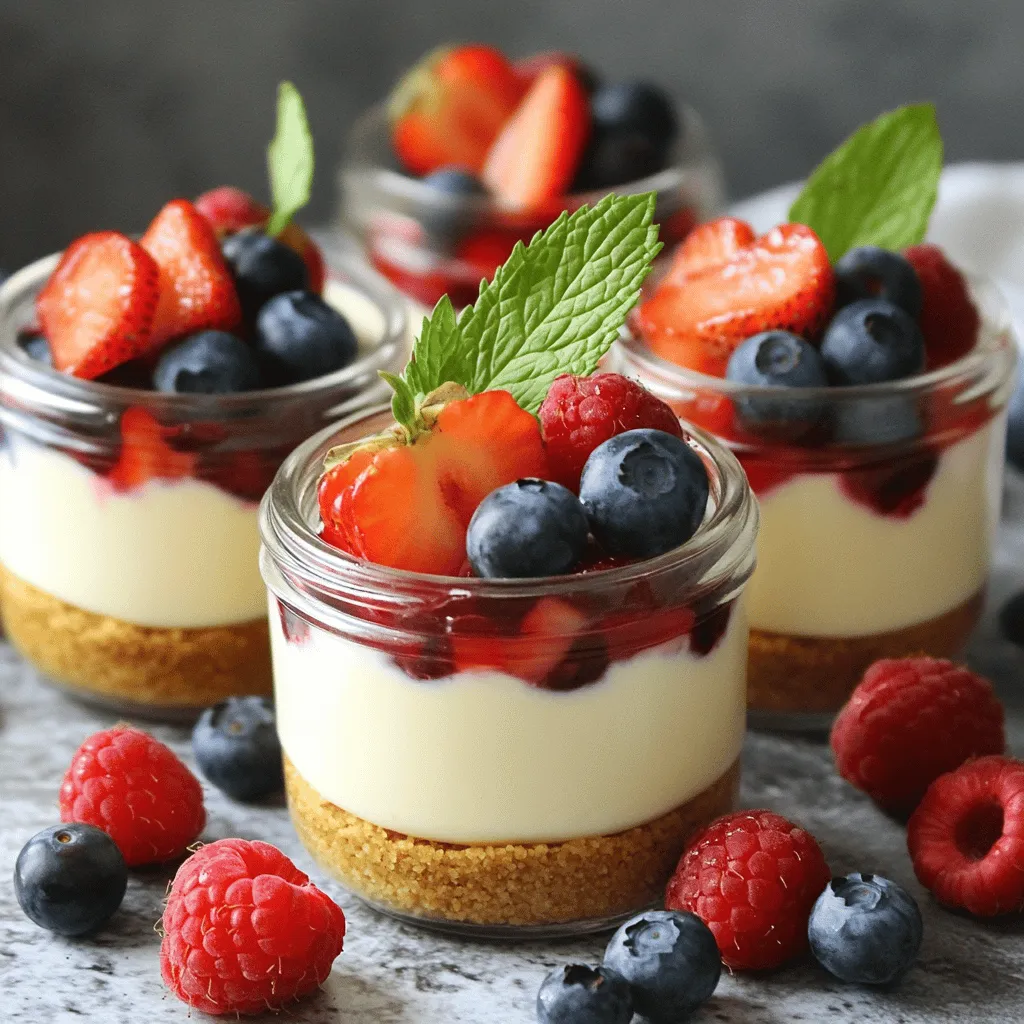
Looking for a quick and delicious dessert? No-Bake Cheesecake Jars are the answer! These tasty treats combine smooth cheesecake filling with a crunchy crust, all in a cute jar. They’re perfect for parties or a sweet night in. With simple steps and fun variations, you’ll impress friends and family in no time. Let’s dive into the easy recipe and tips to make your dessert shine!
Ingredients
List of Ingredients for No-Bake Cheesecake Jars
– 1 cup graham cracker crumbs
– 1/2 cup unsalted butter, melted
– 2 cups cream cheese, softened
– 1 cup powdered sugar
– 1 teaspoon vanilla extract
– 1 cup heavy whipping cream
– Fresh berries (strawberries, blueberries, or raspberries) for topping
– Mint leaves for garnish (optional)
Each ingredient plays a key role in making these cheesecake jars special. The graham cracker crumbs form the base. They give a sweet and crunchy layer. Butter helps hold the crumbs together. Cream cheese adds the rich, creamy texture we love in cheesecake.
Powdered sugar brings sweetness and smoothness. Vanilla extract adds a warm flavor that enhances the cheesecake. Heavy whipping cream lightens the filling. It gives the jars a fluffy feel. Fresh berries add a burst of color and freshness on top. Mint leaves can add a nice touch, too.
Feel free to mix and match toppings! You can try different berries or even chocolate shavings. Experimenting with flavors makes the jars fun and unique. For the full recipe, check out the detailed steps. Enjoy making this easy and delicious dessert!
Step-by-Step Instructions
Preparation of Crust
Mixing Graham Cracker Crumbs and Butter
Start by taking a mixing bowl. Add 1 cup of graham cracker crumbs. Then pour in 1/2 cup of melted unsalted butter. Mix them well. You want the crumbs to be fully coated with butter. This mix gives your crust a rich flavor.
Forming the Crust in Jars
Now, grab your small jars. Spoon the graham cracker mix into each jar. Press down slightly with a spoon or your fingers. Make sure the bottom is even and compact. This step is vital for a sturdy crust.
Making the Cheesecake Filling
Beating the Cream Cheese
In another bowl, place 2 cups of softened cream cheese. Use an electric mixer to beat it until it’s smooth. This step helps the cream cheese become fluffy.
Incorporating Powdered Sugar and Vanilla
Next, add 1 cup of powdered sugar and 1 teaspoon of vanilla extract. Mix until everything is well combined. The sugar adds sweetness, while the vanilla brings a nice scent.
Combining Creamy Components
Whipping Heavy Cream
In a separate bowl, pour in 1 cup of heavy whipping cream. Use a mixer to whip it until soft peaks form. This creates a light texture for the filling.
Folding the Mixtures Together
Now, gently fold the whipped cream into the cream cheese mixture. Use a spatula for this. Be careful not to deflate the whipped cream. This keeps your filling light and airy.
Assembling the Jars
Layering the Crust and Filling
Begin by adding a layer of the cheesecake filling over the crust in each jar. Fill each jar to about three-quarters full. This way, you have room for toppings later.
Proper Filling Techniques
Use a spoon to help layer the filling smoothly. You can also tap the jars gently on the counter. This helps eliminate any air pockets.
Chilling and Setting
Recommended Chilling Time
Place the jars in the fridge. Let them chill for at least 4 hours. If you can, chill them overnight. This time allows the flavors to blend and the filling to set.
Importance of Refrigeration
Refrigeration is key for a good cheesecake. It helps the filling become firm. Chilling also enhances the flavors, making each bite delicious. For the full recipe, please refer to the earlier section.
Tips & Tricks
Perfecting the Cheesecake Texture
Avoiding Lumpiness
To keep your cheesecake smooth, start with soft cream cheese. Cold cream cheese forms lumps. So, let it sit out for about 30 minutes before mixing. When you beat it, use a high-speed mixer. This helps break down any lumps. Mix until it is creamy and smooth.
Cream Cheese Temperature Tips
The right temperature is key. Room temperature cream cheese blends better. Cold cream cheese is harder to mix. If you forget to take it out, microwave it for 10 seconds. Check it often to avoid melting.
Serving Tips for No-Bake Cheesecake Jars
Creative Serving Ideas
Serve your cheesecake jars in fun, colorful glasses. They look great at parties. You can also layer the jars to show off the crust and filling. Use small spoons for easy eating. Guests will love it!
Customizing with Various Toppings
Top your jars with fresh fruit. Strawberries, blueberries, or raspberries all work well. You can also add chocolate shavings or nuts for crunch. If you want something sweet, drizzle honey or chocolate sauce on top.
Common Mistakes to Avoid
Overmixing the Filling
Mix just until combined. Overmixing can make the filling too airy. This can lead to cracks when it sets. A few folds are enough once you add the whipped cream.
Inappropriate Jar Sizes
Choose jars that are not too big or small. A 4-ounce jar works perfectly. This size allows for nice layers and good portion control. If you use a larger jar, the cheesecake may not set properly.
Variations
Flavor Variations for Cheesecake Jars
You can easily change the flavor of your no-bake cheesecake jars. Here are two great ideas:
– Chocolate No-Bake Cheesecake: Just add cocoa powder to the cream cheese mix. Use 1/3 cup of unsweetened cocoa powder. This gives a rich and creamy chocolate taste.
– Fruit Flavored Cheesecake Options: You can mix in lemon juice or berry puree. For lemon, add 1/4 cup of fresh lemon juice. For berry flavors, blend 1 cup of fresh berries and fold into the cream cheese.
These adaptations let you create a new taste each time.
Alternative Crust Ideas
You don’t have to stick with graham cracker crumbs. Here are some fun crust options:
– Using Oreo Crumbs: Crush Oreo cookies instead of graham crackers. Mix them with melted butter. This gives a sweet and chocolatey crust.
– Gluten-Free Crust Options: Use crushed gluten-free cookies or nuts. Almond flour mixed with butter also works well. This way, you make the dessert suitable for everyone.
Customizing with Unique Toppings
Toppings make your cheesecake jars look great and add flavor. Here are some ideas:
– Seasonal Fruit Options: Use fresh fruits like strawberries, raspberries, or peaches. They add color and taste. You can match fruits with the cheesecake flavor.
– Special Garnishes: Try chocolate shavings or a drizzle of caramel. These small touches make a big impact on presentation and taste.
Feel free to mix and match these ideas to make your jars unique. You can find the full recipe for no-bake cheesecake jars to get started!
Storage Info
How to Store No-Bake Cheesecake Jars
To keep your no-bake cheesecake jars fresh, use airtight containers. Glass jars work well because they seal tightly. If you don’t have glass jars, plastic containers are fine too. Store them in the fridge. This keeps the cheesecake creamy and safe.
Make sure the jars are cool before sealing. If they are warm, moisture may form inside. This can affect the texture of your cheesecake.
Shelf Life and Freezing Advice
No-bake cheesecake jars last about 5 days in the fridge. Always check for signs of spoilage before eating. If they look or smell off, it’s best to throw them out.
You can freeze no-bake cheesecake jars, but it’s not ideal. Freezing can change the texture. If you choose to freeze them, use a freezer-safe container. They can last up to 2 months in the freezer. When you’re ready to eat, thaw them in the fridge overnight.
FAQs
How long do No-Bake Cheesecake Jars need to set?
No-Bake Cheesecake Jars need at least 4 hours to set in the fridge. For the best taste and texture, I recommend chilling them overnight. The longer they sit, the better the flavors blend together. This time allows the cream cheese filling to firm up nicely, so you get a perfect, creamy bite.
Can I use low-fat cream cheese for the recipe?
Yes, you can use low-fat cream cheese if you want a lighter option. It still gives a nice flavor and texture. Just keep in mind that the cheesecake may be a bit less creamy. You might want to add a little more heavy cream to help it stay fluffy. This way, you can enjoy a tasty treat without too many calories.
What can I use instead of heavy cream?
If you need a substitute for heavy cream, try using coconut cream or whipped topping. Both can work well in this recipe. Coconut cream adds a nice flavor, while whipped topping makes it light and airy. You can also try using half-and-half, but it may not be as rich. Choose what fits your diet best and still keeps it delicious.
For the full recipe, check out the detailed steps in the earlier sections.
You now know how to create delicious no-bake cheesecake jars. We covered key ingredients, preparation steps, and tips for the perfect texture. You can customize flavors and learn how to store them well. Keep these pointers in mind to avoid common mistakes. Embrace the joy of making these treats at home. They are easy, fun, and sure to impress any guest. With practice, you will master this delightful dessert. Enjoy your cheesecake journey!