
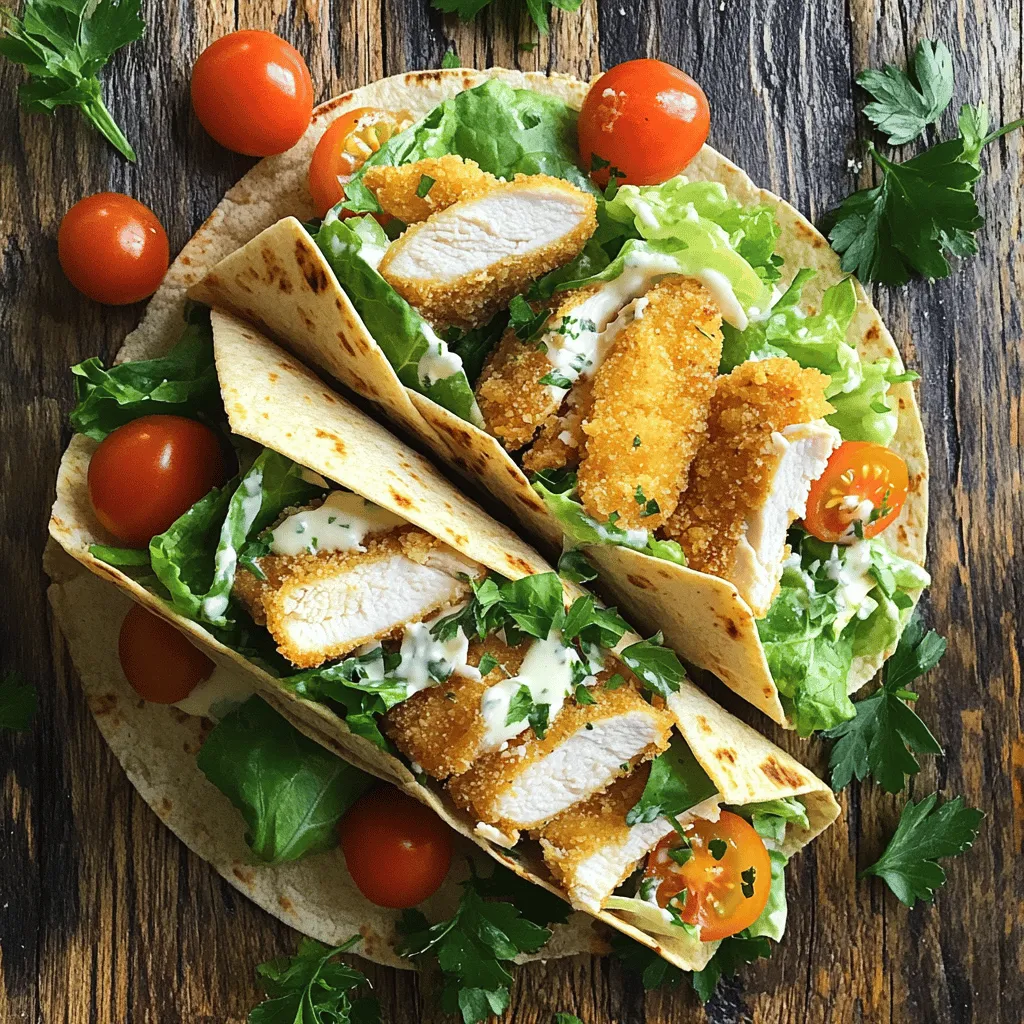
Savory Chicken Caesar Wraps Easy and Tasty Meal
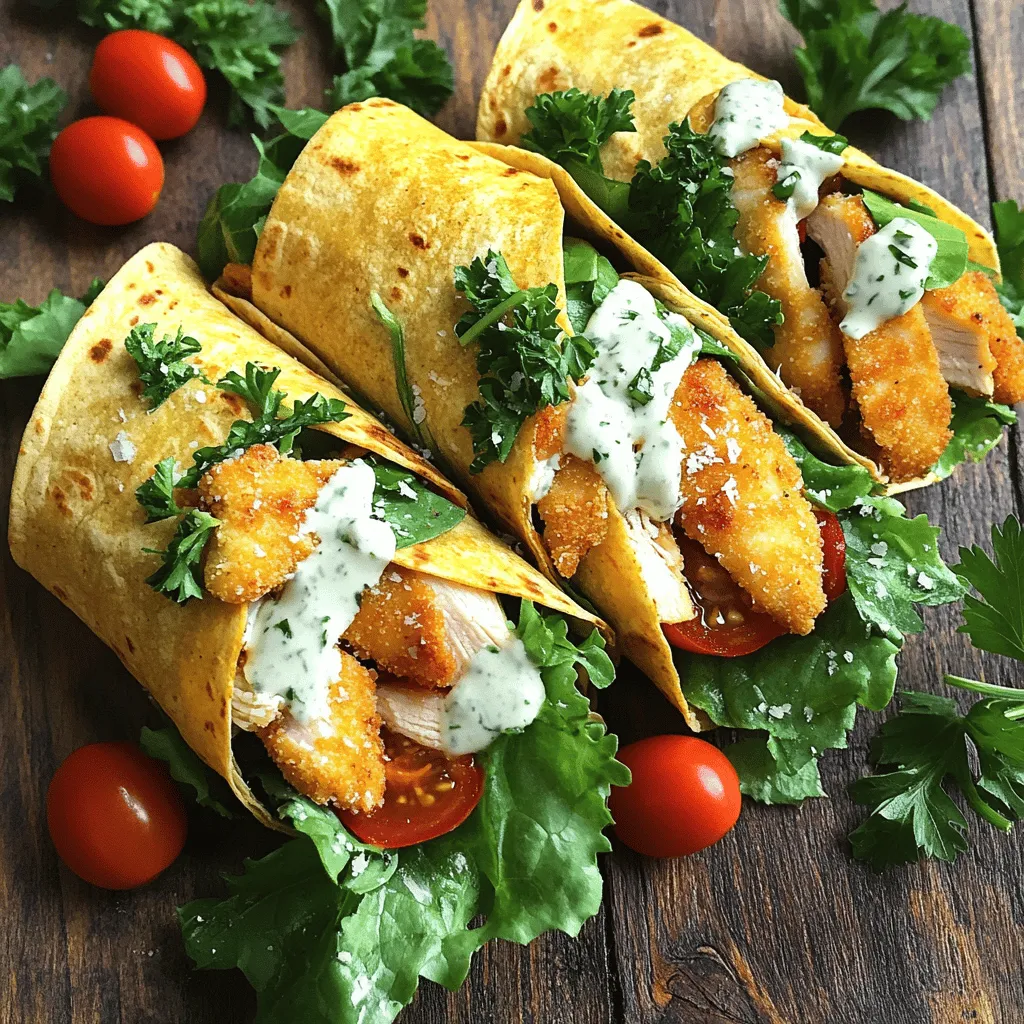
Are you looking for a quick and delicious meal? My Savory Chicken Caesar Wraps are the perfect solution! With just a few simple ingredients and easy steps, you can whip up a tasty wrap that suits any busy day. They’re great for lunch or dinner and are sure to impress. Join me as I share how to make these wraps, along with helpful tips, variations, and storing advice. Let’s get cooking!
Ingredients
Essential Ingredients for Chicken Caesar Wraps
To make tasty Chicken Caesar Wraps, you need some key items. Here’s what to gather:
– 2 boneless, skinless chicken breasts
– 1 cup Romaine lettuce, chopped
– ½ cup cherry tomatoes, halved
– ½ cup Caesar dressing
– ¼ cup grated Parmesan cheese
– 4 large flour tortillas
– Olive oil for cooking
These ingredients create a fresh and flavorful wrap. The chicken adds protein, while the lettuce and tomatoes give a nice crunch. The Caesar dressing ties everything together with its rich taste.
Suggested Seasonings
Seasoning makes a big difference in flavor. For these wraps, I use:
– 1 teaspoon garlic powder
– 1 teaspoon paprika
– Salt and pepper to taste
Garlic powder gives a warm taste, and paprika adds a little color and smokiness. Salt and pepper enhance the flavors of all the ingredients.
Optional Garnishes
Garnishes can make your dish look even better. Here are some options:
– Fresh parsley
Adding fresh parsley is a great touch. It brightens up the dish and adds a pop of color. You can sprinkle it on top before serving for extra flair.
You can find the Full Recipe for detailed steps on putting all these ingredients together.
Step-by-Step Instructions
Detailed Cooking Process
To start, season the chicken breasts with garlic powder, paprika, salt, and pepper. This adds great flavor. Heat a tablespoon of olive oil in a skillet over medium heat. Once the oil is hot, add the chicken breasts. Cook them for about 6-7 minutes on each side. You want them to be golden brown and fully cooked.
After cooking, remove the chicken from the skillet. Let it rest for a few minutes. This helps keep it juicy. Now, slice the chicken into thin strips.
In a large bowl, mix the chopped Romaine lettuce, halved cherry tomatoes, sliced chicken, Caesar dressing, and grated Parmesan cheese. Toss gently until everything is well-coated.
Tips for Perfectly Cooked Chicken
To cook chicken well, make sure your skillet is hot before adding the chicken. This helps create a nice sear. Use a meat thermometer if you want to be precise. The chicken should reach 165°F. Avoid overcrowding the pan; this can steam the chicken instead of searing it.
Letting the chicken rest is key. This allows the juices to settle, making it tender.
Assembling Your Wrap
Now it’s time to assemble your wraps! Lay a tortilla flat on a clean surface. Spoon a generous amount of the chicken Caesar mixture onto the center.
Fold the sides of the tortilla inward. Then, roll it up tightly from the bottom. Make sure to encase the filling well. Repeat this process with the rest of the tortillas and filling.
For extra crispiness, place the wraps seam-side down in the skillet for 2-3 minutes. This gives them a nice golden look. Finally, slice each wrap in half diagonally and serve warm. Enjoy your tasty Chicken Caesar Wraps! For the complete recipe, check out the Full Recipe section.
Tips & Tricks
How to Keep Your Wraps Fresh
To keep your wraps fresh, store them in an airtight container. Wrap each one in plastic wrap, too. This helps hold in moisture and flavor. You can also place a damp paper towel inside. It keeps the wraps from drying out. If you plan to eat them later, add the dressing just before serving. This prevents sogginess.
Enhancing Flavor with Additions
You can easily boost the flavor of your Chicken Caesar Wraps. Try adding slices of avocado for creaminess. You can also toss in some crisp bacon bits for a smoky taste. Fresh herbs like basil or cilantro add a nice touch, too. Want some heat? Add sliced jalapeños or a dash of hot sauce. These simple additions make each bite even better.
Common Mistakes to Avoid
One common mistake is overcooking the chicken. This can make it dry and tough. Always check the chicken’s internal temperature. It should be 165°F for safety. Another mistake is using too much dressing. This can make your wrap soggy. Start with a small amount and add more if you need it. Finally, don’t forget to slice your wraps. This makes them easy to eat and fun to share.
Variations
Vegetarian Chicken Caesar Wraps
You can easily switch to a vegetarian version. Use grilled tofu or tempeh instead of chicken. Both options absorb flavor well and offer great texture. Add your favorite veggies, like bell peppers, cucumbers, or even roasted carrots. These wraps stay tasty and filling, while keeping the classic Caesar flavor.
Alternative Dressings
If you want to change the taste, try different dressings. A ranch or Greek yogurt dressing can work well. You can also mix in a bit of lemon juice for freshness. Experiment with flavors until you find your favorite. Each dressing brings a new twist to your wrap.
Healthier Options: Low-Calorie Alternatives
You can make your wraps lighter by using whole wheat tortillas. Swap regular Caesar dressing for a light version. You can also reduce cheese or use nutritional yeast for a cheesy flavor without the calories. Add more greens, like spinach or kale, to boost nutrients. These small changes keep your meal healthy and delicious.
Storage Info
Storing Leftover Wraps
If you have extra Chicken Caesar wraps, store them in the fridge. Place each wrap in a sealed container or wrap them in plastic. They will stay fresh for about 2 days. Make sure to keep them away from strong smells in your fridge. This helps maintain their taste.
Best Practices for Freezing
To freeze your Chicken Caesar wraps, wrap each one tightly in foil or plastic wrap. Then, place them in a freezer bag. They can last up to 3 months in the freezer. When you want to eat them, it’s best to thaw them overnight in the fridge. This keeps the wraps from getting soggy.
Reheating Tips
When you are ready to enjoy your wraps, you can reheat them in a skillet. Heat the skillet over medium heat and place the wraps seam-side down. Cook for about 2-3 minutes on each side until they are warm and crispy. You can also microwave them for about 30 seconds, but they won’t be as crispy. Enjoy these tasty wraps fresh and hot!
FAQs
How can I make Chicken Caesar Wraps gluten-free?
To make Chicken Caesar Wraps gluten-free, use gluten-free tortillas. These are easy to find at most grocery stores. You can also make your own using gluten-free flour. Ensure your Caesar dressing is gluten-free too. Check the label for any hidden gluten. Using these swaps keeps your wraps tasty and safe.
Can I use leftover chicken for this recipe?
Yes, you can use leftover chicken for this recipe. Shredded or diced chicken works great. It saves time and adds flavor. Just make sure it’s cooked well and seasoned. This way, you can enjoy a quick meal without starting from scratch.
Where can I find the Full Recipe?
You can find the Full Recipe for these Chicken Caesar Wraps in the article above. Follow the steps to create a delicious meal that your family will love. Don’t forget to enjoy the process!
Chicken Caesar wraps are simple and fun to make. We covered must-have ingredients, cooking steps, and tips to keep your wraps fresh. Variations let you enjoy different flavors while storage info helps reduce waste. Remember, you can adapt this wrap to fit your needs, whether gluten-free or using leftovers. Enjoy exploring these options and making your own delicious wraps!

![To make smoky chipotle bean burritos, gather these key ingredients: - 1 cup black beans, cooked and mashed - 1 cup pinto beans, cooked and mashed - 1 tablespoon chipotle pepper in adobo sauce, minced - 4 large flour tortillas - 1 cup cooked brown rice - 1 cup corn kernels (fresh, frozen, or canned) - 1 cup shredded cheese (cheddar or a cheese blend) These ingredients create a rich and satisfying filling. The black and pinto beans add protein and flavor. The tortillas hold everything together, making it easy to enjoy. The right spices and seasonings elevate your burritos. Here’s what you need: - 1 teaspoon smoked paprika - 1 teaspoon ground cumin - ½ teaspoon garlic powder - ½ teaspoon onion powder - Salt and pepper to taste Smoked paprika gives a deep flavor. Ground cumin adds warmth and earthiness. Garlic and onion powders bring out the savory notes. Adjust the salt and pepper based on your taste. Toppings add freshness and fun to your burritos. Consider these options: - ½ cup sour cream or Greek yogurt - Fresh cilantro, chopped - Lime wedges for serving Sour cream or yogurt adds creaminess. Cilantro brings a touch of brightness. Lime juice adds zing and balances the flavors. Feel free to mix and match your toppings! Checking out the Full Recipe can help you see how to use these ingredients effectively. To start, gather your ingredients. In a medium bowl, mix 1 cup of black beans and 1 cup of pinto beans. Use a fork to mash them slightly, but leave some texture for bite. This adds a nice feel to the burrito. Next, add 1 tablespoon of minced chipotle pepper in adobo sauce. This gives the burrito its smoky kick. Then, sprinkle in 1 teaspoon of smoked paprika, 1 teaspoon of ground cumin, ½ teaspoon of garlic powder, and ½ teaspoon of onion powder. Season with salt and pepper to taste. Mix everything well, so the flavors blend nicely. Now, let’s assemble the burritos. Take a clean surface or a large plate. Lay out one large flour tortilla on the surface. Add an even scoop of the bean mixture down the center of the tortilla. Be generous, but don’t overfill! Next, add a scoop of cooked brown rice, followed by a sprinkle of corn kernels. Top it all off with a handful of shredded cheese. Now, fold the sides of the tortilla over the filling. Then, roll the burrito tightly from the bottom up. Repeat this with the remaining tortillas until all the filling is used. To cook the burritos, heat a non-stick skillet over medium heat. Place the burritos seam-side down in the skillet. Cook them for about 2-3 minutes on each side. Look for a golden brown and crispy texture. This step makes them extra tasty! Once cooked, remove the burritos from the skillet and let them cool slightly. Serve warm, topped with a dollop of sour cream or Greek yogurt, chopped cilantro, and lime wedges on the side for squeezing. Enjoy your smoky chipotle bean burritos! For more details, check out the Full Recipe. To boost the smoky taste, add more chipotle pepper. You can use two tablespoons if you like it hot. Smoked paprika also adds depth. I often sprinkle extra on top before serving. For a touch of sweetness, add a bit of honey. This balance makes the flavors pop. You can make these burritos in advance. Prepare the filling and wrap them in tortillas. Then, wrap each burrito in foil. Store them in the fridge for up to three days. When you're ready, heat them in the oven for a quick meal. This method keeps them tasty and fresh. A few tools help make this recipe easier. Use a large bowl for mixing the bean filling. A non-stick skillet is great for cooking the burritos. A spatula helps flip them without breaking. If you have a tortilla press, it can shape the tortillas perfectly. Lastly, kitchen scissors can cut cilantro quickly. For the full recipe, check out the [Full Recipe]. {{image_2}} You can make this recipe vegetarian or vegan easily. Use plant-based cheese for a vegan choice. You can also swap sour cream for cashew cream or avocado. Both options add creaminess without dairy. This way, everyone can enjoy these burritos. Feel free to add more veggies to your burritos. Try diced bell peppers, zucchini, or spinach. Sauté them before mixing with the beans for extra flavor. You can also add roasted veggies for a smoky taste. This adds color and nutrition, making your meal even better. If you want to change the protein, use lentils or quinoa. Both provide great texture and nutrients. You can also try chickpeas for a different flavor. They blend well with the smoky spices. These options keep your burritos hearty and satisfying. You can keep your Smoky Chipotle Bean Burritos in the fridge. Place them in an airtight container. They will stay fresh for about 3 to 4 days. If you want to keep them longer, consider freezing. To freeze the burritos, wrap each one tightly in plastic wrap. Then, place them in a freezer-safe bag. This keeps them safe from freezer burn. They can last in the freezer for up to 3 months. When you’re ready to eat, just thaw them in the fridge overnight. To reheat, you can use an oven or a skillet. If using the oven, preheat it to 350°F (175°C). Wrap the burrito in foil and heat for about 15-20 minutes. If using a skillet, heat it over medium heat. Cook the burrito for about 3-4 minutes on each side. This keeps them crispy and warm. For a quick option, you can use the microwave. Heat it for 1-2 minutes, but it may not stay crispy. Enjoy your delicious burritos! For the full recipe, check out the Smoky Chipotle Bean Burritos recipe. You can use any beans you like. Great options include kidney beans or chickpeas. You can also blend beans for a smoother texture. If you want a meat option, try shredded chicken or ground beef. Remember to adjust the seasoning to fit the new beans or meat. To add heat, try more chipotle peppers in adobo sauce. You can also mix in diced jalapeños or a splash of hot sauce. If you like it really spicy, use a pinch of cayenne pepper. Taste the filling as you go to reach your perfect heat level. Yes, you can use corn tortillas! They add a nice flavor and texture. Just be careful, as they can tear more easily than flour tortillas. Warm them slightly before filling to make them more pliable. This way, they’ll hold up better when you roll them. For the full recipe, check out the details above. In this post, I covered how to make smoky chipotle bean burritos. We explored key ingredients, spices, and toppings. I shared simple steps for preparation, assembly, and cooking. Helpful tips improved smoky flavors and storage methods. I also offered vegetarian options and variations. These burritos are easy, tasty, and fun to make. You can adapt them to your taste and enjoy any time. With these insights, you are ready to create a delicious meal. Happy cooking!](http://dailydishly.com/wp-content/uploads/2025/06/6af8d986-bcf9-4176-ab5b-3d565f261c50-768x768.webp)
![To make Chicken and Cheese Enchiladas Casserole, you need the right ingredients. Here they are: - 2 cups cooked chicken, shredded - 1 can (15 oz) black beans, rinsed and drained - 1 cup frozen corn - 1 can (10 oz) enchilada sauce (red or green) - 2 cups shredded cheese (cheddar and Monterey Jack mix) - 8 corn tortillas - 1 small red onion, diced - 1 teaspoon ground cumin - 1 teaspoon chili powder - Salt and pepper to taste - Fresh cilantro, for garnish - Sliced jalapeños, for garnish (optional) Each ingredient serves a purpose. The chicken adds protein, while the beans and corn provide fiber. The enchilada sauce gives a rich flavor. The cheese melts beautifully, creating a creamy texture. Tortillas hold it all together. Don't forget the spices! They bring warmth and depth to the dish. Using fresh ingredients makes a big difference. Fresh cilantro adds color and bright flavor. If you want a kick, sliced jalapeños can spice things up. For a full guide on making this dish, check the Full Recipe. - Preheat the oven to 350°F (175°C). - In a large bowl, mix the cooked chicken, black beans, corn, half the enchilada sauce, cumin, chili powder, diced onion, salt, and pepper. Stir it well. This mix gives your casserole a great flavor. - Take a 9x13 inch baking dish and spread a thin layer of the remaining enchilada sauce on the bottom. - Place 4 corn tortillas over the sauce. Overlap them slightly. This helps keep everything together. - Spoon half of your chicken and bean mix over the tortillas. Then sprinkle half of the cheese on top. - Repeat this with another layer of tortillas, the rest of the chicken mixture, and the remaining cheese. - End with a final layer of tortillas and drizzle any remaining enchilada sauce on top. This keeps the dish moist. - Cover the baking dish with aluminum foil. Bake in the preheated oven for 20 minutes. - After 20 minutes, remove the foil. Bake for an extra 10-15 minutes. This lets the cheese get bubbly and golden brown. - Once done, take it out and let it sit for about 5 minutes before slicing. This helps it hold its shape. - For the full recipe, check the detailed instructions above. To make shredding chicken easy, use two forks. Hold one fork in each hand. Pull the chicken apart in opposite directions. This method works great and saves time. You can also use a stand mixer with a paddle attachment. Just place the cooked chicken in the bowl and mix on low speed. To prevent soggy tortillas, lightly fry them in oil first. This step makes them crisp and adds flavor. You can also warm them in the oven for a few minutes. This keeps them from getting too soft when layered in the casserole. For a great side dish, serve Mexican rice or refried beans. These pair nicely with the creamy casserole. You can also add a fresh green salad on the side. A simple salad with lettuce, tomatoes, and avocado adds freshness. To enhance your casserole's look, garnish with fresh cilantro and jalapeño slices. These colorful toppings add a nice touch. A drizzle of extra enchilada sauce can also make it pop. You can serve the casserole on individual plates for a nice presentation. For the full recipe, check out the Chicken and Cheese Enchiladas Casserole section above. {{image_2}} If you have leftover ingredients, use them! You can swap cooked chicken for shredded beef or even pork. If you have extra veggies, toss in bell peppers or zucchini for added color and nutrients. You can also switch the black beans for pinto beans or kidney beans. They add a nice texture and flavor. For a twist, try chickpeas for a protein boost. Adjust the spice levels to fit your taste. Use mild chili powder for a gentle heat or add cayenne pepper for a kick. You can also mix in diced green chiles for extra flavor without too much heat. If you want a meatless version, skip the chicken and add more beans. You can use lentils or quinoa for protein. Toss in spinach or kale for a healthy touch. Enjoy the variety! For the full recipe, check out the [Full Recipe]. To keep your Chicken and Cheese Enchiladas Casserole fresh, store it in an airtight container in the fridge. It will last for about 3 to 4 days. If you want to keep it longer, freeze it. Wrap it well in plastic wrap and aluminum foil. It can last in the freezer for up to 3 months. Just remember to label it with the date. When you're ready to enjoy leftovers, preheat your oven to 350°F (175°C). Place the casserole in an oven-safe dish. Cover it with aluminum foil to keep it moist. Bake for about 20 minutes. If you prefer to use a microwave, slice a portion and place it on a microwave-safe plate. Heat it for 1-2 minutes, checking often. Make sure it is hot throughout. Avoid overheating, as it can make the dish dry. For the best taste, use the oven when possible. How can I make Chicken and Cheese Enchiladas Casserole gluten-free? To make this casserole gluten-free, use corn tortillas. Check that your enchilada sauce is gluten-free too. Many brands offer gluten-free options. Can I prepare this casserole in advance? Yes, you can prepare it a day ahead. Assemble the casserole, then cover and refrigerate. Bake it just before serving. What are the best sides to serve with Chicken and Cheese Enchiladas Casserole? Some great sides include refried beans, Mexican rice, or a fresh salad. These add color and flavor to your meal. Is it possible to add more vegetables to the recipe? Absolutely! You can add bell peppers, zucchini, or spinach. Just chop them small and mix them in with the chicken. Can I use other types of cheese besides cheddar and Monterey Jack? Yes, feel free to experiment! You can use pepper jack for spice or even queso fresco for a creamy touch. This post covered the tasty Chicken and Cheese Enchiladas Casserole. We looked at the main ingredients, steps to create it, tips to perfect it, and storage methods. You can customize this dish easily with varied ingredients or toppings. Remember, cooking should be fun and creative. I hope you enjoy making this hearty casserole as much as I do. Happy cooking!](http://dailydishly.com/wp-content/uploads/2025/06/88aadb9b-53ae-4392-a371-8958c664e0d2-768x768.webp)
![- 4 chicken thighs, bone-in and skin-on - 1/4 cup honey - 4 cloves garlic, minced - 2 tablespoons soy sauce (or tamari for gluten-free) - 1 tablespoon apple cider vinegar - 1 tablespoon olive oil - 1 teaspoon grated fresh ginger - 1/2 teaspoon black pepper - Chopped green onions - Sesame seeds The main ingredients in this dish are simple yet powerful. Chicken thighs offer rich flavor and juicy texture. Honey adds sweetness that balances the savory notes. Garlic brings a punch that enhances every bite. The additional ingredients work together to create a delicious marinade. Soy sauce adds umami depth, while apple cider vinegar brings brightness. Olive oil helps keep the chicken moist during cooking. For seasoning, fresh ginger adds warmth. Black pepper gives a slight kick. The green onions and sesame seeds make for a lovely garnish, adding color and crunch. You can find the complete process in the Full Recipe. These ingredients blend to create a honey garlic glaze that makes this chicken dish truly special. Preparing the marinade To start, grab a medium bowl. Whisk together the honey, minced garlic, soy sauce, apple cider vinegar, olive oil, grated ginger, black pepper, and a small pinch of salt. Mix until all ingredients blend well. This sauce will give your chicken a sweet and savory flavor. Marinating the chicken Next, take your chicken thighs and place them in a zip-lock bag or shallow dish. Pour the marinade over the chicken, making sure each piece gets coated. Seal the bag or cover the dish. Refrigerate for at least one hour. For deeper flavor, marinate overnight. Preheating the oven While the chicken marinates, preheat your oven to 400°F (200°C). A hot oven helps the chicken cook evenly and crisp the skin. Baking the chicken After marinating, remove the chicken from the marinade. Don’t throw the marinade away; you will use it later. Place the chicken thighs skin side up on a baking tray lined with parchment paper. Bake in the preheated oven for 30-35 minutes. The chicken is ready when it reaches an internal temperature of 165°F (74°C) and the skin is crispy. Cooking the sauce While your chicken bakes, pour the reserved marinade into a small saucepan. Heat it over medium heat. Let it simmer for about 5-7 minutes until it thickens slightly. This will be your delicious glaze. Glazing and serving When the chicken is done, brush the thickened glaze over the thighs. Return the tray to the oven for another 5 minutes to caramelize the glaze. Once done, remove and sprinkle with chopped green onions and sesame seeds. Let the chicken rest for a few minutes before serving. Enjoy your Honey Garlic Glazed Chicken Thighs! For the full recipe, check the earlier section. - The best time to marinate chicken thighs is at least one hour. For deeper flavor, marinate overnight. - Use a zip-lock bag for even coating. Squeeze out air to let the marinade soak in well. - To get crispy skin, bake the chicken thighs skin side up. This allows the fat to render and crisp up. - Check the internal temperature with a meat thermometer. It should reach 165°F (74°C) for safe eating. - Pair your honey garlic glazed chicken with steamed rice or roasted vegetables. - For a nice look, garnish with chopped green onions and sesame seeds. This adds color and crunch. For the full recipe, refer to the instructions above. Enjoy your cooking! {{image_2}} You can switch up the protein in this dish. Chicken breast works well if you want less fat. For a plant-based option, try tofu. Just press it to remove excess water and cut it into cubes. You can also change the sweetener. If you want a lower sugar option, use maple syrup or agave nectar. These alternatives blend nicely with the other flavors. Make this dish even better by adding spices or herbs. Try ginger or chili flakes for a kick. Fresh herbs like cilantro or basil can bring a nice twist too. You can also play with acids. Lime juice adds a bright flavor, while balsamic vinegar gives a sweet tang. Try adding a splash during cooking for a new taste. Grilling the chicken gives it a smoky flavor. Just marinate as usual and grill over medium heat. It takes about 20 minutes, and you’ll get nice grill marks. If you own an Instant Pot, you can use it for this recipe too. Cook the marinated chicken on high for 10 minutes, then let it naturally release. This method keeps the chicken super juicy. For the full recipe, check out the complete instructions and details. To keep your honey garlic glazed chicken thighs fresh, store them in the fridge. Place the cooked chicken in an airtight container. It can last up to 3 days in the refrigerator. If you want to store it longer, consider freezing it. Wrap the chicken tightly in plastic wrap, then place it in a freezer-safe bag. This way, it can stay good for up to 3 months. When it's time to enjoy leftovers, reheating can be simple. The best way to reheat is in the oven. Set your oven to 350°F (175°C). Place the chicken on a baking sheet and cover it with foil. This helps keep the chicken moist. Heat it for about 15-20 minutes or until it's warm. You can also use a microwave, but use a lower power setting to avoid drying it out. Cover the chicken with a damp paper towel to keep moisture in. You can store your honey garlic glazed chicken thighs safely for a few days. In the fridge, they stay good for 3 days. In the freezer, they last for 3 months. Signs of spoilage include a strange smell, changes in color, or a slimy texture. Always check before eating to stay safe. For more details on how to make this dish, check the Full Recipe. Can I use boneless chicken thighs? Yes, you can use boneless chicken thighs. They will cook faster than bone-in thighs. Check the internal temperature to ensure they reach 165°F (74°C). How to make the glaze thicker? To thicken the glaze, simmer it longer. Cook it on medium heat until it reduces and becomes syrupy. You can also add a cornstarch slurry for extra thickness. How to make it gluten-free? Use tamari instead of soy sauce. Tamari is a gluten-free option that tastes great. Can I add vegetables to the dish? Yes, you can add vegetables. Try bell peppers, broccoli, or carrots. Toss them on the baking tray with the chicken. How many servings does this recipe yield? This recipe makes four servings. It’s perfect for a small family meal. Can I double the recipe for a larger group? Yes, you can double the recipe. Just ensure your baking tray has enough space. You may need to adjust cooking time slightly. For the complete recipe, check out the [Full Recipe]. This recipe uses simple ingredients like chicken thighs, honey, and garlic. You learned how to prepare and cook tasty chicken with an easy glaze. I shared tips to help with marinating and cooking for the best results. Feel free to explore variations and enjoy leftovers too. Try different flavors and cooking methods. Cooking should be fun and personal. Use your taste to create amazing meals. Enjoy making this dish with friends and family!](http://dailydishly.com/wp-content/uploads/2025/07/b9cba3e0-ee7f-4dbf-9eac-9b8411a1c4fd-768x768.webp)

![- 4 salmon fillets (6 ounces each) - 1/4 cup soy sauce (low-sodium preferred) - 1/4 cup honey - 2 tablespoons rice vinegar - 1 tablespoon grated fresh ginger - 2 cloves garlic, minced - 1 teaspoon sesame oil The heart of this dish is the salmon. I love using fresh salmon fillets for their rich flavor and texture. They cook well and stay moist. For the sauce, soy sauce adds that umami punch. Low-sodium options are great if you want to cut down on salt. Honey gives a sweet touch, balancing the salty soy. Rice vinegar adds tang and depth. Fresh ginger and garlic bring warmth and spice to the marinade. - 2 green onions, finely chopped (for garnish) - 1 tablespoon sesame seeds (for garnish) Garnishes can elevate your dish. Chopped green onions add color and a mild onion flavor. Sesame seeds give a nice crunch and nutty taste. They make the dish look beautiful too. - Cooked jasmine rice - Steamed vegetables I recommend serving the teriyaki salmon over fluffy jasmine rice. The rice soaks up the sauce perfectly. Steamed vegetables are great on the side. They add color, texture, and nutrients to your meal. This combo makes a full and balanced plate. For the complete cooking process, check the Full Recipe. To start, you need to whisk the marinade. In a medium bowl, combine: - 1/4 cup soy sauce - 1/4 cup honey - 2 tablespoons rice vinegar - 1 tablespoon grated fresh ginger - 2 cloves garlic, minced - 1 teaspoon sesame oil Whisk them until smooth. This creates a sweet and salty blend. Next, marinate the salmon. Place the salmon fillets in a shallow dish. Pour the marinade over them. Cover the dish and refrigerate for at least 30 minutes. For a stronger flavor, marinate up to 2 hours. Now, it’s time to bake. Preheat your oven to 400°F (200°C). This step is key for even cooking. Line a baking sheet with parchment paper or foil. This makes for easy cleanup. After marinating, take the salmon out. Reserve the marinade for later. Place the fillets skin-side down on the sheet. Bake the salmon for 12-15 minutes. It’s done when it flakes easily with a fork. While the salmon bakes, prepare the sauce. Pour the reserved marinade into a small saucepan. Bring it to a boil over medium heat. Let it simmer for 3-5 minutes. This thickens the sauce nicely. Be careful not to over-reduce it. Once the salmon is ready, drizzle the thickened sauce on top. Garnish with: - Chopped green onions - Sesame seeds Now, serve your teriyaki salmon over fluffy jasmine rice for a complete meal. For the full recipe, check the section above. For the best teriyaki salmon, marination is key. I recommend marinating for at least 30 minutes. If you have time, go for 2 hours. This extra time allows the flavors to soak in. Balancing the flavors is also important. The soy sauce adds saltiness, while honey brings sweetness. Adjust these to fit your taste. You can even add a splash of lime juice for a zesty kick! You can cook the salmon in the oven or on the grill. If you use the oven, preheat it to 400°F (200°C). For grilling, heat your grill to medium-high. Both methods yield tasty results. Just make sure not to overcook the salmon. Cook it until it flakes easily with a fork. This usually takes about 12 to 15 minutes in the oven. If grilling, check often to avoid dryness. When plating, keep it simple and elegant. Place the salmon on a bed of fluffy jasmine rice. Drizzle it with the thickened teriyaki sauce. Garnish with green onions and sesame seeds for a pop of color. For sides, steamed vegetables work great. Try broccoli or snap peas for a fresh crunch. This makes your meal not just tasty but also beautiful! {{image_2}} You can swap out salmon for other fish. Try using trout or tilapia. Both have great flavors and cook well. For gluten-free options, use tamari instead of soy sauce. Tamari has a similar taste and works perfectly in this recipe. You can also use coconut aminos, a great soy sauce alternative. Want to change the taste? Add spices like black pepper or red pepper flakes. These spices give the dish a nice kick. You can also add citrus juice. Lime or lemon juice brightens up the flavors. Just mix it into the marinade for a fresh twist. You can grill the salmon for a smoky flavor. Just preheat your grill and cook the salmon for about 6-8 minutes each side. If you want a caramelized finish, try broiling. Place the salmon under a broiler for 2-3 minutes after baking. This gives a nice, crisp topping. This Easy Teriyaki Salmon recipe is flexible. Feel free to mix and match these ideas! For the full recipe, check out the [Full Recipe]. To store leftovers, let the salmon cool to room temperature. Place it in an airtight container. This keeps it fresh and prevents strong smells. The shelf life in the fridge is about 3 to 4 days. If you plan to eat it later, remember to check for any signs of spoilage before enjoying. You can freeze cooked salmon for up to 3 months. Wrap each piece tightly in plastic wrap, then place it in an airtight container or freezer bag. To reheat, thaw the salmon overnight in the fridge. You can warm it in the oven at 350°F (175°C) for about 10-15 minutes. This helps keep the texture nice and flaky. Use airtight containers for storing salmon. This prevents air from getting in and keeps it fresh longer. Avoid leaving cooked salmon out at room temperature for too long. Proper storage helps retain its rich flavor and juicy texture. Enjoy your Easy Teriyaki Salmon at its best! For the full recipe, check out the [Full Recipe]. I recommend marinating teriyaki salmon for at least 30 minutes. This allows the flavors to soak in. For a stronger taste, you can marinate it for up to 2 hours. Just don’t go over two hours, or the salmon may get too salty. Yes, you can use frozen salmon! Just be sure to thaw it first. To thaw, place the salmon in the fridge overnight. If you need it faster, seal it in a bag and submerge it in cold water for about an hour. After thawing, pat it dry before marinating. I love serving teriyaki salmon with fluffy jasmine rice. It soaks up the tasty sauce well. You can also pair it with steamed vegetables like broccoli or green beans. A fresh salad with a light dressing works great, too! Check out the Full Recipe for more ideas. In this post, we explored how to make easy teriyaki salmon using simple ingredients. We discussed key items like salmon fillets, soy sauce, honey, and fresh ginger. You learned step-by-step instructions for making the marinade, baking the salmon, and adding finishing touches. We also covered tips for perfecting the dish and how to customize it. Remember, you can store leftovers for later enjoyment. With these insights, you now have all the tools to create a delicious teriyaki salmon that impresses. Enjoy your cooking journey!](http://dailydishly.com/wp-content/uploads/2025/06/d319870b-f2b5-4b65-bbf7-0456604e94a9-768x768.webp)