
Cranberry Pecan Chicken Salad Fresh and Tasty Recipe
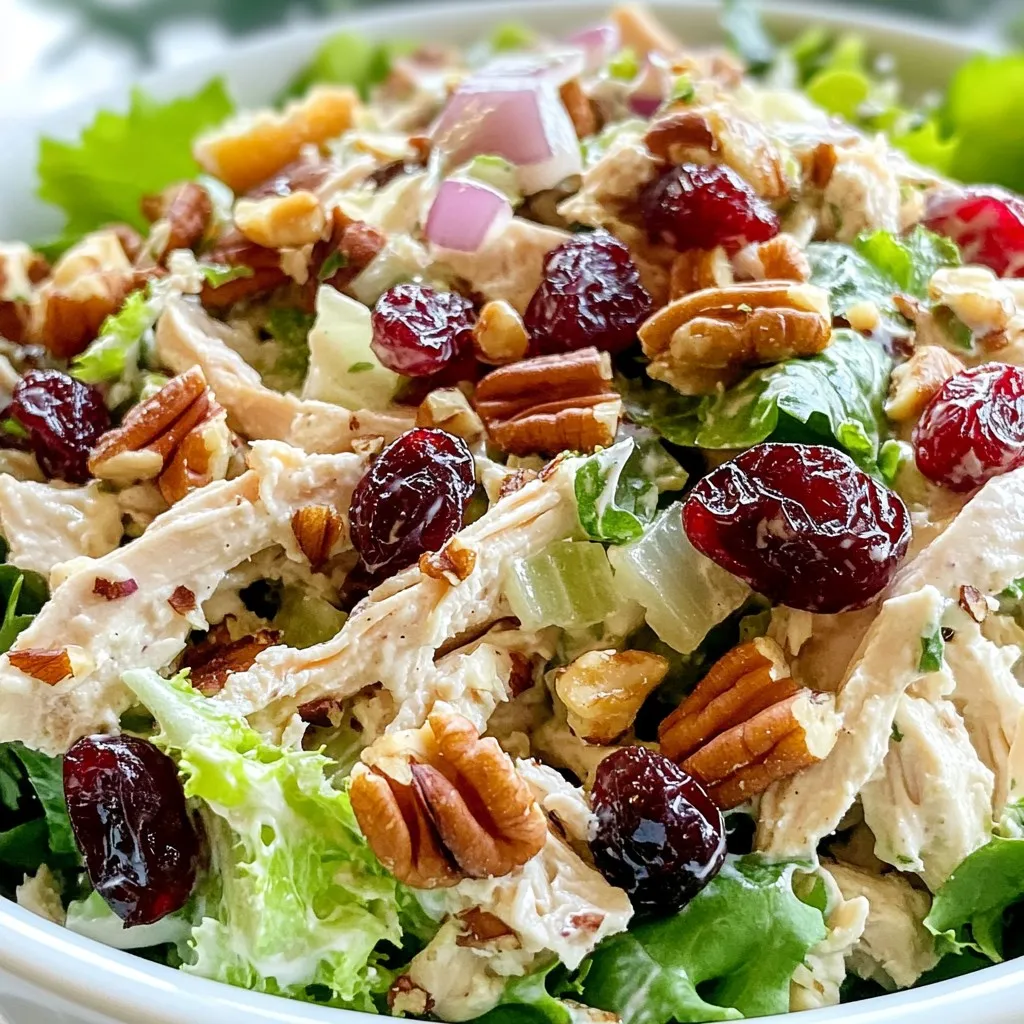

Looking for a quick and tasty meal? This Cranberry Pecan Chicken Salad mixes chicken, nuts, and cranberries for a burst of flavor! It’s not just fresh; it’s easy to make and packed with good-for-you ingredients. Whether you need a lunch option or a light dinner, this recipe has you covered. Let’s dive into this deliciously simple dish that’s sure to please everyone at your table!
Why I Love This Recipe
- Quick and Easy: This salad can be whipped up in just 15 minutes, making it a perfect option for busy weeknights or last-minute gatherings.
- Healthy and Nutritious: Packed with protein from the chicken and healthy fats from the pecans, this salad is both satisfying and nutritious.
- Flavorful Combination: The sweet and tangy cranberries combined with the crunchy pecans create a delicious contrast that enhances the overall taste.
- Versatile Serving Options: This chicken salad can be served on its own, in a sandwich, or atop a bed of greens, making it versatile for any meal.
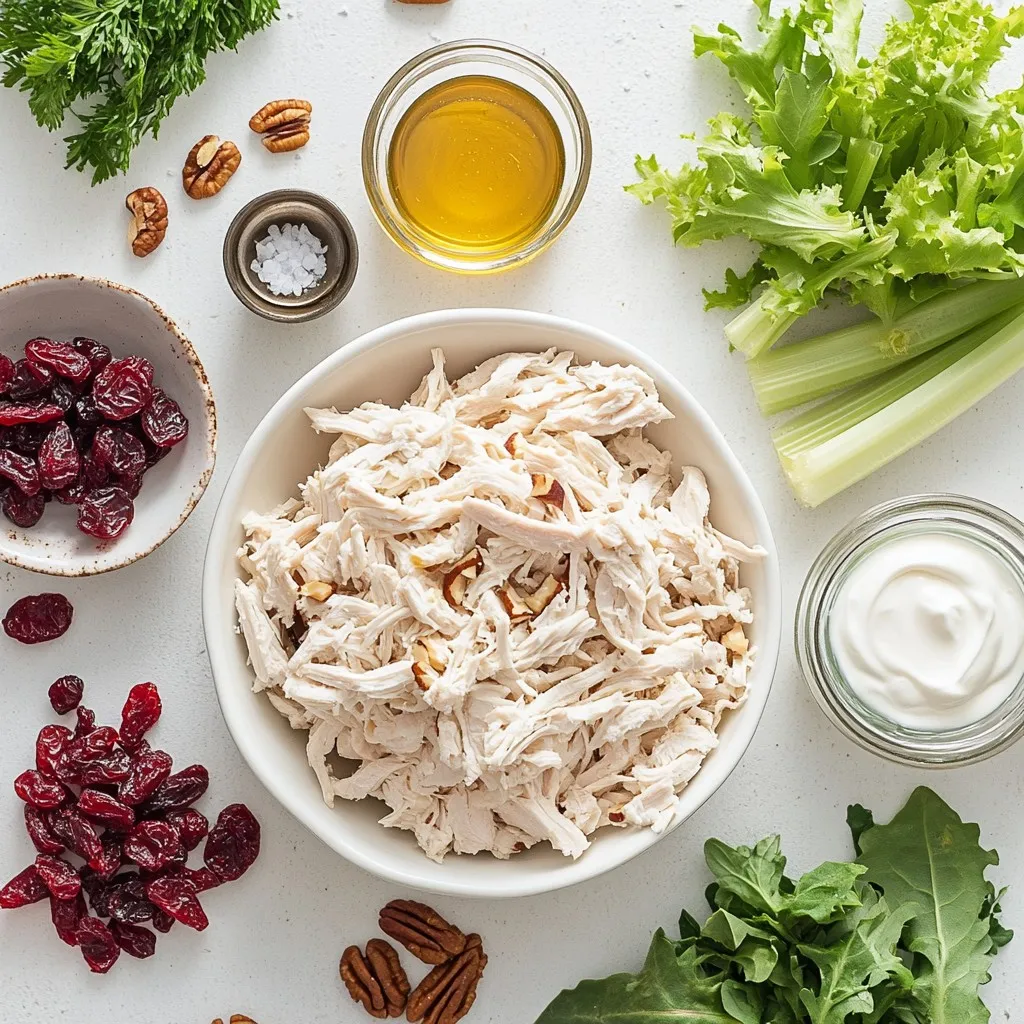
Ingredients
List of Ingredients
– 2 cups cooked chicken breast, shredded
– 1/2 cup dried cranberries
– 1/2 cup pecans, roughly chopped
– 1/2 cup celery, diced
– 1/4 cup red onion, finely chopped
– 1/2 cup plain Greek yogurt
– 1 tablespoon Dijon mustard
– 1 tablespoon honey
– Salt and pepper to taste
– Mixed greens, for serving
For this cranberry pecan chicken salad, you need a mix of fresh and hearty ingredients. I like to use cooked chicken breast that is shredded. It gives a nice base and adds protein. Dried cranberries bring a sweet and tart flavor. Pecans add a crunchy texture and nutty taste.
Celery and red onion add crunch and a fresh bite. The Greek yogurt acts as a creamy dressing option. Dijon mustard and honey give it a unique flavor. Don’t forget to season with salt and pepper to bring it all together. Finally, serve the salad on a bed of mixed greens for a fresh touch. This mix creates a balanced, tasty dish that’s perfect for lunch or dinner.
Step-by-Step Instructions
Preparation of the Chicken Salad
1. In a large bowl, combine the shredded chicken, dried cranberries, chopped pecans, diced celery, and finely chopped red onion. Mix them well. This creates a great base for your salad. Each ingredient adds a different texture and flavor.
2. In a small bowl, prepare the dressing. Mix together the Greek yogurt, Dijon mustard, honey, salt, and pepper until smooth. This dressing is creamy and gives a nice tart flavor to the salad.
3. Pour the dressing over the chicken mixture. Toss everything together until all the ingredients are well coated. This step makes sure every bite is full of flavor.
Flavor Adjustments
– After mixing, taste the salad. Add more salt and pepper if needed. Adjusting these flavors can make a big difference.
– Cover the bowl and refrigerate the chicken salad for at least 30 minutes. This helps the flavors to meld together, making the salad even tastier.
Serving Suggestions
– To serve, arrange a handful of mixed greens on a plate. This adds color and freshness to your dish.
– Top the greens with a generous scoop of the cranberry pecan chicken salad. You can also sprinkle some extra pecans or cranberries on top for added crunch and flavor. Enjoy your fresh and tasty creation!
Tips & Tricks
Ingredient Substitutions
What can I use instead of Greek yogurt?
If you need a Greek yogurt alternative, try plain sour cream. You can also use mayonnaise for a richer taste. For a lighter option, consider using cottage cheese blended until smooth. These swaps keep the salad creamy and delicious.
What if I need a nut-free option?
If you want a nut-free salad, skip the pecans. You can add sunflower seeds for a nice crunch. Pumpkin seeds are another great choice. They add texture and flavor without the nuts.
Making Ahead
What are the best practices for storage?
To make your salad ahead of time, store it in an airtight container. This keeps it fresh. You can refrigerate it for up to three days. Just be sure to keep the mixed greens separate until serving.
How can I keep the ingredients fresh?
Keep the celery and onion in a separate bag. Adding them just before serving helps keep their crunch. This way, your salad stays fresh and tasty.
Enhancing Flavor
What are some suggestions for seasoning?
You can add a pinch of garlic powder or onion powder to the dressing. A squeeze of lemon juice can brighten the flavors, too. Don’t forget to taste and adjust salt and pepper as needed!
What fresh herbs can I add?
Chopped fresh parsley or dill can elevate your salad. You could also use chives for a mild onion flavor. Adding herbs gives your salad a fresh twist.
Pro Tips
- Use Rotisserie Chicken: For a quicker preparation, consider using store-bought rotisserie chicken instead of cooking your own.
- Customize Your Nuts: Feel free to substitute pecans with walnuts or almonds for a different flavor and texture.
- Add Fresh Herbs: Enhance the flavor by adding fresh herbs like parsley or dill to the salad mixture.
- Serve with Toast: For a heartier meal, serve the chicken salad on toasted bread or in a wrap.

Variations
Additives for Extra Flavor
You can add different fruits to your salad for more taste. Sliced apples are crisp and sweet. They balance the tartness of the cranberries. You can also use grapes. Halve them for easy eating.
Cheese is another great addition. Feta adds a salty bite. Goat cheese gives a creamy texture. Both cheeses blend well with the other ingredients.
Dietary Considerations
If you need a gluten-free option, use gluten-free yogurt. Make sure to check labels. Most of the ingredients are already gluten-free.
For a vegetarian version, remove chicken. You can replace it with chickpeas. They add protein and texture. You can also try using tofu.
Different Serving Styles
You can serve this salad in many ways. It works great as a wrap. Use a tortilla or lettuce leaf to hold the salad.
Stuffed avocados or tomatoes are fun, too. Cut them in half and scoop out some flesh. Fill them with the salad mix for a colorful dish.
Storage Info
Refrigeration Guidelines
How long does the salad last? The cranberry pecan chicken salad stays fresh for about three to four days in the fridge. Proper airtight storage is key to keeping it tasty. Use a sealed container to avoid air and moisture. This helps maintain its flavor and texture.
Freezing the Chicken Salad
Can it be frozen? While you can freeze the chicken salad, the texture may change. The vegetables might become mushy after thawing. Best practices for freezing and thawing include portioning it into small containers. This way, you only thaw what you need. Thaw it overnight in the fridge for best results.
Reheating Instructions
How can you refresh leftovers? If you have some left, avoid reheating in the microwave. Instead, let it sit at room temperature for about 15 minutes. This brings back some freshness. To avoid sogginess, skip adding extra dressing before refrigerating leftovers. Store it separately and mix it in when ready to eat.
FAQs
What is the best way to cook chicken for salad?
You can cook chicken in several ways. I recommend poaching or baking.
– Poaching: This keeps the chicken moist. Place chicken in simmering water, cook for about 15 to 20 minutes.
– Baking: Preheat the oven to 375°F (190°C). Season the chicken and bake for 25 to 30 minutes.
– Grilling: For a smoky flavor, grill chicken breasts for 6 to 8 minutes per side.
After cooking, let the chicken cool. Then, shred it for your salad.
Can I make Cranberry Pecan Chicken Salad without chicken?
Yes, you can! There are many tasty protein options.
– Tofu: Use firm tofu, cubed and sautéed.
– Chickpeas: Canned chickpeas work well. Rinse and mash lightly before adding.
– Turkey: Shredded turkey is a great substitute if you have leftovers.
– Tempeh: This adds a nutty flavor. Cook it until golden and crumble it in.
These options make the salad both yummy and filling.
How long can I keep the salad in the fridge?
You can keep the salad in the fridge for up to three days.
– Store it in an airtight container for the best quality.
– If you notice any off smells or slimy textures, it’s best to throw it away.
Always check before eating leftovers to keep it safe.
This blog post covered how to make a tasty Cranberry Pecan Chicken Salad. You learned about the key ingredients, step-by-step instructions, and helpful tips. I shared ways to adjust flavors and variations to suit your taste.
In conclusion, enjoy making this salad that is fresh and easy. It’s perfect for meals or snacks. Don’t forget to store it correctly for later enjoyment. Now you have the tools to create a delicious dish anytim

Cranberry Pecan Chicken Salad
Ingredients
- 2 cups cooked chicken breast, shredded
- 0.5 cup dried cranberries
- 0.5 cup pecans, roughly chopped
- 0.5 cup celery, diced
- 0.25 cup red onion, finely chopped
- 0.5 cup plain Greek yogurt
- 1 tablespoon Dijon mustard
- 1 tablespoon honey
- Salt and pepper to taste
- Mixed greens, for serving
Instructions
- In a large mixing bowl, combine the shredded chicken, dried cranberries, chopped pecans, diced celery, and finely chopped red onion.
- In a separate small bowl, prepare the dressing by mixing together the Greek yogurt, Dijon mustard, honey, salt, and pepper until smooth.
- Pour the dressing over the chicken mixture and toss until all ingredients are well coated and evenly mixed.
- Taste the salad and adjust seasoning, adding more salt and pepper if necessary.
- Cover the bowl and refrigerate the chicken salad for at least 30 minutes to allow the flavors to meld.
- To serve, arrange a handful of mixed greens on a plate and top with a generous scoop of the cranberry pecan chicken salad.


![For creamy roasted red pepper pasta, you need: - 12 oz pasta (penne or fusilli) - 2 large red bell peppers - 1 cup heavy cream - 1/2 cup grated Parmesan cheese - 2 cloves garlic, minced - 2 tablespoons olive oil - 1 teaspoon dried basil - 1/2 teaspoon red pepper flakes (adjust for spice level) - Salt and pepper to taste - Fresh basil leaves for garnish These ingredients work together to create a rich and flavorful dish. The roasted red peppers give a sweet taste, while the cream adds a smooth texture. If you want to make this dish vegan, you can swap the heavy cream for coconut cream or a cashew cream. Use nutritional yeast instead of Parmesan cheese for a cheesy flavor. For gluten-free pasta, look for pasta made from rice, lentils, or chickpeas. If you want to make more or less pasta, here’s how to adjust the ingredients: - For every 4 oz of pasta, use about 1/3 cup of heavy cream. - For every 1 oz of cheese, use 2 tablespoons of cream. - Adjust the red bell peppers: 1 large pepper equals about 1 cup chopped. This way, you can easily scale the recipe to fit your needs. If you want the full recipe, refer to the top of the article. Start by preheating your oven to 400°F (200°C). This heat helps the peppers roast well. Place the two red bell peppers on a baking sheet. Drizzle with olive oil for flavor and moisture. Roast them for 25-30 minutes. You want the skins to char and blister. When done, take them out and let them cool. Once cool, peel off the charred skin and remove the seeds. Chop the flesh into small pieces. This step gives your pasta its rich flavor. While the peppers roast, bring a pot of water to a boil. Add salt to the water, which helps flavor the pasta. Add 12 oz of pasta, like penne or fusilli. Cook it according to the package instructions until it's al dente. This means it should be firm but not hard. Drain the pasta and save about 1 cup of the pasta water. This water helps create a creamy sauce later. Now, it’s time to make the sauce. In a blender, add the roasted red peppers, 1 cup of heavy cream, 2 cloves of minced garlic, and 1 teaspoon of dried basil. For a bit of heat, include 1/2 teaspoon of red pepper flakes. Add a pinch of salt too. Blend everything until it's smooth and creamy. In a large skillet, combine the creamy mixture with the drained pasta over medium heat. If the sauce is too thick, add a splash of reserved pasta water. Stir in 1/2 cup of grated Parmesan cheese until it melts. Taste and adjust with more salt and pepper if needed. Serve your dish hot. Garnish with fresh basil leaves and more Parmesan cheese if you like. For the full details, refer to the Full Recipe. To get the perfect pasta, cook it in a big pot of salted water. Use about a tablespoon of salt per quart. This adds flavor to your pasta. Cook it until it's al dente, which means it should still have a little bite. After draining, don't rinse your pasta. This keeps the starch that helps the sauce stick. If you like more heat, add extra red pepper flakes. Start with a pinch and taste. You can always add more later. If it's too spicy, balance it with more cream or cheese. The goal is to make it just right for your taste. For a smooth sauce, blend the roasted peppers well. Add the heavy cream slowly while blending. If the sauce is too thick, use some reserved pasta water to thin it. This water has starch that helps the sauce cling to the pasta. Don't forget to stir in the Parmesan cheese at the end. It adds creaminess and flavor. For the complete recipe, check out the Full Recipe. {{image_2}} You can make this dish vegetarian by using vegetable broth instead of chicken broth. Swap out the Parmesan for a plant-based cheese. You can also add veggies like spinach or mushrooms for extra flavor. They will add texture and nutrients. For a heartier meal, consider adding chicken or shrimp. Cook the protein separately and add it to the pasta after mixing in the sauce. Grilled chicken breast or sautéed shrimp both work well. They soak up the creamy flavors nicely. If you need a gluten-free option, use gluten-free pasta. Brands like brown rice or chickpea pasta are great choices. They cook similarly and absorb the sauce well. Just remember to adjust cooking times as needed for different pasta types. You can find the full recipe for this dish here: [Full Recipe]. To store leftovers, let the pasta cool first. Use an airtight container. This keeps the flavors fresh. Place in the fridge for up to three days. If you want to keep it longer, freeze it. When reheating, add a splash of water or cream. This helps restore the creamy texture. Warm it slowly on the stove over low heat. Stir often to avoid burning. You can also use the microwave, but watch it closely. You can freeze the roasted red pepper sauce. Let it cool, then pour it into freezer bags. Flatten the bags to save space. It will last up to three months. When ready to use, thaw it overnight in the fridge before reheating. Yes, you can use many types of pasta. Options like spaghetti, fettuccine, or even gluten-free pasta work well. The key is to choose a shape that holds sauce nicely. Try different types to find your favorite! You can make the sauce cream-free by using cashews or silken tofu. Blend soaked cashews or tofu with roasted peppers and a little vegetable broth. This gives a creamy texture while keeping it dairy-free. Adjust seasonings to taste. This dish pairs well with a fresh salad or garlic bread. You can also serve it with grilled vegetables or a light protein, like chicken or shrimp. These sides enhance the meal and make it more filling. For more ideas, check the Full Recipe. This blog post covered all you need for creamy roasted red pepper pasta. I shared ingredient lists, cooking steps, and tips for the best results. You can explore variations for diets and learn how to store leftovers. Remember, cooking is about having fun and trying new things. Your creations can be as unique as you are. Enjoy each bite and keep experimenting in the kitchen!](https://dailydishly.com/wp-content/uploads/2025/07/67c62068-3baa-44bf-b117-e4c3c451c449-768x768.webp)
![- 2 cans (15 oz each) black beans, rinsed and drained - 1 tablespoon olive oil - 1 medium onion, finely chopped - 3 cloves garlic, minced - 1 chipotle pepper in adobo sauce, minced (or more for extra spiciness) - 1 teaspoon ground cumin - 1 teaspoon smoked paprika - Salt and black pepper to taste - 8 small corn or flour tortillas - 1 avocado, sliced - 1 cup cherry tomatoes, halved - Fresh cilantro, chopped for garnish - Lime wedges, for serving Using high-quality ingredients makes a big difference. I prefer fresh, whole foods. Canned beans are great too, but rinse them well. They taste better and are healthier. If you want a vegan dish, this recipe is perfect. Just use corn tortillas. They are usually gluten-free. If you need a gluten-free option, corn tortillas are a good choice. They add a nice crunch. You can also use whole wheat tortillas for a different flavor. - Sour cream - Shredded cheese - Sliced jalapeños Toppings can really enhance your tacos. I love adding sour cream for creaminess. Shredded cheese adds flavor. For heat, try sliced jalapeños. Making toppings at home is often better than store-bought. You control the taste and freshness. Plus, it's fun to experiment. Try making your own salsa or guacamole for a tasty twist. Start by heating the olive oil in a large skillet over medium heat. Once hot, add the finely chopped onion. Sauté it for about five minutes. When the onion softens, add the minced garlic and chipotle pepper. Stir for one to two minutes, until you smell the garlic. Next, add the black beans, ground cumin, smoked paprika, salt, and pepper. Cook this mixture for five to seven minutes. Stir occasionally and mash some beans with a fork. This will make the mixture creamy. If you taste it and think it needs more flavor, add more salt or spices. Now, let's warm the tortillas. You can use a dry skillet or a microwave. For the skillet, place the tortillas over medium heat. Heat each side for about 30 seconds or until they feel soft. If you use a microwave, wrap them in a damp paper towel and heat for 15 to 20 seconds. Corn tortillas can break easily, so handle them gently. Flour tortillas are more flexible, but both taste great! It's time to put everything together! Start by placing a warm tortilla on a plate. Spoon some of the spicy black bean mixture onto the center. Then, add sliced avocado and halved cherry tomatoes on top. Finish with a sprinkle of fresh cilantro for color and flavor. For a pretty presentation, arrange the tacos on a large platter. Add lime wedges next to them for squeezing. You can even serve them with a side of salsa for extra fun! For the full recipe, check out the details above. Temperature control is key when cooking beans. Start with medium heat. This helps the beans warm evenly without burning. Stir often to avoid sticking. The perfect texture for the bean mixture is creamy but not mushy. Lightly mash some beans as you cook. This gives a nice blend of smooth and chunky. To boost flavor, consider adding spices like chili powder or cayenne pepper. Fresh herbs like cilantro or parsley also add brightness. Marinating the bean mixture can deepen the flavor. Let it sit for at least 30 minutes to absorb the spices. This step is easy and makes a big difference. Meal prepping your ingredients is a smart way to save time. Chop onions and garlic a day ahead. You can also mash the beans in advance. Store each ingredient in separate containers. When you're ready, assembly is quick! For faster assembly, warm all tortillas at once. Use a large skillet to heat them. This way, you can serve warm tacos to everyone. For the full recipe, check out the details above. {{image_2}} You can change up your Spicy Black Bean Tacos by adding different proteins. If you want meat, try diced chicken or ground beef. For a plant-based option, use lentils or quinoa. Both options add new flavors and textures. You can spice up those chicken tacos with smoky seasonings. Add chipotle or cayenne for even more heat. Tacos vary by region, so you can get creative! For a twist, make black bean burritos by wrapping the filling in a larger tortilla. You could also create taco bowls by layering the ingredients in a bowl instead of a tortilla. Each method brings its own fun to the table and allows for more customization. Using seasonal produce makes your tacos fresh and vibrant. In summer, add grilled zucchini or corn for a sweet crunch. In the fall, try roasted butternut squash for a warm flavor. You can also use leftover veggies from your fridge. Toss them in with the black beans for a tasty, resourceful meal. To store your taco filling, first let it cool to room temperature. Place it in an airtight container. This keeps it fresh for up to four days in the fridge. If you want to freeze the bean mixture, use a freezer-safe container. Label it with the date. The filling can last up to three months in the freezer. To reheat, simply thaw it overnight in the fridge and warm it on the stove. Stir occasionally until heated through. Store leftover tortillas in a zip-top bag. This helps prevent them from drying out. Keep the bag in the fridge for best results. If your tortillas get stale, don’t worry! You can revive them. Just wrap them in a damp paper towel and microwave for 10-15 seconds. This will make them soft and pliable again. The black bean mixture will last in the fridge for about four days. Tortillas can last one to two weeks if stored well. To stay safe, always check for any odd smells or mold before eating. When in doubt, throw it out! Enjoy your Spicy Black Bean Tacos knowing you stored them safely. For the complete recipe, visit the [Full Recipe] link. To make your tacos less spicy, skip the chipotle pepper. You can also use bell peppers for flavor. Adding a dollop of sour cream or yogurt cools the heat too. If you want a milder taste, use less cumin and smoked paprika. Try adding sweet corn or diced tomatoes for a fresh twist. Yes, you can use canned black beans. They are safe and save you time. Just rinse and drain them to remove extra salt. Canned beans are cooked, so you only need to heat them in your taco mix. This makes cooking easier and faster. Pair your tacos with some tasty sides. Try serving them with Mexican rice or a fresh salad. Guacamole is a great dip too. If you want a drink, serve with limeade or iced tea. These sides balance the flavors and make your meal complete. For more ideas, check out the Full Recipe. In this post, I covered how to make Spicy Black Bean Tacos from start to finish. We explored key ingredients, cooking steps, and tips to enhance flavor and texture. I also shared ideas for variations, storage, and how to handle leftovers. Tacos are fun and easy to make. You can customize them any way you want. Enjoy your cooking adventure!](https://dailydishly.com/wp-content/uploads/2025/06/e30d655b-3f29-4259-b589-8a39593520a7-768x768.webp)