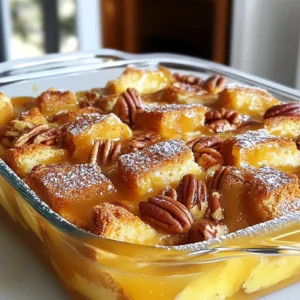
Caramel Pecan Bread Pudding Delightfully Simple Recipe

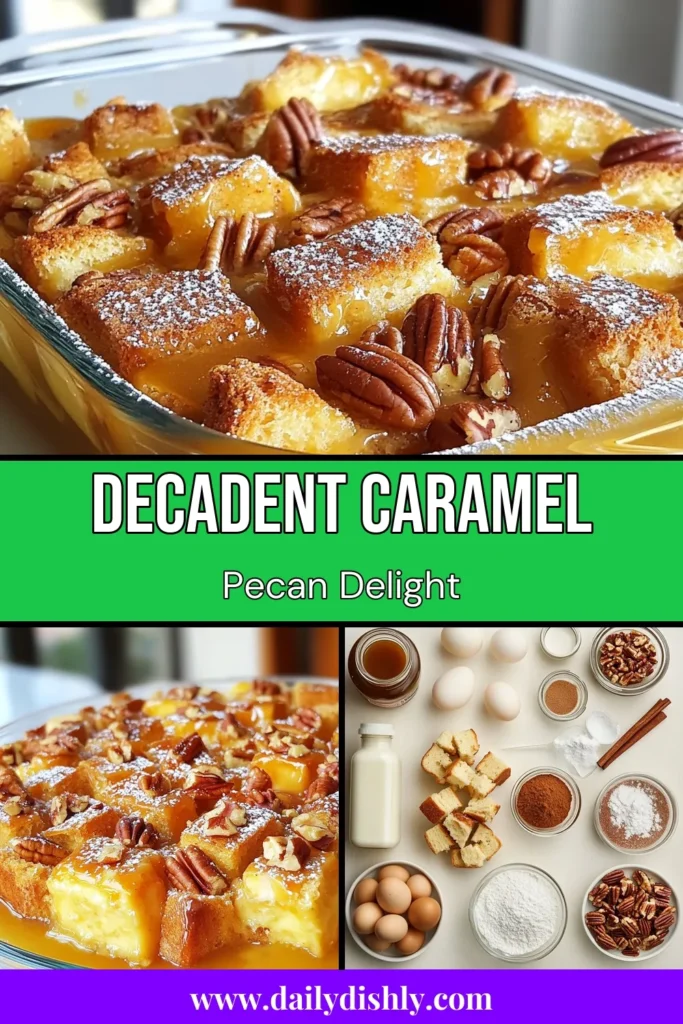
Are you ready to indulge in a warm, gooey dessert that everyone will love? My Caramel Pecan Bread Pudding is simple to make with just a few ingredients you probably have at home! This dish combines flavors of rich caramel and crunchy pecans, creating a comforting treat perfect for any gathering. Stick around, and I’ll guide you step-by-step to dessert perfection, ensuring you impress your family and friends!
Why I Love This Recipe
- Decadent Flavor: This caramel pecan bread pudding is rich and indulgent, combining the sweetness of caramel with the nutty crunch of pecans.
- Easy to Prepare: With simple ingredients and straightforward steps, this recipe is perfect for both novice and experienced bakers.
- Perfect for Any Occasion: Whether it’s a cozy family dessert or a festive holiday treat, this dish is sure to impress your guests.
- Make-Ahead Option: You can prepare the bread pudding in advance, making it a convenient choice for entertaining or meal prepping.
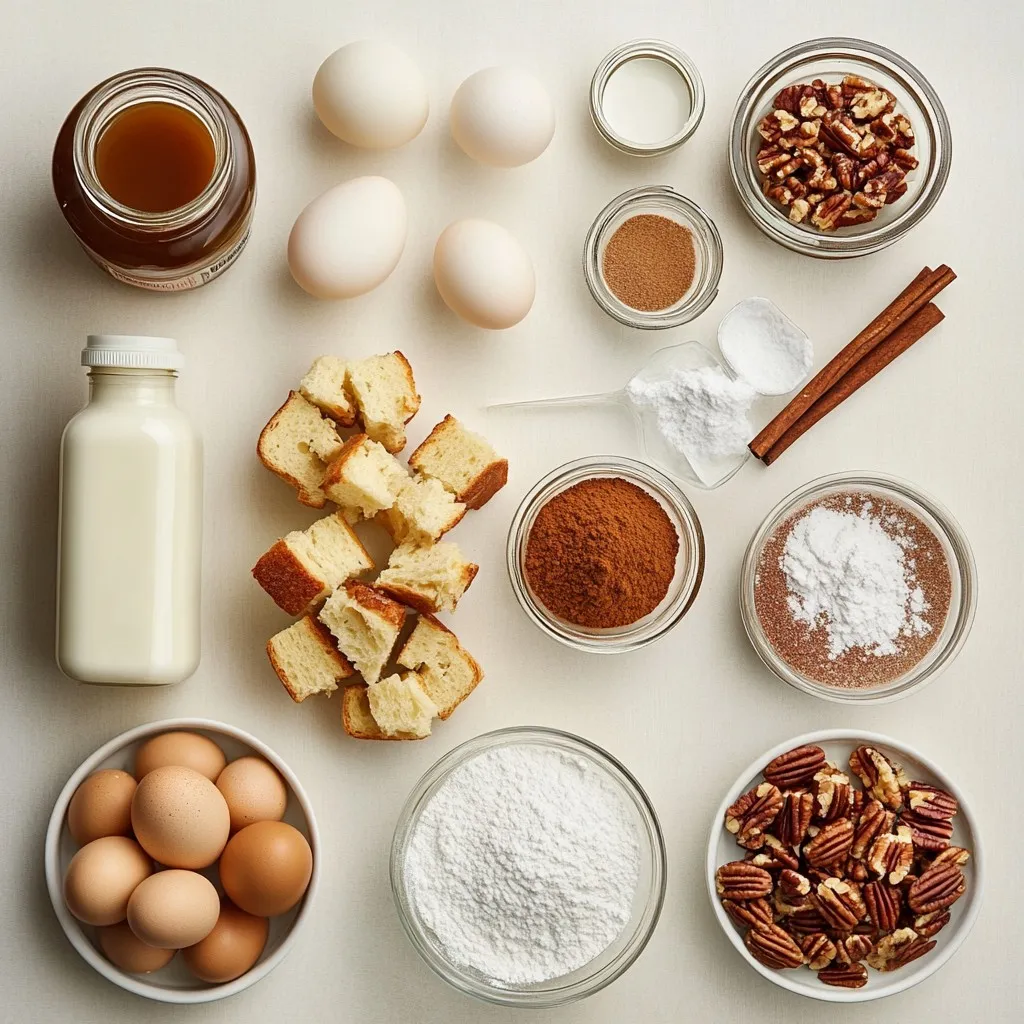
Ingredients
Main Ingredients
– 6 cups day-old brioche or challah bread, cubed
– 4 large eggs
– 2 cups whole milk
– 1 cup heavy cream
– 1 cup packed brown sugar
– 1 teaspoon vanilla extract
– 1 teaspoon ground cinnamon
– 1/2 teaspoon salt
– 1 cup chopped pecans
Each main ingredient plays an important role. The bread gives structure, while the eggs bind everything. Milk and cream add richness. Brown sugar sweetens and adds depth, while vanilla and cinnamon provide flavor. Salt brings all the tastes together, and pecans add crunch and nuttiness.
Optional Ingredients
– 1/2 cup caramel sauce (store-bought or homemade)
– Powdered sugar for dusting
The caramel sauce is key for that sweet drizzle. You can use store-bought for ease or make it at home for a personal touch. Dusting with powdered sugar adds a nice finish. It makes the dish look pretty and adds a bit of sweetness.
Step-by-Step Instructions
Preparation Steps
1. Preheat your oven to 350°F (175°C). This helps the pudding cook evenly.
2. Grease a 9×13-inch baking dish with butter or non-stick spray. This keeps the pudding from sticking.
3. In a large bowl, whisk together the eggs, milk, heavy cream, brown sugar, vanilla extract, ground cinnamon, and salt. Make sure they blend well.
Bread Soaking Process
1. Add the cubed bread into the egg mixture. Stir gently to coat each piece.
2. Let the mixture sit for about 15 minutes. This gives the bread time to soak up the liquid.
Assembling the Pudding
1. Pour half of the bread mixture into the greased baking dish.
2. Drizzle half of the caramel sauce over the bread layer. This adds sweetness.
3. Pour the rest of the mixture on top and repeat with the caramel drizzle.
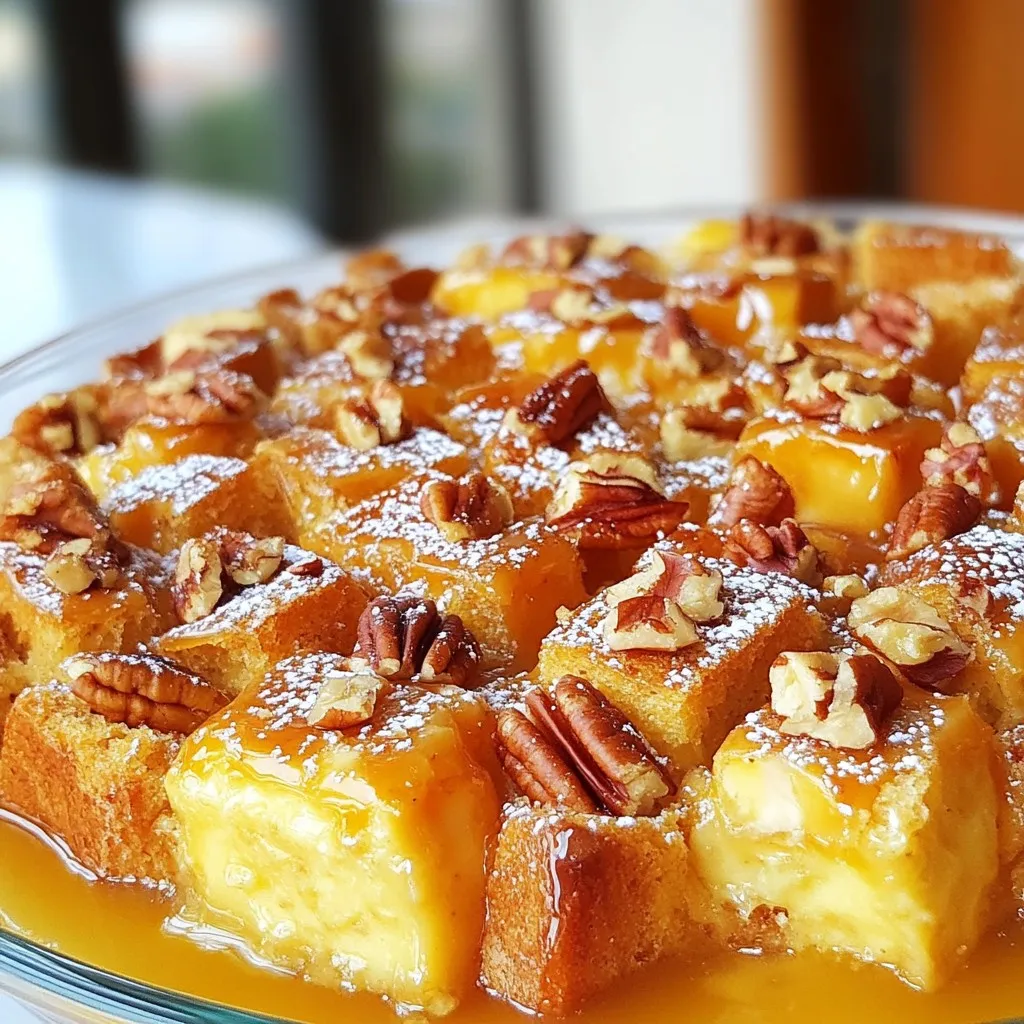
4. Bake in the oven for 45-50 minutes. The top should be golden brown. A knife inserted in the center should come out clean.
Tips & Tricks
Perfecting Your Bread Pudding
Choosing the right type of bread makes all the difference. I recommend using day-old brioche or challah bread. These breads soak up the custard well. Fresh bread can turn soggy and mushy. You want your bread to hold its shape while absorbing flavors.
To ensure even bread absorption, let your mixture sit after combining. After adding cubed bread, wait about 15 minutes. This wait allows the bread to soak up the egg mixture. Stir gently to coat each piece fully.
Serving Suggestions
For toppings, I suggest drizzling extra caramel sauce on top. A sprinkle of powdered sugar adds a nice touch too. You could also add a scoop of vanilla ice cream. It melts slightly and adds creaminess.
For presentation, serve it warm in individual ramekins. This makes it look special and inviting. Use a colorful plate to contrast with the pudding’s warm tones.
Common Mistakes to Avoid
Overbaking can dry out your bread pudding. Keep an eye on it in the oven. Test for doneness by inserting a knife into the center. If it comes out clean, your pudding is done.
Underbaking can lead to a soggy center. Adjust baking time according to your oven.
When substituting ingredients, be cautious. Using low-fat milk can change the texture. Stick to heavy cream and whole milk for the best results.
Pro Tips
- Use Stale Bread: Day-old brioche or challah works best as it absorbs the custard mixture without falling apart.
- Customize Your Nuts: If you prefer, you can substitute pecans with walnuts or almonds for a different flavor.
- Make Ahead: This bread pudding can be assembled a day in advance and stored in the refrigerator until ready to bake.
- Serving Suggestions: Serve with a scoop of vanilla ice cream or whipped cream for an indulgent dessert experience.
Variations
Flavor Variations
You can easily change the flavor of your caramel pecan bread pudding. Try adding chocolate chips for a rich twist. Dark or milk chocolate works great. You can also mix in fruits like apples, bananas, or berries. They add fresh taste and texture.
Spices and extracts can enhance flavor too. Consider adding nutmeg or allspice for warmth. A splash of almond or maple extract can add a unique note. These small changes make a big difference.
Diet-Friendly Adjustments
If you want a vegan option, you can replace eggs and dairy. Use flaxseed meal mixed with water instead of eggs. Almond or oat milk can replace whole milk. Coconut cream can work instead of heavy cream.
For gluten-free versions, choose gluten-free bread. Many brands offer tasty options. You can make your own by using gluten-free flour. This way, everyone can enjoy your dish!
Serving Size Adjustments
You can scale this recipe up or down easily. If you need more servings, just double the ingredients. Use a larger baking dish to fit the mix. For smaller gatherings, halve the recipe and use a smaller dish.
When hosting larger gatherings, consider serving it in individual ramekins. This makes for great presentation and easy serving. You can also prepare it ahead of time. Just bake it closer to serving time for the best taste.
Storage Info
Proper Storage Techniques
To keep your caramel pecan bread pudding fresh, store it properly. First, let it cool down to room temperature. Then, cover it tightly with plastic wrap or aluminum foil. This keeps the moisture in and stops it from drying out. You can also place it in an airtight container for added protection.
If you have leftovers, the pudding will last in the fridge for about three to four days. For longer storage, consider freezing it. Cut the pudding into squares for easy serving. Wrap each piece tightly in plastic wrap, then place them in a freezer bag. This method can keep it fresh for up to three months.
How to Reheat
When it’s time to enjoy your pudding again, you have two options: microwave or oven. For quick reheating, the microwave works well. Place a piece of pudding on a microwave-safe plate. Heat it for about 30 seconds to 1 minute. Check to see if it’s warm throughout.
If you prefer using the oven, preheat it to 350°F (175°C). Place the pudding in an oven-safe dish. Cover it with foil to prevent drying out. Heat for about 15-20 minutes. This method helps to keep the texture nice and soft.
To preserve the texture, avoid overheating. Overheating can make the pudding dry. Always check with a fork to see if it’s warm enough. Enjoy your delicious pudding without losing its charm!
FAQs
Common Questions
How to avoid a soggy bread pudding?
To avoid soggy bread pudding, use day-old bread. It needs to be dry enough to soak up the liquid but not too stale. Let the bread sit in the egg mixture for about 15 minutes. This helps it soak up just the right amount.
Can I prepare this recipe in advance?
Yes, you can prepare this recipe a day ahead. Just cover the dish with plastic wrap after mixing. Keep it in the fridge overnight. Bake it the next day when you’re ready to serve.
What are the best types of bread to use?
Brioche and challah work best. They are soft and rich, giving the pudding a nice texture. You can also use French bread or even sourdough if you like a bit of tang.
Substitutions and Alternatives
Can I use almond milk instead of whole milk?
Yes, almond milk can replace whole milk. Use unsweetened almond milk for a better flavor match. The pudding will still turn out great, but the taste may be slightly different.
What can I substitute for pecans?
If you don’t have pecans, walnuts are a good choice. You can also skip nuts if preferred. Or, try using chocolate chips for a sweet twist.
Serving and Pairing Suggestions
What drinks pair well with caramel pecan bread pudding?
Coffee or tea pairs nicely with this dessert. A glass of sweet dessert wine also works well. If you want something cold, try a sweet iced tea.
How to serve with ice cream or whipped cream?
Serve warm bread pudding with a scoop of vanilla ice cream. Drizzle extra caramel on top for added flavor. You can also use whipped cream for a lighter touch.
Making caramel pecan bread pudding is fun and rewarding. We talked about essential ingredients like brioche, eggs, and cream. I described how to prepare it step-by-step for great results. Remember to choose your bread wisely and avoid common mistakes.
In the end, you can customize your pudding with flavors or diet-friendly swaps. Whether you serve it fresh or store leftovers, this dish is sure to impress. Enjoy your cooking adventur

![To make these vegan chocolate chip cookies, you will need a few key ingredients. Each one plays a special role in creating the perfect texture and flavor. Here’s the list of ingredients: - 1 cup almond flour - 1 cup all-purpose flour - 1/2 teaspoon baking soda - 1/2 teaspoon baking powder - 1/4 teaspoon salt - 1/2 cup coconut sugar - 1/2 cup maple syrup - 1/3 cup coconut oil, melted - 1 teaspoon vanilla extract - 1/2 cup vegan chocolate chips - 1/4 cup chopped walnuts (optional) Almond flour adds a nice, nutty flavor and keeps the cookies soft. All-purpose flour gives the cookies structure. Baking soda and baking powder help them rise. Coconut sugar sweetens the cookies while adding a hint of caramel flavor. Maple syrup adds moisture and sweetness. Coconut oil gives a lovely richness and helps with texture. Vanilla extract enhances the flavor of the chocolate chips. Vegan chocolate chips are a must for that classic taste. If you like nuts, walnuts add a crunchy touch. For the full recipe, follow the instructions carefully, and you’ll create cookies that everyone will love! 1. Preheating the oven First, set your oven to 350°F (175°C). This step helps the cookies bake evenly. While the oven heats, get your baking sheet ready by lining it with parchment paper. 2. Mixing dry ingredients In a big bowl, combine the almond flour, all-purpose flour, baking soda, baking powder, and salt. Use a whisk to blend them well. This ensures the leavening agents work when baking. 3. Combining wet ingredients In another bowl, mix the melted coconut oil, coconut sugar, maple syrup, and vanilla extract. Stir until it looks smooth. This mixture brings sweetness and flavor to your cookies. 1. Mixing wet and dry ingredients Pour the wet mix into the dry mix. Stir until no flour streaks show. The dough should be slightly sticky. This texture helps the cookies hold together. 2. Folding in chocolate chips and walnuts Gently fold in the vegan chocolate chips and walnuts if you choose to use them. Make sure they are evenly spread throughout the dough. This adds a delightful crunch and flavor. 1. Shaping the cookies Scoop tablespoon-sized portions of the dough. Roll them into balls and place them on your prepared baking sheet, leaving space between each ball. They will spread as they bake. 2. Baking time and tips for doneness Press each ball down gently with your palm to flatten it a bit. Bake for 10 to 12 minutes. Look for lightly golden edges. The cookies will seem soft but will firm up as they cool. Enjoy the aroma wafting through your kitchen! For the complete recipe, check out the Full Recipe. To get the best texture, start with room-temperature ingredients. When your coconut oil is melted but not hot, it blends well. Cold ingredients can lead to uneven mixing and odd textures. Use baking soda for a nice spread and chewiness. Baking powder adds lift but may make cookies puffier. You want a balance, so stick with 1/2 teaspoon of each, as this recipe suggests. To make your cookies pop, think about adding extracts or spices. A little cinnamon or a dash of nutmeg can elevate the flavor. You can also try almond or orange extract for a fun twist! If you're feeling adventurous, swap out chocolate chips. Try peanut butter chips, white chocolate, or even dried fruit. Each choice brings a new taste to the classic cookie. If your cookies spread too much, check your oven temperature. An oven that runs hot can cause this problem. You can also chill the dough for about 30 minutes before baking. This helps the dough hold its shape better. For cookies that are too crumbly, make sure to measure your flour correctly. Too much flour can lead to a dry texture. Add a small splash of almond milk to bring the dough together if needed. {{image_2}} If you want a gluten-free version of these cookies, you can use different flours. Try using all almond flour or a mix of almond and oat flour. You can also use a gluten-free flour blend. This keeps the texture nice and soft while making it safe for those with gluten sensitivities. Switching up the chocolate chips can bring new life to your cookies. You can use dark chocolate chips, white chocolate chips, or even peanut butter chips. You can also add fruits like dried cranberries or chopped bananas for a twist. If you enjoy nuts, consider adding chopped pecans or hazelnuts for a crunchy bite. Get creative with seasonal flavors! For fall, try adding pumpkin spice to the dough. This gives your cookies a warm and cozy taste. During the holidays, consider using peppermint extract or festive sprinkles. You can even shape the cookies into fun holiday designs. This makes them a perfect treat for any celebration! For the full recipe, check out the [Full Recipe]. To keep your vegan chocolate chip cookies fresh, store them in an airtight container. This method helps retain moisture and keeps them soft. You can place a slice of bread in the container to absorb any excess air. This trick works wonders for keeping cookies fresh longer. If you plan to eat them in a few days, simply store them at room temperature. For longer storage, freezing cookies is a great choice. Let the cookies cool completely before freezing. Place them in a single layer on a baking sheet. Once frozen solid, transfer them to a freezer-safe bag or container. Label the bag with the date. Frozen cookies can last up to three months. When you crave a treat, just pull one out and let it thaw. To enjoy leftover cookies, reheating is key. Preheat your oven to 350°F (175°C). Place the cookies on a baking sheet and warm for about 5 to 8 minutes. This will restore their soft, gooey texture. Alternatively, you can microwave them for 10-15 seconds. Just be careful not to overheat, or they may get tough. Enjoy every bite of those delicious cookies! Can I use regular flour instead of almond flour? Yes, you can use regular flour. However, almond flour adds a nice nutty taste. It also makes the cookies moist. If you swap it out, use a little less all-purpose flour. How long do these cookies last? These cookies can last up to a week in an airtight container. If you want them fresher, store them in the fridge. You can also freeze them for up to three months. Can I substitute maple syrup with another sweetener? Yes, you can use agave syrup or brown sugar. Both will work well. Just remember, each sweetener has its own taste and may change the cookie's texture a bit. What can I use instead of coconut sugar? You can use brown sugar or cane sugar as a substitute. Coconut sugar has a rich flavor, but the others will work in a pinch. Just keep in mind the sweetness level might change slightly. Do I need to chill the dough before baking? No, chilling the dough is not necessary. Chilling can help if you want thicker cookies. But for these cookies, you can bake them right after mixing. Can I add additional toppings to these cookies? Absolutely! You can add nuts, dried fruit, or even more chocolate chips. Feel free to get creative and experiment with flavors. You can create delicious vegan chocolate chip cookies with simple steps and great ingredients. We covered how to mix your dry and wet items, shape your cookies, and bake them perfectly. I shared tips for the best texture and flavor, along with common issues you might face. You now have options for gluten-free variations and how to store your cookies. Bake these cookies and enjoy every bite!](https://dailydishly.com/wp-content/uploads/2025/07/ef525e3c-3cc1-498f-b5ee-30e7bbeeb1ea-768x768.webp)