
Mexican Street Corn Salad Flavorful and Fresh Delight

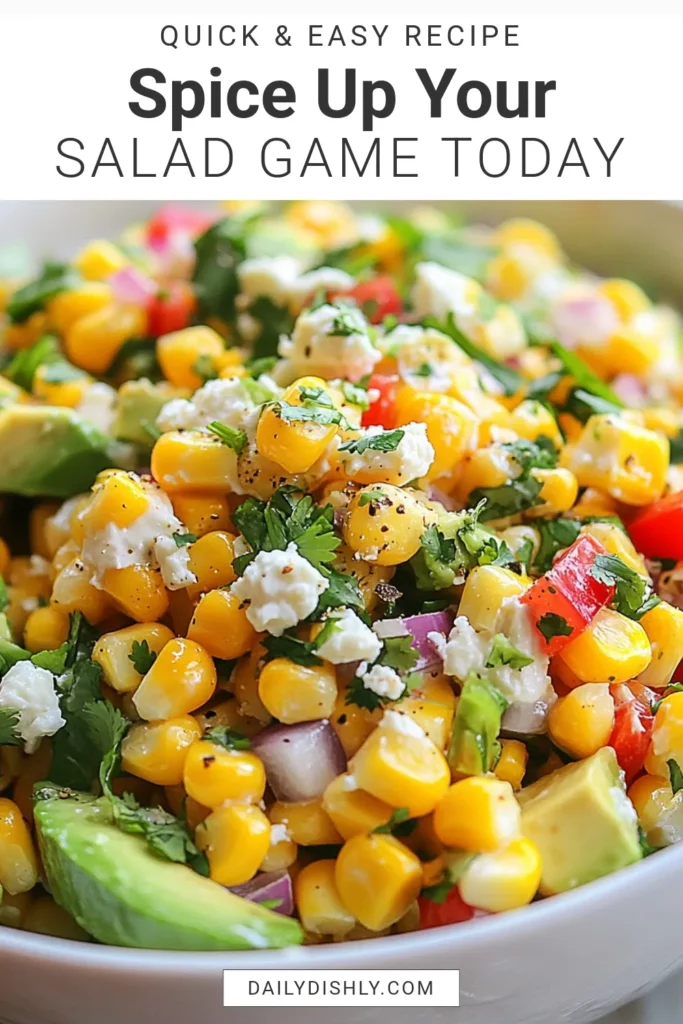
Are you ready to brighten your plate with a burst of flavor? Mexican Street Corn Salad is a colorful, fresh delight you’ll want to make again and again. This dish combines sweet corn, bright veggies, and zesty spices for an irresistible treat. In this guide, I’ll walk you through the key ingredients, easy steps, and fun variations to customize your salad. Let’s dive into the delicious world of Mexican Street Corn Salad!
Why I Love This Recipe
- Fresh and Flavorful: This salad combines the sweet, smoky taste of grilled corn with vibrant vegetables and fresh herbs, creating a dish that bursts with flavor.
- Easy to Prepare: With minimal cooking and simple ingredients, this salad can be whipped up in just 30 minutes, making it perfect for busy weeknights or last-minute gatherings.
- Versatile Dish: This salad works as a side or a main, and you can easily customize it by adding proteins like grilled chicken or shrimp, or adjusting the spice level to suit your taste.
- Healthier Option: Packed with fresh veggies and healthy fats from avocado, this salad is a nutritious choice that doesn’t compromise on taste, making it a guilt-free indulgence.
Ingredients
Main Ingredients
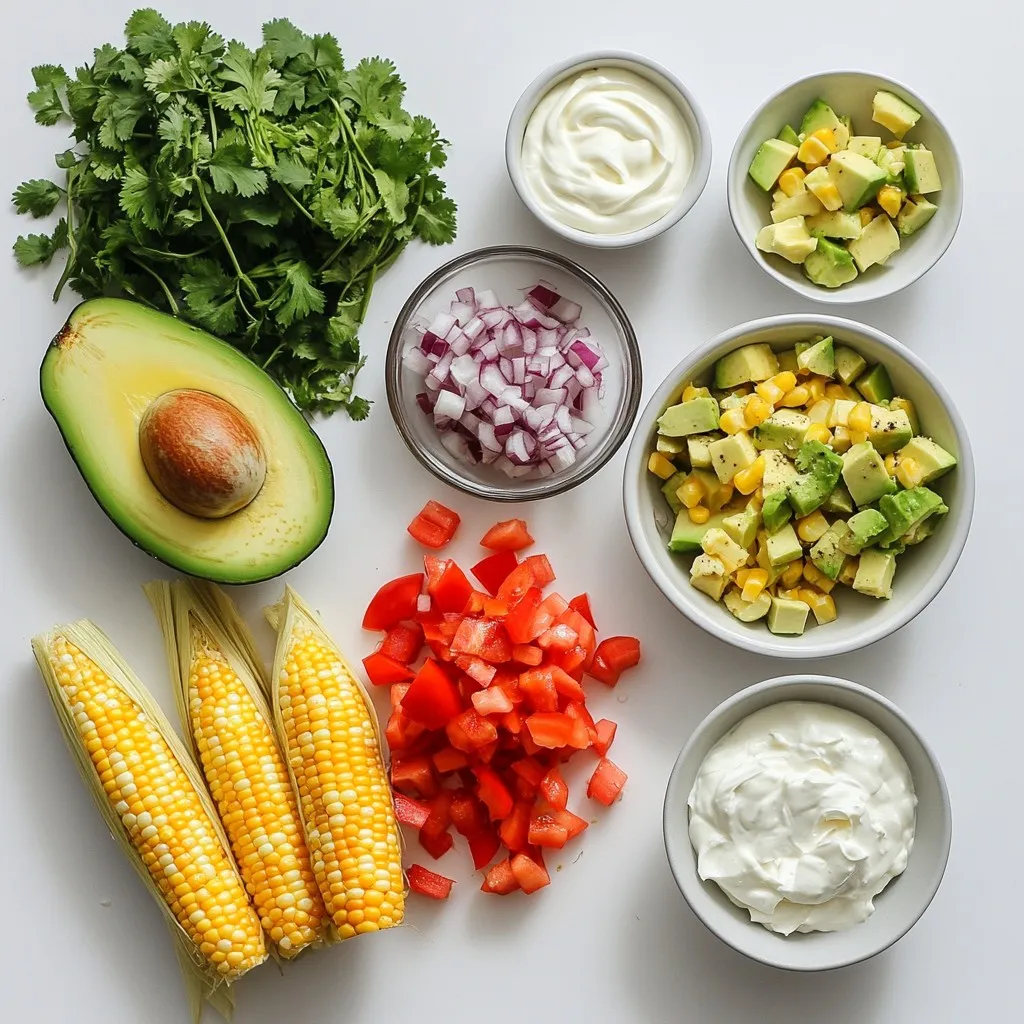
To make a delicious Mexican street corn salad, you need some key items. Here is a list of the essential components:
– 4 ears of corn, husked
– 1 red bell pepper, diced
– 1/4 cup red onion, finely chopped
– 1/2 cup crumbled queso fresco
– 1/4 cup fresh cilantro, chopped
– 2 tablespoons mayonnaise
– 1 tablespoon sour cream
– 1 tablespoon lime juice
– 1 teaspoon chili powder
– Salt and pepper to taste
– 1 avocado, diced (optional)
The corn gives the salad a sweet flavor. The red bell pepper and red onion add crunch and color. Queso fresco provides a creamy, salty touch. The cilantro adds a fresh taste, while the lime juice gives it a zesty kick.
Measurements and Variations
Here are the detailed measurements for each ingredient:
– Corn: 4 ears
– Red bell pepper: 1, diced
– Red onion: 1/4 cup, finely chopped
– Queso fresco: 1/2 cup, crumbled
– Fresh cilantro: 1/4 cup, chopped
– Mayonnaise: 2 tablespoons
– Sour cream: 1 tablespoon
– Lime juice: 1 tablespoon
– Chili powder: 1 teaspoon
– Salt and pepper: to taste
– Avocado: 1, diced (optional)
You can personalize this salad easily. Add diced jalapeños for heat or mango for sweetness. If you prefer a vegan option, substitute the mayo and cheese with plant-based versions. This way, you can make it fit your taste and dietary needs.
Step-by-Step Instructions
Preparing the Corn
To make this salad, start by grilling the corn. First, husk the corn. Then, preheat your grill to medium-high heat. Place the corn directly on the grill grates. Grill it for about 10-12 minutes. Turn the corn occasionally until it gets slightly charred. This adds a nice smoky flavor.
After grilling, carefully remove the corn. Let it cool until it’s safe to handle. Cut the kernels off the cob using a sharp knife. Hold the cob upright in a bowl to catch the kernels as you cut them. This helps avoid a mess!
Mixing Ingredients
Next, combine all the salad ingredients. In a large mixing bowl, add the grilled corn, diced red bell pepper, finely chopped red onion, and crumbled queso fresco. Each of these ingredients brings its own flavor and texture to the dish.
Now, let’s prepare the dressing. In a small bowl, mix together the mayonnaise, sour cream, lime juice, chili powder, salt, and pepper. Stir until smooth. This creamy dressing ties everything together.
Final Assembly
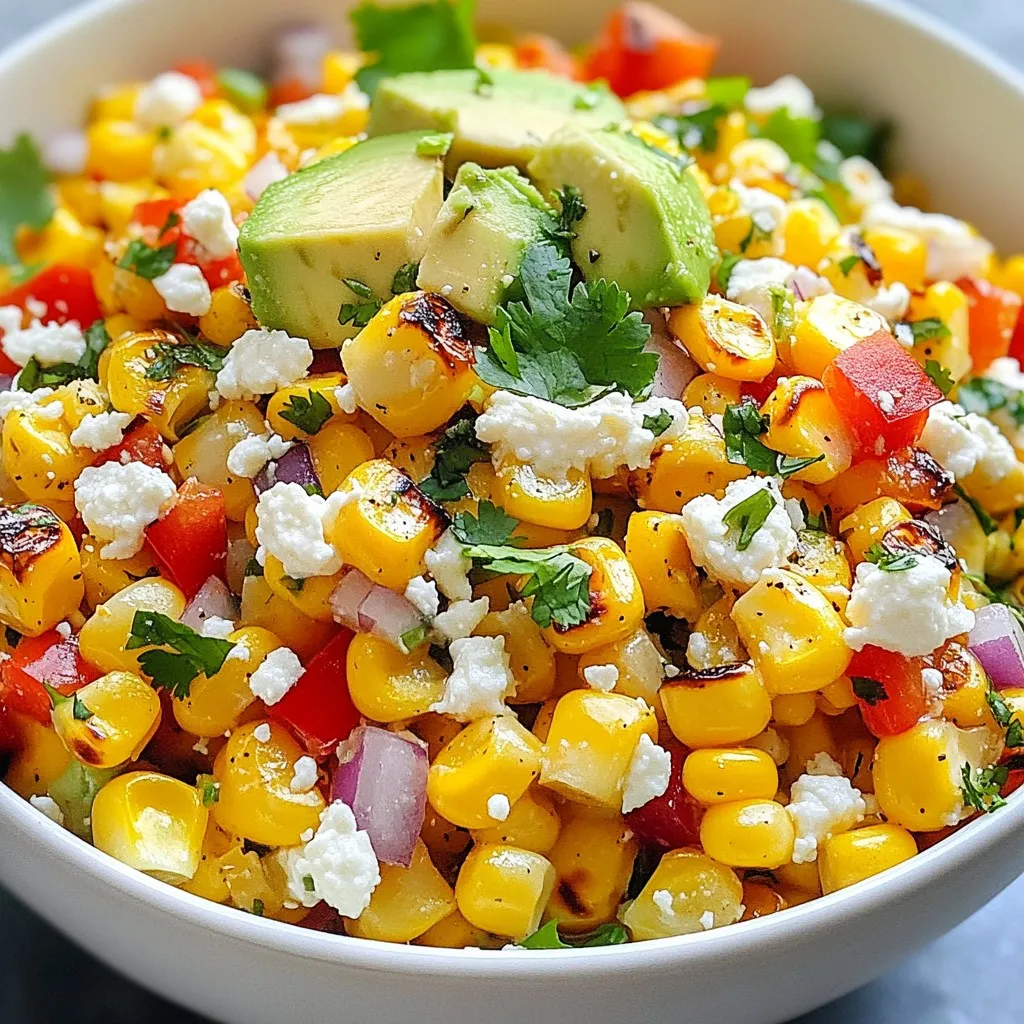
Finally, it’s time to assemble the salad. Pour the dressing over the corn mixture. Gently toss everything until well combined. If you want extra creaminess, fold in diced avocado. This adds a rich texture.
To finish, stir in the fresh cilantro. This herb gives a bright taste. Taste the salad and adjust the seasoning if needed. For serving, use a colorful bowl. You can garnish with extra cilantro and a sprinkle of chili powder for an added pop of color. Enjoy!
Tips & Tricks
Ensuring Flavor and Texture
To enhance the taste of your Mexican street corn salad, focus on seasoning. Use salt and pepper to bring out the flavors. I like to sprinkle a bit of chili powder for a kick. If you want a creamier texture, consider adding ripe avocados. They add richness and a smooth feel to the salad. Choose ripe avocados that yield slightly when pressed. This shows they are ready to eat.
Grilling Techniques
For perfect grill marks, preheat your grill to medium-high heat. Grill the corn for about 10-12 minutes. Turn it often to get an even char. If you can’t grill, you can boil the corn or roast it in the oven. Both methods work well, but grilling gives the best flavor.
Serving Suggestions
When serving your salad, use a colorful bowl to make it pop. Top it with extra cilantro or a sprinkle of chili powder. This adds visual appeal. Pair the salad with grilled chicken or fish for a complete meal. It also goes well with tortilla chips or a fresh salsa on the side.
Pro Tips
- Grill to Perfection: Ensure your grill is preheated to medium-high heat for optimal charring of the corn. This adds a smoky flavor that enhances the overall taste of the salad.
- Fresh Corn is Best: Use fresh corn on the cob when in season for the sweetest flavor. If fresh corn isn’t available, frozen corn can be a good substitute; just thaw and drain it before use.
- Customize Your Heat: Adjust the chili powder according to your spice preference. For a milder version, reduce the amount, or for extra heat, add a pinch of cayenne pepper or diced jalapeños.
- Serving Suggestions: This salad can be served as a side dish or a topping for grilled meats. It’s also great on its own as a light lunch, so get creative with your serving options!
Variations
Flavor Enhancements
To make your Mexican street corn salad even better, think about adding spices. If you love heat, add jalapeños or a pinch of cayenne pepper. These spices give the salad a nice kick. You can also add mango or pineapple for a tropical twist. These fruits add sweetness and a fun flavor.
Dietary Substitutions
If you want a vegan salad, you can swap out the mayo for vegan mayo. You can also use a dairy-free cheese instead of queso fresco. This keeps the salad creamy without any animal products. For gluten-free options, you’re in luck! All the main ingredients are gluten-free. Just check your mayo and any added spices to be sure.
Seasonal Ingredients
Using seasonal vegetables can change the flavor of your salad. In summer, add diced cucumber or cherry tomatoes for freshness. In fall, consider roasted butternut squash for a cozy touch. Adjust the salad to match different seasons for varied tastes and colors. This keeps your dish fun, fresh, and exciting all year long.
Storage Info
Making Ahead
You can make this salad ahead of time. It saves you time on busy days. Prepare the corn salad but leave out the avocado. The avocado may brown quickly. Store the salad in an airtight container in the fridge.
To store leftovers, keep them in the same airtight container. You can eat the leftovers cold or heat them up later. Just remember to add fresh avocado if you want that creamy touch.
Storing Techniques
Use glass or plastic containers with tight lids. These containers help keep the flavors fresh. The salad stays good for about 3 to 4 days in the fridge. Check for any signs of spoilage before eating. If it smells off, throw it out.
Reheating Guidelines
To serve leftover salad, you can enjoy it cold right from the fridge. If you want to warm it up, heat it gently in a pan. Avoid high heat as it can make the salad mushy.
If the salad feels dry after a few days, add a splash of lime juice. This will refresh the flavors and make it taste bright again.
FAQs
What is Mexican Street Corn Salad?
Mexican Street Corn Salad is a bright and tasty dish. It features grilled corn, fresh veggies, and creamy dressing. This salad comes from the popular Mexican street food called elote. Vendors grill corn on the cob and serve it with toppings. My salad takes those flavors and mixes them into a bowl. The result is a colorful, flavorful dish that everyone loves.
Can I use canned corn?
Yes, you can use canned corn in this salad. Canned corn is convenient and saves time. However, fresh corn has a sweeter taste and better texture. Grilling fresh corn adds a nice smoky flavor. If you use canned corn, rinse it well to remove extra salt. It can work, but fresh corn is best for this dish.
How long can I keep the salad in the fridge?
You can store Mexican Street Corn Salad in the fridge for up to three days. Keep it in an airtight container to stay fresh. The flavors will blend more over time, making it even tastier. Just remember, if it has avocado, it may not last as long. The avocado can brown and change the look of the salad. Enjoy it fresh for the best taste!
In this post, we explored the delightful Mexican Street Corn Salad. We discussed the main ingredients, like corn and cheese, along with measurements and fun variations. You learned step-by-step instructions for preparation, mixing, and serving. Plus, we shared tips for enhancing flavor and texture.
To wrap it up, this salad is easy to customize and great for any occasion. Enjoy making it your own with fresh, seasonal ingredient

Zesty Mexican Street Corn Salad
Ingredients
- 4 ears corn, husked
- 1 whole red bell pepper, diced
- 0.25 cup red onion, finely chopped
- 0.5 cup crumbled queso fresco
- 0.25 cup fresh cilantro, chopped
- 2 tablespoons mayonnaise
- 1 tablespoon sour cream
- 1 tablespoon lime juice
- 1 teaspoon chili powder
- to taste salt and pepper
- 1 whole avocado, diced (optional)
Instructions
- Preheat your grill to medium-high heat.
- Grill the corn directly on the grill grates for about 10-12 minutes, turning occasionally until slightly charred and cooked.
- Remove the corn from the grill and let it cool. Once cool enough to handle, cut the kernels off the cob and transfer into a large mixing bowl.
- Add in the diced red bell pepper, chopped red onion, and crumbled queso fresco to the bowl with the corn.
- In a small bowl, mix together the mayonnaise, sour cream, lime juice, chili powder, salt, and pepper until smooth.
- Pour the dressing over the corn mixture and gently toss everything together until well combined.
- If using, fold in the diced avocado for added creaminess and richness.
- Lastly, stir in the fresh cilantro for a burst of flavor.
- Taste and adjust seasoning if necessary before serving.


![To make Honey Sriracha Brussels Sprouts, gather the following ingredients: - 1 pound Brussels sprouts, trimmed and halved - 3 tablespoons olive oil - 2 tablespoons honey - 2 tablespoons Sriracha sauce - 1 teaspoon garlic powder - Salt and pepper to taste - Optional garnish: 1 tablespoon sesame seeds - Optional garnish: 2 green onions, chopped Each ingredient plays a key role. The Brussels sprouts give a hearty base. Olive oil helps to crisp them up. Honey adds sweetness, while Sriracha brings heat. Garlic powder enhances flavor. Salt and pepper bring everything together. If you want to add flair, sprinkle sesame seeds and green onions on top. You can find the full recipe in the article. Enjoy the sweet and spicy blend! - Preheat your oven to 425°F (220°C). - Line a large baking sheet with parchment paper. - In a large bowl, mix the halved Brussels sprouts, olive oil, honey, Sriracha sauce, garlic powder, salt, and pepper. - Toss well to coat each sprout evenly. - Spread the Brussels sprouts on the baking sheet, cut side down. - Roast for 20-25 minutes until they are tender and crispy. I love the way the heat from the Sriracha blends with the sweetness of honey. It creates a perfect balance. The garlic powder adds a subtle depth. Remember, tossing halfway helps them cook evenly. If you want to know more, check out the Full Recipe for all the details! To get crispy Brussels sprouts, start with fresh sprouts. Make sure to trim and halve them. Oven heat is key; preheat to 425°F (220°C). Use a baking sheet lined with parchment paper. This helps with cleanup and browning. Toss the sprouts halfway through cooking. This ensures even heat and crispiness. If you skip this step, some may burn while others stay soggy. For extra flavor, think about adding spices. A pinch of cayenne or paprika can bring heat. Fresh herbs like thyme or rosemary also work great. They add depth to the sweet and spicy mix. Try different types of honey or Sriracha, too. Each honey has its own unique taste. You might prefer a lighter honey for a sweet touch. A spicier Sriracha can kick up the heat. Experiment and find your favorite mix. For the full recipe, check out the details above. {{image_2}} You can swap Brussels sprouts for other veggies. Broccoli, cauliflower, or green beans work well. Each adds a unique taste and texture. Try mixing these veggies for fun flavors. You can also explore different sauces. Instead of honey and Sriracha, use teriyaki or balsamic glaze. This change will give you a new flavor profile. Want to make this recipe vegan? Replace honey with maple syrup or agave nectar. This keeps the sweet taste without animal products. You can also make it gluten-free. Just ensure your Sriracha and any other sauces are gluten-free. For low-carb options, skip the honey or use a sugar substitute. This keeps the dish tasty while reducing carbs. Check the [Full Recipe] for more ideas on how to adapt this dish! To keep your Honey Sriracha Brussels sprouts fresh, store leftovers in the fridge. Place them in an airtight container. This helps keep the flavors intact. Make sure to cool them down first. If you plan to eat them soon, they can last up to four days. For longer storage, you can freeze them. Use a freezer-safe bag or container. Make sure to remove as much air as possible. They can last up to three months in the freezer. When you're ready to enjoy your Brussels sprouts again, reheating is key. The best method is using an oven. Preheat it to 350°F (175°C). Spread the sprouts on a baking sheet. Heat for about 10-15 minutes. This will help keep them crispy. If you're in a hurry, you can use a microwave. Place them in a microwave-safe dish. Heat in short bursts of 30 seconds. Check often to avoid sogginess. To keep that crunch, try reheating in a skillet. Just a few minutes over medium heat will do the trick. Enjoy the sweet and spicy goodness of these Brussels sprouts again! For the full recipe, check the earlier section. What do I serve with Honey Sriracha Brussels Sprouts? You can serve these sprouts with rice or quinoa. They also pair well with grilled chicken or fish. For a hearty meal, try them alongside a steak. The sweet and spicy flavors complement many dishes. Can I use frozen Brussels sprouts for this recipe? Yes, you can use frozen Brussels sprouts. Just thaw them first and pat them dry. This helps to get a nice crispy texture. The cooking time may be a bit longer, so keep an eye on them. How spicy are these Brussels sprouts? The heat level depends on how much Sriracha you use. Two tablespoons give a nice kick, but you can adjust it to your taste. If you prefer less heat, use one tablespoon of Sriracha. How do I make the recipe ahead of time? You can prepare the Brussels sprouts up to a day in advance. Toss them in the sauce and store in the fridge. When ready to cook, spread them on the baking sheet and roast as directed. Can I make this on the stovetop? Yes, you can cook these on the stovetop. Heat oil in a large pan over medium heat. Add the Brussels sprouts cut side down and cook until browned. Then, toss them with the sauce and cover to steam until tender. What are some popular side dishes to pair with it? Some great side dishes include mashed potatoes or a fresh salad. You can also serve them with roasted carrots or sweet potatoes for a colorful plate. These sides balance the flavors well. You learned how to make delicious Honey Sriracha Brussels sprouts. Using simple ingredients, we created the perfect balance of sweet and spicy flavors. I shared tips for achieving that crispy texture and ideas for variations, like different veggies or sauces. Don’t forget the best storage and reheating methods to keep them tasty. Enjoy these sprouts as a side dish or a fun main course. Cooking can be easy and satisfying. Try it out, and make it your own!](https://dailydishly.com/wp-content/uploads/2025/06/e27bd237-cd9d-45ea-93fd-8494cb919a9a-768x768.webp)