
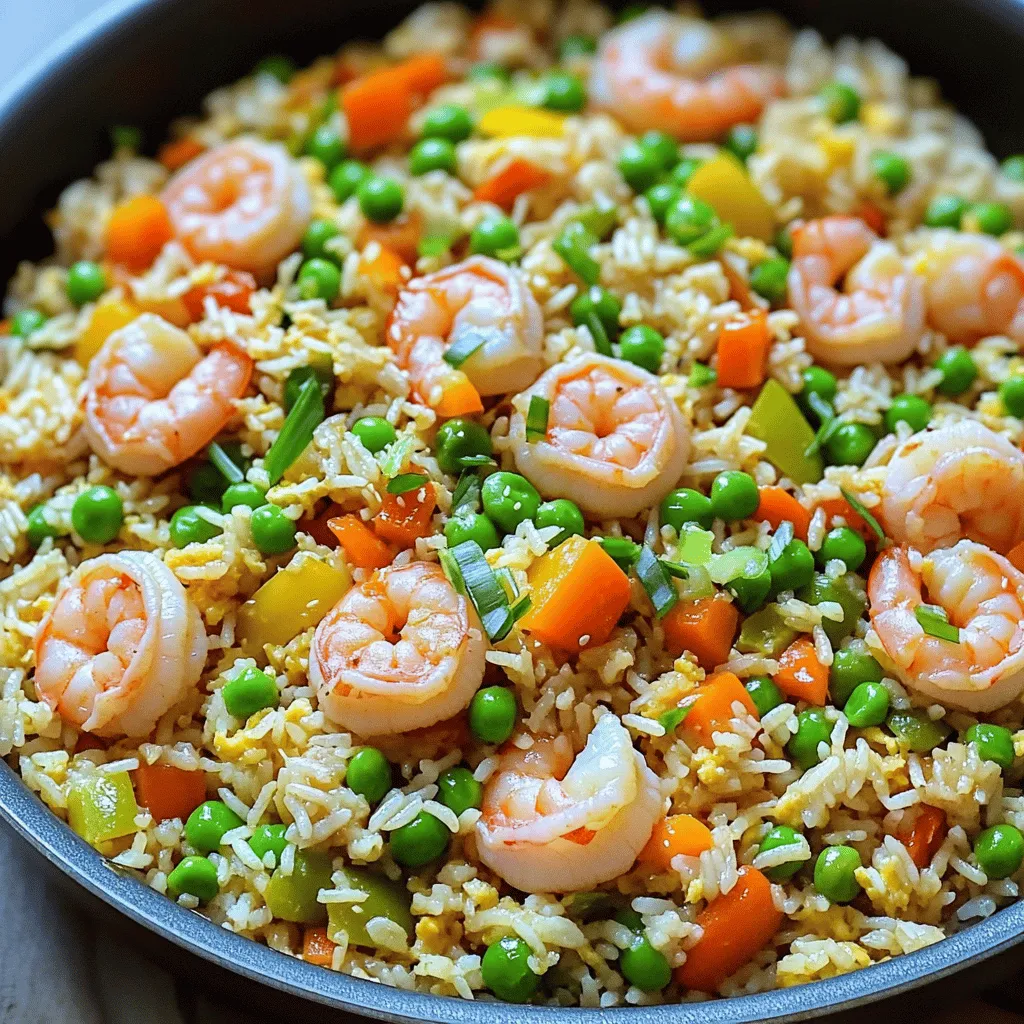
Easy Shrimp Fried Rice Quick and Flavorful Recipe

Are you ready to whip up a delicious and quick meal? This Easy Shrimp Fried Rice recipe is your answer! With simple ingredients and easy steps, you’ll be serving up a flavorful dish in no time. Whether you’re a busy parent or a cooking newbie, this meal makes dinner stress-free. Let’s dive into this tasty and satisfying recipe that you can enjoy any day of the week!
Ingredients
Main Ingredients for Easy Shrimp Fried Rice
– 1 cup uncooked jasmine rice
– 1 pound shrimp, peeled and deveined
– 2 tablespoons vegetable oil
Additional Ingredients
– 2 cloves garlic, minced
– 1 cup mixed vegetables (peas, carrots, bell peppers)
– 3 tablespoons soy sauce
Optional Ingredients
– 1 tablespoon sesame oil
– Green onions, sliced (for garnish)
In this recipe, I use jasmine rice for its soft texture and great flavor. The shrimp adds protein and a touch of sweetness. Vegetable oil helps to fry everything nicely and keeps it from sticking.
Garlic gives a wonderful aroma and taste. Mixed vegetables add color and crunch. Soy sauce provides that savory umami flavor. If you like, you can use sesame oil for a nutty twist, and green onions make a fresh garnish.
This easy shrimp fried rice recipe is perfect for busy nights.
Step-by-Step Instructions
Preparing the Rice
– Rinse the jasmine rice until water runs clear. This helps remove excess starch.
– Cook rice with water or low-sodium chicken broth. This adds great flavor to the rice.
Sautéing the Aromatics and Shrimp
– Heat vegetable oil in a large skillet over medium-high heat. This is where the magic starts.
– Sauté minced garlic and chopped onion until fragrant and soft. It takes about 2-3 minutes.
– Add the shrimp to the skillet. Cook until they turn pink and opaque, about 2-3 minutes. This step locks in flavor.
Mixing Ingredients Together
– Add mixed vegetables to the skillet. Cook them until tender, which should take another 2-3 minutes.
– Push the veggies to one side of the skillet. Pour in the beaten eggs on the other side and scramble them.
– Mix in the cooled rice along with the shrimp. Stir everything together for a perfect blend.
– Drizzle soy sauce and sesame oil over the mixture. Stir well to combine and season with salt and pepper. Cook for 2-3 minutes until heated through.
– Garnish with sliced green onions before serving. This adds a nice, fresh touch.Enjoy your quick and tasty meal!
Tips & Tricks
Perfecting Your Shrimp Fried Rice
To cook rice perfectly, start with rinsing jasmine rice. Rinse until the water runs clear. This step removes extra starch and helps prevent clumping. Use a pot with a tight lid. Combine 1 cup of rinsed rice with 2 cups of water or low-sodium chicken broth. Bring it to a boil, then lower the heat and cover. Let it simmer for about 15 minutes. Fluff the rice with a fork and let it cool before mixing.
For frying, I recommend vegetable oil for its high smoke point. You can also use peanut oil for a nutty flavor. Both oils work well for high heat cooking.
Enhancing Flavor
Using fresh ingredients adds vibrant taste and texture. Fresh shrimp gives a juicy bite, while fresh veggies bring color. Frozen ingredients are okay but may lack the same crunch. If you use frozen, thaw and drain them well before cooking.
Adjust the soy sauce based on your taste. Start with 3 tablespoons and taste as you go. If you like it saltier, add more. For a milder flavor, try low-sodium soy sauce or tamari.
Timing and Temperature
High heat is key for great fried rice. It helps achieve that perfect crispy texture. Heat your pan before adding oil. Once the oil shimmers, add garlic and onion. This step ensures they are fragrant and cooked well.
Cook the shrimp first, then set it aside. Next, add the veggies. This cooking order keeps everything fresh and flavorful. Finally, mix everything together at high heat. This method ensures every bite is delicious.
Variations
Protein Alternatives
You can swap out shrimp for chicken or tofu. Chicken gives a hearty taste. Just cook it until golden brown. Tofu adds a nice texture and can soak up all the flavors. For a vegetarian version, skip the eggs. You can still enjoy a tasty meal.
Veggie Add-Ins
Feel free to customize with your favorite vegetables. Peas and carrots work well. Bell peppers add a nice crunch. You can also add broccoli or corn. If you like heat, toss in some chili peppers or a splash of sriracha. These spicy additions will kick up the flavor.
Sauces and Seasonings
Try different sauces to enhance the taste. Sweet soy sauce adds a fun twist. You can also use oyster sauce for more depth. If you need gluten-free options, use tamari instead of regular soy sauce. It tastes great and keeps the dish safe for everyone.
Storage Info
Storing Leftovers
To keep your shrimp fried rice fresh, store it in the refrigerator. Use an airtight container to prevent moisture loss. Make sure it cools down before sealing the container. This helps avoid soggy rice. You can store it for up to four days.
If you want to freeze it, let the fried rice cool completely. Then, place it in a freezer-safe bag or container. Remove as much air as possible to prevent freezer burn. It can last for about three months in the freezer.
Reheating Instructions
Reheating fried rice can be tricky. You want to keep it tasty and not mushy. The best method is to use a skillet. Heat a little oil over medium heat. Add the fried rice and stir it gently. This warms it through without losing its texture.
You can also use the microwave. Place the rice in a bowl and cover it with a damp paper towel. Heat it in 30-second bursts, stirring in between. This method helps keep the rice moist.
Shelf Life
Shrimp fried rice is best enjoyed fresh. However, when stored properly, it can last. In the fridge, it stays good for about four days.
Keep an eye out for signs that it has gone bad. If it smells sour or has strange colors, it is time to throw it away. Always trust your nose and eyes when it comes to food safety.
FAQs
How do I make shrimp fried rice from scratch?
To make shrimp fried rice from scratch, follow these key steps:
1. Rinse the rice until the water is clear. This removes extra starch.
2. Cook the rice using water or chicken broth. This adds flavor.
3. Heat vegetable oil in a large skillet. Sauté garlic and onion until soft.
4. Add shrimp to the skillet. Cook until they turn pink.
5. Stir in mixed vegetables and cook until tender.
6. Push everything to one side and scramble eggs on the other side.
7. Mix in the cooled rice with the shrimp and veggies.
8. Drizzle soy sauce and sesame oil over the mix.
9. Stir well and season with salt and pepper to taste.
This method makes a tasty and quick meal.
What is the best rice to use for fried rice?
The best rice for fried rice is jasmine rice. Here’s why:
– Texture: Jasmine rice has a light, fluffy texture. This helps it separate easily when frying.
– Flavor: It has a subtle floral aroma that enhances the dish.
– Comparison: Long-grain rice works too, but it may not have the same flavor. Short-grain rice can be sticky, which isn’t ideal for fried rice.
Using jasmine rice gives your dish the best taste and texture.
Can I make shrimp fried rice ahead of time?
Yes, you can make shrimp fried rice ahead of time. Here are some tips:
– Prep in Advance: Cook the rice a day before. Cool it and store it in the fridge.
– Store Properly: Keep cooked shrimp and veggies separate until you are ready to fry them.
– Reheat with Care: When you are ready to serve, use a hot skillet. This helps bring back the texture.
Making this dish ahead of time can save you cooking time later!
Shrimp fried rice is simple and tasty. We covered key ingredients, step-by-step instructions, and helpful tips. You can use different proteins or veggies to change things up. Storing and reheating is easy with the right methods. With this guide, you can make perfect shrimp fried rice at home. Enjoy personalizing it to fit your taste. Cook it well, and it’ll be a hit every time!


![- 1 zucchini, sliced into thick rounds - 1 yellow bell pepper, sliced into strips - 1 red bell pepper, sliced into strips - 1 red onion, cut into wedges - 1 cup cherry tomatoes - 3 tablespoons olive oil - Zest and juice of 1 lemon - 2 teaspoons dried oregano - 2 teaspoons dried thyme - 2 cloves garlic, minced - Salt and pepper to taste - Fresh parsley, chopped (for garnish) When I create Lemon Herb Grilled Vegetables, I focus on using fresh, high-quality vegetables. Zucchini brings a nice crunch, while yellow and red bell peppers add sweetness and color. The red onion gives a mild bite, and cherry tomatoes burst with flavor. Next, I make the marinade. I combine olive oil, lemon zest, and lemon juice to give a citrusy kick. Dried oregano and thyme add earthy notes, while minced garlic brings depth. Salt and pepper enhance all the flavors. This marinade coats the veggies, making them vibrant and flavorful. Finally, I garnish with fresh parsley. This simple touch adds brightness and a pop of color. For the full recipe, check the complete cooking instructions and enjoy this fresh dish! To start, gather your ingredients. In a large bowl, combine these items: - 3 tablespoons olive oil - Zest of 1 lemon - Juice of 1 lemon - 2 teaspoons dried oregano - 2 teaspoons dried thyme - 2 cloves garlic, minced - Salt and pepper to taste Whisk these together until smooth. This marinade packs in bright flavors. It will make your veggies sing! Next, it's time to add the fresh veggies. Use: - 1 zucchini, sliced into thick rounds - 1 yellow bell pepper, sliced into strips - 1 red bell pepper, sliced into strips - 1 red onion, cut into wedges - 1 cup cherry tomatoes Toss the veggies in the marinade. Make sure every piece gets coated well. Cover your bowl with plastic wrap. Place it in the fridge. Let the vegetables sit for at least 30 minutes. This step is key for flavor. After marinating, it’s grilling time! First, preheat your grill or grill pan on medium-high heat. When hot, place the marinated vegetables directly on the grill. Spread them out in a single layer. Grill for about 6-8 minutes. Turn them occasionally. You want those lovely grill marks! The veggies should be tender but still crisp. Once done, remove the vegetables from the grill. Transfer them to a serving platter. For a nice touch, garnish with fresh chopped parsley before serving. For the full recipe, check out the details above! For Lemon Herb Grilled Vegetables, choose fresh and seasonal options. Look for bright colors and firm textures. Zucchini, bell peppers, red onion, and cherry tomatoes are great choices. They all grill well and taste amazing. Select vegetables in peak season for the best flavor. Visit local farmers' markets to find the freshest picks. To get those perfect grill marks, preheat your grill to medium-high heat. Spread the vegetables in a single layer on the grill. This helps them cook evenly. Turn them occasionally for even char and tenderness. Aim for 6-8 minutes of grilling. You want them tender but still crisp. Use tongs to flip them gently. Enhance the taste of your grilled veggies with extra herbs or spices. Fresh herbs like basil or cilantro work well. You can also try adding a pinch of red pepper flakes for heat. A drizzle of balsamic glaze after grilling adds a sweet touch. Customize the flavors to match your meal or mood. For the full recipe, check out Lemon Herb Grilled Vegetables. {{image_2}} You can swap in many vegetables for this dish. Asparagus works great on the grill. It adds a nice crunch and fresh taste. Eggplant is another tasty choice. It absorbs flavors well and becomes creamy when grilled. Other options include mushrooms, carrots, or even sweet potatoes. Each choice brings something unique to your plate. If you want to change up the taste, try different citrus fruits. Lime or orange juice can add a new twist. You can also mix in fresh herbs like basil or cilantro. These herbs give a fresh and vibrant flavor. A splash of balsamic vinegar can also work wonders. Experimenting with marinades keeps the meal exciting. Pair your grilled vegetables with grains for a full meal. Quinoa, rice, or couscous work well. You can also add grilled chicken or fish for protein. A fresh salad on the side brightens up the dish. For a little kick, drizzle some chili oil over the top. This dish can be a main event or a perfect side for any meal. For the full recipe, check out the complete guide. Grilled vegetables can last in the fridge for about 3 to 5 days. Make sure to store them in an airtight container. This keeps them fresh and tasty. When you want to eat them again, just take a look and see if they still smell good. If they look or smell off, it's best to discard them. If you want to save grilled vegetables for later, freezing is a great option. Here’s how to do it: 1. Cool the Vegetables: Let them cool to room temperature first. 2. Prepare the Freezer Bags: Use freezer-safe bags or containers. 3. Pack the Vegetables: Place the veggies in the bags, leaving some space for air. 4. Seal and Label: Seal the bags tightly. Label them with the date. 5. Freeze: Lay the bags flat in the freezer to save space. These steps help keep your vegetables safe and tasty for up to 3 months. When it’s time to enjoy your grilled vegetables again, reheating them the right way is key. Here are some great methods: - Stovetop: Heat a skillet over medium heat. Add a splash of olive oil. Toss the veggies for about 5 minutes, until warmed through. - Oven: Preheat your oven to 350°F (175°C). Spread the vegetables on a baking sheet. Bake for about 10 minutes, or until hot. - Microwave: Place the vegetables in a microwave-safe dish. Heat for 1-2 minutes, stirring halfway. These methods keep the flavor and texture close to fresh, so you can enjoy them just like the first time. For the full recipe, check out the instructions above. Yes, you can prepare these grilled vegetables ahead of time. I recommend marinating them first. Mix the marinade and coat the veggies. Then, cover the bowl and place it in the fridge. You can marinate for at least 30 minutes or up to 24 hours. The longer they sit, the more flavor they absorb. Grill them right before serving for the best taste and texture. Lemon Herb Grilled Vegetables pair well with many dishes. Serve them alongside grilled chicken or fish for a balanced meal. They also go great with quinoa or couscous. Add a fresh salad for extra crunch. You can even toss them into pasta dishes for added flavor. Yes, this recipe is perfect for both vegetarians and vegans. All the ingredients are plant-based. If you want extra protein, consider adding chickpeas or tofu. These additions make the dish even heartier while maintaining its vibrant flavor. Enjoy this healthy and colorful meal! For the complete recipe, check out the [Full Recipe]. This blog post showed you how to make Lemon Herb Grilled Vegetables. We covered fresh veggies, flavorful marinades, and tips for grilling. Choosing fresh ingredients boosts taste. Also, various veggie combos can spice up your meals. Storing and reheating are easy too. You can enjoy this dish any time. Whether you’re cooking for yourself or feeding a crowd, you have all the tools needed to impress. Dive into the joy of grilling, and experiment with your favorite flavors. Enjoy your delicious creations!](https://dailydishly.com/wp-content/uploads/2025/06/2c532b5c-078c-48cf-b109-f94e84489936-768x768.webp)