
Caramel Apple Crisp Bars Irresistible Sweet Treat
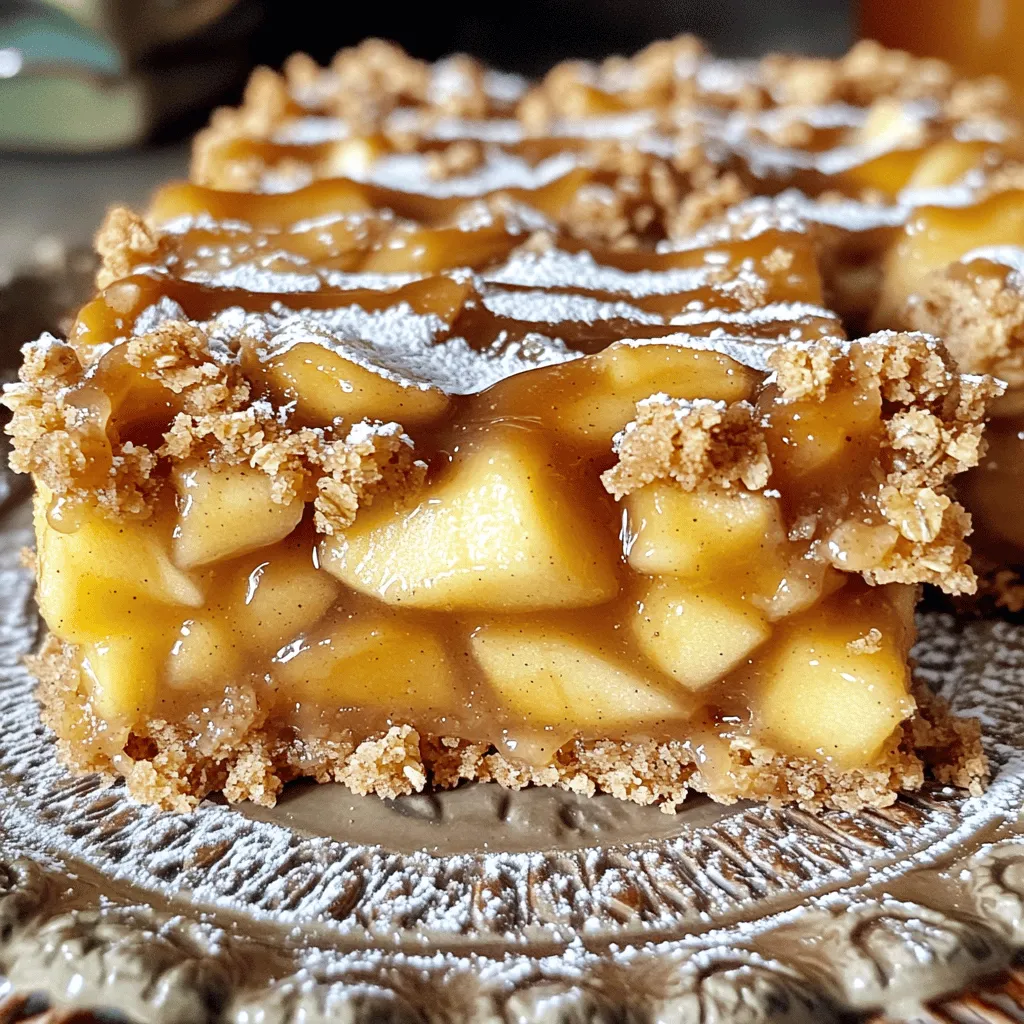
Are you ready to treat yourself to a delicious dessert? My Caramel Apple Crisp Bars blend warm, spiced apples with a buttery, crunchy topping. This recipe is simple and perfect for any occasion. Imagine biting into a slice with gooey caramel drizzled on top. Whether you’re hosting a party or need a cozy snack, these bars will delight your taste buds. Let’s dive into making this irresistible sweet treat!
Ingredients
List of Ingredients
– 2 cups all-purpose flour
– 1 cup rolled oats
– 1 cup brown sugar, packed
– 1 teaspoon baking powder
– 1/2 teaspoon baking soda
– 1/2 teaspoon salt
– 1 cup unsalted butter, melted
– 3 cups apples (Granny Smith recommended)
– 1/2 cup granulated sugar
– 1 teaspoon cinnamon
– 1/4 teaspoon nutmeg
– 1 cup caramel sauce
– 1/2 cup chopped nuts (optional)
To make delicious caramel apple crisp bars, gather these simple ingredients. Start with 2 cups of all-purpose flour. Next, add 1 cup of rolled oats for texture. Use 1 cup of brown sugar to give sweetness and depth. Combine with 1 teaspoon of baking powder, 1/2 teaspoon of baking soda, and 1/2 teaspoon of salt to help with rising.
Melt 1 cup of unsalted butter to bind everything together. For the filling, choose 3 cups of peeled and diced Granny Smith apples. Their tartness balances the sweetness. Mix them with 1/2 cup of granulated sugar, 1 teaspoon of cinnamon, and 1/4 teaspoon of nutmeg for that warm spice flavor.
Don’t forget the star of this recipe, 1 cup of caramel sauce, to drizzle over the apples. If you like, add 1/2 cup of chopped nuts for a bit of crunch. These ingredients come together to create a sweet treat you won’t forget!
Step-by-Step Instructions
Oven Preparation
– Preheat oven to 350°F (175°C).
– Grease or line a 9×13 inch baking dish.
Prepare the Base Layer
– In a large bowl, combine 2 cups of flour, 1 cup of rolled oats, and 1 cup of brown sugar.
– Add 1 teaspoon of baking powder, 1/2 teaspoon of baking soda, and 1/2 teaspoon of salt.
– Mix until everything is well blended.
– Pour in 1 cup of melted butter and stir until crumbly.
– Reserve 1 cup of this mixture for topping.
– Press the remaining mixture firmly into the baking dish to form the base layer.
Prepare the Apple Filling
– Peel, core, and dice 3 cups of apples. Granny Smith works best for tartness.
– In a bowl, toss the diced apples with 1/2 cup of granulated sugar, 1 teaspoon of cinnamon, and 1/4 teaspoon of nutmeg.
– Mix until the apples are well coated.
– Evenly distribute the apple mixture over the base layer.
Assemble the Bars
– Drizzle half of the caramel sauce over the apples.
– Sprinkle the reserved crumb mixture on top.
– If you like, add 1/2 cup of chopped nuts for extra crunch.
– Bake the bars for 25-30 minutes, until the top is golden brown and the apples are tender.
– Let the bars cool completely in the pan before slicing.
– Drizzle the remaining caramel sauce on top before serving.
Tips & Tricks
Baking Tips
– Check the bars mid-way through baking for even cooking. This helps avoid over-baking.
– Use parchment paper in your baking dish. This makes it easy to lift the bars out later.
Ingredient Substitutions
– Swap granulated sugar with coconut sugar. It adds a nice caramel flavor.
– For a vegan option, use coconut oil instead of butter. You can also find vegan caramel sauce in stores.
Serving Suggestions
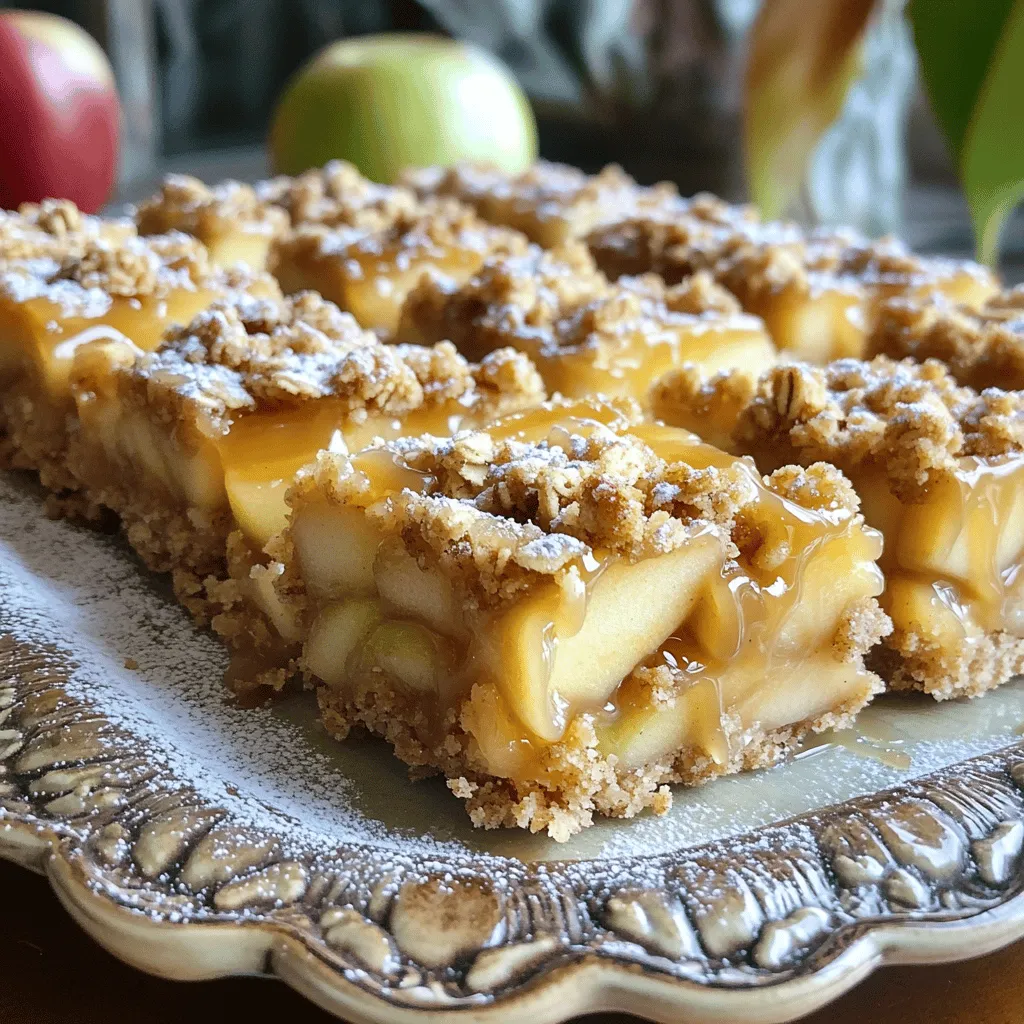
– Serve caramel apple crisp bars warm with a scoop of vanilla ice cream. It adds creaminess.
– Present the bars on a pretty platter. Dust with powdered sugar for a nice touch.
– Drizzle extra caramel sauce on each plate. This adds sweetness and makes your dessert pop.
Variations
Flavor Variations
You can change the taste of your caramel apple crisp bars. Adding spices like ginger or allspice makes them unique. These spices add warmth and depth. You can also try different types of apples. Granny Smith apples are tart and firm. Other apples, like Fuji or Honeycrisp, offer sweetness. Mixing apple varieties gives your bars a fun twist!
Caramel Options
When it comes to caramel, you have choices. You can use homemade caramel sauce for a rich flavor. Making it at home is easy and rewarding. If you’re short on time, store-bought caramel works just as well. You can also try alternative toppings. A chocolate drizzle adds a sweet surprise. It pairs nicely with the apple and caramel.
Dietary Variations
You can adapt this recipe for different diets. For a gluten-free version, swap all-purpose flour for gluten-free flour. This keeps the bars tasty for everyone. If you need nut-free options, simply leave out the nuts. The bars will still be delicious and satisfying. You can enjoy these treats and cater to different dietary needs!
Storage Info
How to Store
To keep your caramel apple crisp bars fresh, store them properly.
– Cool completely before storing. This helps avoid condensation.
– Use an airtight container to keep them moist.
– Place parchment paper between layers to prevent sticking.
– They stay fresh for up to one week at room temperature.
For longer storage, refrigerate them to extend freshness.
Freezing Instructions
You can also freeze these delicious bars for later.
– Cut the bars into squares before freezing.
– Wrap each square in plastic wrap.
– Place wrapped bars in a freezer-safe bag or container.
– They can last up to three months in the freezer.
To enjoy later, simply thaw at room temperature. For best texture, warm them in the oven for a few minutes.
FAQs
Common Questions
How long do caramel apple crisp bars last?
Caramel apple crisp bars will stay fresh for up to one week. Keep them in an airtight container. This helps keep the bars moist and tasty.
Can I make this recipe ahead of time?
Yes, you can make these bars a day in advance. Just cool them completely and store them. This allows the flavors to blend even more.
What’s the best way to reheat the bars?
To reheat, place the bars in a warm oven at 350°F for about 10 minutes. This will soften them up and make the caramel gooey again.
Health and Nutrition
Are caramel apple crisp bars healthy?
These bars are a sweet treat and not a health food. They contain sugar and butter, but you can make healthier choices. Use whole wheat flour or less sugar for a lighter version.
Nutritional facts and serving sizes
Each bar contains about 200 calories, with 10 grams of fat and 30 grams of carbs. This is based on a serving size of one bar. Remember to enjoy them in moderation!
Troubleshooting
Why are my bars too crumbly?
If your bars are too crumbly, you may have added too much flour or not enough butter. Make sure to measure carefully and mix well. Press the mixture firmly into the baking dish.
What to do if the apples are too firm?
If your apples are too firm, you can slice them thinner next time. You can also bake the bars a bit longer. This will help the apples soften and blend with the other flavors.
We’ve covered how to create delicious caramel apple crisp bars with easy steps. From choosing the right ingredients to baking and storing, this guide has you set for success. Remember to check for even cooking and get creative with flavors. You can adapt this recipe for your needs too. Enjoy making these tasty bars that everyone will love! Dive into baking and share your sweet results.

![To make these vegan chocolate chip cookies, you will need a few key ingredients. Each one plays a special role in creating the perfect texture and flavor. Here’s the list of ingredients: - 1 cup almond flour - 1 cup all-purpose flour - 1/2 teaspoon baking soda - 1/2 teaspoon baking powder - 1/4 teaspoon salt - 1/2 cup coconut sugar - 1/2 cup maple syrup - 1/3 cup coconut oil, melted - 1 teaspoon vanilla extract - 1/2 cup vegan chocolate chips - 1/4 cup chopped walnuts (optional) Almond flour adds a nice, nutty flavor and keeps the cookies soft. All-purpose flour gives the cookies structure. Baking soda and baking powder help them rise. Coconut sugar sweetens the cookies while adding a hint of caramel flavor. Maple syrup adds moisture and sweetness. Coconut oil gives a lovely richness and helps with texture. Vanilla extract enhances the flavor of the chocolate chips. Vegan chocolate chips are a must for that classic taste. If you like nuts, walnuts add a crunchy touch. For the full recipe, follow the instructions carefully, and you’ll create cookies that everyone will love! 1. Preheating the oven First, set your oven to 350°F (175°C). This step helps the cookies bake evenly. While the oven heats, get your baking sheet ready by lining it with parchment paper. 2. Mixing dry ingredients In a big bowl, combine the almond flour, all-purpose flour, baking soda, baking powder, and salt. Use a whisk to blend them well. This ensures the leavening agents work when baking. 3. Combining wet ingredients In another bowl, mix the melted coconut oil, coconut sugar, maple syrup, and vanilla extract. Stir until it looks smooth. This mixture brings sweetness and flavor to your cookies. 1. Mixing wet and dry ingredients Pour the wet mix into the dry mix. Stir until no flour streaks show. The dough should be slightly sticky. This texture helps the cookies hold together. 2. Folding in chocolate chips and walnuts Gently fold in the vegan chocolate chips and walnuts if you choose to use them. Make sure they are evenly spread throughout the dough. This adds a delightful crunch and flavor. 1. Shaping the cookies Scoop tablespoon-sized portions of the dough. Roll them into balls and place them on your prepared baking sheet, leaving space between each ball. They will spread as they bake. 2. Baking time and tips for doneness Press each ball down gently with your palm to flatten it a bit. Bake for 10 to 12 minutes. Look for lightly golden edges. The cookies will seem soft but will firm up as they cool. Enjoy the aroma wafting through your kitchen! For the complete recipe, check out the Full Recipe. To get the best texture, start with room-temperature ingredients. When your coconut oil is melted but not hot, it blends well. Cold ingredients can lead to uneven mixing and odd textures. Use baking soda for a nice spread and chewiness. Baking powder adds lift but may make cookies puffier. You want a balance, so stick with 1/2 teaspoon of each, as this recipe suggests. To make your cookies pop, think about adding extracts or spices. A little cinnamon or a dash of nutmeg can elevate the flavor. You can also try almond or orange extract for a fun twist! If you're feeling adventurous, swap out chocolate chips. Try peanut butter chips, white chocolate, or even dried fruit. Each choice brings a new taste to the classic cookie. If your cookies spread too much, check your oven temperature. An oven that runs hot can cause this problem. You can also chill the dough for about 30 minutes before baking. This helps the dough hold its shape better. For cookies that are too crumbly, make sure to measure your flour correctly. Too much flour can lead to a dry texture. Add a small splash of almond milk to bring the dough together if needed. {{image_2}} If you want a gluten-free version of these cookies, you can use different flours. Try using all almond flour or a mix of almond and oat flour. You can also use a gluten-free flour blend. This keeps the texture nice and soft while making it safe for those with gluten sensitivities. Switching up the chocolate chips can bring new life to your cookies. You can use dark chocolate chips, white chocolate chips, or even peanut butter chips. You can also add fruits like dried cranberries or chopped bananas for a twist. If you enjoy nuts, consider adding chopped pecans or hazelnuts for a crunchy bite. Get creative with seasonal flavors! For fall, try adding pumpkin spice to the dough. This gives your cookies a warm and cozy taste. During the holidays, consider using peppermint extract or festive sprinkles. You can even shape the cookies into fun holiday designs. This makes them a perfect treat for any celebration! For the full recipe, check out the [Full Recipe]. To keep your vegan chocolate chip cookies fresh, store them in an airtight container. This method helps retain moisture and keeps them soft. You can place a slice of bread in the container to absorb any excess air. This trick works wonders for keeping cookies fresh longer. If you plan to eat them in a few days, simply store them at room temperature. For longer storage, freezing cookies is a great choice. Let the cookies cool completely before freezing. Place them in a single layer on a baking sheet. Once frozen solid, transfer them to a freezer-safe bag or container. Label the bag with the date. Frozen cookies can last up to three months. When you crave a treat, just pull one out and let it thaw. To enjoy leftover cookies, reheating is key. Preheat your oven to 350°F (175°C). Place the cookies on a baking sheet and warm for about 5 to 8 minutes. This will restore their soft, gooey texture. Alternatively, you can microwave them for 10-15 seconds. Just be careful not to overheat, or they may get tough. Enjoy every bite of those delicious cookies! Can I use regular flour instead of almond flour? Yes, you can use regular flour. However, almond flour adds a nice nutty taste. It also makes the cookies moist. If you swap it out, use a little less all-purpose flour. How long do these cookies last? These cookies can last up to a week in an airtight container. If you want them fresher, store them in the fridge. You can also freeze them for up to three months. Can I substitute maple syrup with another sweetener? Yes, you can use agave syrup or brown sugar. Both will work well. Just remember, each sweetener has its own taste and may change the cookie's texture a bit. What can I use instead of coconut sugar? You can use brown sugar or cane sugar as a substitute. Coconut sugar has a rich flavor, but the others will work in a pinch. Just keep in mind the sweetness level might change slightly. Do I need to chill the dough before baking? No, chilling the dough is not necessary. Chilling can help if you want thicker cookies. But for these cookies, you can bake them right after mixing. Can I add additional toppings to these cookies? Absolutely! You can add nuts, dried fruit, or even more chocolate chips. Feel free to get creative and experiment with flavors. You can create delicious vegan chocolate chip cookies with simple steps and great ingredients. We covered how to mix your dry and wet items, shape your cookies, and bake them perfectly. I shared tips for the best texture and flavor, along with common issues you might face. You now have options for gluten-free variations and how to store your cookies. Bake these cookies and enjoy every bite!](https://dailydishly.com/wp-content/uploads/2025/07/ef525e3c-3cc1-498f-b5ee-30e7bbeeb1ea-768x768.webp)

![- 4 slices of thick bread (brioche or challah) - 2 large eggs - 1/2 cup milk - 1 teaspoon vanilla extract - 1 teaspoon ground cinnamon - 1 tablespoon granulated sugar - Additional mixture (1 tablespoon sugar and 1/2 teaspoon cinnamon) - 1 tablespoon unsalted butter (for frying) - Maple syrup or honey for serving The key to great Cinnamon Sugar French Toast Sticks lies in the ingredients. Start with thick slices of bread like brioche or challah. These breads soak up the egg mixture well. For the egg mix, use large eggs, milk, and vanilla extract. This mix adds richness and flavor. Next, you need cinnamon and sugar. Ground cinnamon brings warmth and spice, while granulated sugar adds sweetness. You will want an extra mix of sugar and cinnamon for coating later. This makes them irresistible. Don't forget the butter! A tablespoon of unsalted butter helps fry the sticks. It gives them a nice golden color and flavor. The dish pairs perfectly with maple syrup or honey for dipping. With these ingredients, you can make a delightful breakfast or snack that everyone will love. Check out the Full Recipe for all the details! In a shallow bowl, whisk together the eggs, milk, vanilla, cinnamon, and sugar. This mix is key. It gives the French toast sticks their rich flavor. Make sure the ingredients blend well. You want a smooth mixture. This will coat the bread perfectly. Next, slice the bread into sticks. Aim for 1-inch wide pieces. This size helps them cook evenly. Using thick bread, like brioche or challah, adds great taste. Uniform sticks ensure that every bite is just as tasty as the last. Now, dip each stick into the egg mixture. Make sure they get fully coated. Let any extra liquid drip off before cooking. Heat a non-stick skillet over medium heat. Add butter and let it melt. Once the pan is ready, place the sticks in without crowding. Cook for about 2-3 minutes on each side. You want them golden brown and a bit crispy. After cooking, mix some sugar and cinnamon in a bowl. While the sticks are warm, roll them in this mix. The cinnamon sugar coating makes them delightful! For more details, you can refer to the [Full Recipe]. The best bread makes a big difference. I love using thick bread like brioche or challah. These types add a soft texture and sweet flavor. They soak up the egg mixture well and stay soft inside. You can also try Texas toast for a nice change. Look for bread that isn't too fresh. Day-old bread works best. It holds up better while cooking. To get perfect golden-brown sticks, use medium heat. If the heat is too high, they might burn. Keep an eye on them while cooking. Flip them carefully with a spatula. Cook for about 2-3 minutes on each side. The goal is a crispy outside and soft center. If they are browning too fast, lower the heat. This way, you get that nice, even color. You can serve these sticks in many fun ways! Maple syrup or honey make great dips. They add sweetness and flavor. You can also add fresh fruit like strawberries or bananas on the side. For extra flair, sprinkle some whipped cream on top. If you're feeling adventurous, try a chocolate sauce for dipping. It makes a tasty treat! {{image_2}} You can add chocolate chips or fruit to the egg mixture. This twist makes your French toast sticks even more fun. Just fold in small amounts of your favorite fruit, like berries or bananas, before dipping the bread. For chocolate lovers, sprinkle in some mini chocolate chips. These additions bring sweetness and texture to each bite. Switching to brown sugar or flavored syrups can change the flavor profile. Brown sugar adds a rich, caramel taste that pairs well with cinnamon. You can also try flavored syrups, like maple or vanilla, for a unique touch. Drizzle these on or serve them for dipping. Each option offers a new twist on this classic dish. You can easily make this dish plant-based by swapping out eggs and milk. Use a mixture of flaxseed meal and water instead of eggs. For milk, try almond, soy, or oat milk. These substitutes maintain the creaminess and flavor you want. This way, everyone can enjoy cinnamon sugar French toast sticks, regardless of their diet. For the full recipe, check the main article. To keep leftover cinnamon sugar French toast sticks fresh, follow these steps: - Cool the sticks: Let them cool to room temperature. - Use an airtight container: Place the sticks in a container with a tight lid. - Refrigerate: Store them in the fridge for up to three days. - Freeze for longer storage: For freezing, wrap each stick in plastic wrap and place them in a freezer bag. To enjoy the sticks again, reheating is key: - Oven method: Preheat your oven to 350°F (175°C). Place the sticks on a baking sheet and heat for about 10 minutes. This keeps them crispy. - Skillet method: Heat a non-stick skillet over medium heat. Add a small amount of butter, then place the sticks in the pan. Cook for 2-3 minutes on each side. Knowing how long your cinnamon sugar French toast sticks last is important: - In the fridge: They stay fresh for about three days. - In the freezer: They can last for up to three months. When ready to eat, thaw in the fridge overnight before reheating. By following these storage tips, you can savor every bite of your delicious cinnamon sugar French toast sticks. For the full recipe, refer to the earlier sections. Yes, you can prepare them in advance. Make the egg mixture and cut the bread into sticks. Store them in an airtight container in the fridge for a few hours. You can also cook them, then keep them warm in the oven at low heat. This way, you save time and still enjoy a tasty breakfast. If you need alternatives, try using gluten-free bread or low-carb options like cloud bread. You can also use slices of banana or even zucchini for a unique twist. These options still give you a fun shape and taste great with cinnamon sugar! To keep the sticks crisp, don't soak them too long in the egg mixture. Just a quick dip works wonders. Make sure your pan is hot enough before cooking. This helps to seal the outside quickly, keeping the inside soft but not soggy. Enjoy your delicious Cinnamon Sugar French Toast Sticks! In this blog post, we covered how to make delicious Cinnamon Sugar French Toast Sticks. You learned about the key ingredients, step-by-step cooking instructions, and helpful tips for the best results. I also shared fun variations and storage techniques to keep your leftovers fresh. Enjoying these treats at breakfast or brunch elevates your meal. Whether you customize the flavors or pick the right bread, your French toast will impress. Try it out and make each bite count.](https://dailydishly.com/wp-content/uploads/2025/07/664e1dd1-150a-4660-86e6-505ad35a42cc-768x768.webp)
