Pineapple Teriyaki Chicken Skewers Flavorful Delight


Are you ready to take your taste buds on a flavor journey? My Pineapple Teriyaki Chicken Skewers offer the perfect mix of sweet and savory. Made with juicy chicken thighs, fresh pineapple, and colorful bell peppers, these skewers are easy to make and ideal for any occasion. Join me as we dive into the simple ingredients and step-by-step instructions that will help you impress your friends and family with this delicious dish!
Why I Love This Recipe
- Bold Flavors: The combination of sweet pineapple and savory teriyaki sauce creates a mouthwatering flavor explosion in every bite.
- Colorful Presentation: The vibrant colors of the bell peppers and pineapple make these skewers visually appealing, perfect for gatherings.
- Easy to Make: This recipe is straightforward and quick, making it an excellent choice for busy weeknights or weekend barbecues.
- Healthier Option: Using boneless chicken thighs and fresh ingredients makes these skewers a healthier alternative to traditional fast food.
Ingredients
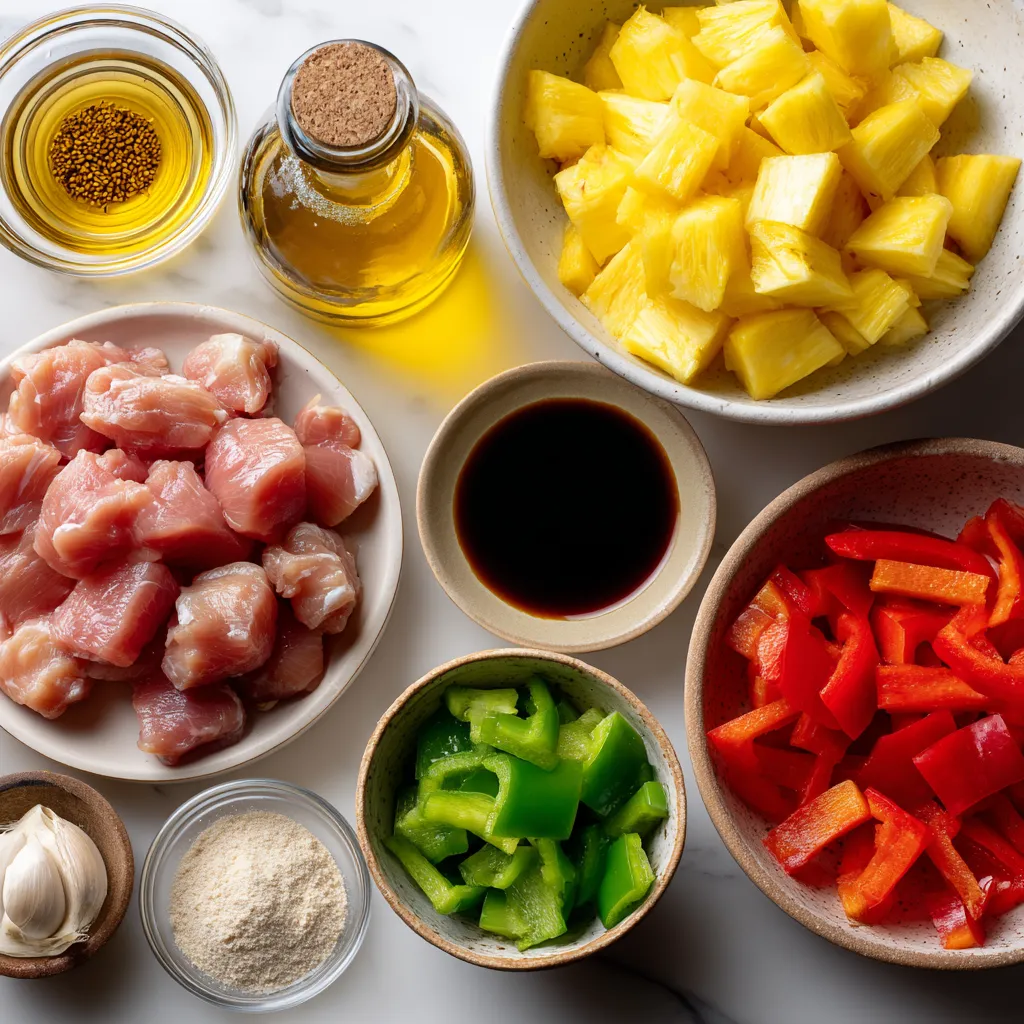
Main Ingredients
– 1 lb boneless chicken thighs: I love using these because they stay juicy.
– 1 cup fresh pineapple: Sweet and tangy, it adds a nice twist.
– 1 red bell pepper: This gives a pop of color and flavor.
– 1 green bell pepper: It balances the sweetness of the pineapple.
– ½ cup low-sodium soy sauce: This is key for our tasty marinade.
– ¼ cup honey: It adds sweetness and helps with caramelization.
– 2 tablespoons rice vinegar: This gives a nice acidity to the dish.
– 2 tablespoons sesame oil: It brings a rich, nutty flavor to the skewers.
– 2 cloves garlic, minced: Fresh garlic boosts the flavor.
– 1 teaspoon ginger, minced: This adds warmth and zest to the marinade.
Optional Ingredients
– 1 teaspoon cornstarch: Use this if you want a thicker sauce.
– Garnish ideas: I suggest sesame seeds and green onions for a lovely finish.
Every ingredient plays a role in making these skewers a flavorful delight. The sweet pineapple pairs perfectly with the savory chicken. The vibrant bell peppers add crunch and color. Don’t forget the optional ingredients; they elevate the dish further!
Step-by-Step Instructions
Marinating the Chicken
To start, we need to prepare the marinade. In a medium bowl, whisk together the low-sodium soy sauce, honey, rice vinegar, sesame oil, minced garlic, and ginger. This mix brings out the sweet and savory flavors. It’s key for the chicken. Reserve a few tablespoons of marinade for basting later.
Next, add the chicken cubes to the marinade. Make sure each piece is well-coated. Cover the bowl and refrigerate for at least 30 minutes. If you have time, let it marinate for up to 2 hours. The longer it sits, the more flavor it picks up.
Preparing Skewers
If you use wooden skewers, soak them in water for 30 minutes. This step helps prevent them from burning on the grill. If you have metal skewers, you can skip this part.
Once the chicken is done marinating, it’s time to assemble the skewers. Thread the marinated chicken, fresh pineapple, and bell pepper pieces alternately onto the skewers. Packing them tightly looks great and helps them cook evenly.
Cooking the Skewers
For cooking, preheat your grill or grill pan over medium-high heat. Place the skewers on the grill and cook for about 10 to 15 minutes. Turn them occasionally to ensure they cook evenly. Baste them with the reserved marinade as they cook. This helps keep them juicy and adds extra flavor.
If you want a thicker glaze, you can mix cornstarch with a little water. Add this to the reserved marinade in the last few minutes of cooking. This step makes the sauce stick nicely to the skewers.
Once cooked, remove the skewers from the grill. Let them rest for a couple of minutes before serving. Enjoy the rich flavors of pineapple teriyaki chicken skewers!
Tips & Tricks
Perfecting the Marinade
To get the best flavor, let the chicken soak in the marinade. I recommend marinating for at least 30 minutes. If you have time, go for 2 hours. This helps the chicken absorb all the tasty flavors.
Alternative marinating ingredients: You can mix things up. Try adding fresh lime juice or orange juice for a citrus twist. Fresh herbs like cilantro or basil can add a nice touch too.
Cooking Tips
Ensure even cooking by turning the skewers often. This helps all sides cook the same. You want nice grill marks, which add great taste and looks. Use medium-high heat for the best results.
For those perfect marks, place the skewers on the grill and do not move them for a couple of minutes. Then, turn them to get nice lines.
Serving Suggestions
Pair these skewers with rice or a fresh salad. They make a great meal when served with jasmine or coconut rice. You can also serve them with a tangy slaw for crunch.
Presentation ideas: Arrange the skewers on a large platter. Garnish with sesame seeds and chopped green onions for color. This makes the dish pop and look inviting.
Pro Tips
- Marinate Longer for Flavor: Allowing the chicken to marinate for up to 2 hours will enhance the flavor, making it more succulent and delicious.
- Choose Fresh Ingredients: Using fresh pineapple and vibrant bell peppers not only boosts the flavor but also adds a colorful presentation to your skewers.
- Monitor Grill Temperature: Keep an eye on grill temperature to prevent burning; medium-high heat is ideal for achieving a nice char while cooking the chicken through.
- Experiment with Vegetables: Feel free to add other vegetables like zucchini or cherry tomatoes to your skewers for added variety and nutrition.

Variations
Ingredient Swaps
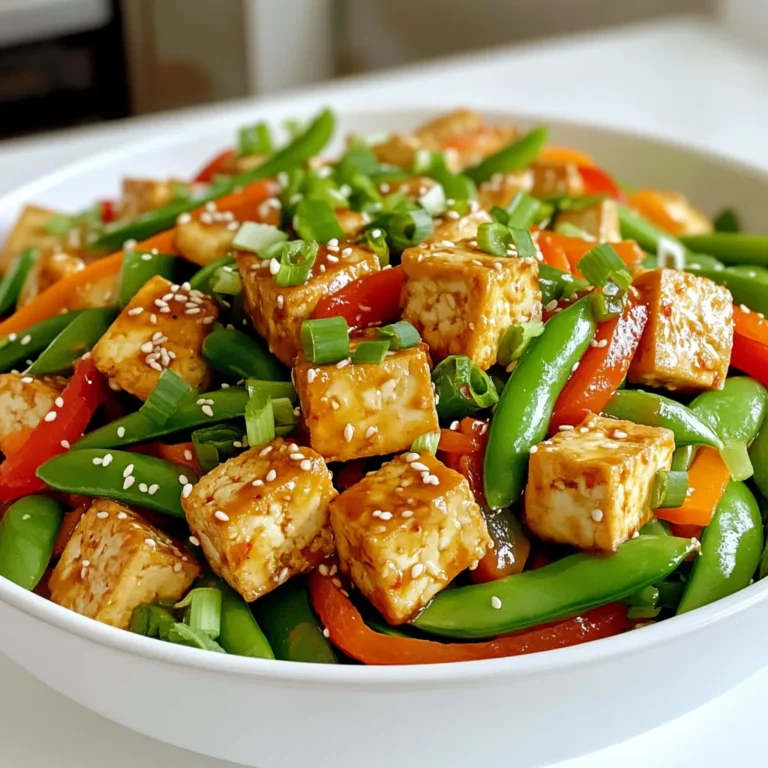
You can swap out the chicken for other proteins. Tofu works well for a vegetarian dish. It absorbs flavors nicely. Shrimp is another great choice. It cooks quickly and adds a nice texture.
Feel free to change the vegetables too. Try using zucchini or mushrooms. They add a different taste and look lovely on the skewers. You can also add cherry tomatoes for a pop of color.
Flavor Twists
Want to give your skewers a tropical twist? Add mango chunks or coconut flakes. These fruits enhance the sweet and savory flavor. You could also try adding lime juice for some zing.
If you like heat, add hot sauce to the marinade. A dash of sriracha or chili flakes can spice things up. This adds a new layer of flavor and makes each bite exciting.
Cooking Methods
You don’t have to grill your skewers. You can bake them in the oven too. Preheat your oven to 400°F. Place the skewers on a baking sheet and cook for 20 minutes. Flip them halfway through for even cooking.
Another method is using an air fryer. Set it to 380°F and cook for about 12 minutes. This method gives you a nice crispy finish. Plus, it’s quick and easy, perfect for busy nights!
Storage Info
Refrigeration Guidelines
To store leftovers, place the skewers in an airtight container. This keeps them fresh. You can also wrap them tightly in plastic wrap. Leftovers stay good for up to three days in the fridge. After that, they might lose taste and texture.
Freezing Instructions
You can freeze pre-cooked skewers for later use. Make sure they are cool before you freeze them. Wrap each skewer in foil or place them in a freezer-safe bag. They can last for up to three months in the freezer.
When it’s time to eat, thaw the skewers in the fridge overnight. Reheat them on a grill or in the oven until they are hot. This way, you keep all the flavors intact.
FAQs
Common Questions
Can I use chicken breast instead of thighs?
Yes, you can use chicken breast. Chicken thighs add more flavor and stay juicy. If you prefer chicken breast, cut it into 1-inch cubes. Just keep an eye on the cooking time, as breasts cook faster.
What can I substitute for soy sauce?
You can replace soy sauce with coconut aminos or tamari. Both options give a similar taste. Coconut aminos is great if you want a soy-free choice.
Cooking-Related Questions
How long do I need to marinate the chicken?
Marinate the chicken for at least 30 minutes. For deeper flavor, let it sit for up to 2 hours. This helps the chicken soak up all the tasty marinade.
What’s the best temperature for grilling?
Preheat your grill to medium-high heat, around 400°F. This temperature gives nice grill marks and cooks the chicken evenly. Keep an eye on it to avoid burning.
Health and Nutritional Questions
Is this recipe healthy?
Yes, this recipe can be healthy. It has lean protein and fresh veggies. The pineapple adds natural sweetness without too much added sugar.
How to lower the sugar content?
To lower sugar, use less honey or substitute it with a sugar-free sweetener. You can also skip the honey entirely for a lower-sugar option.
You now have a tasty recipe for chicken skewers with various flavors. Remember to choose fresh ingredients like boneless chicken thighs and ripe pineapple. Marinate the chicken for the best flavor, and don’t forget about optional garnishes like green onions.
You can swap in different proteins or veggies for fun twists. Whether you grill, bake, or air-fry, enjoy your skewers hot off the grill. With the right storage, you can enjoy these delicious meals longer. Happy cookin

Teriyaki Chicken Skewers with a Pineapple Twist
Ingredients
- 1 lb boneless chicken thighs, cut into 1-inch cubes
- 1 cup fresh pineapple, cut into 1-inch cubes
- 1 piece red bell pepper, cut into 1-inch pieces
- 1 piece green bell pepper, cut into 1-inch pieces
- ½ cup low-sodium soy sauce
- ¼ cup honey
- 2 tablespoons rice vinegar
- 2 tablespoons sesame oil
- 2 cloves garlic, minced
- 1 teaspoon ginger, minced
- 1 teaspoon cornstarch (optional, for thicker sauce)
- to taste Skewers (soaked in water if wooden)
Instructions
- In a medium bowl, whisk together soy sauce, honey, rice vinegar, sesame oil, minced garlic, and ginger. Reserve a few tablespoons for basting later. Add the chicken cubes to the marinade, ensuring they're well-coated. Cover and refrigerate for at least 30 minutes or up to 2 hours for deeper flavor.
- If using wooden skewers, soak them in water for 30 minutes to prevent burning. If using metal skewers, you can skip this step.
- After marinating, thread the chicken, pineapple, and bell pepper pieces alternately onto the skewers, packing them in tightly for an appealing presentation.
- Preheat a grill or grill pan over medium-high heat. Place skewers on the grill and cook for about 10-15 minutes, turning occasionally and basting with reserved marinade until the chicken is cooked through and has nice grill marks. If you like a thicker glaze, you can dissolve cornstarch in a little water and add it to the reserved marinade in the last few minutes of cooking.
- Once cooked, remove skewers from the grill and let them rest for a couple of minutes. Serve warm, with a sprinkle of sesame seeds and chopped green onions for garnish if desired.

. 1. Heat 1 tablespoon of olive oil in a large pot over medium heat. 2. Add 1 medium diced onion and sauté until it turns translucent, about 5 minutes. 3. Next, add 2 minced garlic cloves and cook for 1 more minute. 1. Pour in 1 can (28 oz) of crushed tomatoes and 4 cups of vegetable broth. 2. Add 1 teaspoon of dried oregano, 1 teaspoon of dried basil, salt, and pepper. 3. Bring the mixture to a simmer, letting the flavors blend. 4. Once simmering, add 9 oz of fresh cheese tortellini. Cook it according to the package, usually about 3-5 minutes. 1. Reduce the heat to low. Stir in 1 cup of heavy cream until mixed well. 2. Let the soup heat for an additional 2-3 minutes, but don’t let it boil. 3. Taste the soup and adjust the seasoning if needed. 4. Serve hot, garnished with fresh basil leaves and grated Parmesan cheese. For the full recipe, refer to the earlier section for all details. Enjoy your cooking! To make the best creamy tomato tortellini soup, cook the tortellini just right. Follow the package instructions closely. Fresh tortellini cooks quickly, usually in just 3-5 minutes. Stir gently to avoid breaking them. You can adjust the creaminess and flavor easily. If you want a richer taste, add more heavy cream. For a lighter option, use coconut milk. Taste the soup before serving. Adjust salt and pepper to suit your liking. One common mistake is overcooking the tortellini. This makes them mushy and loses their shape. Keep an eye on the timer to prevent this. Another mistake is skipping seasoning adjustments. Each ingredient plays a role in flavor. After cooking, taste your soup. You might need more salt, pepper, or herbs to enhance the taste. To add depth, try a splash of balsamic vinegar. This little tweak can brighten the flavors. Just a teaspoon can work wonders. Using fresh herbs for garnish is another great way to boost flavor. Fresh basil leaves add a nice touch and a burst of color. They bring freshness that makes each bowl inviting. For the full recipe, check the earlier section and enjoy making this comforting meal! {{image_2}} Adding spinach makes this soup even better. You can use fresh or frozen spinach. If you have fresh, chop it up and add it right before serving. For frozen, just stir it in when the soup is hot. It will wilt nicely and give a pop of green. This adds nutrients and a nice flavor to the soup. For a heartier meal, try adding cooked Italian sausage. Brown the sausage in the pot before you add the onion. This step adds a rich flavor that blends well with the tomatoes. After cooking the sausage, follow the rest of the recipe as usual. The sausage will make the soup more filling and tasty. You can easily make this soup vegan and gluten-free. Use gluten-free pasta instead of regular tortellini. There are many great options available today. For the creamy base, substitute heavy cream with coconut milk. It gives a nice texture and a hint of sweetness. Be sure to use vegetable broth for the best flavors. This way, everyone can enjoy this soup! For the full recipe, check out the complete guide. To keep your creamy tomato tortellini soup fresh, use an airtight container. This helps prevent spills and keeps out air. You can store it in the fridge for up to three days. If you need more time, consider freezing it. Make sure to cool the soup before storing. This prevents steam buildup in the container. Freezing the soup is easy and a great way to save it for later. Pour the cooled soup into freezer-safe bags or containers. Remove as much air as possible before sealing. This helps avoid freezer burn. You can freeze it for up to three months. When you’re ready to enjoy it, let it thaw in the fridge overnight. To reheat without losing texture, do it slowly. Pour the soup into a pot and warm it over low heat. Stir often to prevent sticking. If it seems too thick, add a splash of broth or water. For the best flavor, avoid boiling it. This keeps the creamy texture just right. When choosing tortellini, I prefer fresh cheese tortellini. It cooks quickly and adds a creamy texture. Cheese tortellini pairs well with the soup’s flavors. Meat tortellini works too, but it can change the taste. Stick with cheese for a classic, comforting soup. Yes, you can make this soup ahead of time. To meal prep, cook the soup without adding the tortellini. Store it in an airtight container in the fridge. When ready to eat, heat it up and add the tortellini. This keeps the pasta from getting mushy. You can store the soup in the fridge for up to three days. If you freeze it, it lasts for about three months. When you reheat it, add a little water or broth. This helps keep the soup creamy and fresh. In this blog post, we explored how to make a delicious creamy tomato tortellini soup. We discussed key ingredients like olive oil, crushed tomatoes, and fresh tortellini. You learned easy steps for preparation, cooking, and final touches. We shared tips for avoiding common mistakes and enhancing flavors. You also discovered tasty variations and proper storage methods. With these insights, you can create a comforting meal that warms the heart. Enjoy making this soup as much as I do!](https://dailydishly.com/wp-content/uploads/2025/06/f157e764-c4a1-4324-a22a-5668ebbc8ae4-768x768.webp)
![For a rich and hearty Chicken and Wild Rice Soup, gather these key ingredients: - 1 lb boneless, skinless chicken breasts, diced - 1 cup wild rice, rinsed - 1 medium onion, chopped - 2 carrots, diced - 2 celery stalks, diced - 3 cloves garlic, minced - 6 cups chicken broth (low sodium) - 1 cup heavy cream or coconut milk for a dairy-free option - 1 teaspoon dried thyme - 1 teaspoon dried rosemary - 1 teaspoon paprika - Salt and pepper to taste - 2 tablespoons olive oil - Fresh parsley, chopped (for garnish) Adding a few garnishes can elevate your soup. Consider these options: - Crusty bread on the side - Extra chopped parsley for color - A sprinkle of black pepper for spice - A drizzle of olive oil for richness If you need to swap out some ingredients, here are my suggestions: - Chicken: Use rotisserie chicken for quicker prep. - Rice: Substitute with brown rice or quinoa if you prefer. - Cream: Almond milk or cashew cream can work as dairy-free options. - Herbs: Fresh herbs can replace dried ones for a fresh taste. These swaps keep the soup delicious while catering to your needs. For the full recipe, check out the detailed instructions. 1. Start by gathering all your ingredients. This makes cooking easier. 2. Dice the chicken into small pieces. This helps it cook evenly. 3. Chop the onion, carrots, and celery. Aim for similar sizes for even cooking. 4. Rinse the wild rice under cool water. This removes any dust or debris. 5. Mince the garlic. Fresh garlic gives the best flavor in this soup. 1. In a large pot, heat 2 tablespoons of olive oil over medium heat. 2. Add the chopped onions, carrots, and celery. Sauté these for about 5 minutes. 3. Stir in the minced garlic and let it cook for one minute. 4. Now, add the diced chicken to the pot. Cook it until there is no pink, about 5-7 minutes. 5. Next, stir in the rinsed wild rice, chicken broth, thyme, rosemary, paprika, salt, and pepper. 6. Bring this mixture to a boil. Once boiling, reduce the heat to low. 7. Cover the pot and let the soup simmer for 45-50 minutes. The rice should be tender when done. 8. Once the wild rice is cooked, stir in the heavy cream or coconut milk. Heat for another 5 minutes. 9. Taste and adjust the seasoning if you need to. 1. Serve the soup hot in rustic bowls. 2. Garnish with fresh parsley for color and flavor. 3. Pair the soup with crusty bread for dipping. 4. For a twist, try adding a squeeze of lemon juice before serving. You can find the full recipe [here]. Enjoy your comforting chicken and wild rice soup! To make your chicken and wild rice soup truly special, use fresh ingredients. Start with quality chicken and fresh herbs. They add great flavor. Don't rush the cooking process. Let the soup simmer gently. This brings out the best taste. Stir in cream or coconut milk at the end. This keeps it rich and smooth. Always taste your soup before serving. Adjust the salt and pepper if needed. Store your soup in an airtight container. This keeps it fresh for up to five days in the fridge. If you want to save it for longer, freezing is a great option. Let the soup cool down before you freeze it. Use freezer-safe containers or bags. It can last up to three months in the freezer. When you're ready to eat, thaw it in the fridge overnight. When serving your soup, use rustic bowls for a cozy feel. A sprinkle of fresh parsley adds color and flavor. Pair it with crusty bread for dipping. This makes the meal even more comforting. You can also add a squeeze of lemon for a bright touch. Enjoy your soup hot for the best experience. For the full recipe, follow the instructions above. {{image_2}} If you want a dairy-free soup, try using coconut milk. It gives a nice, creamy texture. You can also use almond milk or soy milk. Just skip the heavy cream in the recipe. This way, you still enjoy a rich flavor without dairy. You can change the protein in this soup. Instead of chicken, use turkey for a lighter taste. If you're vegetarian, try adding chickpeas or lentils. They add protein and make the soup hearty. You can also use tofu for a great texture and flavor. Adding more veggies makes the soup even better. Try spinach, kale, or peas for a pop of color. You can also add mushrooms for a nice earthy taste. Bell peppers or zucchini work well too. Just chop them small so they cook evenly. To keep your Chicken and Wild Rice Soup fresh, place it in an airtight container. Make sure the soup cools to room temperature before sealing it. Store it in the fridge for up to three days. If you want to keep it longer, freezing is a great option. To freeze your soup, use freezer-safe containers. Leave about an inch of space at the top for expansion. You can also use freezer bags. Make sure to squeeze out the air before sealing. The soup can last in the freezer for up to three months. When you’re ready to enjoy your soup again, thaw it overnight in the fridge. To reheat, pour the soup into a pot over medium heat. Stir often until it is hot. You can also use a microwave. Heat it in a bowl, stirring every minute to warm it evenly. Enjoy your comforting meal! For the full recipe, check out the complete guide. To make Chicken and Wild Rice Soup gluten-free, choose gluten-free chicken broth. Most wild rice is already gluten-free. Always check the labels on your broth and any added ingredients. Avoid any flour thickeners or other gluten items. Yes, you can use rotisserie chicken. It saves time and adds great flavor. Just shred the chicken and add it when the soup is nearly done. This keeps it tender and warm without overcooking. To freeze Chicken and Wild Rice Soup, cool it completely first. Use airtight containers or freezer bags. Leave some space for expansion. Label the bags with the date. It can last up to three months in the freezer. To reheat, thaw overnight in the fridge and heat on the stove. Add a splash of broth or water if it thickens too much. In this blog post, we explored how to make Chicken and Wild Rice Soup. We learned about key ingredients, step-by-step preparation, and cooking methods. I shared tips for perfecting your soup and storing leftovers. We also discussed variations, like dairy-free options and added proteins. This soup can be a warm, comforting meal for anyone. Use these ideas and instructions to create your own tasty version. Enjoy every delicious bite!](https://dailydishly.com/wp-content/uploads/2025/06/ba29d031-2d2c-4923-bda3-eccafd61a64a-768x768.webp)
![- 4 bone-in chicken thighs, skin-on - 2 medium zucchinis, sliced into half-moons - 1 bell pepper (red or yellow), chopped - 1 cup cherry tomatoes, halved - 1 red onion, cut into wedges - 4 cloves garlic, minced - 1/4 cup olive oil - Juice of 2 lemons - Zest of 1 lemon - 2 teaspoons dried oregano - 1 teaspoon smoked paprika - Salt and pepper to taste - Fresh parsley, chopped for garnish For the main dish, I like to use bone-in chicken thighs. They stay juicy and add great flavor. Pair them with colorful veggies like zucchini, bell peppers, cherry tomatoes, and red onion. Don’t forget the garlic—its aroma will fill your kitchen. The olive oil and lemon juice create a tasty marinade that makes everything shine. - Fresh herbs and spices - Alternative vegetables to add - Marinade variations Fresh herbs like thyme or rosemary can boost flavor even more. You could also swap in veggies like asparagus or broccoli based on what you have. For a twist, try a different marinade. A honey mustard blend or a spicy harissa can change the game. With these options, you can create your own unique version of the dish. Check out the Full Recipe for more details on how to make it! Start by whisking together the marinade. In a bowl, mix olive oil, lemon juice, lemon zest, minced garlic, oregano, smoked paprika, salt, and pepper. This mix brings bright flavors to the chicken and veggies. Marinating is key. Place the chicken thighs in a bag or bowl. Pour half of the marinade over the chicken. Let it sit in the fridge for at least 30 minutes. For stronger flavor, marinate up to 2 hours. Next, preheat your oven to 425°F (220°C). This step ensures even cooking. While the oven heats, prepare the veggies. In a large bowl, combine zucchini, bell pepper, cherry tomatoes, and red onion. Pour the remaining marinade over the veggies and toss well. This will help the vegetables soak up the flavors. Now, arrange the chicken and veggies on a sheet pan. Place the marinated chicken in the center. Spread the veggies around the chicken for even cooking. Bake the dish for 30 to 35 minutes. The chicken should reach an internal temperature of 165°F (75°C). The veggies will become tender and slightly caramelized. Check for doneness by using a meat thermometer. Once done, remove the pan from the oven. Let it rest for a few minutes before serving. Garnish with freshly chopped parsley for a pop of color. For the full recipe, check out the [Full Recipe]. To enhance the marinade, focus on fresh ingredients. Fresh lemon juice adds brightness. The zest boosts the lemon flavor. Garlic brings depth and warmth. Use quality olive oil for richness. You can also add fresh herbs like rosemary or thyme for extra flavor. When choosing chicken cuts, I recommend bone-in thighs. They stay juicy and tender during cooking. The skin adds flavor and helps crisp up nicely. You can also use drumsticks, but avoid boneless cuts. They tend to dry out faster. For even cooking, cut vegetables into similar sizes. This way, they cook together without some burning. Toss them in the marinade well. Make sure every piece is coated for the best flavor. To add textures, mix soft and crunchy vegetables. Cherry tomatoes become sweet and juicy. Zucchini softens but keeps some bite. Bell peppers add a nice crunch. Red onions caramelize, bringing sweetness to the dish. {{image_2}} You can switch up the taste of your sheet pan lemon chicken easily. Instead of lemon, try lime or orange juice. Both citrus fruits bring a unique zest to the dish. Lime adds a fresh twist, while orange gives a sweeter note. Mixing in different herbs and spices can also change the flavor profile. For example, swap oregano for thyme or rosemary. These herbs add depth and pair well with chicken. You can even try a dash of chili powder for a spicy kick! Grilling is a fun way to cook this recipe. It gives a nice smoky flavor that's hard to beat. Just marinate the chicken and veggies as usual. Then, place them on the grill until cooked through. If you want a one-pan meal, consider using other proteins. Boneless chicken breast, shrimp, or even tofu work great. Adjust the cooking time as needed. This way, you can enjoy new flavors while keeping it simple. After enjoying your sheet pan lemon chicken and veggies, store leftovers properly to keep them fresh. - Refrigerating leftovers safely: Place the chicken and veggies in an airtight container. They will stay good in the fridge for up to four days. Make sure to let them cool down before sealing the container. - Freezing guidelines for chicken and veggies: If you want to save them for later, freeze the leftovers. Use freezer-safe bags or containers. You can freeze them for up to three months. Just remember to label the bags with the date. To enjoy your meal again, reheating is key to keeping it tasty. - Best methods to maintain quality: The best way to reheat is in the oven. Preheat it to 350°F (175°C). Place the chicken and veggies in a baking dish. Cover with foil to keep them moist. - Time and temperature considerations: Heat for about 20-25 minutes. Check that the chicken reaches 165°F (75°C) again. This ensures it is safe and delicious to eat. I recommend marinating the chicken for at least 30 minutes. If you can, let it marinate for up to 2 hours. This longer time allows the chicken to soak in all the zesty flavors. The marinade adds moisture and taste, making the chicken juicy and savory. Yes, you can use boneless chicken. Just remember to adjust the cooking time. Boneless chicken cooks faster than bone-in cuts. Start checking for doneness at about 20 minutes. You want the internal temperature to reach 165°F. This will ensure your chicken is safe to eat and still juicy. If you don’t have a sheet pan, don’t worry! You can use a baking dish or a large skillet. Just make sure to arrange the chicken and veggies in a single layer. This helps them cook evenly. If you use a smaller pan, you may need to cook in batches. This recipe is great for meal prep! You can make it ahead and store the leftovers in the fridge. It keeps well for up to four days. Just reheat portions in the oven or microwave when you’re ready to eat. Divide the meal into containers for easy lunches or dinners. For a twist, try adding different sides throughout the week. Exciting meals can make your prep even more fun! For the full recipe, be sure to check out the details above. This blog post showed you how to make a tasty sheet pan lemon chicken. We covered the main and optional ingredients, plus how to prepare and cook them. You learned tips for flavor and texture, and even some fun variations. Don’t forget how to store and reheat leftovers. Now, you can enjoy delicious meals without much fuss. Try making this dish and share it with friends or family. Cooking can be fun and easy!](https://dailydishly.com/wp-content/uploads/2025/06/6619f650-0475-47be-ab23-3ec1a8437763-768x768.webp)