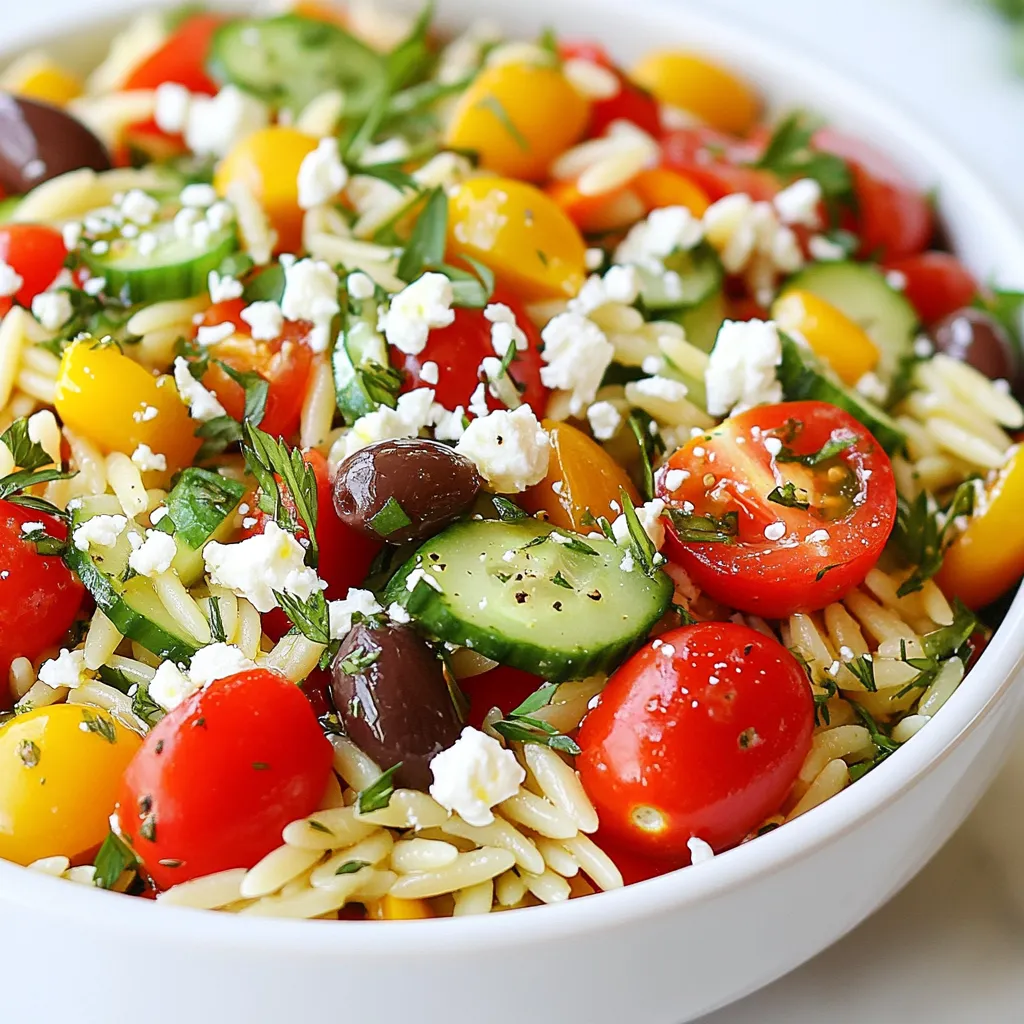
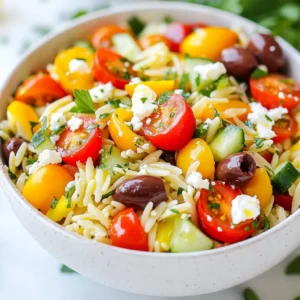
Greek Orzo Salad with Feta Flavorful Fresh Dish


Looking to elevate your lunch or dinner? Try my Greek Orzo Salad with Feta! This fresh dish is packed with flavor and easy to make. You’ll love the bright veggies, creamy feta, and zesty dressing that tie everything together. Whether you seek a quick meal or a side for a gathering, this salad fits the bill. Let’s dive into the ingredients and steps to create this delightful recipe!
Why I Love This Recipe
- Fresh and Vibrant: This Greek Orzo Salad is packed with fresh vegetables and herbs, making it a colorful and appealing dish that’s perfect for any occasion.
- Easy to Prepare: With minimal cooking required, this salad comes together quickly, making it an ideal choice for busy weeknights or last-minute gatherings.
- Versatile and Customizable: Feel free to add your favorite protein, such as grilled chicken or chickpeas, to make this salad a complete meal.
- Deliciously Satisfying: The combination of feta cheese, olives, and a zesty dressing gives this salad a rich flavor that is both satisfying and refreshing.
Ingredients
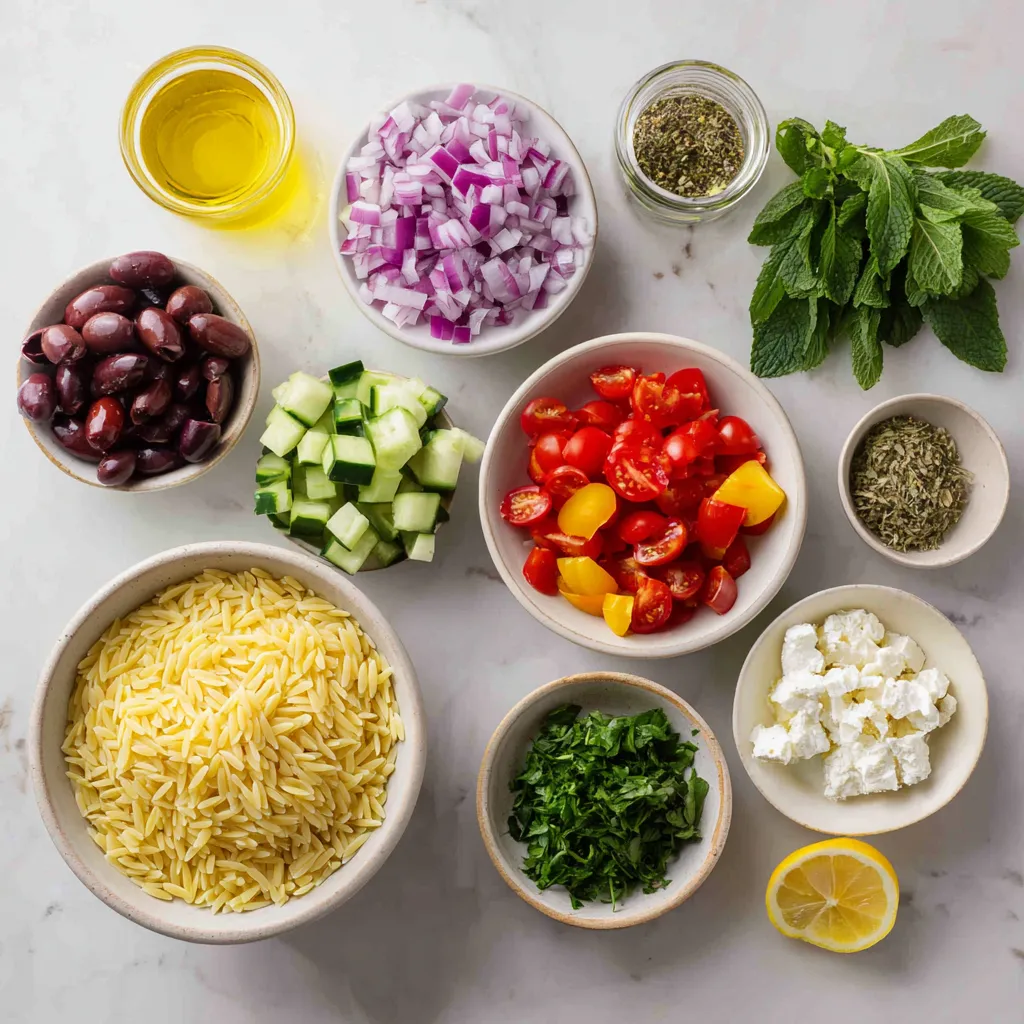
List of Ingredients for Greek Orzo Salad with Feta
– 1 cup orzo pasta
– 1 cup cherry tomatoes, halved
– 1 cucumber, diced
– 1/2 red onion, finely chopped
– 1/2 bell pepper, diced (red or yellow for sweetness)
– 1/2 cup Kalamata olives, pitted and halved
– 1 cup feta cheese, crumbled
– 1/4 cup fresh parsley, chopped
– 1/4 cup fresh mint, chopped
– 1/4 cup olive oil
– 2 tablespoons lemon juice
– 1 teaspoon dried oregano
– Salt and pepper to taste
Ingredient Notes and Substitutions
You can swap orzo with quinoa or pasta of your choice. Cherry tomatoes can change to diced tomatoes for a different taste. If you like it spicy, add a chopped jalapeño or some crushed red pepper. For a lighter option, use low-fat feta or omit it altogether. If you prefer, you can replace Kalamata olives with green olives for a milder flavor.
Importance of Fresh Ingredients
Fresh ingredients make this salad shine. The taste of ripe cherry tomatoes brings sweetness, while crunchy cucumbers add texture. Fresh herbs like parsley and mint give a bright flavor. Always choose the freshest veggies and herbs you can find. They boost the salad’s taste and make it delightful. Using fresh ingredients helps you enjoy a meal that is not only tasty but also healthy.
Step-by-Step Instructions
Cooking the Orzo Pasta
Start by boiling a large pot of salted water. Once the water bubbles, add 1 cup of orzo pasta. Cook for about 8-10 minutes until the pasta is al dente. Stir it a few times while cooking. After cooking, drain the orzo in a colander. Rinse it under cold water to stop it from cooking further. Let it drain well.
Preparing the Vegetable Mixture
In a large mixing bowl, add 1 cup of halved cherry tomatoes, 1 diced cucumber, 1/2 finely chopped red onion, and 1/2 diced bell pepper. You can use red or yellow bell pepper for a touch of sweetness. Then, add 1/2 cup of pitted and halved Kalamata olives. Stir the vegetables together until they are well mixed.
Making the Dressing
In a smaller bowl, whisk together 1/4 cup of olive oil, 2 tablespoons of lemon juice, and 1 teaspoon of dried oregano. Add salt and pepper to taste. Mix it well until the oil and lemon juice blend together smoothly.
Combining Ingredients and Tossing the Salad
Add the cooled orzo to the bowl with the vegetables. Crumble in 1 cup of feta cheese, and add 1/4 cup of chopped fresh parsley and 1/4 cup of chopped fresh mint. Drizzle your dressing over the whole mixture. Gently toss everything together to coat the ingredients evenly with the dressing.
Adjusting Seasoning
Before serving, taste the salad. If it needs more flavor, add extra salt and pepper. Let the salad sit for at least 15 minutes. This waiting time allows the flavors to mix well. Enjoy your bright and fresh Greek Orzo Salad!
Tips & Tricks
Best Practices for Cooking Orzo
To cook orzo perfectly, start with lots of water. Use a big pot to keep the pasta from sticking. Add salt to the boiling water; this helps flavor the pasta. Cook it for 8 to 10 minutes until tender but firm. After cooking, drain the orzo right away. Rinse it under cold water to stop cooking. This keeps the orzo from getting mushy.
How to Enhance Flavor with Herbs
Fresh herbs give your Greek Orzo Salad a bright taste. I love using parsley and mint. They add freshness and a bit of crunch. Chop them finely and mix them in just before serving. You can also use dried oregano for a warm, earthy flavor. If you want a twist, try basil or dill. These herbs boost flavor without overpowering the dish.
Serving Suggestions for Greek Orzo Salad
Presentation matters! Serve the salad in a colorful bowl for a fun look. Sprinkle extra feta on top for a creamy touch. Add a few olives and cherry tomatoes for color. This salad is great as a side dish or a light meal. Pair it with grilled chicken or fish for a complete dinner. Enjoy it chilled or at room temperature for the best taste.
Pro Tips
- Use Fresh Herbs: Fresh parsley and mint add vibrant flavors to your salad. Always opt for fresh herbs over dried for the best taste and aroma.
- Chill Before Serving: Allowing the salad to sit for at least 15 minutes before serving helps the flavors meld together beautifully, enhancing the overall taste.
- Customize Your Veggies: Feel free to swap in seasonal vegetables like bell peppers or zucchini to give your salad a unique twist based on what’s fresh and available.
- Perfect Feta Crumble: For a creamier texture, use block feta and crumble it by hand instead of pre-crumbled feta, which can be drier and less flavorful.
Variations
Additional Ingredients You Can Add
You can make your Greek Orzo Salad even better with extra ingredients. Try adding:
– 1/2 cup roasted red peppers, diced
– 1 cup artichoke hearts, quartered
– 1/4 cup capers, rinsed
– 1/2 cup cooked chickpeas for protein
– Fresh spinach or arugula for greens
These add flavor and texture. Each addition will create a new twist on the classic salad.
Vegan or Vegetarian Adaptations
If you want a vegan version, leave out the feta cheese. Instead, use tofu or avocado for creaminess. Nutritional yeast gives a cheesy flavor without dairy. This keeps the salad fresh and tasty while fitting a vegan diet.
For vegetarians, you can keep the feta. It adds a nice salty flavor and creaminess. You can also try goat cheese or a plant-based feta for variety.
Seasonal Variations for Different Ingredients
Seasonal ingredients can change the salad’s taste. In spring, add fresh peas or asparagus. In summer, use ripe peaches or berries. In fall, roasted butternut squash or sweet potatoes can give warmth. In winter, try using kale or brussels sprouts for crunch.
These swaps keep your salad fresh and exciting all year round. Each season brings new flavors to explore.
Storage Info
How to Store Leftover Salad
To keep your Greek Orzo Salad fresh, place any leftovers in a container. Make sure to cover it tightly. This helps keep out air and moisture. If you add dressing, it might get soggy. So, keep the dressing separate if you plan to store it. This way, you’ll enjoy a fresh salad next time.
Best Containers for Storage
Use glass or plastic containers with tight lids. These containers keep the salad fresh and safe. You can also use resealable bags for smaller servings. Just make sure to remove as much air as possible. This helps prevent spoilage and keeps the flavors bright.
Shelf Life and Reheating Tips
Your salad can last in the fridge for about 3 to 4 days. After that, the veggies may lose their crunch. If you want to reheat it, do so gently. You can use a microwave at a low setting. However, I recommend enjoying it cold. The flavors shine better that way, plus it feels refreshing!
FAQs
How do I make my Greek Orzo Salad more filling?
You can add protein to your Greek Orzo Salad. Try grilled chicken, shrimp, or chickpeas. These ingredients make the salad hearty and satisfying. You can also include more grains, like quinoa, for extra texture and fiber.
Can I prepare Greek Orzo Salad in advance?
Yes, you can make Greek Orzo Salad ahead of time. Prepare it a few hours or even a day before serving. Just keep it in the fridge. This allows the flavors to blend well. Just remember to add the dressing right before serving for freshness.
What can I serve with Greek Orzo Salad?
Greek Orzo Salad pairs well with many dishes. You can serve it with grilled meats, seafood, or roasted vegetables. It also works great as a side for a BBQ or picnic. For a lighter meal, enjoy it with some crusty bread and hummus.
Is Greek Orzo Salad suitable for meal prep?
Greek Orzo Salad is perfect for meal prep. It keeps well in the fridge for several days. Make a big batch and pack it in individual containers. This makes for quick lunches or dinners all week long. Just remember to store the dressing separately.
In this article, we explored how to make a delicious Greek Orzo Salad with Feta. We covered key ingredients, step-by-step cooking, and helpful tips. We also looked at fun variations and storage tips to keep your salad fresh. This salad is perfect for any meal or occasion. By using fresh ingredients and adjusting flavors, you can create your own unique dish. Enjoy making this easy and tasty salad in your kitche
Greek Orzo Salad with Feta
Ingredients
- 1 cup orzo pasta
- 1 cup cherry tomatoes, halved
- 1 whole cucumber, diced
- 0.5 whole red onion, finely chopped
- 0.5 whole bell pepper, diced (red or yellow for sweetness)
- 0.5 cup Kalamata olives, pitted and halved
- 1 cup feta cheese, crumbled
- 0.25 cup fresh parsley, chopped
- 0.25 cup fresh mint, chopped
- 0.25 cup olive oil
- 2 tablespoons lemon juice
- 1 teaspoon dried oregano
- to taste salt and pepper
Instructions
- Begin by cooking the orzo pasta. Bring a large pot of salted water to a boil, add the orzo, and cook according to the package instructions (usually around 8-10 minutes) until al dente.
- Once cooked, drain the orzo and rinse it under cold water to stop the cooking process. Allow it to drain and cool completely.
- In a large mixing bowl, combine the cherry tomatoes, cucumber, red onion, bell pepper, and Kalamata olives. Stir to combine the vegetables evenly.
- In a smaller bowl, prepare the dressing by whisking together the olive oil, lemon juice, dried oregano, salt, and pepper until well mixed.
- Add the cooled orzo to the vegetable mixture along with the crumbled feta, chopped parsley, and mint.
- Drizzle the dressing over the salad and toss everything gently to combine, ensuring the orzo and vegetables are well-coated in the dressing.
- Taste and adjust seasoning with more salt and pepper as needed.
- Let the salad sit for at least 15 minutes to allow the flavors to meld together before serving.


![- 1 lb chicken breast, cut into 1-inch cubes - 2 ripe mangoes, pureed - Zest and juice of 2 limes For the Mango Lime Chicken Skewers, the main ingredients bring the dish to life. Chicken breasts provide a lean protein base. Ripe mangoes lend sweetness and a tropical touch. Lime zest and juice add a bright, tangy flavor that balances the sweetness of the mango. - 2 tablespoons honey - 2 tablespoons olive oil - 1 teaspoon garlic powder - 1 teaspoon ground cumin - Salt and pepper to taste The marinade is key to creating depth in the flavor. Honey adds a hint of sweetness that complements the mango. Olive oil keeps the chicken moist while adding richness. Garlic powder brings a savory note, while ground cumin offers warmth and earthiness. Salt and pepper enhance all the flavors. - Fresh cilantro, for garnish - Wooden or metal skewers Garnishing with fresh cilantro adds a pop of color and fresh taste. It brightens the dish and elevates the presentation. You can use wooden or metal skewers for holding the chicken. Just remember to soak wooden skewers in water for 30 minutes before grilling to prevent burning. By using these ingredients, you set the stage for a flavorful and vibrant meal. For the full recipe, check the link provided. First, gather your ingredients. In a large bowl, combine 2 ripe mangoes pureed, zest and juice of 2 limes, and 2 tablespoons honey. Add 2 tablespoons olive oil, 1 teaspoon garlic powder, 1 teaspoon ground cumin, along with salt and pepper to taste. Mix well until everything blends smoothly. This marinade gives the chicken a sweet and tangy flavor, making it truly special. Next, take 1 pound of chicken breast cut into 1-inch cubes. Coat these chicken cubes with the marinade you just made. Make sure each piece is fully covered. This step is key for the flavor to soak in. Cover your bowl with plastic wrap and place it in the fridge. Let the chicken marinate for at least 1 hour. If you have time, refrigerate overnight for an even better taste. Now, it’s time to grill! Preheat your grill or grill pan to medium-high heat. While it heats up, thread the marinated chicken cubes onto wooden or metal skewers. Leave a little space between each piece for even cooking. Once your grill is ready, place the skewers on it. Cook for about 10 to 12 minutes, turning occasionally. Check the chicken to make sure it’s fully cooked and has nice grill marks. After grilling, let the skewers rest for a few minutes. Garnish with chopped fresh cilantro. Enjoy your Mango Lime Chicken Skewers! For more details, check the Full Recipe. For the best flavor, marinate your chicken for at least one hour. If you have time, let it sit overnight. This longer time allows the flavors to soak in deeply. When you coat the chicken, make sure every piece gets the marinade. Use your hands or a spoon to mix it well. This helps every bite to be bursting with mango and lime. Grill your skewers at medium-high heat. This temperature creates a nice char without burning the chicken. Cook the skewers for about 10 to 12 minutes. Turn them a few times to ensure even cooking. Check the chicken for doneness by cutting a piece open. It should be white inside with no pink. Serve your skewers with fresh sides like a salad or rice. A mango salsa or a zesty yogurt dip also pairs well. For a colorful plate, arrange the skewers neatly and drizzle some extra mango puree on top. Add lime wedges for garnish to give a bright look and extra flavor. You can also sprinkle fresh cilantro for a pop of color. {{image_2}} You can switch out the chicken for shrimp or firm tofu. Shrimp cooks fast and takes on flavors well. Just marinate them the same way as chicken. Firm tofu absorbs all the good taste. Cut it into cubes and let it soak in the marinade for at least 30 minutes. Both options create a tasty dish that fits different diets. To make the dish even more exciting, add spices like chili powder or ginger. Chili powder gives a warm kick, while ginger adds a fresh touch. You can also try different fruits. Pineapple, for example, brings a sweet and tangy flavor. Just chop the fruit and mix it into your marinade. Experimenting with these flavors can lead to fun new tastes. You don’t have to stick to just chicken or shrimp. Try using veggies or other fruits on your skewers. Bell peppers, zucchini, and onions work great and add color. Fruits like pineapple or peaches can also be skewered. They caramelize beautifully on the grill. This not only makes your meal more colorful but also adds more nutrients. To store leftover mango lime chicken skewers, place them in an airtight container. This keeps them fresh. Make sure to cool them to room temperature first. Store them in the fridge for up to three days. For reheating, you can use your grill or a skillet. Heat them on medium until warm. This helps keep the chicken juicy and tasty. Avoid using a microwave, as it can make the chicken dry. Yes, you can freeze mango lime chicken skewers! This is great for meal prep. To freeze, wrap each skewer in plastic wrap. Then, place them in a freezer-safe bag. This keeps them safe from freezer burn. They can last up to three months in the freezer. When ready to eat, thaw them in the fridge overnight. This helps them defrost evenly. Then, grill or reheat as you like. In the fridge, mango lime chicken skewers last for about three days. If you freeze them, they can last for about three months. Always check for any off smell or color before eating! Proper storage ensures your meal stays safe and delicious. To marinate chicken well, use a mix of acid and fat. The acid helps to tenderize the meat. For Mango Lime Chicken Skewers, marinate for at least 1 hour. If you have time, letting it sit overnight gives better flavor. Keep the chicken in the fridge while it marinates. Yes, you can cook these skewers in the oven. Preheat your oven to 400°F. Place the skewers on a baking sheet lined with foil. Bake for about 20-25 minutes. Flip the skewers halfway through cooking for even results. This method works well if you can't grill. To check chicken doneness, look for clear juices. If the juices run clear when you cut into the chicken, it’s done. The meat should not be pink inside. You can also cut a piece in half to check. Always ensure it reaches a safe internal temperature. These skewers are great with a side of rice or a fresh salad. You can also serve them with grilled veggies. Try adding a light dipping sauce, like yogurt or a mango salsa. This adds flavor and balance to your meal. For the complete Mango Lime Chicken Skewers recipe with all details, check out the [Full Recipe]. This blog post covered making delicious Mango Lime Chicken Skewers. You learned about the key ingredients, like chicken and mangoes, and how to prepare a tasty marinade. We went through grilling tips and serving ideas to make your meal shine. You can even try different proteins or spices to mix things up. Remember to store leftovers correctly for later enjoyment. Now, you have all the tools needed to create a flavorful dish that your friends and family will love. Enjoy your cooking adventure with these tasty skewers!](https://dailydishly.com/wp-content/uploads/2025/05/700a395d-140d-49bc-8652-e5807e5ab179-768x768.webp)
![- 4 chicken thighs, bone-in and skin-on - 1/4 cup honey - 4 cloves garlic, minced - 2 tablespoons soy sauce (or tamari for gluten-free) - 1 tablespoon apple cider vinegar - 1 tablespoon olive oil - 1 teaspoon grated fresh ginger - 1/2 teaspoon black pepper - Chopped green onions - Sesame seeds The main ingredients in this dish are simple yet powerful. Chicken thighs offer rich flavor and juicy texture. Honey adds sweetness that balances the savory notes. Garlic brings a punch that enhances every bite. The additional ingredients work together to create a delicious marinade. Soy sauce adds umami depth, while apple cider vinegar brings brightness. Olive oil helps keep the chicken moist during cooking. For seasoning, fresh ginger adds warmth. Black pepper gives a slight kick. The green onions and sesame seeds make for a lovely garnish, adding color and crunch. You can find the complete process in the Full Recipe. These ingredients blend to create a honey garlic glaze that makes this chicken dish truly special. Preparing the marinade To start, grab a medium bowl. Whisk together the honey, minced garlic, soy sauce, apple cider vinegar, olive oil, grated ginger, black pepper, and a small pinch of salt. Mix until all ingredients blend well. This sauce will give your chicken a sweet and savory flavor. Marinating the chicken Next, take your chicken thighs and place them in a zip-lock bag or shallow dish. Pour the marinade over the chicken, making sure each piece gets coated. Seal the bag or cover the dish. Refrigerate for at least one hour. For deeper flavor, marinate overnight. Preheating the oven While the chicken marinates, preheat your oven to 400°F (200°C). A hot oven helps the chicken cook evenly and crisp the skin. Baking the chicken After marinating, remove the chicken from the marinade. Don’t throw the marinade away; you will use it later. Place the chicken thighs skin side up on a baking tray lined with parchment paper. Bake in the preheated oven for 30-35 minutes. The chicken is ready when it reaches an internal temperature of 165°F (74°C) and the skin is crispy. Cooking the sauce While your chicken bakes, pour the reserved marinade into a small saucepan. Heat it over medium heat. Let it simmer for about 5-7 minutes until it thickens slightly. This will be your delicious glaze. Glazing and serving When the chicken is done, brush the thickened glaze over the thighs. Return the tray to the oven for another 5 minutes to caramelize the glaze. Once done, remove and sprinkle with chopped green onions and sesame seeds. Let the chicken rest for a few minutes before serving. Enjoy your Honey Garlic Glazed Chicken Thighs! For the full recipe, check the earlier section. - The best time to marinate chicken thighs is at least one hour. For deeper flavor, marinate overnight. - Use a zip-lock bag for even coating. Squeeze out air to let the marinade soak in well. - To get crispy skin, bake the chicken thighs skin side up. This allows the fat to render and crisp up. - Check the internal temperature with a meat thermometer. It should reach 165°F (74°C) for safe eating. - Pair your honey garlic glazed chicken with steamed rice or roasted vegetables. - For a nice look, garnish with chopped green onions and sesame seeds. This adds color and crunch. For the full recipe, refer to the instructions above. Enjoy your cooking! {{image_2}} You can switch up the protein in this dish. Chicken breast works well if you want less fat. For a plant-based option, try tofu. Just press it to remove excess water and cut it into cubes. You can also change the sweetener. If you want a lower sugar option, use maple syrup or agave nectar. These alternatives blend nicely with the other flavors. Make this dish even better by adding spices or herbs. Try ginger or chili flakes for a kick. Fresh herbs like cilantro or basil can bring a nice twist too. You can also play with acids. Lime juice adds a bright flavor, while balsamic vinegar gives a sweet tang. Try adding a splash during cooking for a new taste. Grilling the chicken gives it a smoky flavor. Just marinate as usual and grill over medium heat. It takes about 20 minutes, and you’ll get nice grill marks. If you own an Instant Pot, you can use it for this recipe too. Cook the marinated chicken on high for 10 minutes, then let it naturally release. This method keeps the chicken super juicy. For the full recipe, check out the complete instructions and details. To keep your honey garlic glazed chicken thighs fresh, store them in the fridge. Place the cooked chicken in an airtight container. It can last up to 3 days in the refrigerator. If you want to store it longer, consider freezing it. Wrap the chicken tightly in plastic wrap, then place it in a freezer-safe bag. This way, it can stay good for up to 3 months. When it's time to enjoy leftovers, reheating can be simple. The best way to reheat is in the oven. Set your oven to 350°F (175°C). Place the chicken on a baking sheet and cover it with foil. This helps keep the chicken moist. Heat it for about 15-20 minutes or until it's warm. You can also use a microwave, but use a lower power setting to avoid drying it out. Cover the chicken with a damp paper towel to keep moisture in. You can store your honey garlic glazed chicken thighs safely for a few days. In the fridge, they stay good for 3 days. In the freezer, they last for 3 months. Signs of spoilage include a strange smell, changes in color, or a slimy texture. Always check before eating to stay safe. For more details on how to make this dish, check the Full Recipe. Can I use boneless chicken thighs? Yes, you can use boneless chicken thighs. They will cook faster than bone-in thighs. Check the internal temperature to ensure they reach 165°F (74°C). How to make the glaze thicker? To thicken the glaze, simmer it longer. Cook it on medium heat until it reduces and becomes syrupy. You can also add a cornstarch slurry for extra thickness. How to make it gluten-free? Use tamari instead of soy sauce. Tamari is a gluten-free option that tastes great. Can I add vegetables to the dish? Yes, you can add vegetables. Try bell peppers, broccoli, or carrots. Toss them on the baking tray with the chicken. How many servings does this recipe yield? This recipe makes four servings. It’s perfect for a small family meal. Can I double the recipe for a larger group? Yes, you can double the recipe. Just ensure your baking tray has enough space. You may need to adjust cooking time slightly. For the complete recipe, check out the [Full Recipe]. This recipe uses simple ingredients like chicken thighs, honey, and garlic. You learned how to prepare and cook tasty chicken with an easy glaze. I shared tips to help with marinating and cooking for the best results. Feel free to explore variations and enjoy leftovers too. Try different flavors and cooking methods. Cooking should be fun and personal. Use your taste to create amazing meals. Enjoy making this dish with friends and family!](https://dailydishly.com/wp-content/uploads/2025/07/b9cba3e0-ee7f-4dbf-9eac-9b8411a1c4fd-768x768.webp)