Go Back
To make roasted garlic hummus, you need simple ingredients. Here’s what I use: - 1 cup canned chickpeas, rinsed and drained - 1/4 cup tahini - 1/4 cup olive oil - 1 whole head of garlic - 2 tablespoons lemon juice - 1/2 teaspoon ground cumin - Salt to taste - Water, as needed - Fresh parsley, for garnish - Paprika, for garnish Each ingredient in this hummus brings great nutrition. Chickpeas are high in protein and fiber. They help you feel full longer. Tahini adds healthy fats and calcium. Olive oil provides heart-healthy monounsaturated fats. Garlic supports your immune system. Lemon juice is rich in vitamin C, boosting your health. Cumin adds flavor and may help digestion. Quality matters when you shop. Choose canned chickpeas with no added sugar or salt. Look for tahini made from pure sesame seeds. Good olive oil has a rich taste and aroma. For garlic, pick firm heads with no soft spots. Fresh lemon juice is best, as it adds bright flavor. Always check the date on your spices for freshness. For more details, check the Full Recipe. To make roasted garlic, start by preheating your oven to 400°F (200°C). Take a whole head of garlic and slice off the top. This helps the garlic cook well. Drizzle a little olive oil on the cut side. Wrap the garlic in aluminum foil. Roast it in the oven for about 30 to 35 minutes. You want the cloves to be soft and golden. Once done, let it cool before using. Now, let’s blend the hummus. In a food processor, add one cup of canned chickpeas that you rinsed and drained. Next, add 1/4 cup of tahini and 1/4 cup of olive oil. Squeeze in two tablespoons of fresh lemon juice and add 1/2 teaspoon of ground cumin. Toss in a pinch of salt. Now, take three to four roasted garlic cloves and add them to the mix. Blend everything until smooth. As you blend, you may need to adjust the texture. If the hummus is too thick, slowly add water. Do this a tablespoon at a time. This helps you reach the creamy consistency you desire. Once blended, taste the hummus. Adjust the flavor by adding more salt or lemon juice if needed. Your roasted garlic hummus is now ready! For the full recipe, check out the details above. To get the best flavor from your roasted garlic hummus, use fresh garlic. Roasting brings out the sweet, nutty taste. I suggest roasting a whole head of garlic. This gives you a rich, creamy flavor. If you want more garlic, feel free to add extra cloves. Remember, the quality of your olive oil matters too. Use a good extra virgin olive oil for a fruity touch. Roasted garlic hummus pairs well with many foods. Serve it with pita chips, fresh veggies, or warm flatbreads. You can spread it on sandwiches or wraps too. For a fun twist, try it with grilled meats or fish. It also works great as a dip at parties. Just keep a bowl handy, and watch it disappear! If you like it spicy, add red pepper flakes or cayenne. Start with a little and taste as you go. You can also mix in smoked paprika for a smoky flavor. If it gets too spicy, balance it with more tahini or lemon juice. This way, you control the heat while keeping it tasty. For the full recipe, check out the instructions above. {{image_2}} You can boost the flavor of your roasted garlic hummus by adding herbs and spices. Fresh herbs like basil or cilantro can give a bright taste. Dry spices like smoked paprika or cayenne add a nice kick. Simply blend these in during the mixing stage for a fun twist. Chickpeas are classic, but you can switch things up. White beans, like cannellini, have a creamy texture. Lentils also work well and add a different taste. Just make sure to use canned or cooked beans for easy blending. Experiment with what you like best! Roasted vegetables can add depth to your hummus. Carrots, red peppers, or even beets create unique flavors. Just roast them until soft and blend them in. This adds color and nutrition to your spread, making it more fun and tasty. Try these variations in the Full Recipe for roasted garlic hummus, and you will make it your own! Store your roasted garlic hummus in an airtight container. This keeps it fresh and tasty. It is best to refrigerate it right after making. If you do not have a lid, use plastic wrap. Press the wrap directly onto the hummus to limit air exposure. This helps prevent drying out. If you want to save some for later, freezing is a great option! Scoop the hummus into freezer-safe containers. Leave some space at the top because it will expand when frozen. You can also use ice cube trays. This method makes it easy to thaw just what you need. Cover the containers tightly and label them with the date. When you're ready to enjoy it, thaw in the fridge overnight. Pre-made hummus usually lasts about a week in the fridge after opening. Always check the expiration date on the package. Once you open it, keep it stored well. If it smells sour or looks off, it’s best to toss it. For safety, always trust your senses! To make roasted garlic hummus, you need simple steps. First, roast a whole head of garlic. Slice off the top and drizzle with olive oil. Wrap it in foil and roast at 400°F for 30 to 35 minutes. Let it cool. Next, blend the chickpeas, tahini, lemon juice, cumin, and salt in a food processor. Squeeze out three to four roasted garlic cloves into the mixture. Blend until smooth. Slowly add olive oil while blending. If too thick, add water until creamy. Taste and adjust seasoning as needed. You can find the Full Recipe for more details. Roasted garlic hummus pairs well with many foods. You can serve it with pita bread, fresh veggies, or crackers. It also shines with chips or as a spread on sandwiches. Add it to a charcuterie board for a tasty treat. You can find pre-made roasted garlic hummus at local grocery stores. Look in the refrigerated section near other dips. Many health food stores also carry it. Check brands that focus on fresh ingredients for the best flavor. This post covered how to make roasted garlic hummus. We started with ingredients, measuring, and tips for quality. Next, I showed you how to prepare, blend, and get that perfect texture. I shared ways to enhance the flavor and how to pair it well. In the variations section, I highlighted adding herbs or changing beans. We also discussed storage tips like freezing and shelf life. Now, you have the tools to make great hummus at home. Enjoy your tasty creation!

Roasted Garlic Hummus

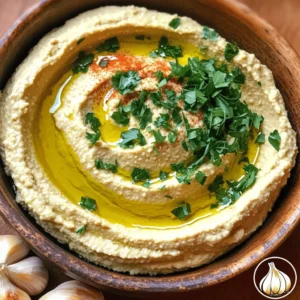
Discover the creamy delight of roasted garlic hummus with this easy recipe! Perfect for snacking or entertaining, this flavorful dip blends chickpeas, tahini, and roasted garlic for a deliciously smooth texture. In just 45 minutes, you can serve up this nutritious treat, garnished with fresh parsley and paprika. Click through to explore the full recipe and elevate your appetizer game today!

Ingredients
  

1 cup canned chickpeas, rinsed and drained

1/4 cup tahini

1/4 cup olive oil

1 whole head of garlic

2 tablespoons lemon juice

1/2 teaspoon ground cumin

Salt to taste

Water, as needed

Fresh parsley, for garnish

Paprika, for garnish

Instructions
 

Preheat your oven to 400°F (200°C).

    Take the whole head of garlic and slice off the top, exposing the individual cloves. Drizzle with a little olive oil and wrap it in aluminum foil. Roast in the oven for about 30-35 minutes until the cloves are soft and golden. Let it cool.

      In a food processor, add the canned chickpeas, tahini, lemon juice, cumin, and a pinch of salt. Squeeze out the roasted garlic cloves (three to four should suffice for a strong flavor) and add them to the processor.

        Begin blending the mixture and with the processor running, slowly drizzle in the olive oil. If the hummus is too thick, add water a tablespoon at a time until you reach your desired consistency.

          Taste and adjust the seasoning by adding more salt or lemon juice as needed.

            Transfer the hummus to a serving bowl. Drizzle a little olive oil on top and garnish with chopped fresh parsley and a sprinkle of paprika for color.

              Prep Time: 10 minutes | Total Time: 45 minutes | Servings: 6