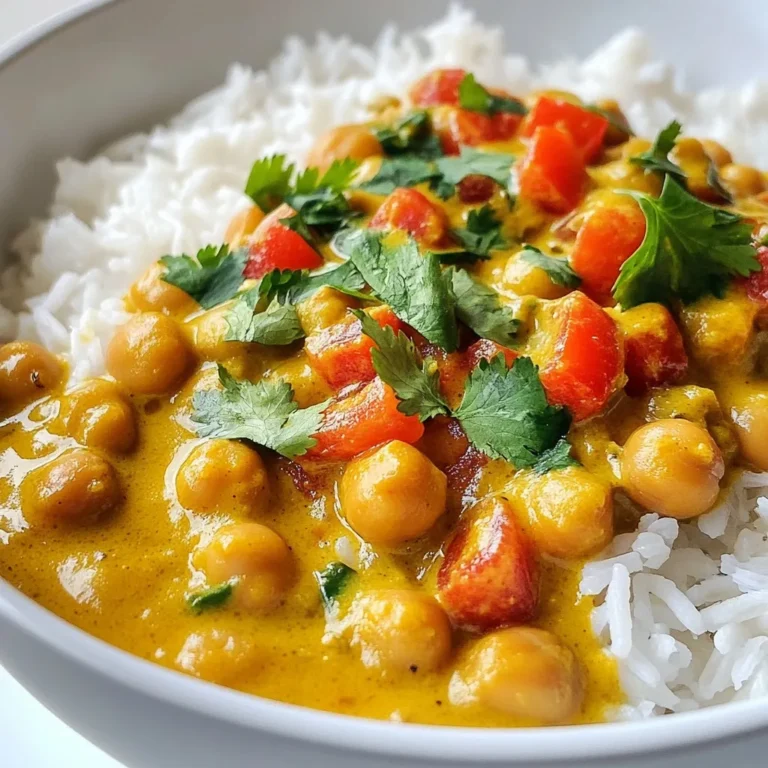
White Chicken Enchiladas Savory and Simple Recipe


Ready to make a meal that impresses with flavor and ease? My White Chicken Enchiladas recipe gives you a tasty dish featuring creamy goodness and tender chicken. With just a few simple ingredients and easy steps, you’ll be whipping up this crowd-pleaser in no time. Stick around to discover how to assemble, bake, and perfect these enchiladas for your next family dinner or gathering!
Why I Love This Recipe
- Delicious Flavor Combination: The creamy texture of the filling combined with the zesty green enchilada sauce creates a mouthwatering dish that everyone will love.
- Easy to Make: This recipe is straightforward and quick, making it perfect for busy weeknights or when you want to impress guests without spending too much time in the kitchen.
- Customizable Spice Level: With the option to adjust the jalapeños, you can easily cater this dish to your preferred spice tolerance, ensuring that everyone can enjoy it.
- Perfect for Meal Prep: These enchiladas freeze well, allowing you to make a large batch and have a delicious meal ready to go whenever you need it.
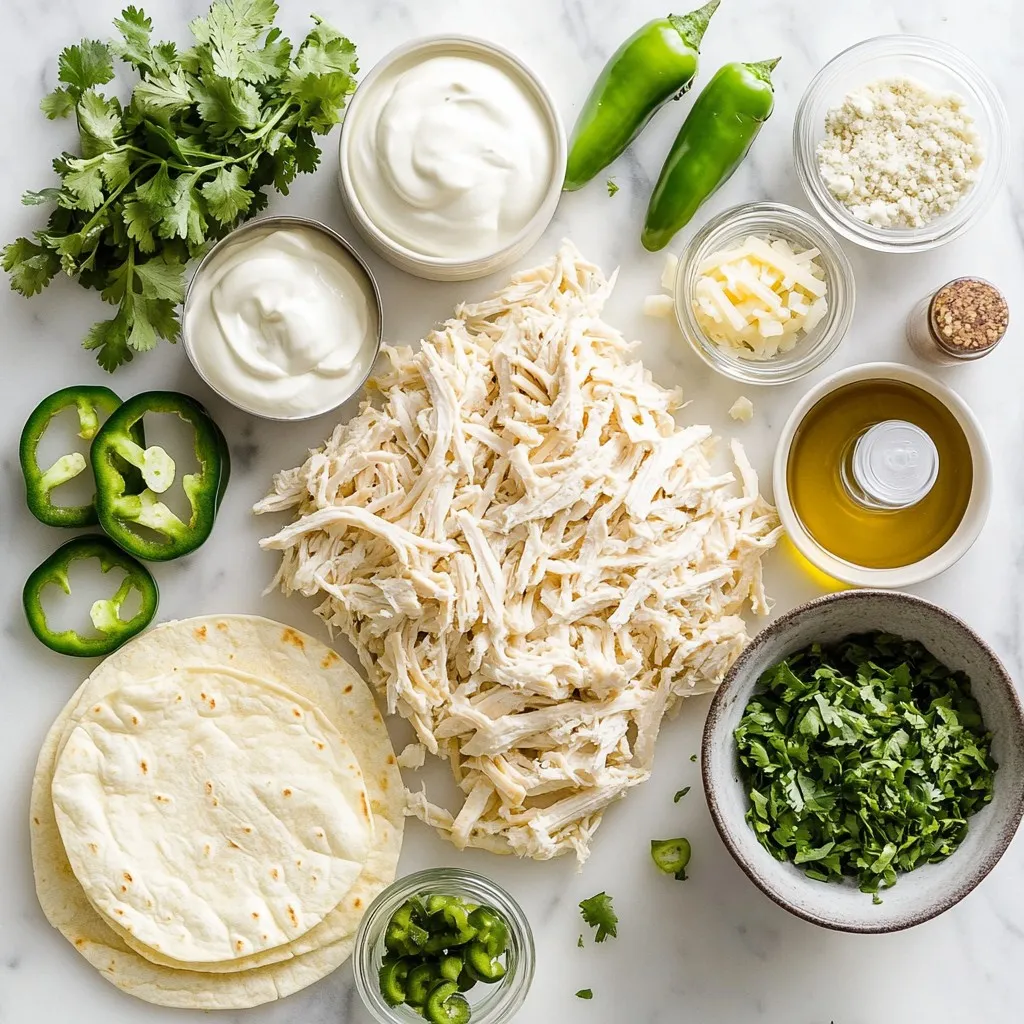
Ingredients
List of Essential Ingredients
– 2 cups cooked chicken, shredded
– 1 cup cream cheese, softened
– 1 cup sour cream
– 1 cup shredded Monterey Jack cheese
– 1 cup green enchilada sauce
– 1-2 jalapeños, diced (adjust based on spice preference)
– 8 small flour tortillas
– 1 tablespoon olive oil
– 1 teaspoon garlic powder
– 1 teaspoon onion powder
– Salt and pepper to taste
– Fresh cilantro, for garnish
– Sliced green onions, for garnish
To make white chicken enchiladas, you need fresh and tasty ingredients. Start with shredded chicken. This can be from a rotisserie or any cooked chicken. Cream cheese and sour cream bring creaminess that balances the dish. Use Monterey Jack cheese for its melting quality and mild flavor.
Green enchilada sauce gives the dish its signature color and taste. Tortillas hold everything together. Flour tortillas work best here, but feel free to choose corn if you prefer. Don’t forget the spices! Garlic and onion powder add depth. Salt and pepper enhance all the flavors. Finally, cilantro and green onions brighten the dish.
Substitutes and Alternatives
– Alternatives for Cream Cheese: You can use Greek yogurt for a lighter version. Cottage cheese works too, but blend it first for a smooth texture.
– Options for Gluten-Free Tortillas: Look for corn tortillas or gluten-free flour options. These can be found at most grocery stores.
– Different Cheese Variations: Try pepper jack for a kick or cheddar for a stronger flavor. Mix and match cheeses for fun.
These substitutes keep the dish flavorful while catering to different diets. You can still enjoy white chicken enchiladas, even if you have dietary needs!
Step-by-Step Instructions
Preparation Steps
– Preheating the Oven
Start by preheating your oven to 350°F (175°C). This step is key for cooking the enchiladas evenly.
– Mixing the Filling
In a large mixing bowl, combine the following:
– 2 cups cooked chicken, shredded
– 1 cup cream cheese, softened
– 1 cup sour cream
– ½ cup shredded Monterey Jack cheese
– 1-2 diced jalapeños
– 1 teaspoon garlic powder
– 1 teaspoon onion powder
– Salt and pepper to taste
Mix everything together until it is well blended. This filling is creamy and full of flavor.
Assembling the Enchiladas
– Preparing the Tortillas
Warm 8 small flour tortillas in a dry skillet or microwave. This makes them soft and easy to roll without breaking.
– Rolling and Placing in Baking Dish
Take a tortilla and spoon a portion of the chicken mixture onto it. Roll it tightly and place it seam-side down in a greased 9×13 inch baking dish. Repeat this for all the tortillas.
Baking Instructions
– Applying Sauce and Cheese
Once all the tortillas are in the dish, pour 1 cup of green enchilada sauce evenly over the top. Then, sprinkle the remaining ½ cup of Monterey Jack cheese on top.
– Baking Time and Temperature
Bake in the preheated oven for about 25-30 minutes. You want the cheese to be bubbly and golden brown. After baking, let the enchiladas cool for a few minutes before serving. Enjoy with fresh cilantro and sliced green onions on top!
Tips & Tricks
Perfecting Texture and Flavor
Tips for Shredding Chicken
To shred chicken, use two forks. Hold one fork to steady the meat. Use the second fork to pull apart the chicken into thin strands. This method gives you a nice texture. You can also use a stand mixer with a paddle attachment. Just mix on low speed until shredded.
Adjusting Spice Levels
Spice levels can make or break your dish. Start with one jalapeño if you prefer mild. You can always add more later. If you want it spicier, keep the seeds in the jalapeños. For a milder taste, remove the seeds and membranes before dicing. You can also swap jalapeños for a milder pepper or use none at all.
Serving Suggestions
Pairing with Side Dishes
White chicken enchiladas pair well with many sides. Try serving them with Mexican rice or a fresh garden salad. You can even add refried beans for more protein. Think about a side of corn or avocado salad for a refreshing crunch.
Garnishing for Presentation
A good garnish makes your dish pop. Use fresh cilantro for a bright touch. Sliced green onions add color and a mild onion flavor. You can also sprinkle some crumbled queso fresco on top for extra flair. These simple additions make your enchiladas look and taste amazing.
Pro Tips
- Use Rotisserie Chicken: For a quicker preparation, consider using store-bought rotisserie chicken. It saves time and adds great flavor!
- Customize the Heat: Adjust the amount of jalapeños or add diced green chilies for a spicier kick. You can also use a milder cheese if preferred.
- Make Ahead: Assemble the enchiladas a day in advance, cover them tightly, and refrigerate. Just bake them when you’re ready to serve!
- Garnish for Freshness: Don’t skip the fresh cilantro and green onions! They provide a burst of freshness that complements the creamy enchiladas perfectly.

Variations
Vegetarian White Enchiladas
Substituting Protein Sources
You can make these enchiladas vegetarian by using beans or tofu. Black beans add great flavor and protein. For a lighter option, try using lentils. They cook quickly and absorb spices well. If you prefer tofu, use firm tofu and press it to remove excess water. Crumble it into the filling for a nice texture.
Sauces to Use
For vegetarian enchiladas, a creamy sauce works best. You can use a white sauce made with plant-based milk and flour. Blend in some garlic and onion for taste. Alternatively, use a green sauce made from tomatillos. This gives a fresh kick that pairs well with veggies.
Different Sauce Options
Red Enchilada Sauce
Red enchilada sauce offers a rich flavor. You can buy it or make your own. To make it, blend tomatoes, chili powder, cumin, and garlic. Simmer until thick. Pour it over your enchiladas before baking. This sauce adds a vibrant color and a tangy taste.
Creamy Green Sauce
A creamy green sauce adds a touch of smoothness. Use green chilies, cream cheese, and sour cream for this sauce. Blend until smooth and pour it over the rolled enchiladas. The creamy texture contrasts nicely with the filling. This option is great for those who enjoy a milder flavor.
Storage Info
Refrigeration Guidelines
To keep your white chicken enchiladas fresh, store leftovers in an airtight container. Make sure they cool completely before sealing. This helps prevent sogginess. They will stay good in the fridge for up to four days.
When you reheat them, use the oven for the best results. Preheat your oven to 350°F (175°C). Place the enchiladas in a baking dish, cover with foil, and heat for about 15-20 minutes. This will keep the cheese nice and melty.
Freezing Enchiladas
If you want to freeze your enchiladas, wrap them tightly in plastic wrap and then foil. This double layer keeps out air and moisture. They can last in the freezer for up to three months.
When you’re ready to eat them, simply remove the wrapping and place them in a baking dish. Thaw them in the fridge overnight for best results. After thawing, reheat in the oven at 350°F (175°C) for about 30-35 minutes. You can also add a little extra cheese on top for added flavor.
FAQs
Common Questions
How can I make white chicken enchiladas spicier?
You can add more jalapeños for heat. You can also use diced green chilies. Another option is to mix in some hot sauce with the chicken filling. Adjust the spice to your liking for a perfect kick.
Can I use leftover rotisserie chicken?
Yes, using leftover rotisserie chicken is a great idea. It saves time and adds flavor. Just shred the chicken and mix it with the other filling ingredients as usual.
What can I substitute for sour cream?
Greek yogurt works well as a sour cream substitute. It adds creaminess with less fat. You can also use cottage cheese for a healthier option. Silken tofu is another dairy-free choice.
Nutritional Information
Caloric Breakdown Per Serving
Each serving of white chicken enchiladas has about 400 calories. This includes protein from the chicken and cheese, along with healthy fats from the cream cheese.
Healthier Ingredient Options
You can lighten the dish by using low-fat cream cheese. Opt for whole wheat tortillas for more fiber. Use a reduced-fat cheese to cut calories while still enjoying great flavor.
This guide covered everything you need for making white chicken enchiladas. We explored essential ingredients, tasty substitutes, and detailed cooking steps. Tips helped you perfect flavor and texture, while variations opened doors to new dishes. Remember, these enchiladas are not just easy to make; they can fit many diets. Store your leftovers safely to enjoy later, and feel free to mix in your twist. Embrace your culinary skills and share these delicious enchiladas with others. Happy cookin

White Chicken Enchiladas
Ingredients
- 2 cups cooked chicken, shredded
- 1 cup cream cheese, softened
- 1 cup sour cream
- 1 cup shredded Monterey Jack cheese
- 1 cup green enchilada sauce
- 1 to 2 jalapeños, diced (adjust based on spice preference)
- 8 small flour tortillas
- 1 tablespoon olive oil
- 1 teaspoon garlic powder
- 1 teaspoon onion powder
- to taste salt and pepper
- for garnish fresh cilantro
- for garnish sliced green onions
Instructions
- Preheat your oven to 350°F (175°C).
- In a large mixing bowl, combine the shredded chicken, cream cheese, sour cream, half of the Monterey Jack cheese, diced jalapeños, garlic powder, onion powder, salt, and pepper. Mix until well combined.
- Warm the tortillas in a dry skillet or microwave until they are pliable.
- Spoon a portion of the chicken mixture into each tortilla, roll tightly, and place seam-side down in a greased 9x13 inch baking dish.
- Once all tortillas are in the dish, pour the green enchilada sauce evenly over the top.
- Sprinkle the remaining Monterey Jack cheese over the enchiladas.
- Bake in the preheated oven for about 25-30 minutes, or until the cheese is bubbly and golden brown.
- Remove from the oven and let cool for a few minutes before serving.
- Garnish with chopped cilantro and sliced green onions for an extra pop of flavor.
![- 1.5 lbs Brussels sprouts, trimmed and halved - 3 tablespoons maple syrup - 2 tablespoons olive oil - 1 teaspoon garlic powder - 1 teaspoon salt - ½ teaspoon black pepper - ½ cup pecans, roughly chopped (optional) - 1 tablespoon balsamic vinegar (optional) When I make maple roasted Brussels sprouts, I love using fresh, vibrant Brussels sprouts. They have a sweet, nutty taste that pairs perfectly with maple syrup. The maple syrup adds a lovely sweetness that balances the slight bitterness of the sprouts. Olive oil is essential here. It helps in roasting and gives a nice, rich flavor. Garlic powder adds depth, while salt and pepper enhance the natural taste. If you want some crunch, add pecans. They bring a great texture and flavor. I sometimes drizzle balsamic vinegar at the end for a tangy twist. - Baking sheet - Large mixing bowl - Measuring spoons - Knife and cutting board For this recipe, you need a few simple tools. A baking sheet helps with even roasting. A large mixing bowl makes it easy to combine everything. Measuring spoons ensure you get the right amounts. Finally, a knife and cutting board are needed to trim the Brussels sprouts. With these ingredients and tools, you're all set to create a delicious dish. You can check out the [Full Recipe] for step-by-step instructions. Enjoy your cooking adventure! - Preheat your oven to 400°F (200°C). - Trim and halve the Brussels sprouts. This helps them cook evenly and taste great. - In a large mixing bowl, mix Brussels sprouts with olive oil, maple syrup, garlic powder, salt, and pepper. Make sure every sprout gets a nice coat. This mixture adds sweetness and flavor. - Spread the sprouts in a single layer on a baking sheet. This step is key for good roasting. - Roast for 20-25 minutes, shaking the pan halfway. This helps them brown evenly. You want them golden and crispy on the edges. For extra crunch, sprinkle chopped pecans during the last five minutes. You can find the full recipe [here](#). To get crispy Brussels sprouts, spread them out on the baking sheet. Make sure they are in a single layer. This helps them roast evenly. Shake the pan halfway through cooking. This allows hot air to reach all sides. You can add balsamic vinegar for a bit of tang. It gives a nice balance to the sweetness of the maple. Garlic adds depth, too. You can also try spices like paprika or cayenne for extra heat. This way, you can customize the flavors to your taste. These Brussels sprouts go well with proteins like chicken or fish. They make a great side dish. You can also serve them as a healthy snack or appetizer. They are delicious warm or at room temperature. For more ideas, check out the Full Recipe. {{image_2}} You can easily make this dish nut-free. Just omit the pecans. The Brussels sprouts will still taste great with the maple syrup and spices. You won't miss the nuts at all! If you want a vegan version, you can keep it simple. Use maple syrup as your only sweetener. This recipe already has olive oil, so it’s vegan-friendly. Just make sure to check your balsamic vinegar for any added ingredients that aren’t vegan. Want to make your Brussels sprouts special for the season? Add some seasonal spices! A sprinkle of cinnamon or nutmeg gives a warm, festive touch. This twist makes your dish stand out and adds a new flavor layer. Try it next time for a fun change! For the full recipe, check out the [Full Recipe]. Store leftovers in an airtight container in the fridge. Make sure the sprouts cool down first. This keeps them fresh and tasty for your next meal. Reheat in the oven for best texture. Set the oven to 350°F (175°C) and warm for about 10 minutes. If you're in a hurry, you can use the microwave. Heat them for 1-2 minutes, checking often to avoid overcooking. These delicious Brussels sprouts last for up to 3 days in the fridge. If you freeze them, the texture can change, making them mushy. For the best quality, enjoy them fresh or stored in the fridge. Yes, but fresh is recommended for better texture. Frozen Brussels sprouts often lose their crunch. They may also release more water, making them less crispy. If you use frozen ones, be sure to thaw and drain them first. All ingredients are naturally gluten-free; ensure seasonings are free of gluten. Check labels on packaged items. Some sauces or spices may contain hidden gluten. Using fresh ingredients helps keep this dish safe for gluten-free diets. Honey or agave can be used as a replacement, though it will alter flavor. Maple syrup provides a unique taste that is hard to match. If you choose honey, use a little less, as it is sweeter. Agave has a milder flavor and can work well, too. This recipe shows you how to make tasty roasted Brussels sprouts. You need simple ingredients and basic tools. Preheat your oven, mix the sprouts, and roast them for a perfect dish. Remember to try different flavors and store any leftovers properly. These sprouts pair well with any meal or stand alone as a snack. Enjoy trying this recipe and make it your own! Happy cooking!](https://dailydishly.com/wp-content/uploads/2025/07/86ea6ed0-8750-4297-97a9-678adfd456c4-768x768.webp)


![- Chicken breast - Marinade components: - 3 tablespoons olive oil - Zest and juice of 2 lemons - 3 cloves garlic, minced - 1 teaspoon dried oregano - 1 teaspoon dried thyme - Salt and pepper to taste The main star here is chicken breast. It is lean and cooks quickly. It absorbs flavors well, making it perfect for skewers. The marinade combines olive oil, lemon, garlic, and herbs. This mix adds brightness and depth to the chicken. The lemon zest and juice bring a fresh, tangy taste. - 1 bell pepper, cut into 1-inch pieces - 1 red onion, cut into wedges Bell pepper and red onion bring color and sweetness. They also add crunch to each bite. I love alternating them with the chicken on the skewers. This adds variety and makes the skewers look nice. - Wooden or metal skewers - Grill or grill pan You will need skewers for this recipe. If you use wooden skewers, soak them in water for 30 minutes. This prevents burning on the grill. A grill or grill pan is also essential. It gives the skewers that nice char and smoky flavor. For the full recipe, refer to the instructions provided. To begin, mix the marinade ingredients in a large bowl. You will need: - 3 tablespoons olive oil - Zest and juice of 2 lemons - 3 cloves garlic, minced - 1 teaspoon dried oregano - 1 teaspoon dried thyme - Salt and pepper to taste Whisk these items until they blend well. The marinade is vital for flavor. Marinate the chicken for at least 30 minutes. If you have time, let it sit for 2 hours. This helps the chicken absorb all the tasty flavors. Next, prepare the skewers. If you use wooden skewers, soak them in water for 30 minutes. This step helps prevent them from burning while grilling. Now, it’s time to thread the chicken and veggies. Take the marinated chicken and thread it onto the skewer. Add pieces of bell pepper and onion. Alternate between chicken and veggies. This mix not only looks great but also adds flavor. Before grilling, preheat your grill or grill pan to medium-high heat. This ensures even cooking. Grill the skewers for about 10 to 12 minutes. Turn them occasionally to get nice char marks. Use a meat thermometer to check if the chicken has reached 165°F (75°C). This step is crucial for food safety. Once cooked, take the skewers off the grill. Let them rest for a few minutes before serving. You can drizzle them with any leftover marinade for extra flavor. Enjoy your Greek Lemon Chicken Skewers! For the full recipe, check out the details above. To make your chicken full of flavor, marinate it well. I like to mix olive oil, lemon zest, lemon juice, garlic, and herbs. This blend really boosts the taste. Aim to marinate the chicken for at least 30 minutes. For even more flavor, you can go for up to 2 hours. Just don’t leave it in too long, or the acid from the lemon can make it mushy. To get those perfect grill marks, heat your grill to medium-high. This gives the chicken a nice char. Place the skewers on the grill and turn them every few minutes. This helps cook the chicken evenly. Keep an eye on the time; grill them for about 10 to 12 minutes. The chicken should reach an internal temperature of 165°F (75°C). This ensures it’s safe to eat and juicy. For a great presentation, serve the skewers on a nice platter. Add lemon wedges and sprinkle some fresh parsley on top. It looks colorful and inviting. I also suggest serving tzatziki sauce on the side for dipping. It adds a cool, creamy contrast to the warm chicken. Check out the Full Recipe for more detailed instructions! {{image_2}} If you want to switch things up, you can use other proteins. Pork and shrimp are great options. They both soak up the lemony marinade well. For shrimp, just adjust the cooking time to avoid overcooking. You can also change the vegetables on your skewers. Try zucchini, mushrooms, or cherry tomatoes. Each veggie brings its own flavor and texture. Mixing these will keep your dish fresh every time. To boost flavor, add more herbs and spices. Fresh parsley or dill can add a nice touch. You could also sprinkle some paprika for a mild kick. Changing the marinade can also create new flavors. For a spicy twist, add red pepper flakes. You could even try a yogurt-based marinade for a creamy contrast. These tweaks can take your Greek Lemon Chicken Skewers to a new level. You have options for cooking these skewers. Grilling is popular, but broiling works well too. Broiling gives a nice char and cooks the chicken quickly. If you prefer, you can bake the skewers in the oven. Set it to 400°F (200°C) and cook for about 15-20 minutes. This method is great for making skewers indoors, especially on rainy days. For the full recipe, visit the link above. Enjoy exploring these variations! To keep your Greek Lemon Chicken Skewers fresh, store them in the fridge. Place the skewers in an airtight container. This will help keep them from drying out. Consume the leftovers within 3 days for the best taste. If you want to store them longer, consider freezing. Wrap each skewer in plastic wrap, then place them in a freezer bag. This method can keep them good for up to three months. Remember to label the bag with the date. When you're ready to eat your leftovers, reheating is key. I suggest using an oven for the best results. Preheat your oven to 350°F (175°C). Place the skewers on a baking sheet and cover them with foil. This keeps the moisture in while they heat. Bake for about 10-15 minutes or until warm. You can also use a microwave for quick reheating. Place the skewers on a microwave-safe plate. Cover them with a damp paper towel to keep the chicken moist. Heat in short bursts of 30 seconds. Check often to avoid overcooking. Enjoy your Greek Lemon Chicken Skewers warm, just like fresh off the grill! For the full recipe, click [Full Recipe]. I suggest marinating the chicken for at least 30 minutes. This time gives the chicken a nice flavor boost. If you can, try marinating for up to 2 hours. The longer it sits in the marinade, the more the flavors mix in. You will taste the lemon, garlic, and herbs in every bite. To avoid burning, make sure to soak wooden skewers for 30 minutes. This step helps prevent charring. When grilling, keep the heat medium to medium-high. Turn the skewers often to cook evenly. Watch the chicken closely. Cook until the internal temperature reaches 165°F (75°C). This way, you enjoy juicy chicken without burnt bits. Yes, you can prepare Greek Lemon Chicken Skewers ahead of time. Marinate the chicken a few hours before grilling. You can also assemble the skewers in advance. Store them in the fridge until you're ready to grill. This makes meal prep easy and quick, leaving you more time to enjoy your meal. For the complete recipe, check out the Full Recipe. In this post, I shared how to make Greek Lemon Chicken Skewers. We covered the main ingredients like chicken, marinade, and vegetables. I walked you through steps for marinade prep, skewer assembly, and grilling. I also offered tips for flavor and cooking techniques. Lastly, we explored storage and reheat options for leftovers. Now you have all the tools to grill skewers like a pro. Enjoy your tasty creations!](https://dailydishly.com/wp-content/uploads/2025/07/9e2cfe4b-078f-41fe-970c-814b799e8851-768x768.webp)