Maple Roasted Brussels Sprouts Easy and Delicious Recipe
![- 1.5 lbs Brussels sprouts, trimmed and halved - 3 tablespoons maple syrup - 2 tablespoons olive oil - 1 teaspoon garlic powder - 1 teaspoon salt - ½ teaspoon black pepper - ½ cup pecans, roughly chopped (optional) - 1 tablespoon balsamic vinegar (optional) When I make maple roasted Brussels sprouts, I love using fresh, vibrant Brussels sprouts. They have a sweet, nutty taste that pairs perfectly with maple syrup. The maple syrup adds a lovely sweetness that balances the slight bitterness of the sprouts. Olive oil is essential here. It helps in roasting and gives a nice, rich flavor. Garlic powder adds depth, while salt and pepper enhance the natural taste. If you want some crunch, add pecans. They bring a great texture and flavor. I sometimes drizzle balsamic vinegar at the end for a tangy twist. - Baking sheet - Large mixing bowl - Measuring spoons - Knife and cutting board For this recipe, you need a few simple tools. A baking sheet helps with even roasting. A large mixing bowl makes it easy to combine everything. Measuring spoons ensure you get the right amounts. Finally, a knife and cutting board are needed to trim the Brussels sprouts. With these ingredients and tools, you're all set to create a delicious dish. You can check out the [Full Recipe] for step-by-step instructions. Enjoy your cooking adventure! - Preheat your oven to 400°F (200°C). - Trim and halve the Brussels sprouts. This helps them cook evenly and taste great. - In a large mixing bowl, mix Brussels sprouts with olive oil, maple syrup, garlic powder, salt, and pepper. Make sure every sprout gets a nice coat. This mixture adds sweetness and flavor. - Spread the sprouts in a single layer on a baking sheet. This step is key for good roasting. - Roast for 20-25 minutes, shaking the pan halfway. This helps them brown evenly. You want them golden and crispy on the edges. For extra crunch, sprinkle chopped pecans during the last five minutes. You can find the full recipe [here](#). To get crispy Brussels sprouts, spread them out on the baking sheet. Make sure they are in a single layer. This helps them roast evenly. Shake the pan halfway through cooking. This allows hot air to reach all sides. You can add balsamic vinegar for a bit of tang. It gives a nice balance to the sweetness of the maple. Garlic adds depth, too. You can also try spices like paprika or cayenne for extra heat. This way, you can customize the flavors to your taste. These Brussels sprouts go well with proteins like chicken or fish. They make a great side dish. You can also serve them as a healthy snack or appetizer. They are delicious warm or at room temperature. For more ideas, check out the Full Recipe. {{image_2}} You can easily make this dish nut-free. Just omit the pecans. The Brussels sprouts will still taste great with the maple syrup and spices. You won't miss the nuts at all! If you want a vegan version, you can keep it simple. Use maple syrup as your only sweetener. This recipe already has olive oil, so it’s vegan-friendly. Just make sure to check your balsamic vinegar for any added ingredients that aren’t vegan. Want to make your Brussels sprouts special for the season? Add some seasonal spices! A sprinkle of cinnamon or nutmeg gives a warm, festive touch. This twist makes your dish stand out and adds a new flavor layer. Try it next time for a fun change! For the full recipe, check out the [Full Recipe]. Store leftovers in an airtight container in the fridge. Make sure the sprouts cool down first. This keeps them fresh and tasty for your next meal. Reheat in the oven for best texture. Set the oven to 350°F (175°C) and warm for about 10 minutes. If you're in a hurry, you can use the microwave. Heat them for 1-2 minutes, checking often to avoid overcooking. These delicious Brussels sprouts last for up to 3 days in the fridge. If you freeze them, the texture can change, making them mushy. For the best quality, enjoy them fresh or stored in the fridge. Yes, but fresh is recommended for better texture. Frozen Brussels sprouts often lose their crunch. They may also release more water, making them less crispy. If you use frozen ones, be sure to thaw and drain them first. All ingredients are naturally gluten-free; ensure seasonings are free of gluten. Check labels on packaged items. Some sauces or spices may contain hidden gluten. Using fresh ingredients helps keep this dish safe for gluten-free diets. Honey or agave can be used as a replacement, though it will alter flavor. Maple syrup provides a unique taste that is hard to match. If you choose honey, use a little less, as it is sweeter. Agave has a milder flavor and can work well, too. This recipe shows you how to make tasty roasted Brussels sprouts. You need simple ingredients and basic tools. Preheat your oven, mix the sprouts, and roast them for a perfect dish. Remember to try different flavors and store any leftovers properly. These sprouts pair well with any meal or stand alone as a snack. Enjoy trying this recipe and make it your own! Happy cooking!](https://dailydishly.com/wp-content/uploads/2025/07/86ea6ed0-8750-4297-97a9-678adfd456c4.webp)
Looking for a tasty way to enjoy Brussels sprouts? You’re in the right place! In this easy and delicious recipe for Maple Roasted Brussels Sprouts, I’ll show you how to transform these little greens into a sweet and savory delight. With just a few simple ingredients and steps, you can impress your family and friends, or treat yourself. Let’s dive into this tasty dish that everyone will love!
Ingredients
Main Ingredients
– 1.5 lbs Brussels sprouts, trimmed and halved
– 3 tablespoons maple syrup
– 2 tablespoons olive oil
– 1 teaspoon garlic powder
– 1 teaspoon salt
– ½ teaspoon black pepper
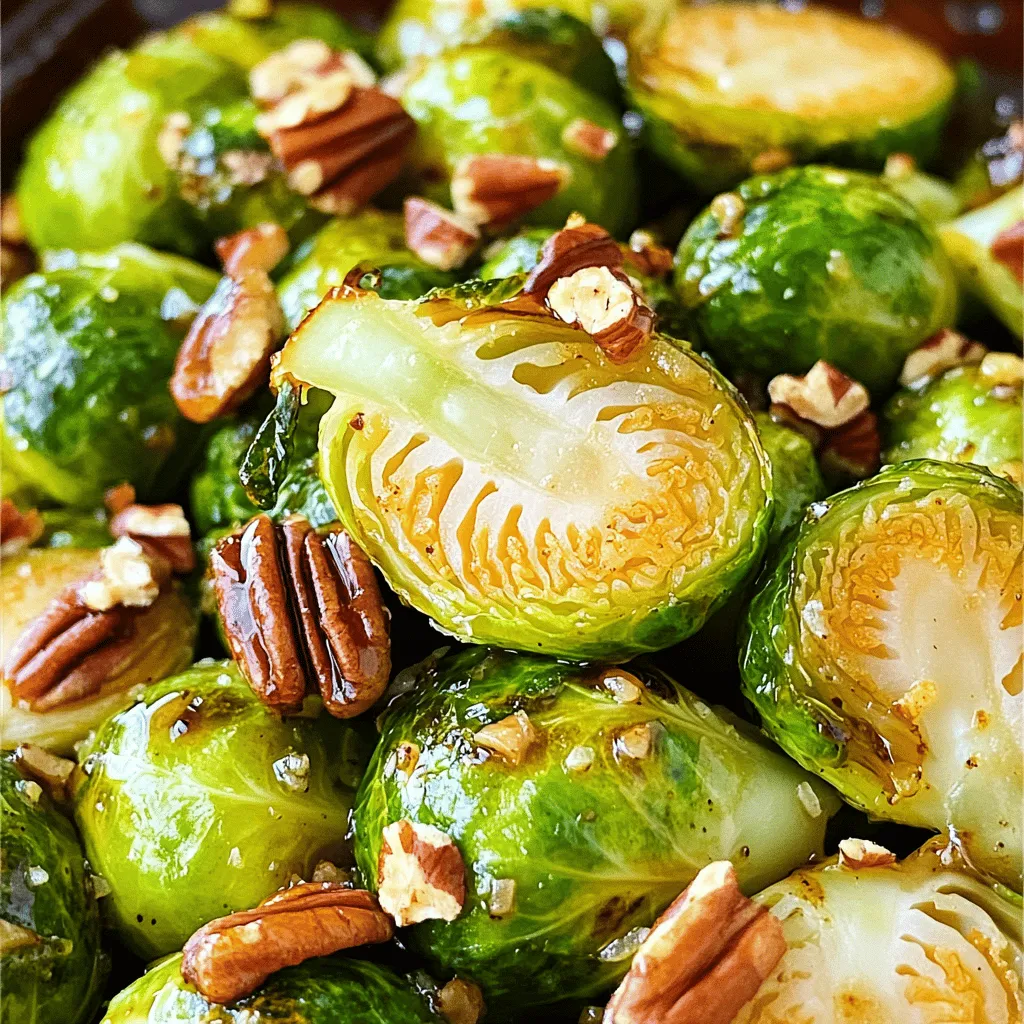
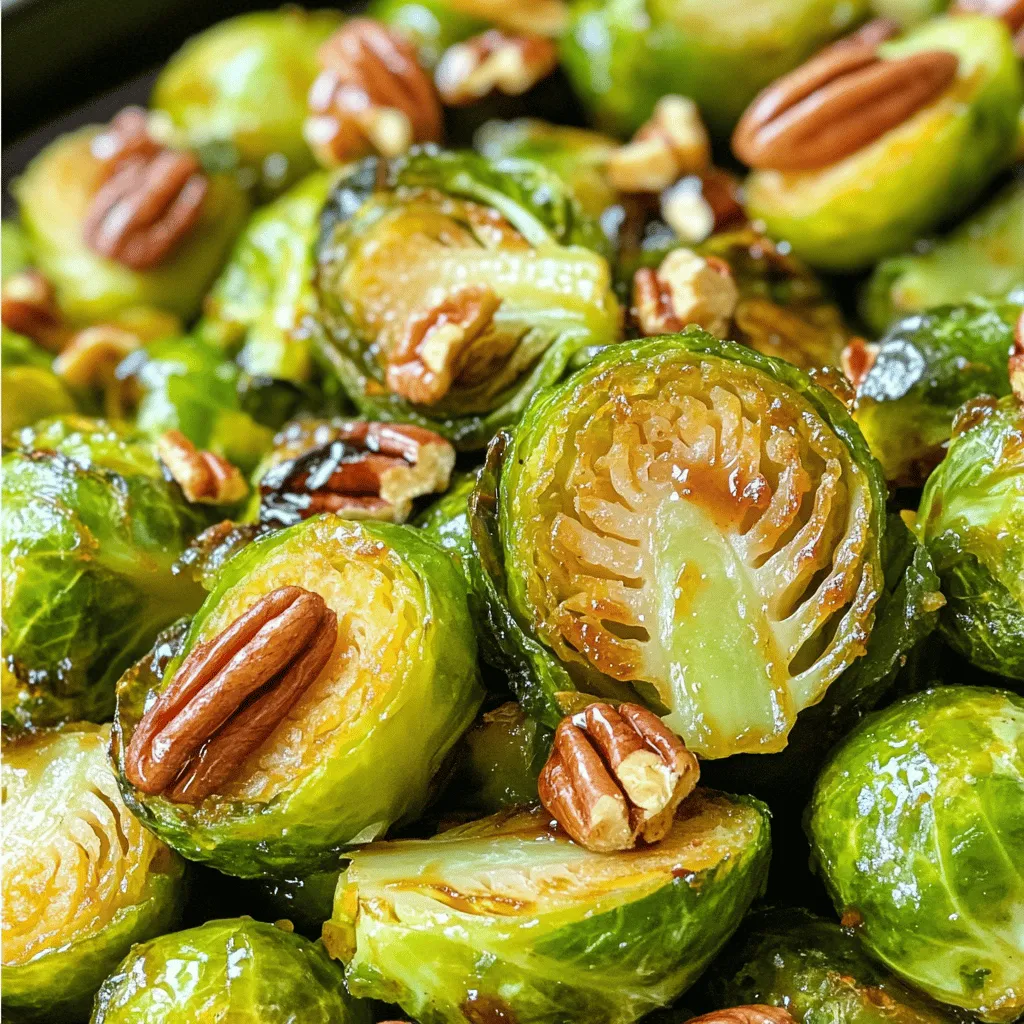
– ½ cup pecans, roughly chopped (optional)
– 1 tablespoon balsamic vinegar (optional)
When I make maple roasted Brussels sprouts, I love using fresh, vibrant Brussels sprouts. They have a sweet, nutty taste that pairs perfectly with maple syrup. The maple syrup adds a lovely sweetness that balances the slight bitterness of the sprouts.
Olive oil is essential here. It helps in roasting and gives a nice, rich flavor. Garlic powder adds depth, while salt and pepper enhance the natural taste. If you want some crunch, add pecans. They bring a great texture and flavor. I sometimes drizzle balsamic vinegar at the end for a tangy twist.
Equipment Needed
– Baking sheet
– Large mixing bowl
– Measuring spoons
– Knife and cutting board
For this recipe, you need a few simple tools. A baking sheet helps with even roasting. A large mixing bowl makes it easy to combine everything. Measuring spoons ensure you get the right amounts. Finally, a knife and cutting board are needed to trim the Brussels sprouts.
With these ingredients and tools, you’re all set to create a delicious dish.Enjoy your cooking adventure!
Step-by-Step Instructions
Preparing the Brussels Sprouts
– Preheat your oven to 400°F (200°C).
– Trim and halve the Brussels sprouts. This helps them cook evenly and taste great.
Combining Ingredients
– In a large mixing bowl, mix Brussels sprouts with olive oil, maple syrup, garlic powder, salt, and pepper. Make sure every sprout gets a nice coat. This mixture adds sweetness and flavor.
Roasting Guide
– Spread the sprouts in a single layer on a baking sheet. This step is key for good roasting.
– Roast for 20-25 minutes, shaking the pan halfway. This helps them brown evenly. You want them golden and crispy on the edges. For extra crunch, sprinkle chopped pecans during the last five minutes.
Tips & Tricks
Achieving Crispy Brussels Sprouts
To get crispy Brussels sprouts, spread them out on the baking sheet. Make sure they are in a single layer. This helps them roast evenly. Shake the pan halfway through cooking. This allows hot air to reach all sides.
Flavor Enhancements
You can add balsamic vinegar for a bit of tang. It gives a nice balance to the sweetness of the maple. Garlic adds depth, too. You can also try spices like paprika or cayenne for extra heat. This way, you can customize the flavors to your taste.
Serving Suggestions
These Brussels sprouts go well with proteins like chicken or fish. They make a great side dish. You can also serve them as a healthy snack or appetizer. They are delicious warm or at room temperature.

Variations
Nut-Free Version
You can easily make this dish nut-free. Just omit the pecans. The Brussels sprouts will still taste great with the maple syrup and spices. You won’t miss the nuts at all!
Vegan Substitute
If you want a vegan version, you can keep it simple. Use maple syrup as your only sweetener. This recipe already has olive oil, so it’s vegan-friendly. Just make sure to check your balsamic vinegar for any added ingredients that aren’t vegan.
Seasonal Twists
Want to make your Brussels sprouts special for the season? Add some seasonal spices! A sprinkle of cinnamon or nutmeg gives a warm, festive touch. This twist makes your dish stand out and adds a new flavor layer. Try it next time for a fun change!
Storage Info
How to Store
Store leftovers in an airtight container in the fridge. Make sure the sprouts cool down first. This keeps them fresh and tasty for your next meal.
Reheating Recommendations
Reheat in the oven for best texture. Set the oven to 350°F (175°C) and warm for about 10 minutes. If you’re in a hurry, you can use the microwave. Heat them for 1-2 minutes, checking often to avoid overcooking.
Shelf Life
These delicious Brussels sprouts last for up to 3 days in the fridge. If you freeze them, the texture can change, making them mushy. For the best quality, enjoy them fresh or stored in the fridge.
FAQs
Can I use frozen Brussels sprouts?
Yes, but fresh is recommended for better texture. Frozen Brussels sprouts often lose their crunch. They may also release more water, making them less crispy. If you use frozen ones, be sure to thaw and drain them first.
How can I make this recipe gluten-free?
All ingredients are naturally gluten-free; ensure seasonings are free of gluten. Check labels on packaged items. Some sauces or spices may contain hidden gluten. Using fresh ingredients helps keep this dish safe for gluten-free diets.
What can I substitute for maple syrup?
Honey or agave can be used as a replacement, though it will alter flavor. Maple syrup provides a unique taste that is hard to match. If you choose honey, use a little less, as it is sweeter. Agave has a milder flavor and can work well, too.
This recipe shows you how to make tasty roasted Brussels sprouts. You need simple ingredients and basic tools. Preheat your oven, mix the sprouts, and roast them for a perfect dish. Remember to try different flavors and store any leftovers properly. These sprouts pair well with any meal or stand alone as a snack. Enjoy trying this recipe and make it your own! Happy cooking!
![- 1.5 lbs Brussels sprouts, trimmed and halved - 3 tablespoons maple syrup - 2 tablespoons olive oil - 1 teaspoon garlic powder - 1 teaspoon salt - ½ teaspoon black pepper - ½ cup pecans, roughly chopped (optional) - 1 tablespoon balsamic vinegar (optional) When I make maple roasted Brussels sprouts, I love using fresh, vibrant Brussels sprouts. They have a sweet, nutty taste that pairs perfectly with maple syrup. The maple syrup adds a lovely sweetness that balances the slight bitterness of the sprouts. Olive oil is essential here. It helps in roasting and gives a nice, rich flavor. Garlic powder adds depth, while salt and pepper enhance the natural taste. If you want some crunch, add pecans. They bring a great texture and flavor. I sometimes drizzle balsamic vinegar at the end for a tangy twist. - Baking sheet - Large mixing bowl - Measuring spoons - Knife and cutting board For this recipe, you need a few simple tools. A baking sheet helps with even roasting. A large mixing bowl makes it easy to combine everything. Measuring spoons ensure you get the right amounts. Finally, a knife and cutting board are needed to trim the Brussels sprouts. With these ingredients and tools, you're all set to create a delicious dish. You can check out the [Full Recipe] for step-by-step instructions. Enjoy your cooking adventure! - Preheat your oven to 400°F (200°C). - Trim and halve the Brussels sprouts. This helps them cook evenly and taste great. - In a large mixing bowl, mix Brussels sprouts with olive oil, maple syrup, garlic powder, salt, and pepper. Make sure every sprout gets a nice coat. This mixture adds sweetness and flavor. - Spread the sprouts in a single layer on a baking sheet. This step is key for good roasting. - Roast for 20-25 minutes, shaking the pan halfway. This helps them brown evenly. You want them golden and crispy on the edges. For extra crunch, sprinkle chopped pecans during the last five minutes. You can find the full recipe [here](#). To get crispy Brussels sprouts, spread them out on the baking sheet. Make sure they are in a single layer. This helps them roast evenly. Shake the pan halfway through cooking. This allows hot air to reach all sides. You can add balsamic vinegar for a bit of tang. It gives a nice balance to the sweetness of the maple. Garlic adds depth, too. You can also try spices like paprika or cayenne for extra heat. This way, you can customize the flavors to your taste. These Brussels sprouts go well with proteins like chicken or fish. They make a great side dish. You can also serve them as a healthy snack or appetizer. They are delicious warm or at room temperature. For more ideas, check out the Full Recipe. {{image_2}} You can easily make this dish nut-free. Just omit the pecans. The Brussels sprouts will still taste great with the maple syrup and spices. You won't miss the nuts at all! If you want a vegan version, you can keep it simple. Use maple syrup as your only sweetener. This recipe already has olive oil, so it’s vegan-friendly. Just make sure to check your balsamic vinegar for any added ingredients that aren’t vegan. Want to make your Brussels sprouts special for the season? Add some seasonal spices! A sprinkle of cinnamon or nutmeg gives a warm, festive touch. This twist makes your dish stand out and adds a new flavor layer. Try it next time for a fun change! For the full recipe, check out the [Full Recipe]. Store leftovers in an airtight container in the fridge. Make sure the sprouts cool down first. This keeps them fresh and tasty for your next meal. Reheat in the oven for best texture. Set the oven to 350°F (175°C) and warm for about 10 minutes. If you're in a hurry, you can use the microwave. Heat them for 1-2 minutes, checking often to avoid overcooking. These delicious Brussels sprouts last for up to 3 days in the fridge. If you freeze them, the texture can change, making them mushy. For the best quality, enjoy them fresh or stored in the fridge. Yes, but fresh is recommended for better texture. Frozen Brussels sprouts often lose their crunch. They may also release more water, making them less crispy. If you use frozen ones, be sure to thaw and drain them first. All ingredients are naturally gluten-free; ensure seasonings are free of gluten. Check labels on packaged items. Some sauces or spices may contain hidden gluten. Using fresh ingredients helps keep this dish safe for gluten-free diets. Honey or agave can be used as a replacement, though it will alter flavor. Maple syrup provides a unique taste that is hard to match. If you choose honey, use a little less, as it is sweeter. Agave has a milder flavor and can work well, too. This recipe shows you how to make tasty roasted Brussels sprouts. You need simple ingredients and basic tools. Preheat your oven, mix the sprouts, and roast them for a perfect dish. Remember to try different flavors and store any leftovers properly. These sprouts pair well with any meal or stand alone as a snack. Enjoy trying this recipe and make it your own! Happy cooking!](https://dailydishly.com/wp-content/uploads/2025/07/86ea6ed0-8750-4297-97a9-678adfd456c4-300x300.webp)


![To make a delicious Margherita pizza, you need the following items: - 2 cups all-purpose flour - 1 teaspoon active dry yeast - ¾ cup warm water (about 110°F) - 1 teaspoon sugar - 1 teaspoon salt - 1 tablespoon olive oil These ingredients create a perfect dough. The flour gives it structure, while the yeast helps it rise. The sugar feeds the yeast, and the salt adds flavor. For the toppings, gather these simple ingredients: - 1 cup canned San Marzano tomatoes, crushed - 1 cup fresh mozzarella cheese, sliced - Fresh basil leaves (about 8-10 leaves) - Salt and pepper to taste - Extra olive oil for drizzling San Marzano tomatoes are sweeter and richer in taste. Fresh mozzarella melts beautifully, and basil adds a fragrant touch. The salt and pepper boost the flavors, while olive oil gives a nice finish. This combination makes the pizza flavorful and fresh, just like you would find in Italy. For the full recipe, check out the details above. - Combine warm water, sugar, and yeast. Let it foam for about 5-10 minutes. - Mix flour and salt in a bowl. Create a well in the center, then add the yeast mixture. - Knead the dough on a floured surface until it's smooth and elastic, about 8-10 minutes. - Shape the dough into a ball. Place it in an oiled bowl and cover it with a damp cloth. - Preheat your oven to its highest setting, usually between 475°F and 500°F. - Prepare the sauce using crushed San Marzano tomatoes. Season it with salt and pepper. - After the dough rises, punch it down. Shape it into a 12-inch round. - Transfer the dough to a pizza peel or baking sheet. Spread the sauce thinly over the dough. - Evenly place slices of fresh mozzarella on top of the sauce. Tear fresh basil leaves and sprinkle them over the cheese. - Bake the pizza in the oven for about 10-12 minutes. Look for a golden crust and bubbling cheese. Use the Full Recipe for detailed steps and measurements to create this classic dish! To make great dough, you want it elastic but not sticky. When you knead, aim for about eight to ten minutes. This builds the right texture. If the dough feels too wet, add a bit more flour. If it’s too dry, a splash of water helps. The goal is a smooth and stretchy dough. For the sauce, use high-quality San Marzano tomatoes. They make a big difference in taste. Crush them gently, and add salt and pepper to enhance the flavor. Be careful not to overload your pizza with toppings. Less is more for a perfect bake. This lets the dough rise and crisp up nicely. A pizza stone is a fantastic tool for a crispier crust. Preheat it in the oven to get it really hot. If you don’t have one, a baking sheet works too. Just keep an eye on your pizza while it bakes. You might need to adjust the baking time based on your oven and your taste. Aim for a golden crust and bubbling cheese for the best results. Using these tips will help you craft a classic Margherita pizza that impresses. For the full recipe, check out our detailed instructions and ingredient list. {{image_2}} You can make your Margherita pizza even better by trying different cheeses. Burrata adds a creamy texture that melts beautifully. Smoked mozzarella brings a rich, savory flavor. Both options will change the taste while keeping it classic. Don’t be afraid to get creative with toppings. Arugula adds a peppery bite that pairs well with the cheese. Prosciutto gives a salty, savory kick. A drizzle of truffle oil can elevate the dish with its earthy aroma. These changes can delight your taste buds while keeping the pizza true to its roots. If you want to mix things up, consider using different sauces. Pesto offers a fresh, herbal twist that complements the cheese. White sauce can add a creamy richness that contrasts nicely with the crust. These variations keep the spirit of Margherita while letting you explore new flavors. For the full recipe, check out the [Full Recipe] section! Store your leftover pizza in the refrigerator. Use an airtight container to keep it fresh. It will stay good for up to 3 days. This way, you can enjoy your pizza a bit longer. Want to save pizza for later? You can freeze unbaked pizza for easy meals. Wrap it tightly in plastic wrap and then in foil. This keeps the flavors intact for future enjoyment. To reheat your pizza, the oven is the best choice. Set it to 375°F and bake for about 10 minutes. This method keeps the crust crispy and the cheese melty. If you're in a hurry, use a skillet. Heat it on medium-low for quicker results. Just cover it with a lid to warm the toppings evenly. Margherita pizza comes from Naples, Italy. It was created in 1889 for Queen Margherita of Savoy. The colors of the pizza match the Italian flag: red tomatoes, white mozzarella, and green basil. This dish is simple but full of flavor. It shows how good food can be made from just a few fresh ingredients. To make gluten-free Margherita pizza, use gluten-free flour. You can mix it with xanthan gum for better texture. Here’s a simple list of gluten-free ingredients: - 2 cups gluten-free flour - 1 teaspoon active dry yeast - ¾ cup warm water - 1 teaspoon sugar - 1 teaspoon salt - 1 tablespoon olive oil Follow the same steps as the regular recipe, and you’ll have a tasty gluten-free pizza. Yes, you can make Margherita pizza without a pizza stone. You can use a baking sheet instead. Just preheat the baking sheet in the oven. It helps to create a nice crust. Place the assembled pizza on the hot sheet and bake as directed. You may also use a cast-iron skillet for a crispy base. An authentic Margherita pizza has key elements. It uses San Marzano tomatoes, fresh mozzarella, and basil. The dough must be hand-stretched and thin. The pizza should be baked at a high temperature for a short time. This method creates a soft inside and crisp outside. This recipe yields 2 to 4 servings. It depends on how big you slice the pizza. If you want more, just double the ingredients. You can also make smaller pizzas for a fun meal with friends or family. The number 19 is special because it refers to the recipe's order in this article. Each recipe is numbered for easy reference. In this case, Margherita pizza is recipe number 19. It highlights the importance of classic dishes in my collection. Classic Margherita pizza combines simple ingredients for a delightful dish. You learned the essential components, from fresh basil to San Marzano tomatoes. Following clear steps, you can create perfect dough and rich toppings. Remember to use quality ingredients for the best taste. Feel free to experiment with variations and storage tips. Making this pizza at home is rewarding and fun. Enjoy the process, and savor the delicious results every time.](https://dailydishly.com/wp-content/uploads/2025/06/379b831d-c22e-427f-bef4-29b7c3a1d548-768x768.webp)
