Pesto Tortellini Pasta Salad Fresh and Flavorful Dish

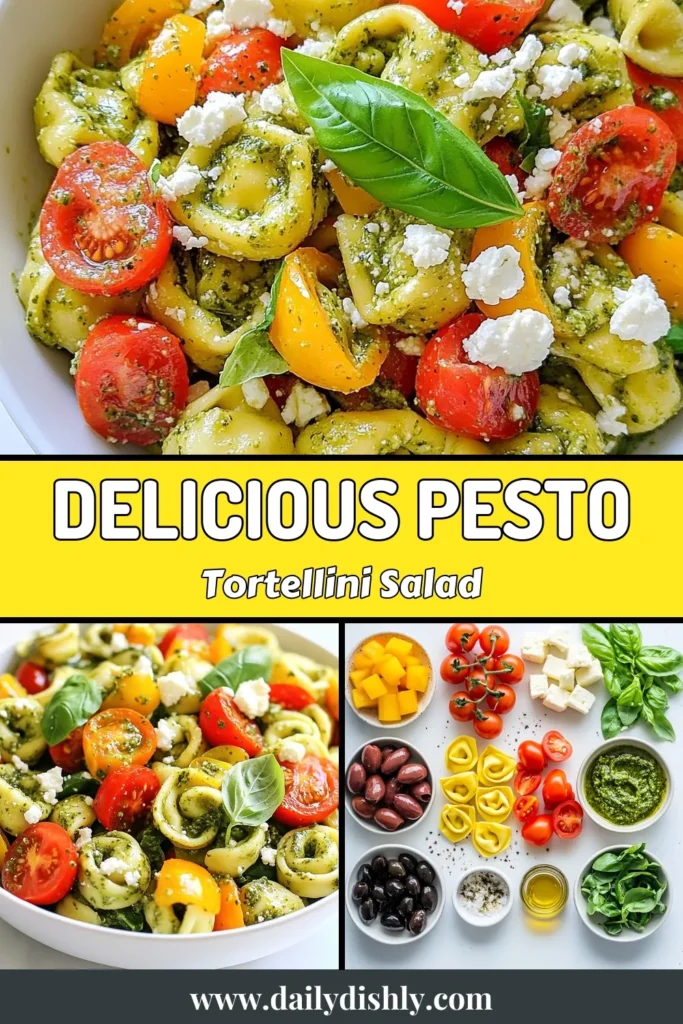
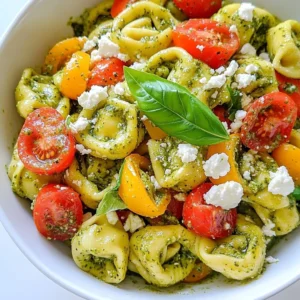
Looking for a fresh and flavorful dish that’s easy to make? My Pesto Tortellini Pasta Salad is just what you need! With vibrant ingredients like cherry tomatoes, bell peppers, and feta cheese, this salad bursts with flavor. Whether you’re prepping for a picnic or a quick weeknight dinner, this recipe is packed with deliciousness. Let’s dive into the simple steps to create a dish you’ll love.
Why I Love This Recipe
- Quick and Easy: This salad comes together in no time, making it a perfect choice for busy weeknights or last-minute gatherings.
- Fresh and Flavorful: The combination of vibrant vegetables and the aromatic pesto creates a refreshing dish that bursts with flavor.
- Customizable: You can easily swap in your favorite veggies or proteins, allowing for endless variations and personal touches.
- Perfect for Meal Prep: This pasta salad holds up well in the fridge, making it a fantastic option for meal prepping and enjoying throughout the week.
Ingredients
Main Ingredients
– 12 oz cheese tortellini
– 1 cup cherry tomatoes, halved
– 1 cup bell peppers, diced (red, yellow, or green)
– 1 cup fresh spinach, roughly chopped
– ½ cup black olives, sliced
– ½ cup feta cheese, crumbled
– ½ cup pesto sauce (store-bought or homemade)
– 2 tablespoons olive oil
– Salt and pepper to taste
– Fresh basil leaves for garnish
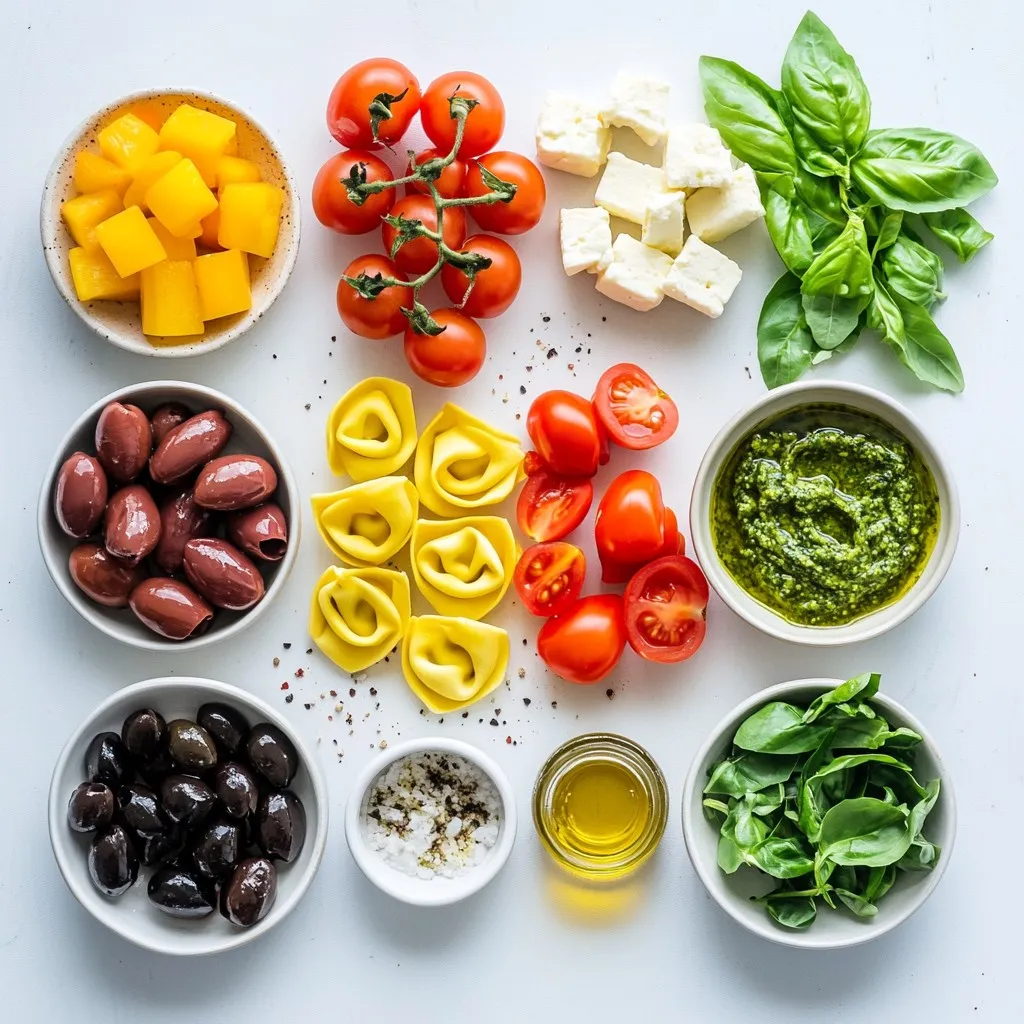
When making pesto tortellini pasta salad, it’s crucial to choose the best ingredients. I love cheese tortellini for its creamy texture. It serves as a great base. Cherry tomatoes bring a burst of freshness. I often use red, yellow, or green bell peppers for added crunch and color. Fresh spinach adds vitamins and a nice green touch.
Black olives lend a salty bite while feta cheese adds creaminess and tang. I prefer using homemade pesto, but store-bought works well too. A drizzle of olive oil enhances the flavor and helps the salad stay moist. Season it with salt and pepper to taste, and don’t forget fresh basil for garnish. It adds a lovely aroma and makes the dish pop visually.
This ingredient mix creates a fresh and flavorful dish. Each bite is packed with taste, making it perfect for any gathering.
Step-by-Step Instructions
Cooking the Tortellini
Start by bringing a large pot of salted water to a boil. This step is key as it flavors the tortellini while cooking. Once the water is bubbling, add the cheese tortellini. Cook it according to the package instructions until al dente. This usually takes about 3 to 5 minutes. When it’s done, drain the tortellini and rinse it under cold water. This will stop the cooking process and help it cool down.
Preparing the Vegetables
Next, wash your vegetables well. For the cherry tomatoes, cut them in half. Dice your bell peppers into small pieces. Roughly chop the fresh spinach. Slice the black olives. In a large mixing bowl, combine the halved cherry tomatoes, diced bell peppers, chopped spinach, sliced olives, and crumbled feta cheese. This mix adds color and crunch to your salad.
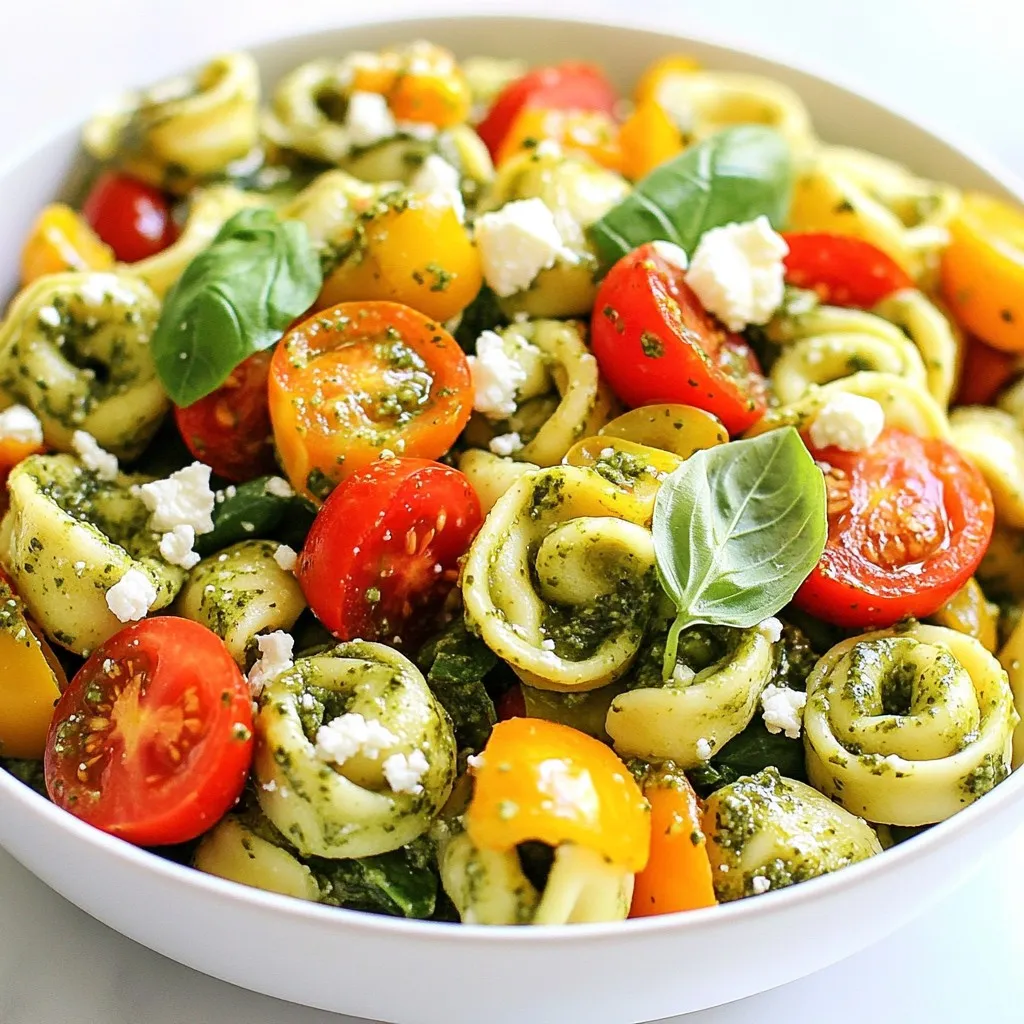
Assembling the Salad
Now it’s time to put everything together. Add the cooled tortellini to the bowl with the vegetables. Pour the pesto sauce and olive oil over the tortellini and veggies. Season with salt and pepper to taste. Gently toss everything together. Make sure the tortellini and veggies are evenly coated with the pesto. Cover the bowl and refrigerate for at least 30 minutes. This chilling time helps all the flavors meld together beautifully. Before serving, give it a quick toss again and garnish with fresh basil leaves. Enjoy your fresh and flavorful pesto tortellini pasta salad!
Tips & Tricks
Customizing Ingredients
You can make this dish your own with different veggies. Try adding
– Zucchini, diced
– Carrots, shredded
– Peas, fresh or frozen
For cheese, you have great choices. Mix in
– Mozzarella balls
– Parmesan shavings
– Goat cheese for a tangy twist
Perfecting the Salad
To coat the tortellini well, add the pesto slowly. Mix gently to cover each piece. A good tip is to use warm tortellini. This helps the pesto stick better.
When serving, warm or cold is great. If you want it warm, serve right after mixing. For a cold dish, chill it for at least 30 minutes. This lets the flavors blend.
Enhancing Flavor
Herbs and spices can boost taste. Add
– A pinch of red pepper flakes for heat
– A sprinkle of garlic powder for depth
To make it fresher, toss in
– Chopped fresh parsley
– Squeezed lemon juice for brightness
– Extra basil leaves for a fragrant touch
Pro Tips
- Use Fresh Ingredients: Whenever possible, opt for fresh vegetables and herbs to enhance the flavor and nutritional value of your pasta salad.
- Make Your Own Pesto: For a richer taste, consider making your own pesto with fresh basil, garlic, pine nuts, Parmesan cheese, and olive oil.
- Chill Before Serving: Allowing the salad to chill for at least 30 minutes helps the flavors blend beautifully, making each bite a burst of taste.
- Customize to Your Liking: Feel free to add or swap in your favorite vegetables, proteins, or cheeses for a personalized touch to the salad.
Variations
Protein Additions
You can easily boost the protein in your pesto tortellini pasta salad. Adding grilled chicken or shrimp works great. Just cook them simply on a grill or in a pan. Slice them and mix them into the salad. If you prefer vegetarian options, try adding chickpeas or black beans. Both add protein and a nice texture.
Gluten-Free Options
If you need a gluten-free salad, swap the cheese tortellini for gluten-free varieties. Many brands offer great gluten-free pasta that cooks well. You can also use gluten-free penne or fusilli. These options taste good and keep the salad fun.
Seasonal Variations
Seasonal vegetables can change the salad’s flavor. In summer, add fresh zucchini or corn for sweetness. In winter, try roasted butternut squash or Brussels sprouts. These veggies warm up the dish and add hearty flavors. Adjusting your salad for the seasons keeps it fresh and exciting.
Storage Info
Storing Leftovers
To store your pesto tortellini pasta salad, place it in an airtight container. This keeps the salad fresh and safe. Refrigerate the container right away. The salad lasts 3 to 5 days in the fridge. Check it for any signs of spoilage before eating.
Freezing & Reheating
Yes, you can freeze the salad! However, some ingredients may change texture. I recommend freezing only the pasta and pesto mix. Avoid freezing fresh vegetables and cheese. When ready to eat, thaw in the fridge overnight. Reheat gently on the stove or microwave. Add a splash of olive oil for moisture if needed.
Maintaining Flavor and Texture
To keep your salad fresh after storage, keep the dressing separate until serving. This helps prevent sogginess. If the salad starts to look dull, add fresh herbs or a little lemon juice. Toss before serving to revive flavors. Enjoy your vibrant salad even after storing!
FAQs
Can I use homemade pesto for the salad?
Yes, you can use homemade pesto for this salad. In fact, I love making my own! Homemade pesto gives you more control over the flavors. You can adjust the garlic, nuts, and cheese to your taste. Store-bought pesto is a great option too, especially when you’re short on time. It’s quick and easy. Both options work well in this dish.
How long can I store pesto tortellini pasta salad?
You can store pesto tortellini pasta salad in the fridge for up to three days. It tastes best when fresh, but it will still be good for a few days. Make sure to keep it in an airtight container. This helps to maintain the flavors and texture. If it sits too long, the pasta may soak up the pesto and become mushy.
Can I use different types of pasta?
Absolutely! While cheese tortellini adds a nice touch, you can use other pasta types. Bowtie, penne, or rotini work well too. Just ensure the pasta cooks al dente so it holds up in the salad. You can even choose gluten-free pasta if needed. It’s all about your personal preference!
This blog post covered a tasty tortellini salad featuring fresh ingredients like tomatoes and spinach. I shared tips on cooking, preparing vegetables, and assembling the salad. We also explored ways to customize and enhance flavors. Remember to store your leftovers properly for later enjoyment. This dish is versatile for any season and can fit various diets. Try it out, and enjoy a delicious meal that’s easy to make and shar
Pesto Tortellini Pasta Salad
Ingredients
- 12 oz cheese tortellini
- 1 cup cherry tomatoes, halved
- 1 cup bell peppers, diced (red, yellow, or green)
- 1 cup fresh spinach, roughly chopped
- 0.5 cup black olives, sliced
- 0.5 cup feta cheese, crumbled
- 0.5 cup pesto sauce (store-bought or homemade)
- 2 tablespoons olive oil
- to taste salt and pepper
- for garnish fresh basil leaves
Instructions
- Bring a large pot of salted water to a boil. Add the cheese tortellini and cook according to the package instructions until al dente.
- Once cooked, drain the tortellini and rinse under cold water to stop the cooking process. Allow it to cool while you prepare the other ingredients.
- In a large mixing bowl, combine the halved cherry tomatoes, diced bell peppers, chopped spinach, sliced olives, and crumbled feta cheese.
- Add the cooled tortellini to the mixing bowl with the vegetables.
- Pour the pesto sauce and olive oil over the tortellini and vegetables, then season with salt and pepper to taste.
- Gently toss everything together until well combined, ensuring the tortellini and vegetables are coated evenly with the pesto.
- Cover and refrigerate the salad for at least 30 minutes before serving to let the flavors meld together.
- Before serving, give it a quick toss and garnish with fresh basil leaves for a pop of color and freshness.


![To make easy roasted chickpeas, you need just a few key items. Here’s what you will need: - 1 can (15 oz) chickpeas, drained and rinsed - 2 tablespoons olive oil - 1 teaspoon smoked paprika - 1 teaspoon garlic powder - 1/2 teaspoon cumin - 1/2 teaspoon ground coriander - 1/4 teaspoon cayenne pepper (adjust to taste) - Salt to taste These ingredients form the base of the recipe. The chickpeas give you protein and fiber, while the olive oil helps them crisp up. The spices add flavor that makes them truly enjoyable. You can easily change up the taste with some optional spices. Try adding: - 1 teaspoon onion powder - 1 teaspoon Italian seasoning - A squeeze of lemon juice - A dash of hot sauce Feel free to mix and match these spices. The more you play around, the more fun flavors you can create! Garnishes can make your roasted chickpeas stand out. I suggest: - Fresh parsley, chopped - A sprinkle of nutritional yeast for a cheesy flavor - Sliced green onions These garnishes not only add color but also provide a fresh touch. Whether you want to keep it simple or fancy, these options enhance your dish. For the full recipe, refer back to the beginning. Start by preheating your oven to 400°F (200°C). Next, take one can of chickpeas and drain them well. Rinse the chickpeas under cold water to remove any canning liquid. This keeps the flavor fresh. Once rinsed, pat the chickpeas dry with paper towels. Removing moisture is key for that perfect crunch. If they are wet, they won't get crispy. In a large mixing bowl, add the dry chickpeas. Pour in two tablespoons of olive oil. This helps the spices stick and adds flavor. Next, sprinkle in one teaspoon each of smoked paprika and garlic powder. Add half a teaspoon of cumin and ground coriander for warmth. For a bit of heat, include a quarter teaspoon of cayenne pepper. You can adjust this to make it spicier or milder. Finish with salt to taste. Toss everything well until all the chickpeas are coated. Spread the seasoned chickpeas on a baking sheet lined with parchment paper. This makes cleanup easy. Roast the chickpeas in your preheated oven for about 20 to 30 minutes. Make sure to stir them every 10 minutes. This ensures even cooking. The chickpeas are done when they look golden brown and feel crispy. After roasting, let them cool for a few minutes. They will crisp up even more as they cool. Garnish with fresh chopped parsley for a pop of color. For the full recipe, refer to the previous section. To get the best crunch, start by drying your chickpeas well. After you rinse them, use paper towels to soak up extra moisture. This step is key! If they are wet, they won’t crisp up. Once dry, coat them evenly with olive oil and spices. Spread them in a single layer on your baking sheet. This helps them roast evenly. Stir them every ten minutes while they cook. This ensures all sides get golden and crunchy! One common mistake is skipping the drying step. Wet chickpeas won’t turn crunchy. Another mistake is overcrowding the pan. If they are too close, they will steam instead of roast. Lastly, don’t skip the stirring! If you leave them alone, some may burn while others stay soft. Follow these tips, and you will have perfect roasted chickpeas! Serve your crispy chickpeas in a bright bowl. They make a great snack or a topping for salads. You can also pair them with a dip, like tahini sauce or vegan yogurt. For a fun twist, sprinkle some extra spices on top right before serving. Enjoy these tasty bites with friends or as a healthy snack during movie night! For the full recipe, check out the detailed instructions above. {{image_2}} You can change the flavor of roasted chickpeas easily. Try a mix of spices. For a savory blend, use onion powder, chili powder, and a touch of thyme. For a Mediterranean twist, combine oregano, lemon zest, and a pinch of salt. If you love herbs, add rosemary or dill for freshness. The options are endless! You can make chickpeas spicy or sweet. For a spicy kick, increase the cayenne pepper. Add some chili flakes for more heat. If you prefer sweet, try cinnamon with a little sugar or maple syrup. This gives a warm, sweet touch. Sweet chickpeas make a great snack or dessert! Boost the flavor by adding extra ingredients. Toss in some nuts or seeds for crunch. You can even mix in dried fruit like raisins or cranberries for a sweet surprise. Another idea is to add garlic cloves while roasting. They will soften and add a rich garlic flavor. These additions make the snack even more exciting and tasty! For the full recipe, check out the [Full Recipe]. After enjoying your roasted chickpeas, let them cool completely. Place them in an airtight container. This keeps them fresh and crunchy. If you do not have an airtight container, use a zip-top bag. Make sure to squeeze out as much air as possible before sealing. Roasted chickpeas are best when fresh, but you can reheat them. Preheat your oven to 350°F (175°C). Spread the chickpeas on a baking sheet in a single layer. Bake for about 10 minutes, or until they are warm and crispy again. Avoid microwaving them; this can make them soft. Properly stored roasted chickpeas last about 3 to 4 days. Keep them away from heat and moisture. For longer storage, consider freezing them. Just make sure to use a freezer-safe container. When ready to eat, let them thaw in the fridge overnight, then reheat as mentioned above. Enjoy keeping your snacks tasty and fresh! Yes, you can use dried chickpeas. First, soak them in water overnight. This helps them soften. After soaking, cook them until they are tender. This usually takes about an hour. Then, drain and rinse them well. Follow the same steps in the Full Recipe for seasoning and roasting. Using dried chickpeas might take longer but can add a fresher taste. Roasted chickpeas are very versatile. You can serve them as a snack on their own. They also make a great salad topper. Try adding them to grain bowls for crunch. For a fun twist, serve them with vegan yogurt or tahini sauce for dipping. You can even mix them into trail mix for a healthy snack. You will know they are done when they are golden brown and crunchy. Check them around the 20-minute mark. Stir them every 10 minutes to ensure even cooking. If they look dry and crispy, they are ready. Let them cool slightly after roasting. They will get crunchier as they cool down. Easy roasted chickpeas are a healthy and tasty snack. We covered ingredients, from essentials to fun seasonings. You learned how to prepare, coat, and roast your chickpeas to crispy perfection. I shared tips to avoid common mistakes and ways to serve them. You can also explore flavor variations and proper storage. Keep this guide on hand for your next snacking adventure! Enjoy your delicious roasted chickpeas, and make them your own.](https://dailydishly.com/wp-content/uploads/2025/06/2a694b00-c6e3-4f48-98d3-e4cb03920d39-768x768.webp)