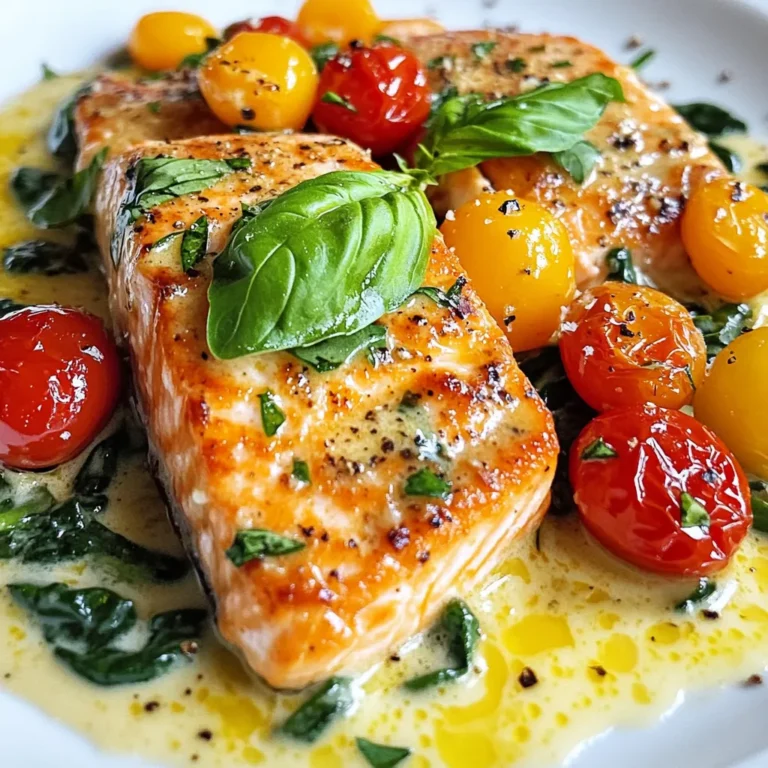
Honey Garlic Soy Salmon Savory and Simple Recipe

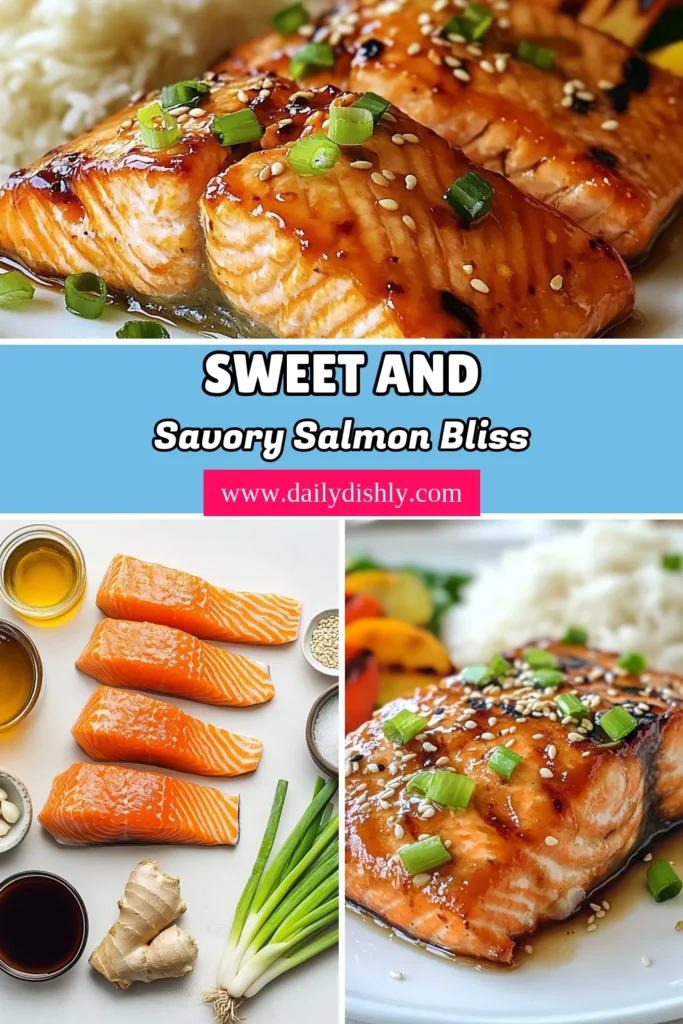
Ready to impress at your next dinner? This Honey Garlic Soy Salmon recipe is packed with flavor and super simple to make. With just a few ingredients like soy sauce, garlic, and honey, you’ll create a dish that’s both savory and sweet. Whether you’re a cooking pro or just starting out, you’ll find tips and tricks to perfect your salmon. Let’s dive into this delicious recipe that’s sure to become a family favorite!
Why I Love This Recipe
- Deliciously Balanced Flavors: This recipe perfectly combines the sweetness of honey with the savory depth of soy sauce, creating a delightful flavor profile that hits all the right notes.
- Quick and Easy Preparation:
- Healthier Option: Using low-sodium soy sauce and fresh ingredients makes this salmon dish a healthier alternative to takeout, offering a nutritious meal that’s packed with flavor.
- Beautiful Presentation: With vibrant garnishes of green onions and sesame seeds, this dish not only tastes great but looks stunning on the plate, impressing family and guests alike.
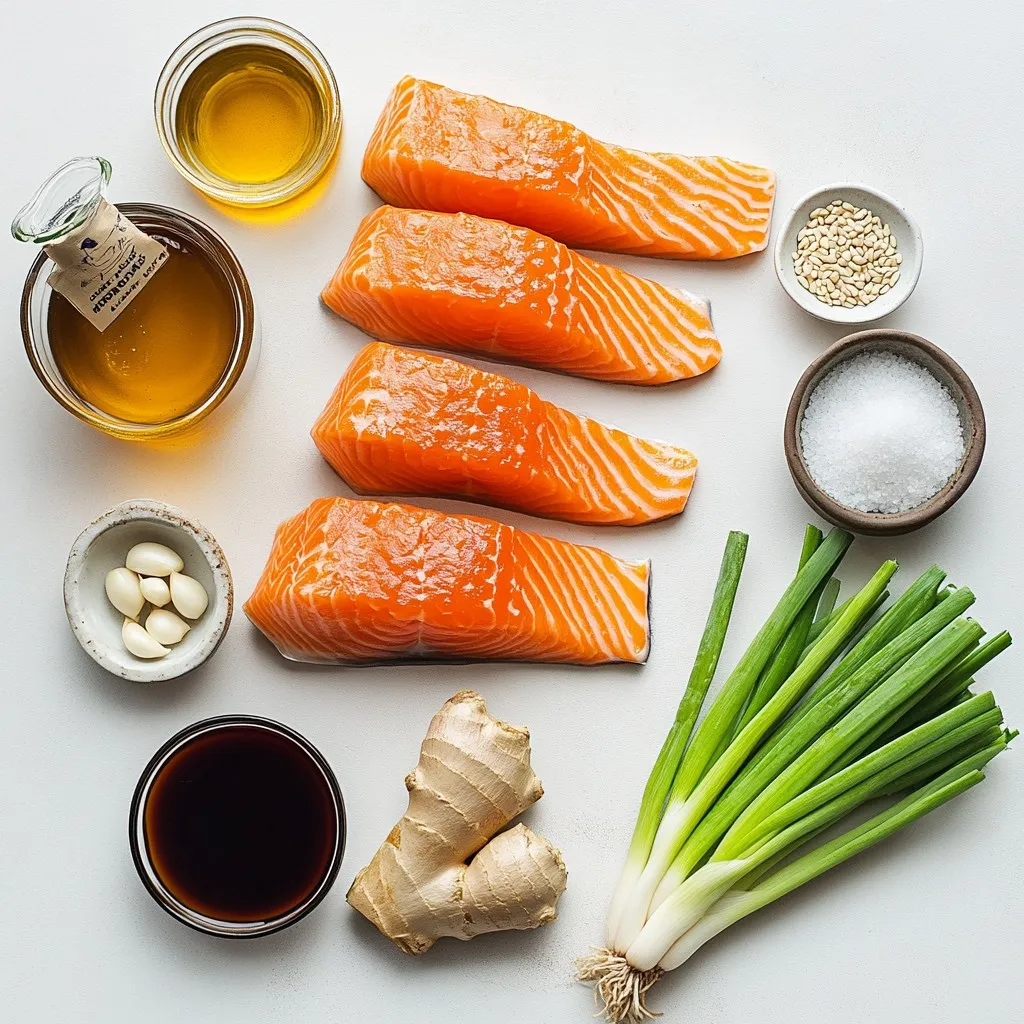
Ingredients
List of Ingredients
– 4 salmon fillets
– 1/4 cup honey
– 1/4 cup soy sauce (low sodium recommended)
– 3 cloves garlic, minced
– 1 tablespoon fresh ginger, grated
– 2 tablespoons sesame oil
– 1 tablespoon rice vinegar
– 1 tablespoon cornstarch (optional for thickening)
– Salt and pepper to taste
– 2 green onions, chopped (for garnish)
– Sesame seeds (for garnish)
For this recipe, you need simple yet tasty ingredients. The salmon fillets serve as the star of the dish. Each fillet brings a rich, buttery flavor. Honey adds sweetness. Soy sauce gives a savory kick. Garlic and ginger bring warmth and depth. Sesame oil adds nuttiness. Rice vinegar cuts the richness and balances flavors.
You can use low-sodium soy sauce for a healthier option. This choice keeps the dish light while still keeping that soy flavor. Cornstarch thickens the sauce, making it cling to the salmon.
Don’t forget the salt and pepper! They help enhance all the flavors. For garnish, chopped green onions and sesame seeds add a pop of color and crunch.
These ingredients work well together. They create a bright, savory dish that is easy to make. Plus, they bring global flavors right to your kitchen.
Step-by-Step Instructions
Marinating the Salmon
– Whisking together the marinade
Start by mixing the marinade. In a bowl, whisk together 1/4 cup honey, 1/4 cup soy sauce, 3 minced garlic cloves, 1 tablespoon grated ginger, 2 tablespoons sesame oil, and 1 tablespoon rice vinegar. Blend until smooth. This mix gives the salmon a sweet and savory flavor.
– Seasoning salmon fillets
Take 4 salmon fillets and sprinkle them with salt and pepper. This adds a nice touch of flavor. After seasoning, place the fillets in the bowl with the marinade. Make sure they are fully coated.
– Marinating time and tips
Let the salmon sit in the fridge for at least 30 minutes. If you have more time, marinate for up to 2 hours. This step helps the flavors sink in.
Baking the Salmon
– Prepping the baking sheet
Preheat your oven to 400°F (200°C). Line a baking sheet with parchment paper. This makes cleanup much easier and prevents sticking.
– Baking time and temperature
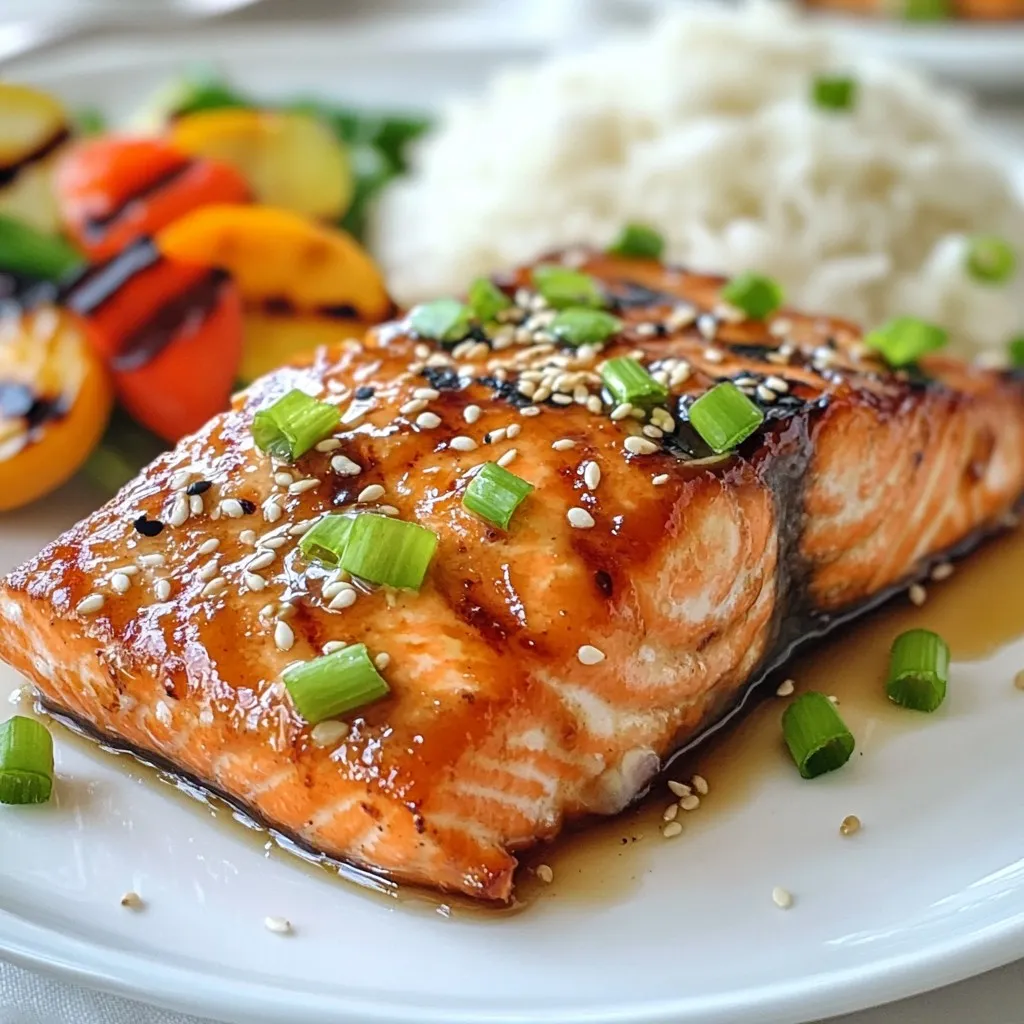
Once marinated, put the salmon fillets on the baking sheet, skin side down. Bake for about 12 to 15 minutes. The salmon should flake easily with a fork when done.
– Signs that the salmon is done
Check for a light pink color in the center. If the salmon flakes apart easily, it’s perfect!
Preparing the Sauce
– Reheating the marinade
While the salmon bakes, take the leftover marinade. Pour it into a small saucepan and bring it to a gentle boil. This step makes the sauce safe to eat.
– Thickening with cornstarch
If you want a thicker sauce, mix 1 tablespoon of cornstarch with cold water. Stir this mixture into the boiling marinade. Let it simmer for 5 to 7 minutes until it thickens.
– Serving suggestions
Once the salmon is ready, drizzle the thickened sauce over the top. I love garnishing with chopped green onions and sesame seeds for added crunch and color. Serve it over rice or alongside grilled veggies for a tasty meal!
Tips & Tricks
Perfecting Your Salmon
The best cooking methods for salmon are baking and grilling. Baking makes it easy to keep the fish moist. Grilling adds a nice smoky flavor. If you choose to grill, use a medium heat to avoid drying it out.
To avoid overcooking the salmon, keep an eye on the time. Salmon cooks fast, usually in 12-15 minutes at 400°F. Check if it flakes easily with a fork. If it does, it’s done!
For easy cooking, use these suggested tools:
– A mixing bowl for the marinade.
– A whisk to blend the sauce.
– A baking sheet lined with parchment paper for easy cleanup.
Flavor Enhancements
You can add herbs and spices to boost the flavor. Fresh herbs like cilantro or parsley work well. Also, consider adding a pinch of black pepper or paprika for warmth.
Adjust the sweetness and saltiness of the sauce to your taste. If you like it sweeter, add more honey. If you prefer saltier, add a touch more soy sauce.
For brightness, pair the salmon with citrus. Squeeze fresh lemon or lime juice on top after cooking. This adds a fresh zing that elevates the dish.
Pro Tips
- Marinate Longer for More Flavor: If time allows, marinate the salmon for 1-2 hours to enhance the flavor even more.
- Use Fresh Ingredients: Fresh garlic and ginger can elevate the dish. If you’re using powdered versions, use them sparingly.
- Check for Doneness: Salmon is perfectly cooked when it flakes easily with a fork and is opaque throughout. Avoid overcooking to maintain moisture.
- Experiment with Garnishes: Besides green onions and sesame seeds, try adding crushed peanuts or a sprinkle of chili flakes for a different flavor profile.
Variations
Different Proteins
You can swap salmon for chicken or tofu. Both options taste great with the honey garlic soy sauce. For chicken, use boneless thighs or breasts. They cook well with this marinade. Tofu is a great vegetarian choice. Choose firm tofu for the best texture.
– Cooking times:
– Chicken thighs: Bake at 400°F (200°C) for 20-25 minutes.
– Chicken breasts: Bake for 25-30 minutes.
– Tofu: Bake for 15-20 minutes until golden brown.
Adjust the cooking time based on the thickness of the protein. Always check if it’s fully cooked through.
Flavor Variations
You can spice things up by adding sriracha or chili flakes. This adds a nice kick to the dish. If you like heat, start with a little and taste as you go.
You can also try different types of vinegar. Rice vinegar gives a mild taste, while apple cider vinegar adds a fruity note. For a stronger flavor, use balsamic vinegar. Each choice changes the dish in a fun way. Don’t be afraid to experiment!
Storage Info
Refrigerating Leftovers
To store salmon properly, let it cool first. Place the salmon in an airtight container. Cover it tightly to keep it fresh. You can also wrap it in plastic wrap. This helps to prevent the fish from drying out.
The shelf life of cooked salmon is about three days in the fridge. After that, the taste may change. It might not taste as good after a few days. Always check for any off smells before eating.
Freezing Instructions
For freezing cooked salmon, let it cool completely. Wrap each piece in plastic wrap. Then put the wrapped salmon in a freezer bag. Try to remove as much air as possible. This helps prevent freezer burn.
When you’re ready to eat it, thaw the salmon in the fridge overnight. To reheat, place it in a preheated oven at 350°F (175°C) for about 10-15 minutes. This keeps the salmon moist and tasty. Avoid microwaving, as it can dry out the fish.
FAQs
How long do I marinate salmon for?
You should marinate salmon for at least 30 minutes. If you have more time, an hour is even better. This allows the flavors to soak in well. The salmon will taste sweeter and more flavorful with extra marinating time.
Can I use regular soy sauce?
Yes, you can use regular soy sauce. However, low sodium soy sauce is a better choice. It has less salt, making your dish healthier. Regular soy sauce can make the dish too salty. Adjust the amount of salt you add if you use regular soy sauce.
What to serve with honey garlic soy salmon?
You can serve honey garlic soy salmon with many side dishes. Here are some great options:
– Steamed rice
– Grilled vegetables
– Roasted broccoli
– Quinoa salad
– Stir-fried greens
These sides balance the flavors of the salmon well. They add color and nutrition to your plate. Enjoy your meal!
This blog post covered how to create a tasty honey garlic soy salmon. You learned about key ingredients, marinating and baking the salmon, and making a delicious sauce. I shared tips for perfecting your dish and explored variations using other proteins. Lastly, we looked at storage options for your leftovers.
Try these steps and enjoy a meal that’s both easy and flavorful. Happy cookin

![- 1 cup quinoa, rinsed - 2 cups water or vegetable broth - 1 large cucumber, diced - 1 red bell pepper, diced - 1 cup cherry tomatoes, halved - 1/4 red onion, finely chopped - 1 cup fresh parsley, chopped - 1/4 cup tahini - 2 tablespoons lemon juice - 1 tablespoon olive oil - 1 clove garlic, minced - Salt and pepper to taste This salad starts with quinoa as the base. Quinoa is a great source of protein and fiber. Rinsing the quinoa helps remove its bitter coating. Use fresh veggies for crunch and color. I love using cucumbers and bell peppers for a fresh bite. Cherry tomatoes bring sweetness and juicy flavor. The red onion adds a nice kick, while parsley gives a fresh touch. The tahini sauce is the star. It adds a creamy texture and nutty flavor. Mix tahini with lemon juice, olive oil, and garlic for a bright dressing. This makes the salad so tasty! - 1/4 cup sunflower seeds or chopped nuts for crunch For extra flavor and texture, you can add sunflower seeds or nuts. They give a nice crunch. Try almonds or walnuts for a rich taste. Fresh herbs like mint or cilantro can also brighten the dish. - Calories per serving: About 250 - Macronutrient breakdown: 10g protein, 12g fats, 30g carbs - Dietary considerations: Gluten-free, vegan, and packed with nutrients This salad is not just tasty; it's also healthy! Each serving has around 250 calories. You get protein from quinoa and tahini. The veggies add vitamins and minerals. Plus, it fits many diets, like vegan and gluten-free. Snack on this salad for a boost of energy! Check the Full Recipe for all the details. 1. Start by rinsing 1 cup of quinoa under cold water. This helps remove any bitter taste. 2. In a medium saucepan, combine the rinsed quinoa and 2 cups of water or vegetable broth. 3. Bring the mixture to a boil over medium-high heat. 4. Once boiling, reduce the heat to low, cover, and let it simmer. Cook for about 15 minutes. 5. The quinoa is done when it is fluffy and the water is absorbed. Remove it from heat and let it cool slightly. 1. In a small bowl, mix together 1/4 cup tahini, 2 tablespoons lemon juice, and 1 tablespoon olive oil. 2. Add 1 clove of minced garlic, salt, and pepper to taste. 3. Whisk until smooth. If the dressing is too thick, add a little water to reach your desired consistency. 1. In a large mixing bowl, combine 1 diced cucumber, 1 diced red bell pepper, 1 cup of halved cherry tomatoes, 1/4 finely chopped red onion, and 1 cup of chopped fresh parsley. 2. Add the cooled quinoa to the vegetable mix and gently toss everything together. 3. Drizzle the tahini dressing over the salad and stir well to coat all the ingredients. 4. For extra crunch, sprinkle 1/4 cup of sunflower seeds or chopped nuts on top before serving. For the full recipe, you can check the details provided above. Enjoy your fresh and flavorful Lemon Tahini Quinoa Salad! To cook quinoa, use a 2:1 ratio of water to quinoa. Rinse the quinoa first. This removes the bitter coating. Bring the water to a boil. Once boiling, lower the heat. Cover the pot and let it simmer for about 15 minutes. Fluff the quinoa with a fork after cooking. This keeps it light and airy, avoiding mushy quinoa. Herbs can change the taste of your salad. Fresh mint or dill works well. Try adding basil for a different twist. For spice, consider adding a pinch of cumin or paprika. These spices bring out the flavors of the vegetables and dressing. Presentation matters! Serve the salad in a large bowl. Garnish with lemon slices and fresh parsley. This adds color and appeal. For a fun twist, use clear glasses. Layer the salad for a stunning visual. Pair this salad with grilled chicken or fish for a complete meal. It’s also great beside roasted veggies. {{image_2}} You can easily add more protein to your Lemon Tahini Quinoa Salad. Chickpeas are a great choice. They add texture and a nutty flavor. Just rinse and drain a can of chickpeas. Then, fold them into the salad for extra protein. Grilled chicken or tofu also works well. Cook the chicken or tofu until it’s golden brown. Then, chop it into bite-sized pieces. Mix it in with the salad for a hearty meal. You can change this salad based on the season. In spring, add fresh peas, radishes, or asparagus. These veggies brighten up the dish and add crunch. In winter, you can use roasted root vegetables. Try carrots or sweet potatoes. They add warmth and depth to the salad while keeping it filling. If you want to switch up the flavor, try other dressings. A simple olive oil and vinegar mix gives a light taste. You can also use yogurt for a creamy twist. Adjust the flavors to suit your taste. Add more lemon juice for tanginess. Or, include herbs like dill or cilantro for freshness. For the complete recipe, check out the [Full Recipe]. To keep your Lemon Tahini Quinoa Salad fresh, store it in the fridge. Use an airtight container. This helps maintain flavor and texture. Before putting it away, let the salad cool. Hot food can raise the fridge temperature, which is not good. Your salad lasts about three to five days in the fridge. Check for any changes in color or smell. If it looks slimy or smells off, toss it out. To reheat, use the microwave. Heat it gently to avoid drying it out. Stir it halfway through to ensure even warming. If you want to serve leftovers, try adding fresh herbs or a squeeze of lemon juice. This can brighten the flavors again. For the full recipe, refer back to the main section. To make this creamy dressing, mix the tahini, lemon juice, olive oil, minced garlic, salt, and pepper in a bowl. Use a whisk for a smooth blend. Adjust the thickness by adding water if needed. This dressing adds a zesty flavor and a creamy texture to your salad. Yes, you can prepare this salad in advance. Store the salad and dressing separately in the fridge. This keeps the vegetables crisp. Combine them just before serving. It tastes even better after the flavors meld together. If you can't find tahini, you can use these alternatives: - Sunflower seed butter - Almond butter - Greek yogurt Each of these options has a unique flavor. Sunflower seed butter is nut-free and creamy. Almond butter adds a nutty taste. Greek yogurt gives a tangy kick. Keep in mind that substituting may change the salad's taste. Adjust the amount of lemon juice to balance flavors. Always taste as you go to find your perfect mix. Enjoy experimenting! This blog post covered how to make a delicious Lemon Tahini Quinoa Salad. You learned about essential and optional ingredients, like quinoa, vegetables, and tahini. I gave you step-by-step instructions, plus tips for cooking and flavoring. We explored salad variations and how to store it properly. This salad is versatile and easy to make. Try adding your favorite ingredients to make it unique. Enjoy a tasty and healthy dish that fits any season!](https://dailydishly.com/wp-content/uploads/2025/07/0131a3b2-a937-48f9-ad75-9f78e7be101a-768x768.webp)
![- 2 boneless, skinless chicken breasts, diced - 2 cups broccoli florets For this dish, I love using fresh chicken and broccoli. The chicken gives a nice, juicy bite. The broccoli adds color and crunch. You can cut the chicken into small pieces. This helps it cook evenly and quickly. For the broccoli, I recommend using florets. They will cook just right and look great on your plate. - 8 ounces fettuccine or pasta of choice - 1 tablespoon olive oil - 3 cloves garlic, minced - 1 cup heavy cream - 1 cup grated Parmesan cheese For the pasta, fettuccine works best. It holds the sauce well. You can use any pasta you like. Just remember to cook it al dente. Olive oil keeps the chicken moist. Garlic adds amazing flavor to the dish. Heavy cream and Parmesan cheese create a rich, creamy sauce. Together, they make this meal feel special. - Salt and pepper to taste - 1/2 teaspoon dried Italian herbs - Fresh parsley, chopped (for garnish) Seasoning is key to great flavor. Use salt and pepper to taste. Italian herbs add warmth and depth. I like to finish the dish with fresh parsley for color. It brightens the plate and makes it look fresh. These simple ingredients elevate the dish without being overwhelming. For the full recipe, check out the details above! First, heat 1 tablespoon of olive oil in a large skillet over medium heat. While the oil heats, dice 2 boneless, skinless chicken breasts. Once the oil is hot, add the chicken to the skillet. Season it with salt, pepper, and 1/2 teaspoon of dried Italian herbs. Cook the chicken for about 5 to 7 minutes. Stir it occasionally to brown all sides. When it’s done, it should be golden and cooked through. Remove the chicken from the skillet and set it aside for now. In the same skillet, add 3 cloves of minced garlic. Sauté the garlic for about 1 minute until it smells good. Then, add 2 cups of broccoli florets to the skillet. Stir and cook for 3 to 4 minutes. You want the broccoli to be tender but still bright green. This will keep it crisp and flavorful. Next, cook 8 ounces of fettuccine or your favorite pasta in a separate pot. Follow the package instructions and drain it once it's al dente. Now, back in the skillet with the broccoli, pour in 1 cup of heavy cream. Bring it to a gentle simmer. Stir in 1 cup of grated Parmesan cheese. Keep stirring until the cheese melts and the sauce is smooth. Add the chicken and drained pasta back into the skillet. Toss everything together so it’s coated in the creamy sauce. Let it heat through for 2 to 3 minutes. Adjust the taste with more salt or pepper if needed. Serve hot, and don’t forget to garnish with fresh parsley! For the full recipe, check out the [Full Recipe]. To get juicy chicken, start with diced pieces. This helps them cook evenly. Cook the chicken until it is a nice golden brown. This usually takes about 5 to 7 minutes. Make sure to not overcrowd the skillet. This allows each piece to sear well. After cooking, let the chicken rest for a few minutes. This keeps the juices inside. Broccoli should stay bright green and crisp. Add it to the skillet after the garlic. Sauté for just 3 to 4 minutes. You want it tender but still crunchy. If you cook it too long, it will turn dull. To keep that vibrant color, you can also shock it in cold water after cooking. This method locks in color and nutrition. The sauce should be creamy and smooth. If it’s too thick, add a little pasta water. This water has starch from cooking the pasta. It helps make the sauce silkier. If it’s too thin, let it simmer a bit longer. Stir in more cheese if you want it richer. Taste as you go to get the perfect balance. For the full recipe, check the details above. {{image_2}} You can swap out chicken for other meats. Shrimp works well and cooks quickly. You can also use turkey or even tofu for a vegetarian twist. Each protein adds its unique flavor. Just adjust cooking times to ensure your choice is fully cooked. Broccoli is excellent, but you can mix in other veggies. Bell peppers add sweetness and crunch. Zucchini or spinach also fit well in this dish. Feel free to experiment! Each vegetable brings a new taste and color. Just make sure to adjust cooking time based on what you use. If you need a gluten-free meal, choose gluten-free pasta. Many brands offer great options that taste good. You can also skip pasta and use rice instead. This keeps the dish hearty while meeting dietary needs. Always check labels to ensure your ingredients are gluten-free. For the full recipe, check the section above. You can store leftovers in the fridge. Place the Chicken and Broccoli Alfredo in an airtight container. It stays fresh for up to three days. Make sure to let it cool down before you seal it. This helps keep the flavor and texture. If you want to save some for later, freezing works well. Use a freezer-safe container or bag. Leave some space for expansion. You can freeze it for up to two months. When you're ready to eat, thaw it in the fridge overnight. To reheat, use the stovetop or microwave. If using the stovetop, add a splash of cream or water. This keeps the dish moist. Stir it often over low heat until warm. If using a microwave, cover the dish to trap steam. Heat in short bursts and stir in between. This way, you'll enjoy a creamy meal again! Yes, you can use frozen broccoli. Just add it to the skillet while cooking the garlic. Frozen broccoli may need a few extra minutes to cook. Make sure it is heated through and tender before serving. This option saves time and works well in this dish. Fettuccine is the best choice for this recipe. It holds the creamy sauce well. However, you can use other pasta types too. Penne, rotini, or even whole wheat pasta are great options. Choose what you like or have at home for this meal. To make this dish healthier, consider these tips: - Use whole-grain pasta for more fiber. - Swap heavy cream for low-fat milk or a plant-based cream. - Add more vegetables like bell peppers or spinach for extra nutrients. - Use less cheese or a lighter cheese option to cut calories. These changes can keep the dish tasty while boosting its nutrition. Check out the Full Recipe for even more ideas! This blog post covered how to make Chicken and Broccoli Alfredo. We explored key ingredients, like chicken, pasta, and sauce. I shared step-by-step instructions for cooking and sautéing. You learned tips for perfect chicken and bright broccoli. We also talked about variations, like swapping proteins or veggies. Lastly, I provided storage info to keep leftovers fresh. Try this recipe to impress. Remember, cooking is fun and easy!](https://dailydishly.com/wp-content/uploads/2025/06/4029d33c-44d0-458a-b053-e8bf24c75967-768x768.webp)