Creamy Roasted Red Pepper Soup Flavorful and Easy Recipe

Are you ready to savor a bowl of creamy roasted red pepper soup? This easy recipe blends the rich flavor of roasted red peppers with garlic and spices. In just a few simple steps, you’ll have a warm dish that comforts and delights. Whether you’re looking for a tasty vegan option or a hearty meal, this soup is sure to impress. Let’s dive into the ingredients and get started!
Ingredients
To make the best creamy roasted red pepper soup, you’ll need simple ingredients. Each one adds flavor and depth to the dish. Here’s what you’ll need:
– 4 large red bell peppers, halved and seeded
– 1 medium onion, chopped
– 3 cloves garlic, minced
– 2 cups vegetable broth
– 1 cup heavy cream (or coconut cream for a dairy-free option)
– 1 tablespoon olive oil
– 1 teaspoon smoked paprika
– Salt and pepper to taste
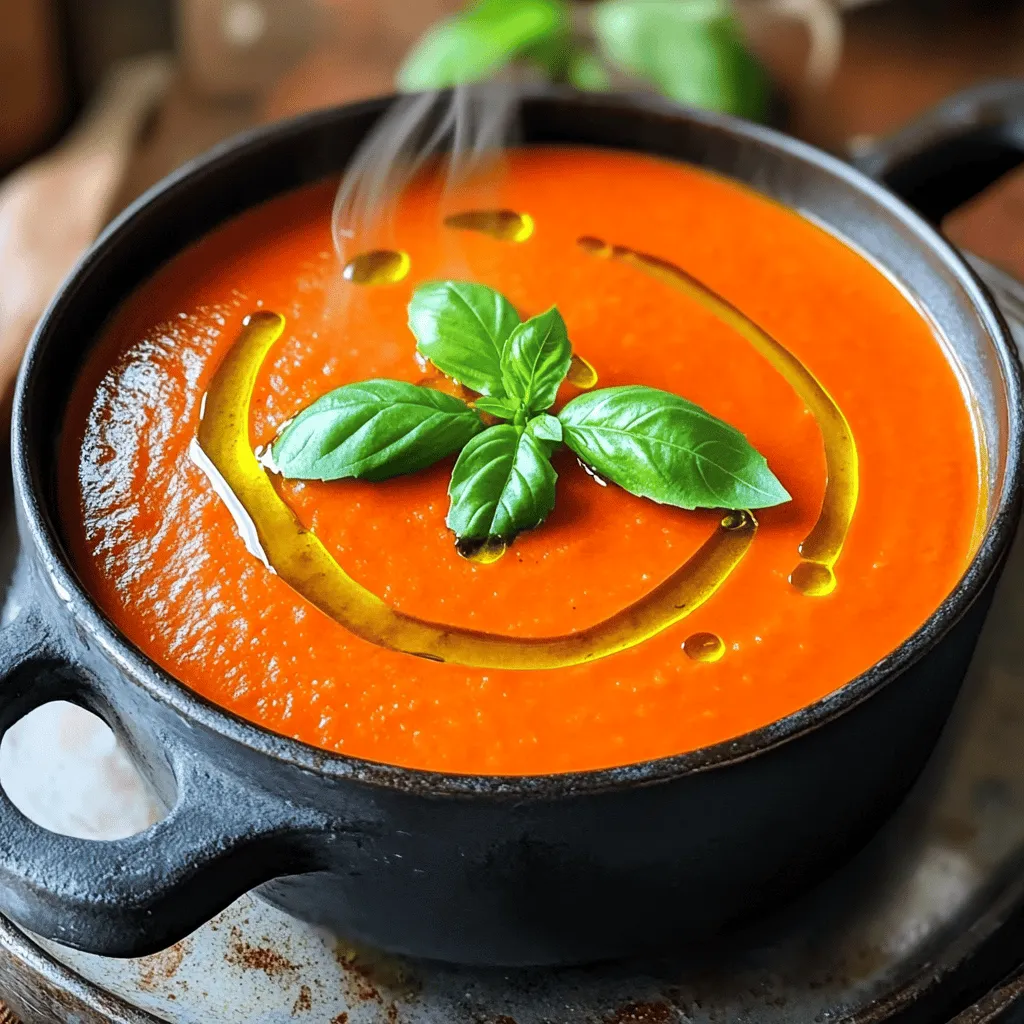
– Fresh basil leaves for garnish
Each ingredient plays a crucial role. The red bell peppers give the soup its sweet and smoky flavor. Onion and garlic add depth and aroma. Vegetable broth gives a warm base, while heavy cream makes it rich and smooth. Smoked paprika adds a unique twist, making it even more delicious. Use fresh basil for a bright finish.
Step-by-Step Instructions
Preparation
1. Preheat oven and prepare ingredients
Begin by preheating your oven to 400°F (200°C). This heat will bring out the best in the peppers. While waiting, gather your ingredients. You will need 4 large red bell peppers, 1 medium onion, 3 cloves of garlic, and some broth.
2. Roast red bell peppers
Cut the bell peppers in half and remove the seeds. Place them cut side down on a baking sheet. Drizzle with olive oil, then roast them in the oven for 25-30 minutes. Look for blistered skins and tender flesh. This step gives the soup a rich, sweet flavor.
Cooking the Base
1. Sauté onions and garlic
While the peppers roast, heat 1 tablespoon of olive oil in a large pot over medium heat. Add your chopped onion. Cook it for about 5-7 minutes until it turns clear. This step builds a tasty base for your soup.
2. Add spices and aromas
Once the onion is ready, stir in 3 minced garlic cloves and 1 teaspoon of smoked paprika. Cook for another 1-2 minutes until you smell the aromas. The smoked paprika adds depth to the flavor, making it special.
Blending and Finishing
1. Combine roasted peppers with base
After roasting, let the peppers cool slightly. Peel off the skins, then add them to the pot with the onions and garlic. Pour in 2 cups of vegetable broth. Bring everything to a simmer and cook for about 10 minutes. This helps all the flavors blend.
2. Blend until smooth and stir in cream
Use an immersion blender to mix the soup until it is smooth. If you don’t have one, you can carefully transfer it to a blender in batches. After blending, stir in 1 cup of heavy cream. Season with salt and pepper to taste. Warm the soup gently but do not let it boil.
Now, you have a delicious creamy roasted red pepper soup ready to serve!
Tips & Tricks
Best Practices
Choosing ripe red bell peppers
Pick peppers that are bright red and firm. Look for a smooth skin with no blemishes. Ripe peppers are sweeter and add more flavor to your soup. They also have a rich color that makes your dish pop.
Optimal roasting techniques
Roasting brings out the natural sweetness of red peppers. Set your oven to 400°F (200°C). Place the peppers cut side down on a baking sheet. Drizzle lightly with olive oil. Roast them for 25-30 minutes. You want the skins to blister and the peppers to be soft.
Blending Techniques
Using an immersion blender vs. traditional blender
An immersion blender is a quick and easy way to blend soup. You can blend right in the pot. This saves time and cuts down on mess. If you use a traditional blender, let the soup cool a bit. Blend in batches to avoid splatter.
Flavor Enhancers
Additional spices and herbs suggestions
You can add more flavor to your soup with spices. Try a pinch of cayenne for heat. Fresh herbs like thyme or oregano can also boost the taste. For a smoky flavor, add a bit more smoked paprika. Experiment to find what you like best!
Variations
Dairy-Free Option
For a dairy-free soup, use coconut cream instead of heavy cream. Coconut cream adds a rich texture and a hint of sweetness. To do this, simply replace the 1 cup of heavy cream in the recipe with 1 cup of coconut cream. The soup will maintain its creamy feel while being dairy-free. This swap works well, especially if you like a touch of coconut flavor.
Spicy Variation
If you enjoy some heat, add red pepper flakes to the soup. Start with 1/2 teaspoon and adjust to your taste. You can add the flakes when you sauté the onions and garlic. This gives the spice time to bloom and mix with the other flavors. The heat from the red pepper flakes pairs well with the sweetness of the roasted peppers, making each spoonful exciting.
Chunky Version
Want a heartier soup? Add vegetables or beans for a chunky texture. You can include diced zucchini, carrots, or even canned beans like cannellini or chickpeas. Chop the veggies and add them to the pot right after you blend in the roasted peppers. Let them simmer for about 10 minutes. This creates a filling meal and adds more nutrients. Feel free to mix and match based on what you have at home.
Storage Info
Refrigeration
To store leftover soup, let it cool first. Pour the soup into an airtight container. Make sure to seal it tightly. Place the container in the fridge. The soup will last for about three to four days. When you are ready to eat, just take it out and reheat.
Freezing
Freezing creamy soup is easy. First, let the soup cool completely. Use freezer-safe containers or bags. Leave some space at the top, as soup expands when frozen. Label the containers with the date. You can freeze the soup for up to three months. When you want to enjoy it again, just take it out of the freezer.
Reheating
Reheating soup can be tricky. To keep the flavor, use a pot on low heat. Stir the soup often as it warms up. If it looks too thick, add a splash of broth or water. Do not boil the soup, as it can change the texture. Enjoy it hot and fresh!
FAQs
Common Questions
How do I make creamy roasted red pepper soup vegan?
You can easily make this soup vegan by replacing heavy cream with coconut cream. This gives the soup a rich taste without dairy. Also, check your vegetable broth to ensure it is vegan-friendly.
Can I use roasted red peppers from a jar?
Yes, using jarred roasted red peppers is a great shortcut. They save time and still add a lovely flavor to the soup. Just drain them well before adding them to your pot.
What can I serve with this soup?
This soup pairs wonderfully with crusty bread or a fresh salad. You can also serve grilled cheese sandwiches for a cozy meal. For something lighter, try a cucumber and tomato salad.
Nutritional Information
Each serving of creamy roasted red pepper soup has approximately:
– Calories: 300
– Fat: 20g
– Carbohydrates: 30g
– Protein: 4g
These values can vary based on the specific ingredients you use.
Serving Suggestions
You can elevate your soup by adding toppings like:
– Croutons for crunch
– A drizzle of olive oil for richness
– A sprinkle of fresh herbs for brightness
This soup also works well as a starter or a main dish. Pair it with a light wine or a refreshing iced tea for a perfect meal.
This blog post covered the key steps to make creamy roasted red pepper soup. We explored the main ingredients, cooking methods, and tips for great flavor. You can adjust this recipe for various dietary needs or tastes. Store leftovers properly for the best results. Remember, cooking is about having fun and trying new things. Enjoy making this delicious soup and share it with friends and family. You’ll impress them with your skills!

![- 1 pound ground turkey - 1/4 cup breadcrumbs - 1 tablespoon soy sauce - 1 tablespoon sesame oil Ground turkey is the star here. It gives a lean, juicy bite. Breadcrumbs help bind the meatballs. Soy sauce adds depth and umami. Sesame oil brings a nutty flavor that rounds it all out. - 1 tablespoon grated fresh ginger - 2 cloves garlic, minced - 1/4 cup green onions, finely chopped Fresh ginger adds warmth and spice. Minced garlic gives a savory kick. Chopped green onions add a fresh crunch. Together, these flavors make the meatballs sing. - 1/4 cup teriyaki sauce - 1 tablespoon honey - 1 teaspoon rice vinegar - 1 teaspoon cornstarch (optional) Teriyaki sauce is key for that sweet, tangy glaze. Honey enhances the sweetness. Rice vinegar adds a touch of acidity. Cornstarch thickens the sauce if you prefer a sticky coating. For the full recipe, check the [Full Recipe] link. To make the meatballs, start by combining the ingredients. In a large bowl, mix together these items: - 1 pound ground turkey - 1/4 cup breadcrumbs - 1 tablespoon soy sauce - 1 tablespoon sesame oil - 1 tablespoon grated fresh ginger - 2 cloves garlic, minced - 1/4 cup green onions, finely chopped - 1/4 teaspoon black pepper Mix well until everything is blended. You want a smooth and even mixture. Now, it's time to form the meatballs. With wet hands, take small amounts of the mixture and roll them into balls. Aim for about 1 inch in diameter. This size helps them cook evenly. Place the meatballs on a baking sheet lined with parchment paper. Next, preheat your oven to 400°F (200°C). This ensures the meatballs cook through and get nice and golden. Once the oven is ready, bake the meatballs for 20 minutes. Keep an eye on them. They should be golden brown and fully cooked. You can use a meat thermometer if you want to check; the internal temperature should reach 165°F (74°C). While the meatballs bake, you can make the teriyaki glaze. In a small saucepan, combine these ingredients: - 1/4 cup teriyaki sauce - 1 tablespoon honey - 1 teaspoon rice vinegar - 1 teaspoon cornstarch (optional, for thickening) Heat the mixture over medium heat. Stir it often until it starts to simmer. This means the sauce is thickening nicely. Once the meatballs are done, toss them in the warm teriyaki sauce until they are fully coated. This step adds all the flavor! Find the full recipe for more details on how to enjoy these teriyaki turkey meatballs! To get the best texture for your meatballs, keep some tips in mind. Use fresh ground turkey for moisture and flavor. Mixing the ingredients well helps bind them together. Avoid overmixing, as it can make the meatballs tough. For even cooking, use a uniform size. Aim for each meatball to be about one inch. This size cooks in about 20 minutes at 400°F (200°C). Use a baking sheet lined with parchment paper to prevent sticking and ensure even browning. You can easily adjust the teriyaki sauce to your taste. If you like it sweeter, add more honey. For a spicy kick, mix in some red pepper flakes. If you want to swap ingredients, try using coconut aminos instead of soy sauce for a different flavor. For a thicker sauce, add cornstarch to the mix. Make sure to stir the sauce while it cooks to avoid lumps. Garnish your teriyaki turkey meatballs with extra chopped green onions for color and crunch. You can also sprinkle sesame seeds on top for added flavor. Pair these meatballs with steamed rice or quinoa for a complete meal. Roasted veggies or a fresh salad also make great side dishes. For a fun touch, serve them in lettuce wraps! You can find the full recipe for Teriyaki Turkey Meatballs in the main article. {{image_2}} You can swap ground turkey for other proteins. Chicken works great, too. Use ground chicken for a lighter taste. Beef meatballs add a richer flavor. Just keep in mind that cooking times may change. If you prefer a veggie option, try using lentils or chickpeas. Blend them with spices and breadcrumbs. This makes a tasty meatball without meat. You can enjoy all the teriyaki flavor while keeping it plant-based. The teriyaki sauce is key here, but you can mix it up. Sweet and sour sauce gives a tangy twist. It pairs well with the meatballs. You can also try different Asian BBQ sauces. These bring a smoky flavor that is simply delicious. Feel free to experiment with your favorite sauces. Each option opens a new taste experience. Batch cooking is perfect for busy days. Make a big batch of meatballs and freeze them. They freeze well and are easy to reheat. This way, you can have a quick meal ready in no time. Pair your meatballs with rice or noodles for a full meal. Add steamed veggies for extra nutrition. Mixing and matching helps keep dinners exciting. Check out the Full Recipe for all the details. You can store leftover teriyaki turkey meatballs in the fridge. They last for about 3 to 4 days. Make sure to use airtight containers. This keeps them fresh and safe to eat. If you use a glass container, it helps avoid odors. If you want to store meatballs for longer, freezing is a great choice. Place the meatballs on a baking sheet to freeze them first. This step stops them from sticking together. After they are frozen, move them to a freezer-safe bag. They can last up to 3 months in the freezer. To thaw, place the meatballs in the fridge overnight. You can also use the microwave for a quick thaw. Just be careful to avoid cooking them too much. This way, you keep the great texture. You can reheat your meatballs in the oven or microwave. To use the oven, preheat it to 350°F. Place the meatballs on a baking tray and cover them with foil. This keeps them moist. Heat for about 15 minutes. In the microwave, place them on a plate. Cover them with a damp paper towel. This keeps them from drying out. Heat in short bursts of 30 seconds. Check often to ensure they are hot but not overcooked. For the best taste, always reheat with the teriyaki sauce. It adds flavor and moisture back to the meatballs. Enjoy your meal! To check if your meatballs are done, you need to look for two key signs: - Cooking temperature indicators: The meatballs should reach an internal temperature of 165°F (74°C). This is safe for ground turkey. - Checking for doneness: Cut one meatball in half. The inside should be no longer pink, and the juices should run clear. If you see pink, they need more time. Yes, you can easily make this recipe gluten-free by swapping out a few ingredients: - Gluten-free alternatives for sauces and breadcrumbs: Use gluten-free breadcrumbs or crushed rice crackers instead of regular breadcrumbs. For the sauce, choose a gluten-free soy sauce or tamari instead of standard soy sauce. This keeps all the flavor while making it safe for those with gluten sensitivities. Pairing side dishes with your meatballs can enhance your meal. Here are some great options: - Recommended side dishes and accompaniments: Serve with steamed rice or quinoa for a filling meal. You can also add stir-fried vegetables for a colorful plate. A fresh salad with a light dressing makes a nice, crisp side. If you like, top your meatballs with extra green onions for added flavor and crunch. For the complete recipe, check out the Full Recipe. In this post, I shared how to make Teriyaki Turkey Meatballs. We explored main ingredients like ground turkey and breadcrumbs, and flavor enhancers like ginger and garlic. I also explained how to prepare and bake the meatballs, and create a delicious teriyaki glaze. Don't forget to customize your sauce and try different proteins or sides. Whether for a quick meal or meal prep, these meatballs offer great taste and flexibility. Enjoy making this recipe and share it with friends for a tasty meal!](https://dailydishly.com/wp-content/uploads/2025/07/96065441-bacf-48e9-8896-75bdb8bd513a-768x768.webp)