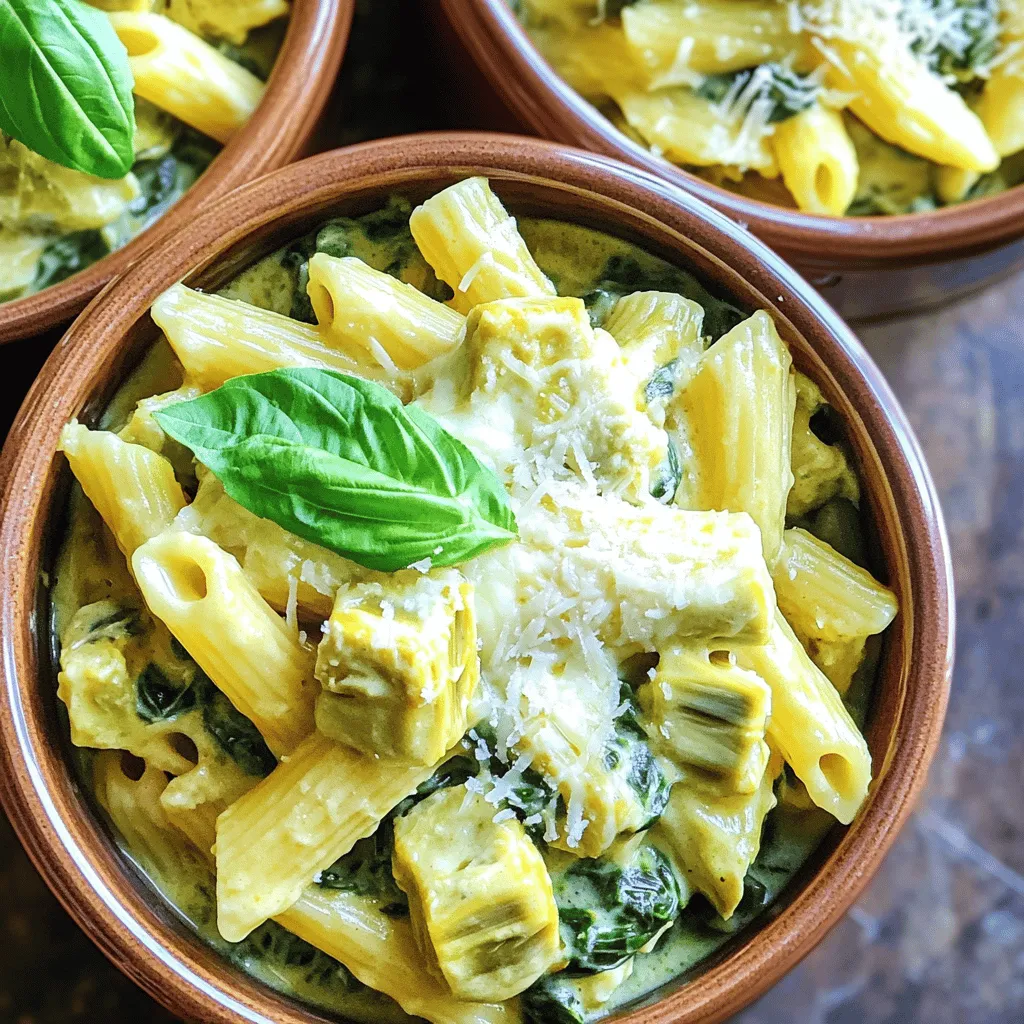
Slow Cooker Cheesy Spinach Artichoke Pasta Delight
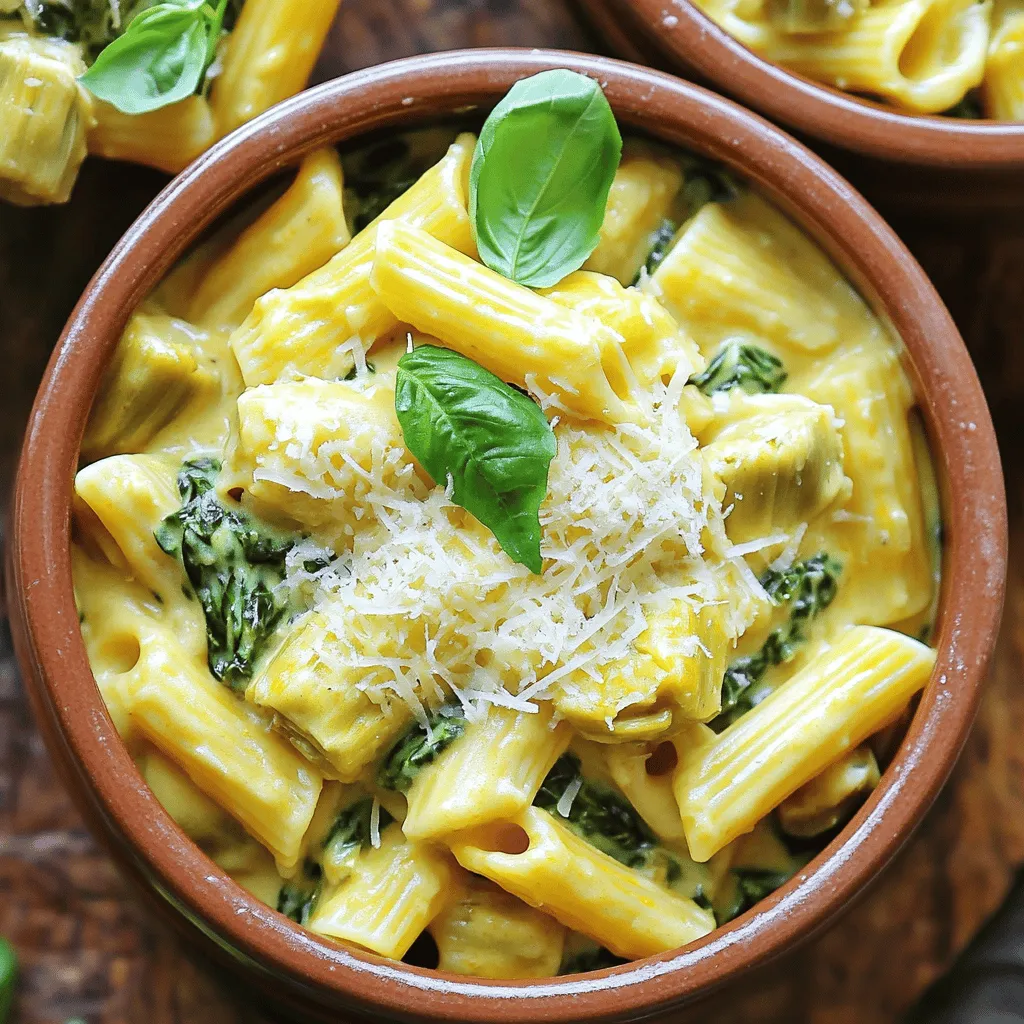
Welcome to your new favorite meal! Slow Cooker Cheesy Spinach Artichoke Pasta is a tasty dish that combines creamy goodness with fresh flavors. You’ll love how easy it is to make in your slow cooker. In this guide, I’ll share simple steps, ingredient tips, and fun variations to try. Whether you’re cooking for a crowd or a cozy night in, this recipe is a winner! Let’s dive in!
Ingredients
List of Required Ingredients
To make Slow Cooker Cheesy Spinach Artichoke Pasta, you will need:
– 12 oz pasta (penne or rotini works well)
– 1 can (14 oz) artichoke hearts, drained and chopped
– 2 cups fresh spinach, roughly chopped
– 1 cup cream cheese, softened
– 1 cup shredded mozzarella cheese
– 1 cup grated Parmesan cheese
– 2 cups vegetable broth
– 1 tablespoon garlic powder
– 1 teaspoon onion powder
– Salt and pepper to taste
Optional Garnishes
Enhance your dish with these garnishes:
– Fresh basil for a pop of color
– Extra grated Parmesan for a cheesy touch
Recommended Substitutions
You can swap ingredients based on your taste or what you have:
– Use whole wheat pasta for a healthier option
– Swap cream cheese with Greek yogurt for a lighter version
– Try different cheese like cheddar or gouda for unique flavors
– Replace vegetable broth with chicken broth for a richer taste
Step-by-Step Instructions
Preparing the Slow Cooker
To start, you need to prepare your slow cooker. Lightly grease the inside with cooking spray or olive oil. This step keeps the pasta from sticking. Make sure to cover all areas. A well-greased slow cooker makes for easy cleanup later!
Combining and Mixing Ingredients
Next, it’s time to combine the ingredients. In your slow cooker, add the following:
– 12 oz pasta (penne or rotini)
– 1 can (14 oz) artichoke hearts, drained and chopped
– 2 cups fresh spinach, roughly chopped
– 1 cup cream cheese, softened
– 1 cup shredded mozzarella cheese
– 1 cup grated Parmesan cheese
After adding these, pour in 2 cups of vegetable broth. Then, sprinkle:
– 1 tablespoon garlic powder
– 1 teaspoon onion powder
– Salt and pepper to taste
Gently stir everything together until well mixed. You want the cream cheese to blend in nicely with the other ingredients.
Cooking Times and Techniques
Now, it’s time to cook. Cover the slow cooker and set it to low for 3 hours. If you’re short on time, you can set it to high for 1.5 hours. Stir halfway through cooking. This helps the flavors mix well.
After cooking, check the pasta. If it still needs more time, cook for another 15-30 minutes on low. When it’s ready, give everything one last stir. Adjust the seasoning if needed. Finally, scoop the cheesy spinach artichoke pasta into bowls. Enjoy your tasty creation!
Tips & Tricks
Common Mistakes to Avoid
Many people rush the cooking time. Always follow the exact time for best results. Stirring halfway helps mix flavors well. If you skip this step, some pasta may cook unevenly. Make sure to check the pasta texture before serving. If it’s too hard, cook a bit longer. Don’t forget to adjust salt and pepper to taste.
Adjusting Flavor Profiles
You can make this dish your own with easy changes. For a bolder taste, add more garlic powder or fresh garlic. A squeeze of lemon juice brightens the flavors, too. If you want a little heat, add red pepper flakes. Fresh basil or parsley adds a nice touch of freshness as well.
Serving and Presentation Suggestions
Serve your pasta in colorful bowls for a fun look. Top each bowl with extra Parmesan cheese. A sprinkle of fresh herbs makes it pop! You can also add a side salad for a complete meal. Remember, a nice presentation makes the dish even more enjoyable!
Variations
Protein Additions (Chicken, Shrimp, etc.)
You can easily add protein to this dish. Cooked chicken or shrimp works great. For chicken, use about 1 pound, diced. For shrimp, 1 pound of peeled shrimp is perfect. Add the protein to the slow cooker with the other ingredients. Both options boost flavor and make the meal heartier.
Vegan/Vegetarian Alternatives
If you want a vegan version, swap out the cheese and cream. Use vegan cream cheese and dairy-free cheese instead. You can also replace the vegetable broth with a homemade blend of water and spices. This keeps the dish creamy without animal products. For added texture, try using chickpeas or tofu. They offer protein while staying plant-based.
Flavor Enhancements (Spices, Extra Vegetables)
You can amp up the flavor with various spices. Try adding red pepper flakes for heat or Italian seasoning for more depth. You can also mix in extra veggies like bell peppers, zucchini, or mushrooms. Just chop them up and add them to the slow cooker. They will cook down nicely and add freshness to your pasta.
Storage Info
Recommended Storage Methods
After enjoying your slow cooker cheesy spinach artichoke pasta, store leftovers safely. Use airtight containers to keep the pasta fresh. Allow the dish to cool before sealing it up. You can keep it in the fridge for up to three days. Always label containers with the date for easy tracking.
Reheating Instructions
Reheating is simple. You can use the microwave or stovetop. If using a microwave, place a serving in a bowl and cover it. Heat in short bursts, stirring often, until warm. On the stovetop, add a splash of broth to the pasta in a pan. Heat over low, stirring gently until warmed through. This keeps it creamy and delicious.
Freezing Tips
If you want to freeze your pasta, let it cool first. Portion it into freezer-safe bags or containers. Be sure to remove as much air as possible to prevent freezer burn. This pasta can last in the freezer for up to three months. When ready to eat, thaw it overnight in the fridge before reheating.
FAQs
Can I use frozen spinach instead of fresh?
Yes, you can use frozen spinach. It saves time and is easy to use. Just thaw and drain it before adding it to the slow cooker. Frozen spinach has a softer texture than fresh, but it still tastes great. Be sure to squeeze out excess water. This way, your dish won’t be too watery.
What other types of pasta can I use?
You can use many types of pasta. Penne and rotini are great, but you can also try shells or farfalle. Just make sure to adjust the cooking time if you use a different shape. The key is to cook it until it’s al dente. This way, the pasta will hold its shape and texture.
How can I make this recipe spicier?
To add some heat, try adding red pepper flakes. Start with a small amount, about 1/4 teaspoon, and taste as you go. You can also add diced jalapeños or spicy sausage for extra flavor. Another option is to add a dash of hot sauce at serving time. Adjust the spice level to fit your taste buds.
This post covered key aspects of your slow cooker recipe, from ingredients to variations. You learned about essential items, options for garnish, and smart swaps. I shared step-by-step instructions to ensure your dish turns out great. We talked about common mistakes and how to enhance flavors. Remember, adjustments matter depending on your taste. With the right tips for storage and reheating, you can enjoy your meal later. I hope you feel ready to try this recipe and make it your own. Enjoy the cooking journey!

![- 1 medium head of cauliflower, cut into florets - 1 cup all-purpose flour - 1 cup water - 1 cup panko breadcrumbs - 1 teaspoon garlic powder - 1 teaspoon onion powder - 1 teaspoon smoked paprika - 1 teaspoon cayenne pepper (adjust for spice preference) - 1 cup buffalo sauce (store-bought or homemade) - 8 small corn or flour tortillas The heart of these tacos is the cauliflower. This veggie gives the dish a great texture and absorbs the buffalo sauce well. You need flour and water to make the batter. Panko breadcrumbs add a nice crunch. Spices like garlic powder, onion powder, smoked paprika, and cayenne pepper give the cauliflower its bold flavor. - 1 ripe avocado, sliced - 1 cup shredded lettuce - ½ cup crumbled blue cheese or feta cheese (optional) - Fresh cilantro, for garnish - Lime wedges, for serving Toppings change the game. Sliced avocado adds creaminess, while shredded lettuce gives a fresh crunch. Blue cheese or feta adds tang. Fresh cilantro brightens the dish. Lime wedges are perfect for squeezing over the tacos. - Vegan, gluten-free options, allergen information These tacos can fit many diets. For a vegan option, skip the cheese. Use gluten-free flour and corn tortillas for a gluten-free meal. Always check for allergies, especially with buffalo sauce and toppings. For the full recipe, check [Full Recipe]. 1. First, preheat your oven to 425°F (220°C). This step is key. 2. Line a baking sheet with parchment paper. It helps with easy cleanup. 3. In a medium bowl, whisk together: - 1 cup all-purpose flour - 1 cup water - 1 teaspoon garlic powder - 1 teaspoon onion powder - 1 teaspoon smoked paprika - 1 teaspoon cayenne pepper (adjust for spice preference) Mix until the batter is smooth. 4. In another bowl, pour in 1 cup of panko breadcrumbs. This will give your cauliflower that crunchy texture. 5. Take each cauliflower floret and dip it into the batter. Let the extra batter drip off. 6. Then coat the floret with panko breadcrumbs. Place the coated florets on the baking sheet. 7. Bake in the oven for 25-30 minutes. Flip halfway through to ensure even cooking. The cauliflower should turn golden brown and crispy. 8. In a large bowl, toss the baked cauliflower with 1 cup of buffalo sauce. Make sure every piece is well-coated. 9. Warm your tortillas on a skillet or in the microwave. This makes them soft and pliable. 10. On each tortilla, layer the buffalo cauliflower, shredded lettuce, and avocado slices. 11. If you like, add crumbled blue cheese or feta on top. 12. Garnish with fresh cilantro and serve with lime wedges. Squeeze lime juice over the tacos for added flavor. For the full recipe, refer to the earlier section. Enjoy your delicious Buffalo Cauliflower Tacos! To get crispy cauliflower, start by removing moisture. After cutting the cauliflower into florets, pat them dry with a paper towel. This helps the batter stick and ensures crispiness. When baking, use a hot oven set to 425°F (220°C). Spread the florets on a lined baking sheet in a single layer. Avoid crowding them, as this traps steam and makes them soggy. Flip the cauliflower halfway through baking for even crispiness. For extra flavor, play with spices. If you like it hot, add more cayenne pepper to the batter. You can also try using garlic or onion powder in larger amounts for a stronger taste. Pair your tacos with delicious dipping sauces like ranch or a creamy avocado dip. A side of crunchy slaw can add freshness and texture. To serve a larger group, simply double the ingredients. For smaller gatherings, halve the recipe. Adjust the number of tortillas and toppings to match your needs. This way, everyone gets their fill of these tasty tacos while minimizing waste. For the complete recipe, check out the Full Recipe. {{image_2}} You can switch up the flavor with different hot sauces. Try a garlic or honey hot sauce for a sweet twist. Sriracha or chipotle sauce can add a smoky kick. Adjust the spice level by adding more or less cayenne pepper. You can also mix in other spices like cumin or chili powder for a unique taste. For a creamy touch, use dairy-free cheese options. Cashew cheese or vegan feta works well. You can also add more veggies like diced tomatoes, corn, or even a crunchy slaw. This adds color and texture to your tacos, making each bite exciting. Want a lighter meal? Turn your tacos into a salad! Start with a bed of greens instead of tortillas. Top with the buffalo cauliflower, avocado, and your favorite toppings. Drizzle with extra buffalo sauce or a zesty dressing. This way, you enjoy the same great flavors in a fresh and healthy way. For the full recipe, check out the detailed instructions above. To keep your tacos fresh, store them in airtight containers. Place the assembled tacos in the fridge. They stay good for up to two days. If you don't want soggy tacos, store the ingredients separately. This way, the tortillas won't get wet. Keep the buffalo cauliflower in one container and the toppings in another. Reheating crispy cauliflower can be tricky. Use an oven for the best results. Preheat it to 350°F (175°C). Spread the cauliflower on a baking sheet and heat for about 10 minutes. This helps maintain its crispiness. If you need to use a microwave, do it quickly. Heat in short bursts to avoid sogginess. You can freeze cooked cauliflower. Just let it cool completely first. Place it in a freezer-safe bag. Try to squeeze out as much air as possible. It can last up to three months in the freezer. When you're ready to eat, thaw it in the fridge overnight and reheat. For the best taste, use the Full Recipe to make fresh tacos when you’re ready to enjoy! Yes, you can prepare these tacos ahead of time. For the best texture, follow these meal prep tips: - Bake the cauliflower: Cook the cauliflower and toss it in buffalo sauce. Let it cool. Store it in an airtight container. - Prep the tortillas: Warm the tortillas just before serving. This keeps them soft. - Keep toppings separate: Store ingredients like avocado and lettuce in separate containers. This keeps them fresh. When ready to serve, just reheat the cauliflower in the oven. If you want a gluten-free version, here are some options: - Flour: Use gluten-free all-purpose flour or almond flour instead of regular flour. - Tortillas: Choose corn tortillas or gluten-free flour tortillas. Both work great for these tacos. These swaps keep the flavor intact while making it gluten-free. You can manage the heat level easily. Here are some tips: - Cayenne pepper: Start with less cayenne pepper. You can always add more later. - Buffalo sauce: Choose a milder buffalo sauce. Some brands offer a range of heat levels. - Add toppings: Use toppings like avocado or sour cream to balance the spice. These adjustments help you find your perfect heat level while still enjoying the flavor of the tacos. Buffalo cauliflower tacos are a tasty treat that anyone can enjoy. We covered the main ingredients, from cauliflower to tortillas, and discussed optional toppings. You learned how to prepare, cook, and assemble these tacos, plus tips for crispy perfection. Exploring variations lets you customize to your taste, and knowing how to store leftovers keeps your meal fresh. With the right adjustments, you can make this dish fit your diet. Enjoy creating your own buffalo cauliflower tacos, and share them with family and friends for a fun meal!](https://dailydishly.com/wp-content/uploads/2025/07/222f8f62-8bb8-4cb7-89ef-1e5b6133e329-768x768.webp)

![- 1 cup quinoa, rinsed - 2 cups water or vegetable broth - 1 large cucumber, diced - 1 red bell pepper, diced - 1 cup cherry tomatoes, halved - 1/4 red onion, finely chopped - 1 cup fresh parsley, chopped - 1/4 cup tahini - 2 tablespoons lemon juice - 1 tablespoon olive oil - 1 clove garlic, minced - Salt and pepper to taste This salad starts with quinoa as the base. Quinoa is a great source of protein and fiber. Rinsing the quinoa helps remove its bitter coating. Use fresh veggies for crunch and color. I love using cucumbers and bell peppers for a fresh bite. Cherry tomatoes bring sweetness and juicy flavor. The red onion adds a nice kick, while parsley gives a fresh touch. The tahini sauce is the star. It adds a creamy texture and nutty flavor. Mix tahini with lemon juice, olive oil, and garlic for a bright dressing. This makes the salad so tasty! - 1/4 cup sunflower seeds or chopped nuts for crunch For extra flavor and texture, you can add sunflower seeds or nuts. They give a nice crunch. Try almonds or walnuts for a rich taste. Fresh herbs like mint or cilantro can also brighten the dish. - Calories per serving: About 250 - Macronutrient breakdown: 10g protein, 12g fats, 30g carbs - Dietary considerations: Gluten-free, vegan, and packed with nutrients This salad is not just tasty; it's also healthy! Each serving has around 250 calories. You get protein from quinoa and tahini. The veggies add vitamins and minerals. Plus, it fits many diets, like vegan and gluten-free. Snack on this salad for a boost of energy! Check the Full Recipe for all the details. 1. Start by rinsing 1 cup of quinoa under cold water. This helps remove any bitter taste. 2. In a medium saucepan, combine the rinsed quinoa and 2 cups of water or vegetable broth. 3. Bring the mixture to a boil over medium-high heat. 4. Once boiling, reduce the heat to low, cover, and let it simmer. Cook for about 15 minutes. 5. The quinoa is done when it is fluffy and the water is absorbed. Remove it from heat and let it cool slightly. 1. In a small bowl, mix together 1/4 cup tahini, 2 tablespoons lemon juice, and 1 tablespoon olive oil. 2. Add 1 clove of minced garlic, salt, and pepper to taste. 3. Whisk until smooth. If the dressing is too thick, add a little water to reach your desired consistency. 1. In a large mixing bowl, combine 1 diced cucumber, 1 diced red bell pepper, 1 cup of halved cherry tomatoes, 1/4 finely chopped red onion, and 1 cup of chopped fresh parsley. 2. Add the cooled quinoa to the vegetable mix and gently toss everything together. 3. Drizzle the tahini dressing over the salad and stir well to coat all the ingredients. 4. For extra crunch, sprinkle 1/4 cup of sunflower seeds or chopped nuts on top before serving. For the full recipe, you can check the details provided above. Enjoy your fresh and flavorful Lemon Tahini Quinoa Salad! To cook quinoa, use a 2:1 ratio of water to quinoa. Rinse the quinoa first. This removes the bitter coating. Bring the water to a boil. Once boiling, lower the heat. Cover the pot and let it simmer for about 15 minutes. Fluff the quinoa with a fork after cooking. This keeps it light and airy, avoiding mushy quinoa. Herbs can change the taste of your salad. Fresh mint or dill works well. Try adding basil for a different twist. For spice, consider adding a pinch of cumin or paprika. These spices bring out the flavors of the vegetables and dressing. Presentation matters! Serve the salad in a large bowl. Garnish with lemon slices and fresh parsley. This adds color and appeal. For a fun twist, use clear glasses. Layer the salad for a stunning visual. Pair this salad with grilled chicken or fish for a complete meal. It’s also great beside roasted veggies. {{image_2}} You can easily add more protein to your Lemon Tahini Quinoa Salad. Chickpeas are a great choice. They add texture and a nutty flavor. Just rinse and drain a can of chickpeas. Then, fold them into the salad for extra protein. Grilled chicken or tofu also works well. Cook the chicken or tofu until it’s golden brown. Then, chop it into bite-sized pieces. Mix it in with the salad for a hearty meal. You can change this salad based on the season. In spring, add fresh peas, radishes, or asparagus. These veggies brighten up the dish and add crunch. In winter, you can use roasted root vegetables. Try carrots or sweet potatoes. They add warmth and depth to the salad while keeping it filling. If you want to switch up the flavor, try other dressings. A simple olive oil and vinegar mix gives a light taste. You can also use yogurt for a creamy twist. Adjust the flavors to suit your taste. Add more lemon juice for tanginess. Or, include herbs like dill or cilantro for freshness. For the complete recipe, check out the [Full Recipe]. To keep your Lemon Tahini Quinoa Salad fresh, store it in the fridge. Use an airtight container. This helps maintain flavor and texture. Before putting it away, let the salad cool. Hot food can raise the fridge temperature, which is not good. Your salad lasts about three to five days in the fridge. Check for any changes in color or smell. If it looks slimy or smells off, toss it out. To reheat, use the microwave. Heat it gently to avoid drying it out. Stir it halfway through to ensure even warming. If you want to serve leftovers, try adding fresh herbs or a squeeze of lemon juice. This can brighten the flavors again. For the full recipe, refer back to the main section. To make this creamy dressing, mix the tahini, lemon juice, olive oil, minced garlic, salt, and pepper in a bowl. Use a whisk for a smooth blend. Adjust the thickness by adding water if needed. This dressing adds a zesty flavor and a creamy texture to your salad. Yes, you can prepare this salad in advance. Store the salad and dressing separately in the fridge. This keeps the vegetables crisp. Combine them just before serving. It tastes even better after the flavors meld together. If you can't find tahini, you can use these alternatives: - Sunflower seed butter - Almond butter - Greek yogurt Each of these options has a unique flavor. Sunflower seed butter is nut-free and creamy. Almond butter adds a nutty taste. Greek yogurt gives a tangy kick. Keep in mind that substituting may change the salad's taste. Adjust the amount of lemon juice to balance flavors. Always taste as you go to find your perfect mix. Enjoy experimenting! This blog post covered how to make a delicious Lemon Tahini Quinoa Salad. You learned about essential and optional ingredients, like quinoa, vegetables, and tahini. I gave you step-by-step instructions, plus tips for cooking and flavoring. We explored salad variations and how to store it properly. This salad is versatile and easy to make. Try adding your favorite ingredients to make it unique. Enjoy a tasty and healthy dish that fits any season!](https://dailydishly.com/wp-content/uploads/2025/07/0131a3b2-a937-48f9-ad75-9f78e7be101a-768x768.webp)