
Moroccan Chicken Tagine Flavorful and Easy Recipe


Are you ready to dive into the world of Moroccan cuisine? This Moroccan Chicken Tagine recipe is not just flavorful; it’s also easy to make! Using simple ingredients, you can create a dish that bursts with spices and warmth. I’ll guide you through each step, from cooking the chicken to perfecting the simmer. Whether you’re a novice or a pro, you’ll impress everyone at the table. Let’s get cooking!
Why I Love This Recipe
- Flavorful Spices: This recipe combines aromatic spices like cumin, ginger, and cinnamon, creating a rich, warm flavor profile that is quintessentially Moroccan.
- Comforting Dish: The tender chicken and sweet apricots simmer together, resulting in a comforting meal that’s perfect for any occasion.
- Easy Preparation: With straightforward steps and minimal prep time, this dish is perfect for both novice cooks and seasoned chefs alike.
- Versatile Serving Options: Serve it over couscous or with crusty bread, making it a versatile choice for any dining experience.
Ingredients
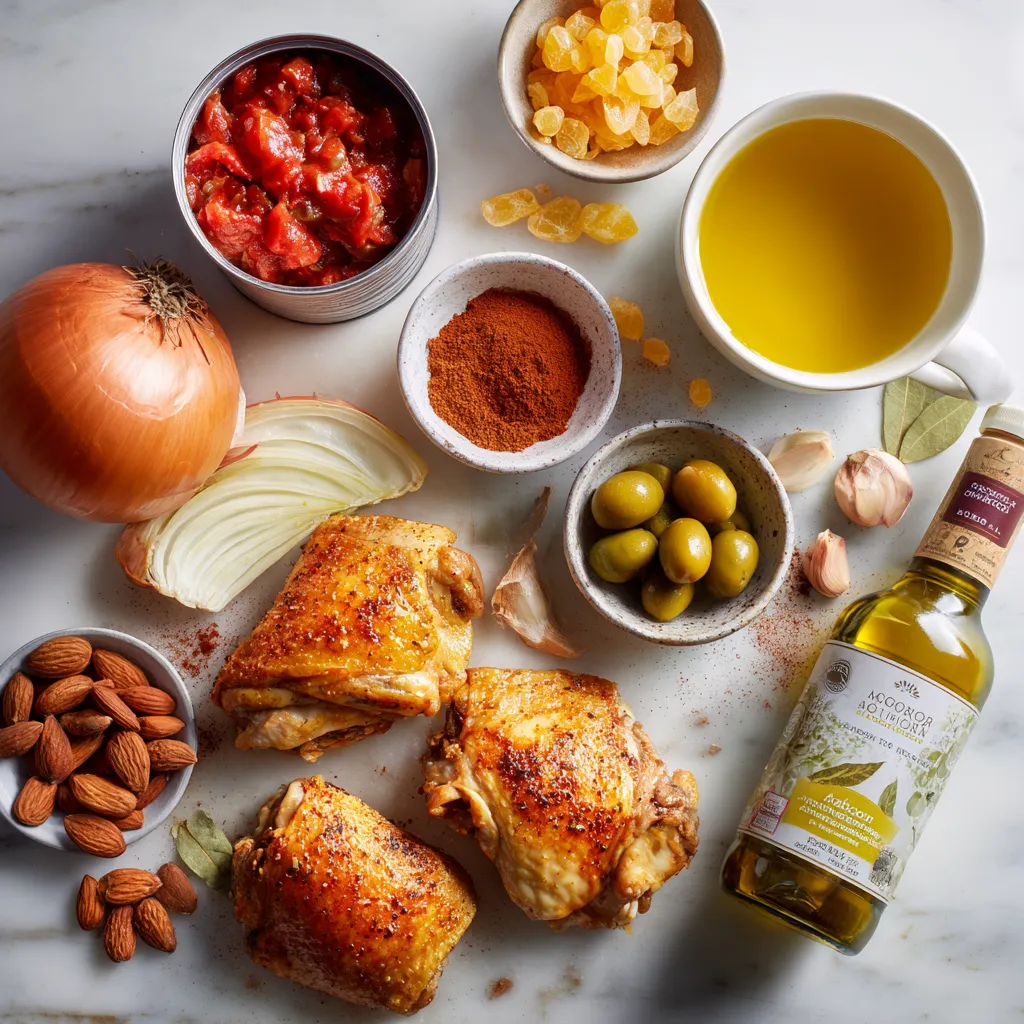
To make Moroccan Chicken Tagine, you need a mix of fresh ingredients and spices. This combination creates a rich flavor that makes the dish special. Here’s what you will need:
– Chicken
– 4 chicken thighs, bone-in and skin-on
– Vegetables
– 1 large onion, finely chopped
– 3 cloves garlic, minced
– Spices
– 1 teaspoon ground cumin
– 1 teaspoon ground ginger
– 1 teaspoon ground cinnamon
– 1 teaspoon smoked paprika
– 1/2 teaspoon cayenne pepper (adjust for spice)
– Liquids
– 1 can (14 oz) diced tomatoes, with juices
– 1 cup chicken broth
– Garnishes
– 1 cup dried apricots, chopped
– 1/2 cup almonds, toasted
– 1 cup green olives, pitted and halved
– Fresh cilantro or parsley for garnish
– Salt and pepper to taste
These ingredients come together to create a delightful dish. The chicken is juicy, and the spices bring warmth to the meal. The dried apricots add a sweet touch, while the olives give a savory bite. Enjoy the process of gathering these components, as they will transform into a wonderful feast!
Step-by-Step Instructions
Preparation Steps
– Cooking the Chicken
Start by heating the olive oil in a tagine or a large pot. Use medium-high heat. Season the chicken thighs with salt and pepper. Cook the chicken until brown on all sides. This takes about 5-7 minutes. Once browned, take the chicken out and set it aside.
– Sautéing the Aromatics
In the same pot, add the finely chopped onion. Sauté it until it looks clear, about 5 minutes. Then, add the minced garlic. Stir this for one minute until it smells good.
– Combining Ingredients
Next, sprinkle in the ground cumin, ginger, cinnamon, smoked paprika, and cayenne pepper. Stir this mix to coat the onions well. Cook it for another 2 minutes to bring out the spice flavors. Pour in the diced tomatoes with their juices and chicken broth. Stir everything together and let it gently simmer.
Simmering Process
– Nestling Chicken into the Sauce
Now, return the browned chicken to the pot. Nestle it deep into the sauce. Add the chopped dried apricots. Cover the pot with a lid.
– Cooking Time
Lower the heat and let the tagine simmer for about 45 minutes. Turn the chicken halfway through cooking. It should be tender and fully cooked.
– Adding Final Touches
In the last 10 minutes, mix in the toasted almonds and halved green olives. Stir gently to combine. When done, take it off the heat. Garnish with fresh cilantro or parsley. Serve it hot over couscous or with crusty bread. Enjoy the tasty meal!
Tips & Tricks
Cooking Tips
– Browning Chicken Perfectly
Start with a hot pot. Heat olive oil over medium-high heat. Season the chicken with salt and pepper. Place the chicken thighs skin-side down. Brown for about 5-7 minutes. Turn them to get even color. This adds great flavor.
– Best Practices for Simmering
After browning, lower the heat when you add liquids. You want a gentle simmer. This keeps your chicken tender. Cover the pot while it cooks. Stir occasionally, and check if it’s sticking.
Flavor Enhancements
– Adjusting Spice Levels
Not everyone likes heat. If you want less spice, skip the cayenne pepper. You can also add more cinnamon for warmth. Taste as you go to find your perfect balance.
– Substituting Ingredients
Don’t have dried apricots? Use raisins or prunes instead. If you can’t find green olives, black olives work too. Each swap brings a unique twist to your tagine.
Pro Tips
- Marinate for Extra Flavor: Consider marinating the chicken thighs in a mixture of spices, olive oil, and lemon juice for a few hours or overnight to enhance the flavor.
- Use a Tagine or Dutch Oven: Cooking in a tagine or a heavy Dutch oven helps retain moisture and infuses the dish with rich flavors. If you don’t have a tagine, a heavy pot with a lid works well.
- Adjust Spice Levels: Feel free to adjust the amount of cayenne pepper based on your spice preference. You can also add a pinch of saffron for a unique flavor twist.
- Garnish for Freshness: Always garnish your dish with fresh herbs before serving. Fresh cilantro or parsley adds a burst of color and freshness to the rich tagine.

Variations
Vegetarian Options
You can easily replace chicken with tofu or vegetables. Tofu absorbs flavors well. Choose firm tofu for the best texture. Simply cut it into cubes. Sauté the tofu until golden before adding it to the sauce. For vegetables, use carrots, bell peppers, or zucchini. Cut them into bite-sized pieces. Add them to the pot after you sauté the onions. Cook until they are just tender before simmering.
Serving Suggestion Variations
Couscous is a great side for Moroccan chicken tagine. It soaks up the sauce well. You can prepare it simply by boiling water and adding couscous. Let it sit for five minutes before fluffing it with a fork. Crusty bread also works. Use it to soak up the tasty sauce.
For garnishing options, fresh cilantro or parsley adds nice color. You can also use sliced almonds for crunch. Try pomegranate seeds for a burst of sweetness. They add a lovely pop of color too.
Storage Info
Storing Leftovers
Refrigeration Guidelines
To keep the Moroccan chicken tagine fresh, store it in an airtight container. Place it in the fridge within two hours of cooking. It will stay good for about 3 to 4 days. Make sure it cools down before sealing the container. This helps prevent condensation, which can make the dish soggy.
Freezing Instructions
You can freeze leftover tagine too! Just make sure it is completely cooled. Transfer it to a freezer-safe container or bag. It will last up to 3 months in the freezer. When you want to eat it, thaw it in the fridge overnight. This keeps the flavors and texture just right.
Reheating Tips
Best Methods
When reheating, the stovetop is best. Place the tagine in a pot over low heat. Stir it often to heat evenly. You can also use a microwave. Just cover the dish and heat it in short bursts. Check it often to avoid overheating.
Maintaining Quality
To keep the tagine tasting great, add a splash of chicken broth or water. This helps revive the sauce. If you find it dry, this little trick works wonders. Always taste before serving to adjust the seasoning if needed.
FAQs
Common Questions
What is a Tagine?
A tagine is a special pot from Morocco. It has a conical lid that helps cook food slowly. This design keeps moisture in and makes flavors richer. You can use a tagine or any heavy pot for this recipe.
Can I make this dish in advance?
Yes, you can prepare this dish a day ahead. Just cook it and let it cool. Store it in the fridge. Reheat it gently before serving. The flavors will taste even better after a day.
How can I adjust the recipe for a larger crowd?
To serve more people, simply double the ingredients. Use a larger pot to hold everything. You may need to adjust cooking time slightly. Make sure the chicken cooks all the way through.
Cooking Techniques
What’s the best cookware to use?
A tagine pot is best, but a heavy pot works too. Look for one that holds heat well. Cast iron or enameled Dutch ovens are great options. They help cook the chicken evenly.
How do I know when the chicken is done?
The chicken is done when it is tender and no longer pink inside. You can check the thickest part of the thigh. If it reaches 165°F (75°C), it’s safe to eat. The meat should pull away from the bone easily.
You learned how to make a tasty dish with chicken and veggies. We covered easy steps for cooking, simmering, and adding flavor. You can also try vegetarian options like tofu. Storing and reheating were explained to keep your meal fresh. With these tips, you can cook a great meal every time. Enjoy exploring new flavors and impressing your friends and famil

Moroccan Chicken Tagine
Ingredients
- 4 thighs chicken, bone-in and skin-on
- 2 tablespoons olive oil
- 1 large onion, finely chopped
- 3 cloves garlic, minced
- 1 teaspoon ground cumin
- 1 teaspoon ground ginger
- 1 teaspoon ground cinnamon
- 1 teaspoon smoked paprika
- 0.5 teaspoon cayenne pepper
- 1 can (14 oz) diced tomatoes, with juices
- 1 cup chicken broth
- 1 cup dried apricots, chopped
- 0.5 cup almonds, toasted
- 1 cup green olives, pitted and halved
- Salt and pepper to taste
- Fresh cilantro or parsley for garnish
Instructions
- In a tagine or a large heavy-bottomed pot, heat the olive oil over medium-high heat.
- Season the chicken thighs with salt and pepper. Brown the chicken on all sides in the hot oil, approximately 5-7 minutes. Remove the chicken and set it aside.
- In the same pot, add the chopped onion and sauté until translucent, about 5 minutes. Then, add the minced garlic, stirring for an additional minute until fragrant.
- Sprinkle in the ground cumin, ginger, cinnamon, smoked paprika, and cayenne pepper, stirring to coat the onions evenly with spices. Cook for another 2 minutes to release the flavors.
- Pour in the diced tomatoes with their juices and chicken broth, stirring to combine. Bring the mixture to a gentle simmer.
- Return the browned chicken to the pot, nestling it into the sauce. Add the chopped dried apricots and cover the pot with a lid.
- Lower the heat and let the tagine simmer for about 45 minutes, turning the chicken halfway through cooking. The chicken should be tender and cooked through.
- In the last 10 minutes of cooking, add the toasted almonds and green olives, stirring gently to combine.
- Once cooked, remove from heat and garnish with fresh cilantro or parsley. Serve hot over a bed of couscous or with crusty bread to soak up the delicious sauce.
![To make vegan lentil sloppy joes, these key ingredients are a must: - 1 cup green or brown lentils, rinsed - 1 small onion, finely chopped - 2 cloves garlic, minced - 1 red bell pepper, diced - 1 carrot, grated - 2 tablespoons tomato paste - 1 cup vegetable broth - 1 tablespoon soy sauce or tamari - 2 tablespoons maple syrup - 1 teaspoon smoked paprika - 1 teaspoon cumin - Salt and pepper to taste - 4 whole wheat burger buns - Fresh parsley, chopped (for garnish) These ingredients create a hearty, flavorful mix. The lentils give protein and fiber. The veggies add crunch and sweetness. You can also add these optional ingredients for a twist: - Jalapeños for heat - Mushrooms for umami - Corn for sweetness - Avocado for creaminess These ingredients can elevate your dish. Feel free to mix and match to find your favorite flavor. Lentils are a powerhouse of nutrition. They are high in protein, which is great for vegans. Here are some benefits: - High in Fiber: Helps with digestion and keeps you full. - Rich in Iron: Supports energy levels and overall health. - Low in Fat: A smart choice for heart health. - Packed with Vitamins: Includes B vitamins, which help with metabolism. Incorporating lentils into your meals is a smart move for your health. They make a tasty and nutritious base for this dish. You can find the full recipe above to get started on your tasty vegan adventure! Start by rinsing 1 cup of green or brown lentils. Put them in a medium pot. Add 3 cups of water. Bring the water to a boil. Then, lower the heat to a simmer. Cook the lentils for about 25 to 30 minutes. They should be tender when done. Once cooked, drain any extra water and set the lentils aside. This step is key for a hearty filling. Next, grab a large skillet. Heat a little water or vegetable broth over medium heat. Add the finely chopped onion and minced garlic. Cook them for about 3 to 4 minutes until they soften. Then, stir in the diced red bell pepper and grated carrot. Cook these veggies for another 5 minutes, until they start to soften. This mix adds great flavor and crunch. Now it's time to bring everything together. Add the cooked lentils to the skillet. Then, mix in 2 tablespoons of tomato paste, 1 cup of vegetable broth, and 1 tablespoon of soy sauce. Don’t forget 2 tablespoons of maple syrup for a touch of sweetness. Next, sprinkle in 1 teaspoon of smoked paprika and 1 teaspoon of cumin. Stir well to combine all the flavors. Let the mixture simmer for about 10 to 15 minutes. This will help it thicken nicely. Taste and season with salt and pepper as needed. For the complete recipe, refer to the [Full Recipe]. This dish will make your taste buds dance! To get a thick and hearty Sloppy Joe, you want to simmer the lentil mixture well. After adding all your ingredients, let it cook for about 10-15 minutes. Stir often to avoid sticking. If it gets too thick, add a splash of vegetable broth. This keeps it moist and tasty. The perfect texture is key for a great bite. You can make your Sloppy Joes your own! Try adding different spices, like chili powder or oregano. Want more heat? Add diced jalapeños or a splash of hot sauce. You can also swap the maple syrup for agave nectar. If you love smoky flavors, consider extra smoked paprika. Each twist brings a new flavor, making it fun to explore. Make cooking easier with a few tricks! Chop your veggies ahead of time. You can store them in the fridge for a few days. Also, cook a big batch of lentils and freeze some for later. This meal can be ready in about 30 minutes if you prep smart. For a quick assembly, toast the buns while the mixture simmers. Get the full recipe for more details on each step! {{image_2}} Want some heat? You can turn your lentil sloppy joes into a spicy treat. Add diced jalapeños or a splash of hot sauce to the mix. You can even swap smoked paprika for cayenne for more kick. Spice lovers will enjoy this twist. Adjust the heat to your taste. You can always add more later! If you need a gluten-free meal, don't worry! Use gluten-free buns instead of whole wheat. Many brands offer tasty options. Just check the label to be sure. You can also serve the lentil mix in lettuce wraps. This keeps it light and fresh. Enjoy the same great flavors without the gluten. Looking to cut carbs? Try serving the lentil mix over cauliflower rice. This gives you a tasty base without the bread. Another option is to use portobello mushrooms as buns. They add great flavor and texture. This way, you enjoy all the taste and still stay low-carb. For the full recipe, check out the instructions above. After making your vegan lentil sloppy joes, you can store leftovers easily. Let the mixture cool down first. Transfer it to an airtight container. It will stay fresh for 3 to 5 days in the fridge. Make sure to keep it separate from the buns. This keeps the buns from getting soggy. You can freeze the lentil mixture for later use. Put the cooled lentil mix in a freezer-safe container. It can last for up to 3 months in the freezer. When you're ready to eat, just thaw it in the fridge overnight. This way, you have a quick meal ready on busy days. To reheat, you can use a stovetop or microwave. If using the stovetop, place the lentil mix in a pan over low heat. Stir occasionally until it's hot. If using a microwave, put it in a microwave-safe bowl and heat in short bursts. Stir between each burst for even heating. Make sure to toast the buns again for that perfect crunch. You can enjoy your delicious vegan lentil sloppy joes just like the first time! For the full recipe, check out the previous section. I recommend using green or brown lentils for this recipe. These lentils hold their shape well when cooked. They also have a nice, earthy flavor that works great in sloppy joes. Red lentils can cook down too much and become mushy, so they are not ideal here. Yes, you can make this recipe ahead of time. The lentil mixture stores well in the fridge for up to five days. Just keep it in an airtight container. When you're ready to eat, simply reheat it on the stove or in the microwave. This makes it perfect for meal prep or busy weeknights. To make this dish less spicy, you can adjust the ingredients. Skip the smoked paprika if you find it too strong. You can also reduce the amount of garlic. Adding a little more maple syrup can balance the heat too, making it sweeter. Enjoy it mild or spicy, depending on your taste! For the full recipe, check out the complete guide on Vegan Lentil Sloppy Joes. In this blog post, we explored how to make tasty vegan lentil sloppy joes. We discussed key ingredients and their benefits, prepared the lentils, and combined everything into a delicious sauce. I shared tips for perfecting the dish and offered variations for spice and dietary needs. These sandwiches are easy to store and reheat. Whether you're new to cooking or a pro, this recipe is sure to impress. Enjoy the fun of cooking and savor the flavors you create!](https://dailydishly.com/wp-content/uploads/2025/07/15cadd50-421d-45eb-818a-a88ea76b441c-768x768.webp)

![- 1 lb boneless, skinless chicken thighs - 1/2 cup cornstarch - 1/4 teaspoon black pepper - 1 cup panko breadcrumbs - 1/4 cup sesame seeds - 1/4 cup soy sauce - 1/4 cup honey - 1 tablespoon apple cider vinegar - 1 teaspoon ginger paste - 1 garlic clove, minced - Green onions, finely sliced - Toasted sesame seeds To make crispy sesame chicken, gather all your ingredients first. This helps you stay organized and enjoy the cooking process. The chicken thighs offer a tender bite while the cornstarch provides that essential crunch. Panko breadcrumbs and sesame seeds create a delightful texture and nutty flavor. For the sauce, soy sauce and honey blend perfectly. Apple cider vinegar adds a hint of tang, while ginger and garlic bring warmth and depth. These simple ingredients make a sauce that truly elevates your dish. Don’t forget your garnishes! Finely sliced green onions and toasted sesame seeds add a pop of color and flavor. When you plate your dish, it not only looks great but also tastes amazing. This is the key to making crispy sesame chicken irresistible. For the detailed steps on how to combine these ingredients, check out the Full Recipe. To start, mix the dry ingredients. In a bowl, combine 1/2 cup cornstarch, 1/2 teaspoon salt, and 1/4 teaspoon black pepper. This mix will help the chicken get crispy. Next, bread the chicken. Take 1 lb of cut chicken thighs. Dip each piece into the cornstarch mix, then into a beaten large egg. Finally, coat each piece with a mix of 1 cup panko breadcrumbs and 1/4 cup sesame seeds. Make sure the coating is even. This step is key for that crunchy texture. Now, heat oil for frying. In a deep skillet, add enough vegetable oil to cover the chicken pieces. Heat it over medium-high heat. Once the oil is hot, fry the chicken in batches. Cook for about 5-7 minutes until each piece is golden brown and crispy. Drain the fried chicken on paper towels. This keeps it from getting soggy. For the sauce, grab a separate saucepan. Combine 1/4 cup soy sauce, 1/4 cup honey, 1 tablespoon apple cider vinegar, 1 teaspoon ginger paste, and a minced garlic clove. Heat the mixture over medium heat. Stir and bring it to a simmer for 3-4 minutes. This thickens your sauce and blends the flavors nicely. Once the chicken is fried, drizzle or toss the sauce over it. Make sure each piece is well-coated. Enjoy your crispy sesame chicken! For more details, check out the Full Recipe. To make your chicken crispy, use cornstarch and panko breadcrumbs. Cornstarch helps absorb moisture, while panko adds crunch. - Use 1/2 cup of cornstarch. - Mix it with 1/2 teaspoon salt and 1/4 teaspoon black pepper. - Coat each chicken piece well before frying. Frying temperature matters too. Heat your vegetable oil to medium-high. The right heat cooks the chicken fast and keeps it crispy. - Fry in small batches. - Cook each batch for about 5-7 minutes. - Drain on paper towels to remove excess oil. To boost flavor, adjust the sauce. This sauce is a mix of sweet and savory, but you can change it to your taste. - Add more honey for sweetness or soy sauce for saltiness. - Try using fresh garlic and ginger. Fresh ingredients add a lively taste and aroma. Use 1 teaspoon of ginger paste and 1 minced garlic clove in your sauce. This makes it more vibrant and tasty. How you serve your chicken makes a big difference. For an attractive plate, use a large platter. - Drizzle extra sauce over the chicken. - Garnish with sliced green onions and toasted sesame seeds for color and texture. This makes your Crispy Sesame Chicken look as good as it tastes! For more tips and the full recipe, check the [Full Recipe]. {{image_2}} You can make Crispy Sesame Chicken lighter. Instead of frying, try baking. Bake the chicken at 400°F for 20-25 minutes. This method keeps the crunch without extra oil. If you want low-sodium soy sauce, use tamari or coconut aminos. Both give a similar flavor but with less salt. You can add spices to the coating for extra flavor. Try paprika or cayenne for a little heat. A pinch of garlic powder adds a nice touch too. To mix things up, use different sauces. Sweet chili sauce or teriyaki sauce can give a fun twist. You can also try a spicy mustard sauce for a zing. Pair your Crispy Sesame Chicken with tasty sides. Steamed broccoli or stir-fried vegetables work well. They add color and nutrition. You can also serve it with rice. Jasmine or brown rice both complement the dish. For a fresh touch, add a side salad with sesame dressing. Enjoy your meal with a mix of flavors and textures! To keep your Crispy Sesame Chicken fresh, refrigerate it right away. Place the chicken in a shallow container. This helps it cool down faster. Cover the container tightly with a lid or plastic wrap. This keeps the chicken from drying out. Use it within three days for the best taste. Use airtight containers for storing leftovers. Glass containers work great since they do not stain. You can also use BPA-free plastic containers. Make sure they are safe for food use. Label your containers with the date. This helps you track how long they have been stored. To enjoy your Crispy Sesame Chicken again, you need to reheat it carefully. The oven is the best choice. Preheat your oven to 350°F (175°C). Place the chicken on a baking sheet. Heat for about 10-15 minutes. This keeps the chicken crispy. The microwave is faster but can make the chicken soggy. If you must use it, heat in short bursts. Check after every 30 seconds to avoid overcooking. Yes, you can freeze Crispy Sesame Chicken! First, let it cool completely. Then, wrap each piece tightly in plastic wrap. Place the wrapped pieces in a freezer bag. Squeeze out the air and seal it. This prevents freezer burn. To thaw, move the chicken to the fridge overnight. This keeps it safe. You can also use the microwave for a quick thaw. Use the defrost setting, checking often. Once thawed, reheat in the oven for the best results. Enjoy your delicious meal again! For the complete recipe, check out the Full Recipe section. You can use chicken breasts as a substitute for chicken thighs. They are leaner but still work well. You may also try chicken tenders, which are tender and cook quickly. For vegetarian options, consider using tofu or tempeh. They absorb flavors well and provide a nice texture when cooked. Look for a golden brown color on the chicken. The coating should be crispy and firm. You can use a meat thermometer to check the temperature. Chicken should reach 165°F (75°C) to be safe to eat. If you do not have a thermometer, cut into a piece. The meat should be white with no pink inside. Yes, you can make the sauce in advance. Just mix all the sauce ingredients in a saucepan. Cook it over medium heat until it thickens slightly. Allow it to cool, then store it in an airtight container. When ready to use, reheat it gently on the stove. You can also microwave it for a quick option. This blog post recaps the steps to make Crispy Sesame Chicken. We covered the ingredients, cooking methods, and tips for perfect results. Whether you fry or bake, the key is achieving crispiness. I shared flavorful sauce ideas and garnishing tips to enhance your dish. Remember to store and reheat leftovers properly for best taste. With simple variations, you can easily adapt this recipe. Enjoy your cooking adventure with these helpful insights, and impress everyone with your delicious meal!](https://dailydishly.com/wp-content/uploads/2025/07/12f93f23-c091-4c02-8196-bfe71a37e11f-768x768.webp)