One-Pot Mexican Rice Casserole Flavorful Family Meal

Looking for a quick, tasty dinner that brings the family together? My One-Pot Mexican Rice Casserole is a colorful, hearty meal that ticks all the boxes! With just a few simple ingredients and one pot, you can create a delicious dish packed with flavor. Let’s dive into this easy recipe that will soon become a family favorite, perfect for any night of the week!
Ingredients
Main Ingredients
– 1 cup long-grain rice
– 1 can (15 oz) black beans, drained and rinsed
– 1 can (14.5 oz) diced tomatoes with green chilies
– 1 cup corn kernels (fresh, frozen, or canned)
Vegetables
– 1 bell pepper (any color), diced
– 1 small onion, chopped
– 2 cloves garlic, minced
Spices and Broth
– 1 teaspoon cumin
– 1 teaspoon chili powder
– 1/2 teaspoon smoked paprika
– 2 cups vegetable broth
– 1 tablespoon olive oil
Garnishes
– 1 cup shredded cheese (cheddar or Mexican blend)
– Chopped fresh cilantro for garnish
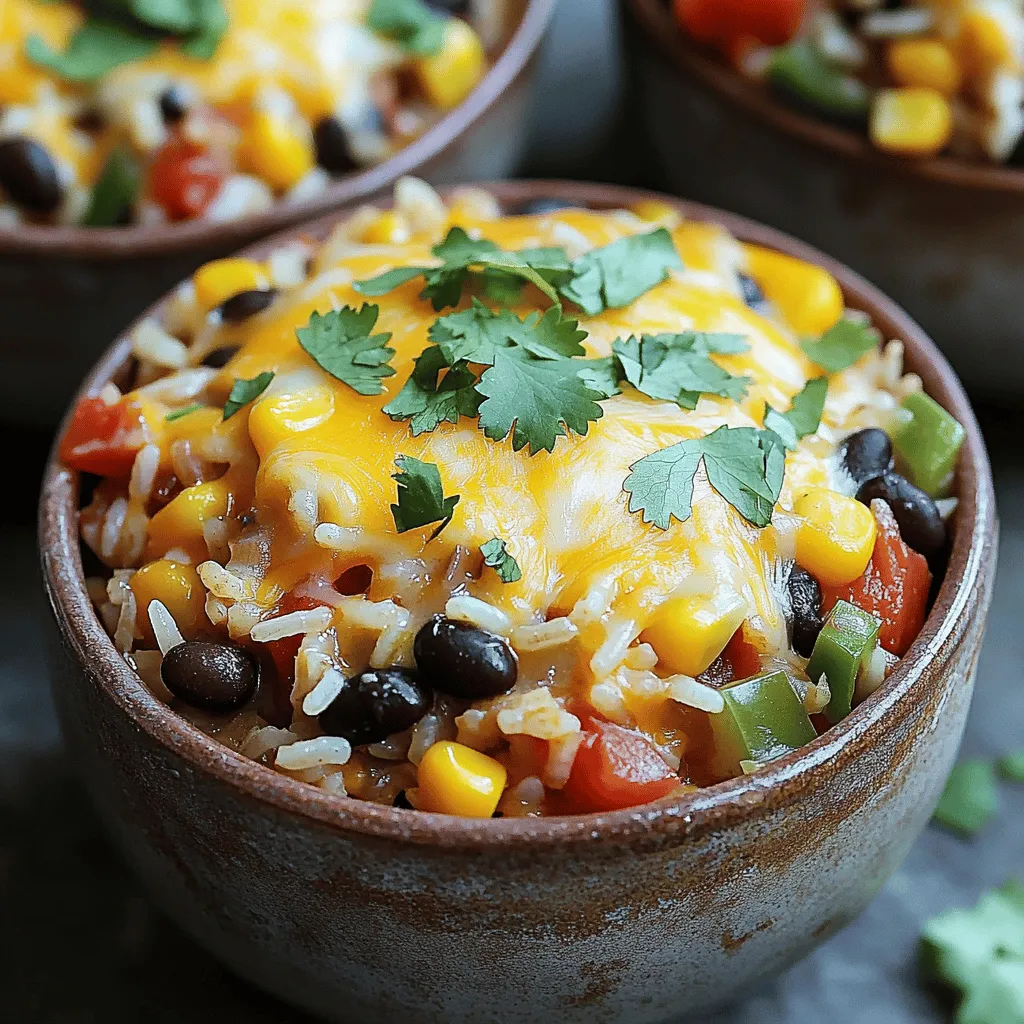
Gather these ingredients for a meal that is tasty and easy to make. Each one plays a key role in adding flavor and texture. The long-grain rice acts as the base, soaking up all the great tastes. Black beans add protein and fiber, making this dish filling. Diced tomatoes with green chilies bring a nice kick and freshness. Corn adds a sweet crunch.
The vegetables are just as important. A bell pepper adds color and sweetness. Onion gives great depth, while garlic brings in a strong, savory note.
The spices and broth tie everything together. Cumin and chili powder add warmth and earthiness. Smoked paprika gives a rich, smoky flavor. The vegetable broth enhances the overall taste, lending moisture and richness to the dish.
Lastly, don’t forget the garnishes! Cheese melts into a gooey layer on top. Fresh cilantro adds a burst of brightness, making every bite enjoyable. Each ingredient works together to create a delicious, one-pot meal that your family will love.
Step-by-Step Instructions
Preparation
First, heat the olive oil in a large pot over medium heat. Once the oil is hot, add the chopped onion and diced bell pepper. Sauté these for about 5 minutes. You want them to soften nicely. Next, add the minced garlic, cumin, chili powder, and smoked paprika. Stir this mixture for 1-2 minutes. This step helps the spices release their full flavors.
Cooking the Rice
Now, it’s time to add the rice. Pour in 1 cup of long-grain rice and stir well. This coats the rice with the spices and oil. Allow the rice to toast for about 2 minutes. It will gain a nice, nutty flavor. After toasting, add the vegetable broth, diced tomatoes with green chilies, black beans, and corn. Don’t forget to season with salt and pepper. Stir everything together until combined.
Simmering the Casserole
Bring the mixture to a boil. Once it starts boiling, reduce the heat to low and cover the pot. Let it simmer for 20-25 minutes. The rice should cook and absorb most of the liquid. After this, remove the pot from heat and sprinkle the shredded cheese on top. Cover the pot again for about 5 minutes to let the cheese melt. Finally, give the casserole a gentle stir to mix everything. You can garnish with chopped fresh cilantro before serving.
Tips & Tricks
Cooking Tips
– For perfect rice, rinse it before cooking. This removes excess starch.
– Use a large pot to ensure even cooking and prevent sticking.
– Adjust the broth based on your rice type; brown rice needs more liquid.
– Taste as you cook. Add salt, pepper, or spices to fit your palate.
Presentation Tips
– Serve directly from the pot for a cozy feel.
– Use bowls for individual servings. Add a sprinkle of cilantro.
– Top with a dollop of sour cream or slices of avocado.
– Serve with tortilla chips on the side for crunch.
Common Mistakes to Avoid
– Avoid overcooking the rice. Check for doneness at 20 minutes.
– Don’t skip the seasoning. It brings the dish to life.
– Stir gently when mixing in cheese. This keeps it creamy.
– Ensure you cover the pot while simmering. This traps steam and cooks the rice evenly.

Variations
Ingredient Swaps
You can mix things up with different beans. Try pinto or kidney beans. They add new flavors and textures. If you want to change the base, substitute quinoa for rice. Quinoa cooks fast and packs a protein punch. Just make sure to adjust the liquid. Use less broth when cooking quinoa.
Spice Level Adjustments
Do you like heat? Add jalapeños for a spicy kick. Dice them up and mix them in with the onions. If you want a milder dish, skip the jalapeños. You can also play with spice blends. Try taco seasoning or a pinch of cayenne. This lets you control the heat.
Dietary Modifications
You can easily make this dish vegan by skipping the cheese. Use a plant-based cheese or leave it out. For a gluten-free option, check your broth. Make sure it is gluten-free. This way, everyone can enjoy your meal.
Storage Info
Refrigeration
To keep your One-Pot Mexican Rice Casserole fresh, store any leftovers in the fridge. Place them in an airtight container. This helps keep the casserole moist and tasty. Make sure to cool it down first before sealing. Leftovers can last about three to four days in the fridge.
Reheating Instructions
When it’s time to enjoy your casserole again, you have a few good options. You can use the microwave or stove. For the microwave, put your portion in a bowl and cover it with a damp paper towel. Heat for about 2-3 minutes. For the stove, place the casserole in a pot over low heat. Stir often and heat until warm. To keep the texture nice, add a splash of broth if needed.
Freezing the Casserole
If you want to save some for later, freezing works great. Let the casserole cool completely first. Then, transfer it to a freezer-safe container or bag. Make sure to remove as much air as possible. This helps prevent freezer burn. You can freeze it for up to three months. When you’re ready to eat, take it out and thaw it in the fridge overnight. Reheat it in the oven or microwave until hot all the way through.
FAQs
What can I serve with One-Pot Mexican Rice Casserole?
You can serve this dish with a variety of sides. Here are some ideas:
– Guacamole: Creamy and fresh, it adds great flavor.
– Sour cream: A dollop on top can cool the spice.
– Tortilla chips: Crunchy chips make a fun contrast.
– Fresh salad: A light salad with lime dressing is refreshing.
– Mexican corn on the cob: A sweet side that pairs well.
Can I make this casserole ahead of time?
Yes, you can prepare this casserole ahead. Here’s how:
– Cook and cool: Make the casserole and let it cool completely.
– Store it: Place it in a covered dish in the fridge.
– Reheat: When you’re ready, reheat it in the oven. Cover it with foil to keep it moist.
How long does leftover casserole last?
Leftover casserole can last for about 3 to 4 days in the fridge. Here are some tips:
– Check for freshness: Always look for any signs of spoilage.
– Store properly: Use airtight containers to keep it fresh.
– Freeze for longer: You can freeze it for up to 3 months. Just thaw before reheating.
This blog post covered making a tasty One-Pot Mexican Rice Casserole. We explored ingredients like rice, beans, spices, and veggies. You learned step-by-step instructions for preparation, cooking, and garnishing. I shared helpful tips for cooking, presentation, and common mistakes to avoid. We also discussed variations, storage methods, and addressed common questions.
Now you can create a delicious casserole that fits your taste. Enjoy trying different ingredients and make it your own!


![To make cheesy scalloped potatoes, you need just a few simple ingredients. Here’s what you’ll need: - 4 large russet potatoes, peeled and thinly sliced - 1 cup sharp cheddar cheese, grated - 1 cup Gruyère cheese, grated - 1 medium onion, finely chopped - 2 cloves garlic, minced - 2 cups heavy cream - 1 tablespoon butter - 1 teaspoon salt - 1/2 teaspoon black pepper - 1/4 teaspoon nutmeg - Fresh parsley, chopped (for garnish) Each ingredient plays a key role in creating that creamy, cheesy goodness. The potatoes provide the base, while the cheeses add flavor and richness. Choosing the right cheese is important. I love using sharp cheddar for its bold flavor. Gruyère brings a nice creaminess and a nutty taste. You can mix these cheeses or use others you like. Just remember, a good melt is what you want. While the basic recipe is tasty, you can add a few seasonings. Consider these: - Fresh thyme for a herbal note - Smoked paprika for a hint of smokiness - Red pepper flakes for some heat These add-ons can elevate your dish. You can adjust them based on your taste. For a full experience, follow the Full Recipe to bring these flavors together perfectly! First, gather all your ingredients. You need four large russet potatoes, sharp cheddar cheese, Gruyère cheese, an onion, garlic, heavy cream, butter, salt, black pepper, nutmeg, and fresh parsley. Peel and thinly slice the potatoes. I often use a mandoline for even slices. Finely chop the onion and mince the garlic. Next, melt one tablespoon of butter in a medium saucepan over medium heat. Add the chopped onion and minced garlic. Sauté until they turn soft and clear, about four to five minutes. This step adds great flavor. Pour in the two cups of heavy cream and mix in the salt, pepper, and nutmeg. Heat until it simmers, but do not boil. Remove from heat. Now, grease a 9x13 inch baking dish. Start by layering half of the sliced potatoes on the bottom. Spread them out evenly. Next, pour half of the cream mixture over the potatoes. Then, sprinkle half of the grated cheddar and Gruyère cheese on top. Do this carefully to cover all the potatoes. Repeat the process with the remaining ingredients. Layer the rest of the potatoes, followed by the cream mixture, and finish with the remaining cheese. This layering gives the dish its rich flavor and texture. Cover the baking dish with aluminum foil. Bake in the preheated oven at 375°F (190°C) for 45 minutes. This helps the potatoes cook through. After 45 minutes, carefully remove the foil. Bake uncovered for an additional 25 to 30 minutes. The top should turn golden brown, and the dish will bubble up. Let the scalloped potatoes cool for about ten minutes before serving. This cooling time helps the layers set. Garnish with fresh parsley for a pop of color. Enjoy this cheesy delight! To get the best creamy texture, use heavy cream. It gives a rich taste. Heat the cream slowly with salt and spices. This helps the flavors mix well. Avoid boiling the cream; just let it simmer. Layer the potatoes and cream mixture evenly in the dish. This allows every bite to be creamy and delicious. To achieve a golden, bubbly cheese top, remove the foil halfway through baking. This lets the heat reach the cheese directly. If you want an extra crispy top, add a bit more cheese before the last baking phase. Broil the dish for a few minutes at the end if you want even more browning. Just watch it closely to avoid burning. One common mistake is cutting the potatoes too thick. Thin slices cook evenly and absorb the cream better. Another mistake is skipping the onion and garlic. These add depth and flavor. Also, don’t rush the baking time. Ensure potatoes are tender before serving. Following the Full Recipe will keep you on track for success. {{image_2}} You can make cheesy scalloped potatoes vegetarian. Simply skip any meat or meat-based broths. Focus on using rich, creamy ingredients like heavy cream and cheese. Add layers of fresh vegetables, too. Spinach, mushrooms, or zucchini give great flavor and texture. They blend well with the potatoes and cheese, making each bite delightful. Cheese is key in this dish. You can play with different cheese blends. Try mozzarella for a gooey texture. Feta adds a nice tang, while gouda gives a smoky flavor. Mix and match your favorites to create a unique taste. Aim for a mix of sharp and creamy cheeses to balance the flavors. Want to make this dish heartier? Add proteins like cooked bacon or ham. Both add savory notes that complement the cheese. You can also sneak in some vegetables. Broccoli or asparagus works well. Simply chop them small and layer them with the potatoes. This not only enhances flavor but also boosts nutrition. For more detailed steps on making these variations, check out the Full Recipe. After you make your cheesy scalloped potatoes, let them cool first. This helps keep them fresh. Store the leftovers in an airtight container. They can stay good in the fridge for about three to four days. If you want to keep them longer, freezing is a great option. You can freeze cheesy scalloped potatoes for up to three months. To do this, make sure they cool completely. Cut them into portions. Wrap each piece tightly with plastic wrap. Then, place them in a freezer-safe bag. Label the bag with the date. This way, you’ll know when to use them. To reheat, take the potatoes out of the fridge or freezer. If frozen, let them thaw overnight in the fridge. Preheat your oven to 350°F (175°C). Place the leftovers in a baking dish. Cover with foil to keep them moist. Bake for about 20 to 30 minutes, or until hot. You can also microwave them, but the oven gives a better texture. Enjoy your cheesy scalloped potatoes just like the first time! For the full recipe, check out the [Full Recipe]. You can make cheesy scalloped potatoes a day before. Prepare the dish fully, then cover it with plastic wrap. Store it in the fridge overnight. When you are ready to bake, remove the wrap and let it sit at room temperature for 30 minutes. Then, bake as instructed in the Full Recipe. This method helps the flavors blend and saves time. Yes, you can use different potatoes. While I prefer russet potatoes for their creaminess, Yukon gold potatoes work well too. They add a nice buttery flavor. Just remember to slice them thinly for even cooking. Avoid waxy potatoes, as they may not soften well in the oven. Cheesy scalloped potatoes pair nicely with many dishes. They complement roast chicken, beef, or pork perfectly. You can also serve them with a fresh salad for a balanced meal. For a special touch, add some steamed green beans or sautéed spinach on the side. These options create a colorful plate and elevate your dining experience. You now know how to make cheesy scalloped potatoes from scratch. We covered essential ingredients, baking steps, and tips to avoid mistakes. Experiment with different cheeses and veggies for your own twist. Remember to store leftovers properly to enjoy later. Use these insights to impress your friends and family at your next meal. Happy cooking; I can’t wait for you to try this dish!](https://dailydishly.com/wp-content/uploads/2025/07/68a68aa2-1fa5-4915-a359-e46e8929230b-768x768.webp)
![- 1.5 lbs Brussels sprouts, trimmed and halved - 3 tablespoons maple syrup - 2 tablespoons olive oil - 1 teaspoon garlic powder - 1 teaspoon salt - ½ teaspoon black pepper - ½ cup pecans, roughly chopped (optional) - 1 tablespoon balsamic vinegar (optional) When I make maple roasted Brussels sprouts, I love using fresh, vibrant Brussels sprouts. They have a sweet, nutty taste that pairs perfectly with maple syrup. The maple syrup adds a lovely sweetness that balances the slight bitterness of the sprouts. Olive oil is essential here. It helps in roasting and gives a nice, rich flavor. Garlic powder adds depth, while salt and pepper enhance the natural taste. If you want some crunch, add pecans. They bring a great texture and flavor. I sometimes drizzle balsamic vinegar at the end for a tangy twist. - Baking sheet - Large mixing bowl - Measuring spoons - Knife and cutting board For this recipe, you need a few simple tools. A baking sheet helps with even roasting. A large mixing bowl makes it easy to combine everything. Measuring spoons ensure you get the right amounts. Finally, a knife and cutting board are needed to trim the Brussels sprouts. With these ingredients and tools, you're all set to create a delicious dish. You can check out the [Full Recipe] for step-by-step instructions. Enjoy your cooking adventure! - Preheat your oven to 400°F (200°C). - Trim and halve the Brussels sprouts. This helps them cook evenly and taste great. - In a large mixing bowl, mix Brussels sprouts with olive oil, maple syrup, garlic powder, salt, and pepper. Make sure every sprout gets a nice coat. This mixture adds sweetness and flavor. - Spread the sprouts in a single layer on a baking sheet. This step is key for good roasting. - Roast for 20-25 minutes, shaking the pan halfway. This helps them brown evenly. You want them golden and crispy on the edges. For extra crunch, sprinkle chopped pecans during the last five minutes. You can find the full recipe [here](#). To get crispy Brussels sprouts, spread them out on the baking sheet. Make sure they are in a single layer. This helps them roast evenly. Shake the pan halfway through cooking. This allows hot air to reach all sides. You can add balsamic vinegar for a bit of tang. It gives a nice balance to the sweetness of the maple. Garlic adds depth, too. You can also try spices like paprika or cayenne for extra heat. This way, you can customize the flavors to your taste. These Brussels sprouts go well with proteins like chicken or fish. They make a great side dish. You can also serve them as a healthy snack or appetizer. They are delicious warm or at room temperature. For more ideas, check out the Full Recipe. {{image_2}} You can easily make this dish nut-free. Just omit the pecans. The Brussels sprouts will still taste great with the maple syrup and spices. You won't miss the nuts at all! If you want a vegan version, you can keep it simple. Use maple syrup as your only sweetener. This recipe already has olive oil, so it’s vegan-friendly. Just make sure to check your balsamic vinegar for any added ingredients that aren’t vegan. Want to make your Brussels sprouts special for the season? Add some seasonal spices! A sprinkle of cinnamon or nutmeg gives a warm, festive touch. This twist makes your dish stand out and adds a new flavor layer. Try it next time for a fun change! For the full recipe, check out the [Full Recipe]. Store leftovers in an airtight container in the fridge. Make sure the sprouts cool down first. This keeps them fresh and tasty for your next meal. Reheat in the oven for best texture. Set the oven to 350°F (175°C) and warm for about 10 minutes. If you're in a hurry, you can use the microwave. Heat them for 1-2 minutes, checking often to avoid overcooking. These delicious Brussels sprouts last for up to 3 days in the fridge. If you freeze them, the texture can change, making them mushy. For the best quality, enjoy them fresh or stored in the fridge. Yes, but fresh is recommended for better texture. Frozen Brussels sprouts often lose their crunch. They may also release more water, making them less crispy. If you use frozen ones, be sure to thaw and drain them first. All ingredients are naturally gluten-free; ensure seasonings are free of gluten. Check labels on packaged items. Some sauces or spices may contain hidden gluten. Using fresh ingredients helps keep this dish safe for gluten-free diets. Honey or agave can be used as a replacement, though it will alter flavor. Maple syrup provides a unique taste that is hard to match. If you choose honey, use a little less, as it is sweeter. Agave has a milder flavor and can work well, too. This recipe shows you how to make tasty roasted Brussels sprouts. You need simple ingredients and basic tools. Preheat your oven, mix the sprouts, and roast them for a perfect dish. Remember to try different flavors and store any leftovers properly. These sprouts pair well with any meal or stand alone as a snack. Enjoy trying this recipe and make it your own! Happy cooking!](https://dailydishly.com/wp-content/uploads/2025/07/86ea6ed0-8750-4297-97a9-678adfd456c4-768x768.webp)


![- 1 cup quinoa, rinsed - 2 cups water or vegetable broth - 1 large cucumber, diced - 1 red bell pepper, diced - 1 cup cherry tomatoes, halved - 1/4 red onion, finely chopped - 1 cup fresh parsley, chopped - 1/4 cup tahini - 2 tablespoons lemon juice - 1 tablespoon olive oil - 1 clove garlic, minced - Salt and pepper to taste This salad starts with quinoa as the base. Quinoa is a great source of protein and fiber. Rinsing the quinoa helps remove its bitter coating. Use fresh veggies for crunch and color. I love using cucumbers and bell peppers for a fresh bite. Cherry tomatoes bring sweetness and juicy flavor. The red onion adds a nice kick, while parsley gives a fresh touch. The tahini sauce is the star. It adds a creamy texture and nutty flavor. Mix tahini with lemon juice, olive oil, and garlic for a bright dressing. This makes the salad so tasty! - 1/4 cup sunflower seeds or chopped nuts for crunch For extra flavor and texture, you can add sunflower seeds or nuts. They give a nice crunch. Try almonds or walnuts for a rich taste. Fresh herbs like mint or cilantro can also brighten the dish. - Calories per serving: About 250 - Macronutrient breakdown: 10g protein, 12g fats, 30g carbs - Dietary considerations: Gluten-free, vegan, and packed with nutrients This salad is not just tasty; it's also healthy! Each serving has around 250 calories. You get protein from quinoa and tahini. The veggies add vitamins and minerals. Plus, it fits many diets, like vegan and gluten-free. Snack on this salad for a boost of energy! Check the Full Recipe for all the details. 1. Start by rinsing 1 cup of quinoa under cold water. This helps remove any bitter taste. 2. In a medium saucepan, combine the rinsed quinoa and 2 cups of water or vegetable broth. 3. Bring the mixture to a boil over medium-high heat. 4. Once boiling, reduce the heat to low, cover, and let it simmer. Cook for about 15 minutes. 5. The quinoa is done when it is fluffy and the water is absorbed. Remove it from heat and let it cool slightly. 1. In a small bowl, mix together 1/4 cup tahini, 2 tablespoons lemon juice, and 1 tablespoon olive oil. 2. Add 1 clove of minced garlic, salt, and pepper to taste. 3. Whisk until smooth. If the dressing is too thick, add a little water to reach your desired consistency. 1. In a large mixing bowl, combine 1 diced cucumber, 1 diced red bell pepper, 1 cup of halved cherry tomatoes, 1/4 finely chopped red onion, and 1 cup of chopped fresh parsley. 2. Add the cooled quinoa to the vegetable mix and gently toss everything together. 3. Drizzle the tahini dressing over the salad and stir well to coat all the ingredients. 4. For extra crunch, sprinkle 1/4 cup of sunflower seeds or chopped nuts on top before serving. For the full recipe, you can check the details provided above. Enjoy your fresh and flavorful Lemon Tahini Quinoa Salad! To cook quinoa, use a 2:1 ratio of water to quinoa. Rinse the quinoa first. This removes the bitter coating. Bring the water to a boil. Once boiling, lower the heat. Cover the pot and let it simmer for about 15 minutes. Fluff the quinoa with a fork after cooking. This keeps it light and airy, avoiding mushy quinoa. Herbs can change the taste of your salad. Fresh mint or dill works well. Try adding basil for a different twist. For spice, consider adding a pinch of cumin or paprika. These spices bring out the flavors of the vegetables and dressing. Presentation matters! Serve the salad in a large bowl. Garnish with lemon slices and fresh parsley. This adds color and appeal. For a fun twist, use clear glasses. Layer the salad for a stunning visual. Pair this salad with grilled chicken or fish for a complete meal. It’s also great beside roasted veggies. {{image_2}} You can easily add more protein to your Lemon Tahini Quinoa Salad. Chickpeas are a great choice. They add texture and a nutty flavor. Just rinse and drain a can of chickpeas. Then, fold them into the salad for extra protein. Grilled chicken or tofu also works well. Cook the chicken or tofu until it’s golden brown. Then, chop it into bite-sized pieces. Mix it in with the salad for a hearty meal. You can change this salad based on the season. In spring, add fresh peas, radishes, or asparagus. These veggies brighten up the dish and add crunch. In winter, you can use roasted root vegetables. Try carrots or sweet potatoes. They add warmth and depth to the salad while keeping it filling. If you want to switch up the flavor, try other dressings. A simple olive oil and vinegar mix gives a light taste. You can also use yogurt for a creamy twist. Adjust the flavors to suit your taste. Add more lemon juice for tanginess. Or, include herbs like dill or cilantro for freshness. For the complete recipe, check out the [Full Recipe]. To keep your Lemon Tahini Quinoa Salad fresh, store it in the fridge. Use an airtight container. This helps maintain flavor and texture. Before putting it away, let the salad cool. Hot food can raise the fridge temperature, which is not good. Your salad lasts about three to five days in the fridge. Check for any changes in color or smell. If it looks slimy or smells off, toss it out. To reheat, use the microwave. Heat it gently to avoid drying it out. Stir it halfway through to ensure even warming. If you want to serve leftovers, try adding fresh herbs or a squeeze of lemon juice. This can brighten the flavors again. For the full recipe, refer back to the main section. To make this creamy dressing, mix the tahini, lemon juice, olive oil, minced garlic, salt, and pepper in a bowl. Use a whisk for a smooth blend. Adjust the thickness by adding water if needed. This dressing adds a zesty flavor and a creamy texture to your salad. Yes, you can prepare this salad in advance. Store the salad and dressing separately in the fridge. This keeps the vegetables crisp. Combine them just before serving. It tastes even better after the flavors meld together. If you can't find tahini, you can use these alternatives: - Sunflower seed butter - Almond butter - Greek yogurt Each of these options has a unique flavor. Sunflower seed butter is nut-free and creamy. Almond butter adds a nutty taste. Greek yogurt gives a tangy kick. Keep in mind that substituting may change the salad's taste. Adjust the amount of lemon juice to balance flavors. Always taste as you go to find your perfect mix. Enjoy experimenting! This blog post covered how to make a delicious Lemon Tahini Quinoa Salad. You learned about essential and optional ingredients, like quinoa, vegetables, and tahini. I gave you step-by-step instructions, plus tips for cooking and flavoring. We explored salad variations and how to store it properly. This salad is versatile and easy to make. Try adding your favorite ingredients to make it unique. Enjoy a tasty and healthy dish that fits any season!](https://dailydishly.com/wp-content/uploads/2025/07/0131a3b2-a937-48f9-ad75-9f78e7be101a-768x768.webp)