Go Back
- 24 Oreo cookies (for crust and garnish) - 1/2 cup unsalted butter, melted - 16 oz cream cheese, softened - 1/2 cup powdered sugar - 1 teaspoon vanilla extract - 2 cups heavy whipping cream - 1/4 cup Oreo crumbs Gathering the right ingredients is key to a great no bake Oreo cheesecake. The star of this recipe is the Oreo cookies. You need 24 cookies for both the crust and the garnish. They provide a rich chocolate flavor that blends well with the creamy filling. You'll also need 1/2 cup of unsalted butter. Melt it to help bind the Oreo crumbs into a solid crust. Next, grab 16 ounces of softened cream cheese. This gives the cheesecake its creamy texture. For sweetness, use 1/2 cup of powdered sugar. It blends smoothly into the cream cheese. Add 1 teaspoon of vanilla extract for warmth and flavor depth. Whipping cream is important too. Use 2 cups of heavy whipping cream. Whipping it adds lightness to the filling. Finally, save 1/4 cup of Oreo crumbs. These crumbs add a nice texture and layer of flavor. Make sure you have all these ingredients ready to go. This will help the process flow smoothly and ensure you create a delicious no bake Oreo cheesecake! {{ingredient_image_1}} 1. Crushing Oreo cookies: Start by taking 24 Oreo cookies. Place them in a food processor. Pulse until they turn into fine crumbs. 2. Combining with melted butter: In a bowl, mix the Oreo crumbs with 1/2 cup of melted butter. Stir until all the crumbs are coated and stick together. 3. Pressing into a springform pan: Take a 9-inch springform pan. Firmly press the Oreo mixture into the bottom. Use the back of a measuring cup to smooth it out. Chill this crust in the fridge while you make the filling. 1. Beating cream cheese: In a large bowl, take 16 oz of softened cream cheese. Use an electric mixer to beat it until it’s creamy and smooth. 2. Incorporating powdered sugar and vanilla: Gradually add in 1/2 cup of powdered sugar and 1 teaspoon of vanilla extract. Mix until everything is well blended. 3. Whipping heavy cream to stiff peaks: In another bowl, pour in 2 cups of heavy whipping cream. Beat this with an electric mixer until stiff peaks form. This takes about 3-5 minutes. 1. Folding whipped cream into cream cheese mixture: Gently fold the whipped cream into the cream cheese mix. Keep folding until you no longer see white streaks. 2. Adding Oreo crumbs: Fold in 1/4 cup of Oreo crumbs. Make sure they are evenly mixed throughout the filling. 3. Filling the crust and smoothing the top: Pour the cheesecake filling into the chilled crust. Use a spatula to smooth the top evenly. 1. Covering and refrigerating: Cover the cheesecake with plastic wrap. Place it in the fridge for at least 4 hours to set. For best results, chill it overnight. 2. Removing from the springform pan: When set, carefully remove the sides of the springform pan. 3. Garnishing before serving: Before serving, sprinkle some crushed Oreo cookies or place whole ones on top for a nice look. Enjoy your rich and creamy no-bake Oreo cheesecake! - Ensure cream cheese is softened: Softened cream cheese mixes better. Leave it out for an hour before starting. This helps create a smooth filling. - Gently fold whipped cream: When you add the whipped cream to the cream cheese, fold carefully. This keeps the mixture light and fluffy. Use a spatula and a gentle motion. - Overmixing the cream: If you mix too much, the cream can lose its air. This can lead to a dense cheesecake. Stop mixing as soon as you see no white streaks. - Not chilling long enough: Chilling is key for the cheesecake to set. Aim for at least four hours. Overnight is best for a firm and creamy texture. - Best tools for making cheesecake: A good electric mixer is a must for the cream cheese. A food processor makes crushing Oreos easy. You also need a 9-inch springform pan to hold everything. - Using a food processor effectively: When crushing cookies, pulse them in short bursts. This helps you get fine crumbs without making a mess. It saves time and effort in the kitchen. Pro Tips Use Room Temperature Ingredients: Make sure your cream cheese is at room temperature for a smoother filling without lumps. Chill the Cheesecake Overnight: For the best texture and flavor, allow the cheesecake to set overnight in the refrigerator. Experiment with Flavors: Add a tablespoon of chocolate or caramel sauce to your filling for an extra layer of flavor. Garnish Creatively: Top your cheesecake with whipped cream, chocolate shavings, or a drizzle of chocolate sauce for a stunning presentation. {{image_2}} You can change the flavor easily. Adding chocolate or vanilla extracts makes it fun. Just one teaspoon can change the taste. You can also swap the Oreo cookies. Try different cookie brands for a new twist. For example, use chocolate mint cookies or peanut butter cookies. Each cookie brings a unique taste, making your cheesecake special. If you need gluten-free options, use gluten-free cookies. Many brands make gluten-free Oreos. You can also create a vegan version. Replace the cream cheese with a dairy-free option. Use coconut cream or vegan cream cheese. For the heavy cream, use coconut whipping cream. These swaps keep the cheesecake rich and delicious without dairy. Serving the cheesecake with fruit adds freshness. Berries like strawberries, raspberries, or blueberries work well. You can also drizzle chocolate sauce on top. This adds a nice touch to each slice. For plating, try using a cake stand for height. Place a few whole Oreos on top for fun. You can even add a sprinkle of Oreo crumbs for a crunchy look. To keep your cheesecake fresh, store it in the fridge. Cover it well with plastic wrap. Alternatively, use an airtight container. This will prevent it from absorbing smells and drying out. Your cheesecake stays good for about 3 to 5 days in the fridge. Freezing your no bake Oreo cheesecake is simple. First, let it chill completely in the fridge. Then, carefully wrap the cheesecake in plastic wrap. After that, place it in a freezer-safe container. This helps keep the cheesecake fresh for up to a month. To thaw, move it to the fridge the night before you want to serve it. This slow thaw keeps the texture nice. Avoid defrosting it at room temperature, as this can make it mushy. The cheesecake needs at least 4 hours to chill. For the best results, leave it overnight. This helps the filling firm up well. It also allows the flavors to blend perfectly. Yes, you can easily make this cheesecake ahead of time. I recommend preparing it a day before you need it. Store it covered in the fridge. This way, it stays fresh. Just remember to add any toppings just before serving. You can use low-fat cream cheese, but it may change the taste and texture. The cheesecake might not be as rich and creamy. If you want a lighter option, it’s worth a try. Just keep in mind that the flavor will differ slightly. You can get creative with toppings! Here are some ideas: - Crushed Oreos for a crunchy layer - Whipped cream for a light touch - Chocolate sauce for added sweetness - Fresh berries for a fruity twist Feel free to mix and match as you like! In this article, we explored how to make a delicious no-bake Oreo cheesecake. We covered all the ingredients needed, from Oreo cookies to cream cheese. You learned step-by-step instructions to create the crust, filling, and how to chill it perfectly. I shared tips for a perfect cheesecake and common mistakes to avoid. You can customize flavors and store leftovers effectively. This cheesecake is fun to make and always a hit. Enjoy creating it for your next gathering!

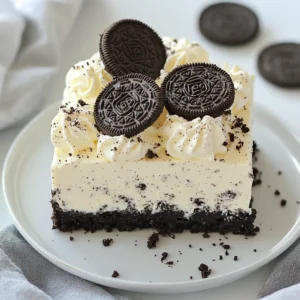
Dreamy No Bake Oreo Cheesecake

A delicious and creamy no-bake cheesecake made with Oreo cookies, perfect for any occasion.
Prep Time 20 minutes
Total Time 4 hours
Course Dessert
Cuisine American
Servings 8
Calories 350 kcal

Ingredients
  

  • 24 cookies Oreo cookies (plus extra for garnish)
  • 1/2 cup unsalted butter, melted
  • 16 oz cream cheese, softened
  • 1/2 cup powdered sugar
  • 1 teaspoon vanilla extract
  • 2 cups heavy whipping cream
  • 1/4 cup Oreo crumbs (from crushed cookies)

Instructions
 

  • Prepare the Crust: In a food processor, crush all 24 Oreo cookies into fine crumbs. Combine the crumbs with melted butter in a bowl and mix until well combined.
  • Form the Base: Press the Oreo mixture firmly into the bottom of a 9-inch springform pan to create an even layer. Use the back of a measuring cup for a smooth finish. Chill in the refrigerator while you prepare the filling.
  • Make the Filling: In a large bowl, beat the softened cream cheese with an electric mixer until creamy and smooth.
  • Add Sweetness: Gradually add powdered sugar and vanilla extract to the cream cheese mixture, continuing to beat until fully incorporated.
  • Whip the Cream: In another bowl, whip the heavy cream until stiff peaks form. This may take about 3-5 minutes with an electric mixer.
  • Combine: Gently fold the whipped cream into the cream cheese mixture until no white streaks remain. Be careful not to deflate the mixture.
  • Add Oreos: Fold in the 1/4 cup of Oreo crumbs, ensuring they are evenly distributed throughout the filling.
  • Fill the Crust: Pour the cheesecake filling into the chilled Oreo crust, smoothing the top with a spatula.
  • Chill: Cover with plastic wrap and refrigerate for at least 4 hours or until set (overnight is best for optimal consistency).
  • Serve: Once set, carefully remove the sides of the springform pan. Garnish the top with additional crushed Oreos or whole cookies before slicing.

Notes

Chill overnight for the best consistency.
Keyword cheesecake, dessert, no-bake, Oreo