28. Roasted Beet and Goat Cheese Salad Fresh Delight

Are you ready to elevate your salad game? Discover the vibrant flavors of my Roasted Beet and Goat Cheese Salad! This dish highlights sweet, earthy beets paired with creamy goat cheese, crunchy nuts, and fresh greens. It’s not just tasty; it’s a feast for the eyes too. Whether you’re hosting a gathering or enjoying a simple meal, this salad will impress everyone. Let’s dive into this fresh delight!
Ingredients
Main Ingredients
– 4 medium beets, scrubbed and trimmed
– 2 tablespoons olive oil
– Salt and pepper to taste
– 4 cups mixed greens (arugula, spinach, and kale)
– 1/2 cup goat cheese, crumbled
– 1/4 cup walnuts, toasted and roughly chopped
– 1/4 cup dried cranberries
– 2 tablespoons balsamic vinegar
– 1 tablespoon honey
– Fresh herbs (like basil or parsley) for garnish
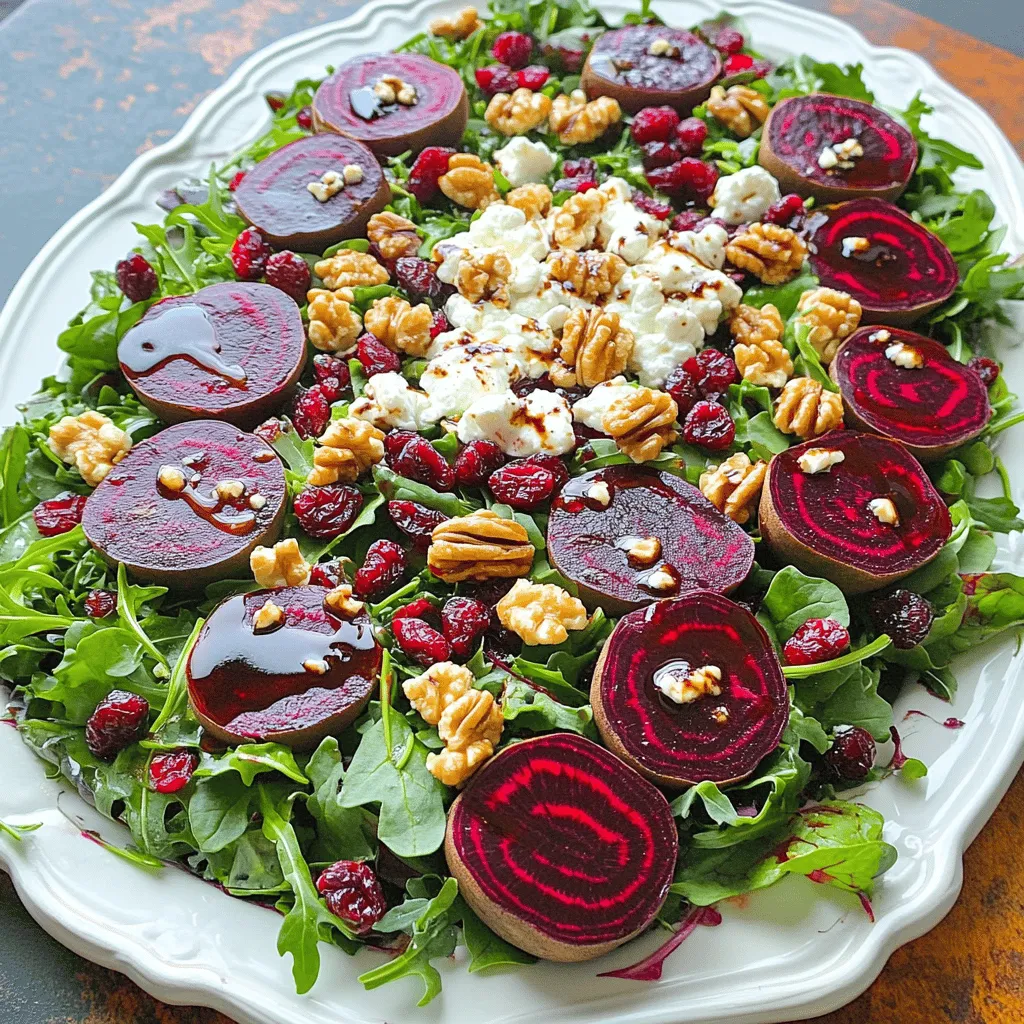
The beets bring a sweet earthiness, while the greens add crunch. Goat cheese provides a creamy texture. Walnuts add a delightful crunch, and cranberries offer a hint of tartness.
Kitchen Tools Needed
– Baking sheet and aluminum foil
– Mixing bowls
– Whisk and knife
A baking sheet helps roast the beets evenly. Aluminum foil makes clean-up easy. Mixing bowls allow you to combine ingredients well. A whisk helps mix the dressing smoothly, and a knife is essential for slicing the beets.
Recommended Serving Size
– Adjusting ingredients for larger gatherings
– Individual portion suggestions
This recipe serves about four people. For larger gatherings, double the ingredients. For smaller servings, you can cut the recipe in half. Each person can enjoy a colorful, tasty salad that is both healthy and filling.”
Step-by-Step Instructions
Preparation Steps
1. Preheating the oven: Start by setting your oven to 400°F (200°C). This heat will roast the beets well.
2. Wrapping and seasoning the beets: Take each beet. Wrap it tightly in aluminum foil. Drizzle 1 tablespoon of olive oil on each. Sprinkle with salt and pepper to taste.
3. Cooling and peeling the beets: After roasting for 45-60 minutes, check if they are tender. Remove them from the oven and let them cool. Once cool, peel them. Wear gloves to avoid stains. Slice them into wedges.
Assembling the Salad
1. Mixing greens with other ingredients: In a large bowl, combine the mixed greens, beet wedges, crumbled goat cheese, toasted walnuts, and dried cranberries.
2. Tossing with dressing: In a small bowl, whisk together balsamic vinegar, honey, and the last tablespoon of olive oil. Season with salt and pepper. Drizzle it over the salad and gently toss to mix.
Serving Suggestions
1. Presentation ideas: Serve your salad on a large platter. Artfully arrange the beet wedges on the greens.
2. Garnishing tips: Finish with a sprinkle of goat cheese and walnuts. Add fresh herbs for color and flavor. They give the salad a vibrant look. For a fancy touch, consider adding edible flowers.Enjoy your fresh delight!
Tips & Tricks
Perfecting Your Roasted Beets
Choosing the best beets is key. Look for firm, smooth skin. Avoid beets with soft spots. Smaller beets have better flavor, so choose baby beets if you can. You can roast, boil, or steam beets. Roasting brings out their natural sweetness best. Boiling is quicker, but it can make them watery. Steaming keeps their flavor and nutrients intact.
Enhancing Flavor
To make your salad pop, add fresh herbs. Try dill, mint, or chives. They add bright notes. You can also spice it up with a pinch of cumin or paprika. For dressings, a simple vinaigrette works wonders. Mix balsamic vinegar with olive oil and a dash of mustard. Add honey for sweetness. This dressing complements the earthy beets and creamy goat cheese nicely.
Avoiding Common Mistakes
Overcooking the beets is a common error. Aim for fork-tender, not mushy. Keep an eye on the time. Balancing flavors is crucial too. If the salad tastes too sweet, add a pinch of salt or acid. A splash of lemon juice can brighten it up. Remember, a great salad has a mix of flavors: sweet, salty, and tangy.

Variations
Adding Protein
You can easily make this salad heartier. Try adding grilled chicken for protein. Just slice it thin and lay it on top. If you prefer a meat-free option, quinoa is a great choice. Cook it first, then mix it in for added texture. It adds protein and a nice crunch. If you want more plant-based proteins, think about chickpeas or lentils. They blend well with the beets and cheese.
Seasonal Ingredient Swaps
Using seasonal ingredients can really change this salad. In spring, you might add fresh peas or asparagus. In summer, try juicy berries or peaches for sweetness. In fall, roasted pumpkin or apples work great. Layer your greens with these toppings for a fresh twist. This keeps the salad exciting all year long. You can also switch up your greens. Use spinach in winter and peppery arugula in warmer months.
Dietary Modifications
If you need a gluten-free salad, you’re in luck! This recipe is naturally gluten-free since it has no grains. For a vegan version, skip the goat cheese. You can use cashew cheese or a dairy-free option instead. Look for lactose-free cheese if you want to keep some creaminess. These simple swaps let everyone enjoy this dish without worry.
Storage Info
Storing Leftovers
To store your Roasted Beet and Goat Cheese Salad, first, place it in an airtight container. Make sure to separate the dressing from the salad to keep it fresh. You can refrigerate the salad for up to three days. If you want to keep the beets fresh, they can last in the fridge for about five days. Always check for any signs of spoilage before you eat.
Reheating Suggestions
Enjoying leftovers is easy. If you want to warm the beets, do it slowly. Place them in a pan over low heat. Stir them gently to avoid burning. You can also microwave them for about 30 seconds. Just make sure to cover them to keep moisture in. Never reheat the salad with goat cheese; it’s best served cold.
Freezing Tips
You can freeze roasted beets, but it’s not ideal for the whole salad. To freeze, slice the beets and place them in a freezer bag. Squeeze out any air before sealing. You can keep them frozen for up to three months. When ready, thaw them in the fridge overnight. Avoid refreezing any thawed beets. This keeps their texture and flavor intact.
FAQs
How long do roasted beets last in the fridge?
Roasted beets can last up to a week in your fridge. Store them in an airtight container. If they smell sour or feel slimy, toss them out. Fresh beets keep their flavor longer, so always check for signs of spoilage before eating.
Can I use canned beets instead?
Yes, you can use canned beets, but fresh beets taste better. Canned beets save time and are ready to use. However, they often have added salt and preservatives, which can alter their flavor. Fresh beets offer a firmer texture and a richer taste, making them ideal for this salad.
What’s the best way to peel roasted beets?
Peeling roasted beets is easy! Let them cool for a bit. Then, wear gloves to avoid staining your hands. Use your fingers or a paper towel to rub off the skin. If you find it tough, a vegetable peeler works well, too. This simple method makes peeling quick and mess-free.
This blog post covered everything you need for a delicious beet salad. We discussed key ingredients like beets, greens, and goat cheese. I detailed the kitchen tools you’ll need and how to serve this dish just right.
Remember, you can swap ingredients based on the season or your diet. Storing leftovers is easy, too. With these tips, you’ll impress everyone at your next meal. Enjoy making this tasty salad again and again!


![- 2 cups cooked salmon, flaked - 1/2 cup breadcrumbs (preferably panko) - 1/4 cup fresh dill, finely chopped - 1/4 cup green onions, finely chopped - 1/4 cup mayonnaise - 1 tablespoon Dijon mustard - 1 tablespoon lemon juice - 1 teaspoon lemon zest - 1 egg, lightly beaten - 1/2 teaspoon garlic powder - Olive oil for frying - Salt and pepper to taste You can swap out fresh dill for dried dill if needed. Use whole wheat or gluten-free breadcrumbs for a healthier option. If you don't have mayonnaise, Greek yogurt works great. For salmon, you can use canned salmon, which saves time and is still tasty. Each salmon cake has about 200 calories. They provide around 15 grams of protein, which is great for muscle health. The healthy fats from salmon support heart health. You also get vitamins and minerals from the dill and lemon. These cakes offer a good balance of carbs and protein, making them a smart choice for meals or snacks. 1. Start by gathering all your ingredients. You will need cooked salmon, breadcrumbs, dill, and more. 2. In a large mixing bowl, combine the flaked salmon, breadcrumbs, dill, green onions, mayonnaise, Dijon mustard, lemon juice, lemon zest, and garlic powder. 3. Next, add the lightly beaten egg along with salt and pepper to taste. 4. Mix everything until just combined. Be careful not to overmix; this keeps the cakes light. 5. Now, form the mixture into patties. Make them about 2-3 inches wide and 1/2 inch thick. You should get around 8-10 patties. 1. Heat a skillet over medium heat. Pour in a drizzle of olive oil to coat the bottom. 2. Wait for the oil to get hot. This is key for a good crisp. 3. Carefully place the patties in the skillet. Don't overcrowd the pan; cook in batches if needed. 4. Fry each side for about 4-5 minutes. You want them golden brown and cooked through. 5. Once they're done, move the cakes to a paper towel-lined plate. This helps absorb extra oil. 1. Present the salmon cakes on a nice platter. Add some lemon wedges on the side for a pop of color. 2. Garnish with extra fresh dill to make it look appealing. 3. Serve with a side of tartar sauce or a light salad for a complete meal. 4. Enjoy your flavorful Lemon Dill Salmon Cakes! You can find the Full Recipe for more detailed steps. To make the best Lemon Dill Salmon Cakes, focus on a few key points. First, use fresh ingredients. Fresh dill and green onions boost flavor. Second, don’t overmix the batter. This keeps your cakes tender. Form the patties gently to maintain their structure. When frying, make sure the oil is hot. This helps create a golden crust. Flip the cakes carefully to avoid breaking them. Lastly, let them rest on paper towels to absorb extra oil. Serve your salmon cakes with bright sides. A fresh green salad pairs well. You might also want to try a simple tartar sauce or yogurt dip. Lemon wedges add a nice touch. Pick a sauce with a bit of tang to balance the richness of the salmon. This will enhance the flavors and make the meal more enjoyable. For storing leftover salmon cakes, cool them first. Then, place them in an airtight container. They can stay in the fridge for up to three days. If you want to keep them longer, freeze them. Wrap each cake in plastic wrap, then place them in a freezer bag. They last up to three months in the freezer. To reheat, warm them in a skillet or the oven. This keeps them crispy and delicious. For the full recipe and step-by-step guide, check the [Full Recipe]. {{image_2}} You can easily change the flavor of these salmon cakes. Adding spices can make a big difference. Try mixing in: - Old Bay seasoning for a classic seafood taste. - Cajun seasoning for a spicy kick. - Fresh parsley instead of dill for a different herb flavor. - Capers for a briny touch. You can also mix in some cheese, like feta or cheddar. This adds creaminess and richness. Don't be afraid to experiment with your favorite flavors. If you want to make these cakes gluten-free, swap out regular breadcrumbs for gluten-free ones. You can also use crushed rice cakes or almond flour. For a low-carb option, skip the breadcrumbs entirely. Use a bit more egg to help bind the cakes. You can even add mashed cauliflower for extra nutrition and texture. While frying gives a nice crispy texture, you can bake or air fry these salmon cakes. To bake, preheat your oven to 400°F (200°C). Place the formed patties on a baking sheet lined with parchment paper. Brush them lightly with olive oil and bake for 15-20 minutes or until golden. For air frying, set your air fryer to 375°F (190°C) and cook for about 10-12 minutes. This method keeps the cakes crispy with less oil. To keep Lemon Dill Salmon Cakes fresh, store them in an airtight container. Place parchment paper between layers to avoid sticking. Refrigerate them if you plan to eat them within three days. For longer storage, freeze the cakes. Wrap each patty in plastic wrap and place them in a freezer bag. This keeps them safe from freezer burn. In the fridge, Lemon Dill Salmon Cakes last about three days. Make sure they are in a sealed container. If you freeze them, they can last up to three months. Just remember, the longer you freeze, the more the texture can change. Reheat salmon cakes safely to enjoy their full flavor. You can use a skillet for the best results. Heat a bit of olive oil over medium heat. Place the cakes in the skillet and cook for about 3-4 minutes on each side. Alternatively, you can use an oven. Preheat it to 350°F (175°C) and bake for 10-15 minutes. This method keeps them moist and helps restore the crispiness. Lemon Dill Salmon Cakes last about 3 to 4 days in the fridge. Make sure to store them in an airtight container. This keeps them fresh and safe to eat. If you see any changes in color or smell, throw them away. Always trust your senses when it comes to food safety. Yes, you can use canned salmon for this recipe. It makes the cooking process quicker and easier. Canned salmon is already cooked, so you just need to mix it with the other ingredients. However, fresh salmon often has a better taste and texture. If you choose canned salmon, look for wild-caught options for a healthier choice. These salmon cakes pair well with many sides. Here are some ideas: - A fresh green salad with a light vinaigrette - Crispy roasted potatoes or sweet potato fries - Steamed vegetables like broccoli or green beans - A tangy tartar sauce or lemon aioli for dipping - Light, chilled white wine or sparkling water These sides complement the flavors of the salmon cakes and make for a tasty meal. For the full recipe, check out the [Full Recipe]. Lemon Dill Salmon Cakes are a tasty, healthy choice. We covered key ingredients, how to make them, and tips for serving. You can mix up flavors and even swap ingredients based on your needs. Remember to store leftovers properly to enjoy later. Whether you're cooking for yourself or others, these cakes bring joy to the table. Experiment with cooking methods and pairings to find your favorite version. Enjoy creating this delicious dish that’s both satisfying and good for you.](https://dailydishly.com/wp-content/uploads/2025/06/eb5d3737-472f-4456-95e5-2392a9f87439-768x768.webp)


. If you need a substitute for quinoa, try these options: - Brown rice - Bulgur wheat - Couscous - Farro - Barley These grains provide a similar texture and can carry flavors well. Each option has its own taste and cooking time, so pick what you like best! Yes, Lemon Garlic Quinoa Salad is very healthy! Quinoa is a complete protein, meaning it has all nine essential amino acids. It is also gluten-free and high in fiber. The fresh vegetables add vitamins and minerals. Olive oil gives healthy fats, while lemon juice adds vitamin C. This salad is low in calories and full of nutrients. It’s a great choice for a light meal or side dish. Yes, you can make this salad in advance! It tastes even better after sitting for a while. Prepare it a few hours before serving. Just keep it in the fridge. The salad can marinate, letting the flavors mix well. If you plan to make it one day ahead, wait to add the feta cheese until serving. This keeps it fresh and tasty. This blog post covered how to make a delicious quinoa salad. We explored main ingredients like quinoa, fresh vegetables, and tasty dressings. I shared tips for cooking quinoa and ways to prep veggies. You learned how to make the dressing and assemble the salad for the best results. Plus, I provided ideas for variations and storage methods. Making this salad can be easy and fun. Trying different flavors can keep it exciting. Enjoy every bite and make it your own!](https://dailydishly.com/wp-content/uploads/2025/07/e42a7f06-4d66-46b9-9caa-936cc7f21d46-768x768.webp)