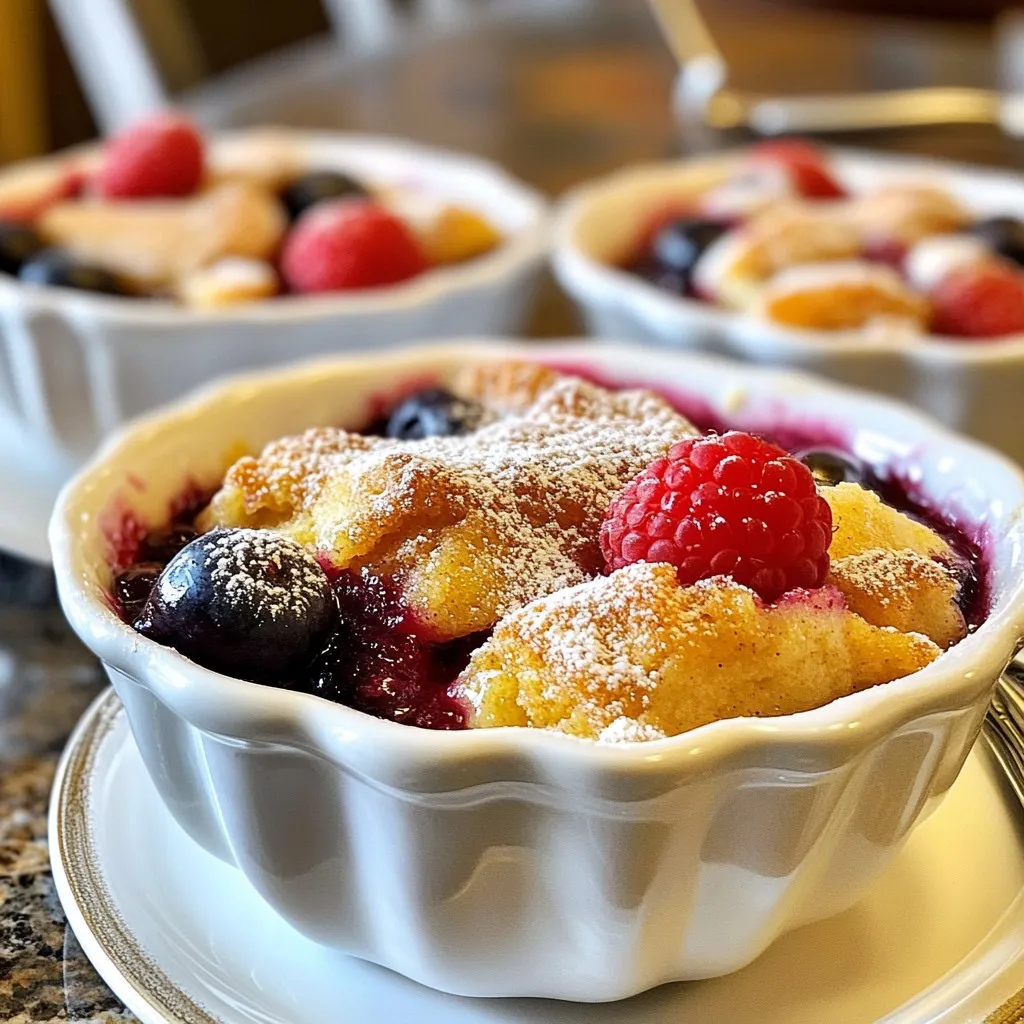
Triple Berry Cobbler Delightful and Simple Recipe


Are you ready to impress your family with a sweet treat? My Triple Berry Cobbler recipe is easy to make and bursting with flavor. Using fresh berries, simple ingredients, and clear steps, you can whip up this dessert in no time. Whether you’re a baking novice or a pro, you’ll love how delightful this cobbler is. Let’s jump in and create a dessert that everyone will love!
Why I Love This Recipe
- Fresh and Fruity: This cobbler features a delightful mix of strawberries, blueberries, and raspberries, providing a burst of flavor in every bite.
- Easy to Make: With simple ingredients and straightforward steps, this recipe is perfect for bakers of all levels.
- Perfectly Sweet: The balance of sweetness from the sugar and the natural tartness of the berries makes this dessert irresistibly delicious.
- Great for Sharing: With generous servings, this cobbler is ideal for gatherings, ensuring everyone gets a taste of this delightful dessert.
Ingredients
Fresh Berries
For this recipe, you need:
– 1 cup strawberries, hulled and sliced
– 1 cup blueberries
– 1 cup raspberries
These berries bring bright color and sweet flavor to the cobbler. They mix well together. You can use fresh or frozen berries, but fresh gives the best taste.
Dry Ingredients
Gather these dry items:
– 1 cup granulated sugar, divided
– 1 tablespoon cornstarch
– 1 ½ cups all-purpose flour
– 2 teaspoons baking powder
– ½ teaspoon salt
– 1 teaspoon ground cinnamon
– 1 tablespoon sugar for topping
These dry ingredients give structure and sweetness to your cobbler. The cornstarch helps thicken the berry juices.
Wet Ingredients
Now, for the wet items:
– 2 tablespoons lemon juice
– 1 teaspoon vanilla extract
– ½ cup unsalted butter, melted
– 1 cup milk
These wet ingredients make the batter rich and moist. The lemon juice adds a nice zing that balances the sweetness.

Step-by-Step Instructions
Preparing the Oven and Baking Dish
First, preheat your oven to 350°F (175°C). This step warms the oven for even baking. Next, grease a 9×13-inch baking dish with butter or spray. This helps the cobbler release easily when done.
Berry Mixture Preparation
In a large bowl, combine the following berries:
– 1 cup strawberries, hulled and sliced
– 1 cup blueberries
– 1 cup raspberries
Next, add these ingredients:
– ½ cup granulated sugar
– 2 tablespoons lemon juice
– 1 tablespoon cornstarch
– 1 teaspoon vanilla extract
Gently toss the berries to coat them well. Pour this sweet berry mixture into the greased baking dish.
Cobbler Batter Creation
In another bowl, whisk together:
– 1 ½ cups all-purpose flour
– 2 teaspoons baking powder
– ½ teaspoon salt
– ½ cup granulated sugar
Add in:
– ½ cup unsalted butter, melted
– 1 cup milk
Stir until just mixed. Avoid overmixing to keep the batter light.
Assembling the Cobbler
Now, pour the cobbler batter over the berry mixture. Use a spatula to spread it gently. It’s okay if some berries peek through the batter. This makes it look rustic and inviting.
Baking Process
Place the baking dish in the preheated oven. Bake for 45-50 minutes. Keep an eye on it. The top should turn golden brown. To check if it’s done, insert a toothpick into the batter; it should come out clean.
Once baked, let it cool for 10-15 minutes. This will help set the juices and flavors. Enjoy your warm triple berry cobbler!
Tips & Tricks
Selecting the Best Berries
For the best flavor, choose ripe berries. Look for bright colors and no soft spots. Fresh strawberries should be red and firm. Blueberries should be plump and deep blue. Raspberries need to be bright and intact. If you can, buy organic berries. They taste better and are safer.
Achieving the Perfect Cobbler Texture
To get a soft and fluffy cobbler, mix the batter gently. Overmixing makes it dense. When you pour the batter over the berries, do not worry if it doesn’t cover them completely. The berries will bubble through while baking. Use melted butter for moisture, and make sure your baking powder is fresh for a good rise.
Serving Suggestions
Serve the cobbler warm for the best taste. Top it with a scoop of vanilla ice cream or whipped cream. You can also sprinkle fresh berries on top for color. If you like a little crunch, add nuts or granola as a topping. For a twist, drizzle honey or caramel sauce over each serving.
Pro Tips
- Choose Fresh Berries: Make sure to select berries that are ripe and firm for the best flavor and texture in your cobbler.
- Mix the Batter Gently: When combining the wet and dry ingredients, stir just until mixed to avoid a tough texture.
- Let it Cool: Allow the cobbler to rest before serving; this helps the juices thicken and makes it easier to serve.
- Serving Suggestions: Enhance the dish by pairing it with vanilla ice cream or a dollop of whipped cream for a delightful contrast.
Variations
Gluten-Free Options
You can easily adapt this recipe for gluten-free diets. Use a gluten-free flour blend instead of all-purpose flour. Look for a mix that works well for baking. This will keep the texture light and fluffy. You can also add a bit more cornstarch for extra binding.
Different Berry Combinations
Feel free to mix and match your berries. You can use blackberries or even cherries. Each berry brings a unique flavor. Experiment with different combinations for a fun twist. Just remember to keep the total amount of berries around three cups.
Adding Flavor Enhancements
To boost flavor, try adding spices like nutmeg or ginger. A splash of almond extract can add a lovely depth. You can also stir in some lemon zest for a fresh zing. These small changes can make your cobbler stand out. Don’t be afraid to get creative!
Storage Info
Storing Leftovers
After you enjoy your triple berry cobbler, you might have some left. Let it cool fully before storing. Place it in an airtight container. It stays fresh in the fridge for up to three days. This way, you can savor those delicious flavors again.
Reheating Instructions
When you’re ready to eat the leftovers, reheat them in the oven. Set the oven to 350°F (175°C). Place the cobbler in an oven-safe dish. Cover it with foil to keep it moist. Heat for about 15-20 minutes. If you like, you can microwave a slice for about 30-60 seconds. Enjoy it warm, just like fresh!
Freezing Tips
If you want to save some cobbler for later, freezing works great. Cut the cooled cobbler into pieces. Wrap each piece in plastic wrap and then foil. Store them in a freezer bag or airtight container. It can last up to three months. When you’re ready to enjoy it, thaw in the fridge overnight. Then, reheat as mentioned before. This way, you get to enjoy that berry goodness anytime!
FAQs
Can I use frozen berries for this recipe?
Yes, you can use frozen berries. They work well in cobbler. Just make sure to thaw them first. Drain any excess juice to avoid a soggy cobbler. Using frozen berries makes this recipe easy all year long.
How do I know when the cobbler is done?
Check the cobbler after 45 minutes of baking. The top should be golden brown. Insert a toothpick in the batter. If it comes out clean, the cobbler is ready. If not, bake for a few more minutes.
What is the best way to serve triple berry cobbler?
Serve the cobbler warm for the best taste. Top it with a scoop of vanilla ice cream. You can also add whipped cream for extra creaminess. Fresh berries on top make it look pretty and add flavor.
Can I substitute ingredients for dietary restrictions?
Yes, you can make substitutions. For a gluten-free option, use a gluten-free flour blend. To reduce sugar, use a sugar substitute. You can also swap dairy milk for almond or oat milk. These changes keep the cobbler tasty and fun.
This article covered how to make a delicious berry cobbler. We explored fresh and dry ingredients, plus the steps to create the perfect batter. I shared tips for selecting the best berries and achieving great texture. You even learned about gluten-free options and how to store your leftovers.
With these pointers, you can whip up a tasty dessert. Enjoy your berry cobbler and get creative with your favorite flavor
Triple Berry Cobbler
Ingredients
- 1 cup strawberries, hulled and sliced
- 1 cup blueberries
- 1 cup raspberries
- 1 cup granulated sugar, divided
- 2 tablespoons lemon juice
- 1 tablespoon cornstarch
- 1 teaspoon vanilla extract
- 1.5 cups all-purpose flour
- 2 teaspoons baking powder
- 0.5 teaspoon salt
- 0.5 cup unsalted butter, melted
- 1 cup milk
- 1 teaspoon ground cinnamon
- 1 tablespoon sugar for topping
Instructions
- Preheat your oven to 350°F (175°C). Grease a 9x13-inch baking dish.
- In a large bowl, combine the sliced strawberries, blueberries, and raspberries. Add ½ cup of sugar, lemon juice, cornstarch, and vanilla extract. Toss to coat the berries evenly. Pour the mixture into the prepared baking dish.
- In another bowl, whisk together the flour, baking powder, salt, and the remaining ½ cup of sugar. Add in the melted butter and milk. Stir until just combined; be careful not to overmix.
- Pour the batter over the berry mixture in the baking dish. Spread it out gently to cover as much of the berries as possible. Don’t worry if some of the berries poke through.
- In a small bowl, mix together the ground cinnamon and 1 tablespoon of sugar. Sprinkle this mixture over the cobbler batter.
- Bake in the preheated oven for about 45-50 minutes, or until the top is golden brown and a toothpick inserted into the batter comes out clean.
- Allow the cobbler to cool for about 10-15 minutes. Serve warm with a scoop of vanilla ice cream or whipped cream if desired.


![To make a No-Bake Oreo Cheesecake, you need a few key items. Here’s what you’ll need: - 24 Oreo cookies (plus extra for garnish) - 4 tablespoons unsalted butter, melted - 16 oz cream cheese, softened - 1 cup powdered sugar - 1 teaspoon vanilla extract - 1 cup heavy whipping cream - 1/2 cup mini chocolate chips (optional) These ingredients create a rich and creamy dessert that everyone loves. You can amp up the taste with a few fun additions. Consider these options: - Crushed peppermint candies for a minty twist - A splash of coffee or espresso for depth - Different flavored cookies, like peanut butter Oreos These extras can give your cheesecake a unique flair. If you’re missing an item, don’t worry! Here are some swaps you can use: - Use gluten-free cookies if you need a gluten-free option. - For a lighter version, try low-fat cream cheese. - Sour cream can replace some cream cheese for tanginess. These substitutions help you customize the recipe to suit your taste or dietary needs. Always remember to check for allergies when serving to others. For the full recipe, you can refer to the details shared above. Enjoy creating this delightful dessert! To start, gather your ingredients. You need 24 Oreo cookies and 4 tablespoons of melted butter. Place the cookies in a food processor. Crush them into fine crumbs. Once you have crumbs, add the melted butter. Pulse the mixture until it's well combined. This should look like wet sand. Next, take a 9-inch springform pan. Press the Oreo mixture firmly into the bottom. Make sure it is even and compact. This crust will hold everything together. Now, put the pan in the refrigerator. Let it chill while you make the filling. Now, let’s focus on the cheesecake filling. You’ll need 16 oz of softened cream cheese, 1 cup of powdered sugar, and 1 teaspoon of vanilla extract. In a large bowl, beat the cream cheese until smooth with an electric mixer. Gradually add the powdered sugar and vanilla. Mix until fully combined. In another bowl, pour in 1 cup of heavy whipping cream. Whip it until stiff peaks form. This will make your cheesecake light and fluffy. Gently fold the whipped cream into the cream cheese mixture. If you like, fold in 1/2 cup of mini chocolate chips for extra flavor. Now, let’s bring it all together. Take the chilled Oreo crust from the refrigerator. Spoon the cheesecake filling over the crust. Smooth the top with a spatula for a nice finish. Cover the pan with plastic wrap. Place it back in the refrigerator and let it chill for at least 4 hours. For the best results, let it chill overnight. This helps the cheesecake set firmly. Once set, remove the cheesecake from the springform pan. Garnish with crushed Oreo cookies on top. Now, slice it into wedges and serve. Enjoy your creamy, delicious no-bake Oreo cheesecake! For the complete recipe, check out the [Full Recipe]. When making a no-bake Oreo cheesecake, avoid overmixing your cream cheese. This can make it too runny. Also, don’t forget to chill the crust before adding the filling. A warm crust can melt the filling. Lastly, use softened cream cheese. Cold cream cheese does not mix well and can cause lumps. To get a smooth texture, beat the cream cheese until creamy before adding sugar. Mix slowly when adding the whipped cream. This keeps the air in the mixture, making it light. If you want a firmer cheesecake, chill it longer. I recommend overnight for the best results. You can make your cheesecake even better. Try adding mini chocolate chips for a fun crunch. You might also mix in crushed Oreos for extra flavor. If you like a hint of coffee, add a teaspoon of espresso powder. This adds depth without overpowering the Oreo flavor. For a fruity twist, use a layer of fruit puree on top. It looks great and tastes amazing! For more details, check out the Full Recipe. {{image_2}} You can have fun with flavors! Instead of Oreos, try using other cookies. For a classic taste, use graham crackers. If you love chocolate, use chocolate sandwich cookies. You can even mix in fruit flavors. Adding lemon or strawberry can brighten your cheesecake. Just swap the cookie crust and adjust the filling to match your new flavor. Want a lighter version? You can use low-fat cream cheese. It still tastes great! Substitute Greek yogurt for some of the cream cheese. This adds protein and cuts fat. You can also use a sugar substitute if you want fewer calories. For the crust, replace regular cookies with whole grain options. These swaps help make a lighter cheesecake without losing the taste. Toppings can change the whole dessert! Besides crushed Oreos, think about fresh fruit. Strawberries and raspberries add color and flavor. You can drizzle chocolate or caramel sauce on top. Whipped cream is always a hit too. For a fun crunch, sprinkle nuts or toffee bits on each slice. Get creative and mix different toppings for a unique look and taste! For the full recipe, check out the details above. Enjoy making your own variations! To keep your No-Bake Oreo Cheesecake fresh, cover it tightly with plastic wrap. You can also use an airtight container. Store it in the refrigerator. It will stay good for up to five days. Make sure it is fully set before covering it. This will help keep the texture perfect. If you want to keep your cheesecake longer, freezing is a great option. First, let the cheesecake chill completely in the fridge. Then, wrap it in plastic wrap, and follow with aluminum foil. This double layer helps prevent freezer burn. It can last up to three months in the freezer. To enjoy it, move the cheesecake to the fridge to thaw overnight. When serving leftovers, use a sharp knife to cut clean slices. Wipe the knife after each cut for neat edges. If you have extra toppings, like whipped cream or chocolate sauce, add them right before serving. This keeps them fresh and tasty. Enjoy your leftovers within three days for the best flavor! It takes about 4 hours for the cheesecake to set. For the best results, chill it overnight. This gives the filling time to firm up. You want it to hold its shape when you slice it. If you rush this step, the cheesecake may be too soft. You need both cream cheese and whipped cream for this recipe. Cream cheese adds the rich flavor. The whipped cream makes the cheesecake light and fluffy. If you only use cream cheese, it will be too dense. Stick to the recipe for the best taste. To cut a no-bake cheesecake, use a sharp knife. Dip the knife in hot water and wipe it dry before cutting. This method helps create clean slices. You can also use a thin spatula to lift out each piece. Enjoy serving this beautiful dessert! This blog covered how to make a no-bake Oreo cheesecake step by step. We explored essential and optional ingredients, plus tips for perfect texture. I also shared variations to make this dessert fit your taste and healthier choices. Finally, I included storage methods and answers to common questions. You now have the tools to create a delicious cheesecake and impress everyone. Enjoy making this tasty treat!](https://dailydishly.com/wp-content/uploads/2025/07/9651beeb-141b-494d-95f3-40869f463a5c-768x768.webp)