
Pumpkin Spice Cheesecake Dip Creamy and Delightful Treat

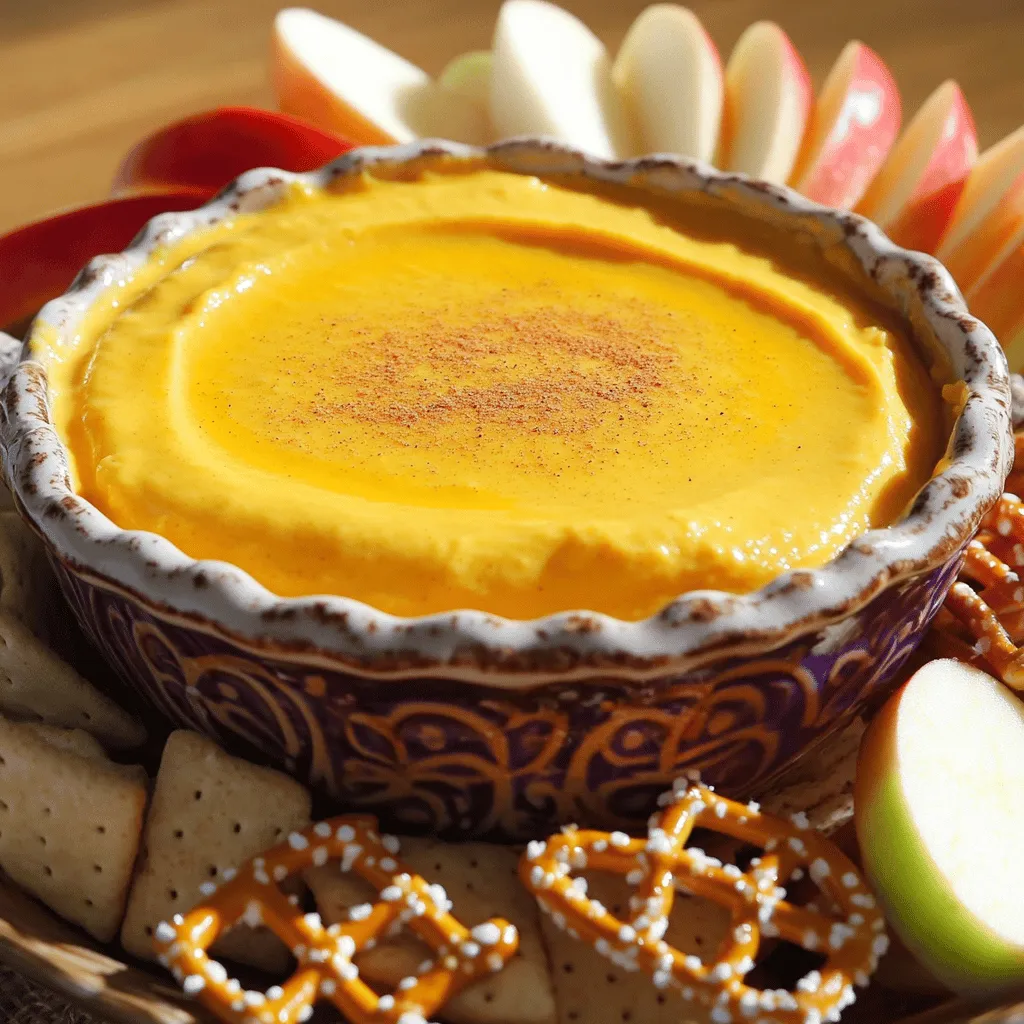
Are you ready to dive into fall flavors? This Pumpkin Spice Cheesecake Dip is a creamy delight that will satisfy your cravings. With a blend of pumpkin puree, cream cheese, and warm spices, it’s perfect for parties or cozy nights in. Plus, it’s easy to make! Join me as we whip up this tasty treat that pairs well with graham crackers, apple slices, or pretzels. Let’s get started!
Ingredients
Essential Ingredients
To make a delicious Pumpkin Spice Cheesecake Dip, you need these key ingredients:
– 8 oz cream cheese, softened
– 1 cup pumpkin puree
– 1/2 cup powdered sugar
– 1 tablespoon brown sugar
– 1 teaspoon vanilla extract
– 1 teaspoon pumpkin pie spice
– 1/2 teaspoon cinnamon
– 1/2 cup whipped topping
– Dippers: graham crackers, apple slices, or pretzels
Each ingredient plays a special role. The cream cheese gives the dip that rich and creamy base. Pumpkin puree adds a nice fall flavor while keeping the dip smooth. Sugar sweetens it just enough, and the spices bring warmth.
I love using whipped topping for a light texture. It makes the dip airy and fun to eat. For dippers, graham crackers add crunch, apple slices bring freshness, and pretzels give a salty kick. You can mix and match to find your favorite!Enjoy making this fun treat!
Step-by-Step Instructions
Prepping the Cream Cheese
Start by taking your cream cheese out of the fridge. You want it to be soft. This makes it easy to mix. Place the cream cheese in a large mixing bowl. Beat it with a mixer until it is smooth. This step is key to a creamy dip.
Mixing the Ingredients
Next, add the pumpkin puree to the bowl. Then, sprinkle in the powdered sugar and brown sugar. Pour in the vanilla extract, pumpkin pie spice, and cinnamon. Mix everything together until you have a smooth and even texture. This is where the flavors start to come alive.
Finishing Touches
Now, it’s time for the whipped topping. Gently fold it into the mixture. This helps keep the dip light and fluffy. After mixing, taste the dip. If you want it sweeter or spicier, adjust as needed. Finally, transfer your dip to a serving bowl. Chill it in the fridge for at least 30 minutes. This lets the flavors blend perfectly. When ready, serve it with graham crackers, apple slices, or pretzels for dipping. Enjoy your creamy and delightful treat!
Tips & Tricks
Achieving the Perfect Texture
To get the right texture, mix gently. Over-mixing can make the dip too runny. You want it smooth but thick. After mixing, chill the dip for at least 30 minutes. Chilling helps the flavors blend well and makes it creamy.
Adjusting Flavor
If you find the dip too sweet, you can change that. Add a little more pumpkin puree or a pinch of salt to balance the sweetness. For more flavor, add extra spices. A dash of nutmeg or more cinnamon can elevate the taste.
Presentation Ideas
How you serve the dip matters. Use a decorative bowl to make it look appealing. You can sprinkle a little pumpkin pie spice on top for style. Arrange graham crackers, apple slices, or pretzels around the bowl. This makes it easy for guests to dip in and adds a nice touch to your table.
Variations
Healthier Alternatives
You can make this dip lighter by swapping cream cheese with Greek yogurt. Greek yogurt adds protein and tang. This change keeps the dip creamy while cutting calories. You can also use natural sweeteners like honey or maple syrup instead of powdered sugar. These options offer a sweet taste without refined sugar.
Flavor Variations
To make your dip more exciting, try adding chocolate chips or nuts. Chocolate chips give a rich flavor that pairs well with pumpkin. Nuts add a nice crunch, making each bite interesting. You can also mix in other spices, such as nutmeg. Nutmeg adds warmth and depth, enhancing the pumpkin spice profile.
Seasonal Twists
For festive fun, add cranberries to your dip. The tartness of cranberries contrasts nicely with the sweet dip. It also gives a holiday vibe. You can also use flavored whipped topping, like cinnamon or vanilla. This twist can add an extra layer of flavor to the dip and surprise your guests.
Storage Info
How to Store Leftovers
Store your Pumpkin Spice Cheesecake Dip in an airtight container. This keeps it fresh and tasty. Place it in the refrigerator right after serving. Avoid leaving it out for too long. To preserve its creamy texture, use the container with the best seal.
Freezing Options
Yes, you can freeze the dip! Just put it in a freezer-safe container. Make sure to leave some space at the top for expansion. When you are ready to eat it, thaw it in the fridge overnight. This method keeps the dip smooth and delicious.
Shelf Life
In the fridge, the dip lasts about 3 to 5 days. Check for any changes in smell or color. If you see separation or an off smell, it’s best to throw it away. Always trust your senses; they guide you well!
FAQs
Can you make Pumpkin Spice Cheesecake Dip ahead of time?
Yes, you can make this dip ahead of time. I recommend preparing it a day before. Just chill it in the fridge. This allows the flavors to blend well.
What can I use as a dipper besides graham crackers?
You have many tasty options! Try apple slices for a fresh crunch. Pretzels add a nice salty bite. You can also use vanilla wafers or even banana slices for a sweet twist.
How long does Pumpkin Spice Cheesecake Dip last?
This dip can last up to five days in the fridge. Store it in an airtight container. If it looks or smells off, don’t eat it. Always check for freshness.
Is this dip gluten-free?
The dip itself is gluten-free if you use gluten-free dippers. Graham crackers often contain gluten, so opt for gluten-free options. Always read the labels to be sure.
The Pumpkin Spice Cheesecake Dip is an easy treat to enjoy. You learned the essential ingredients, from cream cheese to spices. I shared step-by-step instructions for smooth mixing and chilling. You discovered tips to change flavor and achieve the best texture. I also covered storage, variations, and common questions.
This dip is simple, tasty, and perfect for gatherings. Enjoy making this delightful treat whenever you crave something sweet!


![To make Roasted Garlic Parmesan Cauliflower, gather the following main ingredients: - 1 medium head of cauliflower, cut into florets - 6 cloves of garlic, minced - 1/4 cup grated Parmesan cheese - 3 tablespoons olive oil - 1 teaspoon garlic powder - 1/2 teaspoon smoked paprika - Salt and pepper to taste - Fresh parsley, chopped (for garnish) These ingredients create a rich and savory flavor in the dish. The garlic gives it a nice punch, while the Parmesan adds creaminess. You can add some optional ingredients to change up the flavor. Here are a few ideas: - Lemon juice for a tangy twist - Red pepper flakes for heat - Thyme or rosemary for an herbaceous note Using these optional ingredients can give you a unique spin on the original dish. To prepare this delicious dish, you’ll need a few basic tools: - A large mixing bowl - A baking sheet - Parchment paper for easy cleanup - A sharp knife for cutting the cauliflower - A spatula for tossing the florets Having the right tools makes cooking easier and more fun. You can find the full recipe in the guide above. First, you need to wash the cauliflower. Remove the leaves and cut the head into small florets. Make sure they are about the same size. This helps them cook evenly. You want each floret to be bite-sized. It makes serving easier and more fun to eat. In a large bowl, add your cauliflower florets. Now, add minced garlic, olive oil, garlic powder, smoked paprika, salt, and pepper. Toss everything well. Ensure each floret gets coated in the tasty mix. This step is key for great flavor. The garlic and spices will really shine through. Preheat your oven to 425°F (220°C). Spread the seasoned florets on a baking sheet lined with parchment paper. Make sure they are in a single layer. This helps them roast well. Bake for about 20-25 minutes. Stir halfway through to ensure even roasting. The cauliflower should turn tender and golden brown. When you take them out, sprinkle the Parmesan cheese on top. Pop them back in the oven for 5 more minutes. This will melt the cheese and make everything delicious. Finally, let the roasted cauliflower cool for a couple of minutes. Garnish with fresh parsley before serving. Enjoy your flavorful dish! For the full recipe, check [Full Recipe]. To get the best flavor, use fresh garlic. Fresh garlic gives a strong, rich taste. Mince the garlic finely for even better flavor. You can also add a pinch of lemon zest. This adds a bright note that balances the richness of the cheese. Roasting cauliflower is all about the heat. Preheat your oven to 425°F (220°C). This high heat gives the cauliflower a nice golden color. Spread the florets out on the baking sheet. If they are too close, they will steam instead of roast. Stir them halfway through cooking. This helps to brown all sides evenly. Roasted garlic parmesan cauliflower shines on its own. Serve it as a side dish with grilled chicken or fish. You can also toss it into salads for extra flavor. For a fun twist, make it a topping for baked potatoes. The creamy cheese and garlic mix perfectly with the fluffy potato. Don’t forget to check the Full Recipe for more tips! {{image_2}} You can switch up the cheese in this dish. Try using cheddar for a sharper taste. Goat cheese adds a creamy touch that melts nicely. Feta gives a tangy bite that pairs well with garlic. If you want a nutty flavor, use Gruyère instead. Each cheese brings its own flair to the roasted cauliflower. You can mix in other veggies for more color and taste. Broccoli works great with cauliflower. Brussels sprouts add a nice crunch. Carrots give a sweet note that balances the garlic. Feel free to toss in bell peppers or zucchini for extra flavor. Roasting them together makes a tasty medley. If you want a vegan version, swap the Parmesan for nutritional yeast. It gives a cheesy flavor without dairy. You can also use vegan cheese shreds that melt well. For extra creaminess, add a splash of almond milk. This way, you keep the dish flavorful and plant-based. You can find the full recipe for Roasted Garlic Parmesan Cauliflower [here]. After enjoying your Roasted Garlic Parmesan Cauliflower, let it cool first. Place any leftovers in an airtight container. You can store it in the fridge for up to 3 days. This keeps the flavors fresh and the texture nice. To reheat, preheat your oven to 350°F (175°C). Spread the cauliflower on a baking sheet. Heat it for about 10 to 15 minutes. This method keeps the cauliflower crisp. You can also microwave it for 1 to 2 minutes, but the texture may change. If you want to freeze this dish, first let it cool completely. Transfer the cauliflower to a freezer-safe bag or container. It can last for up to a month. To enjoy, thaw it overnight in the fridge. Reheat it in the oven for the best results. For more details, check the Full Recipe. Roasting cauliflower takes about 20 to 25 minutes. Preheat your oven to 425°F (220°C). Spread the cauliflower florets on a baking sheet. Roast until they turn tender and golden brown. Remember to stir halfway through for even cooking. Yes, you can prepare this dish ahead of time. You can cut the cauliflower and mix in the garlic and oil. Store it in the fridge for up to 24 hours before roasting. When you’re ready, just pop it in the oven. This makes it easy for busy days! You can serve Roasted Garlic Parmesan Cauliflower with many dishes. It pairs well with grilled chicken or fish. You can also enjoy it as a side for pasta. For a vegetarian meal, serve it with quinoa or a fresh salad. The flavors work great together and make for a fun meal! For the full recipe, check out the section above. This recipe for Roasted Garlic Parmesan Cauliflower covers everything from ingredients to storage tips. You learned how to prepare, season, and roast the cauliflower for the best flavor. Remember to try different cheeses or veggie options for fun twists. When storing leftovers, keep them safe for another meal. Enjoy this dish alongside your favorites. Cook with confidence, and let your taste buds guide you!](https://dailydishly.com/wp-content/uploads/2025/06/e2797ad0-ebfe-4fec-85bd-8200cd052b8d-768x768.webp)


![- 2 medium zucchinis - 1 cup breadcrumbs (preferably whole wheat) - 1/2 cup grated parmesan cheese - 2 tablespoons fresh parsley, chopped - 1 tablespoon fresh basil, chopped - 1 teaspoon garlic powder - 1/2 teaspoon onion powder - Salt and pepper to taste - 2 large eggs - Olive oil spray or 2 tablespoons olive oil The ingredients for herb crusted zucchini sticks are simple yet flavorful. Zucchini is a great base because it’s mild and absorbs spices well. You want to use fresh herbs like parsley and basil to boost taste. Whole wheat breadcrumbs add a nice crunch, and parmesan brings a cheesy depth. For the coating, garlic and onion powder add savory notes. Make sure to season with salt and pepper to enhance all the flavors. You will need eggs to help the breadcrumbs stick to the zucchini. Olive oil ensures the sticks get crispy in the oven. I recommend you gather everything before you start cooking. This will help you stay organized and make the process smoother. You can find the full recipe below to guide you through this delicious snack. 1. Preheat your oven to 425°F (220°C). This step is vital for crispiness. 2. Line a baking sheet with parchment paper. It helps with easy cleanup. 3. In a shallow bowl, combine the breadcrumbs, parmesan cheese, chopped parsley, basil, garlic powder, onion powder, salt, and pepper. Mix well to blend the flavors. 4. In a separate bowl, whisk the eggs until smooth and fully combined. 1. Take each zucchini stick and dip it in the egg mixture. Let the extra egg drip off. 2. Next, roll the zucchini stick in the breadcrumb mixture. Press gently to coat evenly. 1. Arrange the coated zucchini sticks on the prepared baking sheet. Give them space to crisp. 2. Lightly spray the zucchini sticks with olive oil or drizzle them with olive oil. This adds flavor and helps with browning. 3. Bake in the preheated oven for 20-25 minutes. Turn them halfway through for even crispiness. Look for a golden color as a sign they are done. 4. Remove from the oven and let them cool slightly before serving. Enjoy these crispy delights! For the complete recipe, refer to the [Full Recipe]. To make your herb crusted zucchini sticks crispy, use fresh herbs. Fresh parsley and basil add great flavor. Dried herbs can work, but fresh gives a better taste. For the perfect coating, press the zucchini sticks into the breadcrumb mix. This helps the crumbs stick well. A light spray of olive oil before baking also boosts crispiness. You can bake zucchini sticks or try an air fryer. An air fryer cooks them faster and can make them even crispier. If you use an air fryer, set it to 400°F (200°C) for about 10-15 minutes. Turn them halfway for even cooking. If you prefer baking, keep the temperature at 425°F (220°C) and bake for 20-25 minutes. Adjust the cook time based on how crispy you want them. For dips, ranch dressing or marinara sauce pairs well with zucchini sticks. You can also try a spicy aioli for a kick. As for side dishes, serve them with a fresh salad or alongside grilled chicken for a nice meal. These sticks can be a great snack or a fun side to any dish. {{image_2}} You can make your herb crusted zucchini sticks even tastier! Try adding spices like paprika or chili flakes. This gives a nice kick and makes them more exciting. You can also mix in cheese variations. Feta adds a tangy flavor, while mozzarella gives a creamy touch. Both options will enhance your dish and please your taste buds. Want to make this recipe fit your diet? You can use gluten-free breadcrumbs to keep it safe for those with gluten issues. Just look for certified gluten-free brands. If you’re vegan, replace the eggs with a mixture of ground flaxseed and water. This will help the breadcrumbs stick without using eggs. These zucchini sticks work great as appetizers or party snacks. Serve them with dips like ranch or marinara for extra fun. You can also mix them with other veggies for a colorful platter. Carrots, bell peppers, and cucumbers pair well and add variety to your snack table. Check out the Full Recipe for more ideas! To keep your zucchini sticks fresh, place them in an airtight container. This helps lock in moisture and flavor. If you want the best taste, eat them within three days. After that, they may lose some crispiness and flavor. For the best results, reheat your zucchini sticks in the oven. Preheat the oven to 375°F (190°C). Place the sticks on a baking sheet for about 10 minutes. This method keeps them crispy and tasty. If you need a quick option, the microwave works too. Heat them for 30 seconds. Check if they need more time. Note that they may not be as crispy in the microwave. Yes, you can freeze zucchini sticks! To do this properly, first, let them cool completely. Next, place them in a single layer on a baking sheet. Freeze for about two hours. Once frozen, transfer them to a freezer bag. Make sure to remove as much air as possible. They can last up to three months in the freezer. Just remember to bake them straight from frozen when you are ready to enjoy! For more details, check the Full Recipe. How do I know when the zucchini sticks are done? You can tell the zucchini sticks are done when they turn golden brown and crispy. They should feel firm to the touch. Bake them for 20 to 25 minutes at 425°F (220°C), turning them halfway through cooking. This helps them cook evenly. If you want extra crunch, keep an eye on them during the last few minutes. Can I use frozen zucchini for this recipe? I do not recommend using frozen zucchini for this recipe. Frozen zucchini tends to lose water and becomes mushy when cooked. Fresh zucchini gives the best texture and flavor. If you only have frozen zucchini, try to drain it well before using it. However, it may still not give you the same crispy result. What can I substitute for parmesan cheese? If you want to substitute parmesan cheese, try using nutritional yeast for a vegan option. It adds a nice cheesy flavor. You can also use other cheeses like Pecorino Romano or Grana Padano. Just remember that different cheeses may change the flavor a bit. Can I use regular breadcrumbs instead of whole wheat? Yes, you can use regular breadcrumbs instead of whole wheat. Both types will work well in this recipe. Just remember that whole wheat breadcrumbs add a bit more fiber and a heartier taste. Use what you have on hand for the best results. How can I make my zucchini less watery? To make zucchini less watery, you can salt the sticks before cooking. Cut them and sprinkle salt on them. Let them sit for about 15 minutes, then rinse and pat them dry. This helps remove excess moisture. You can also try using smaller zucchinis, as they tend to be firmer. Can I bake these zucchini sticks without oil? Yes, you can bake zucchini sticks without oil. Just be aware that they may not be as crispy. You can use a light spray of cooking oil for better results, but if you want to skip it, they will still cook fine. Keep an eye on them to prevent burning. In this blog post, we explored how to make crispy zucchini sticks. We covered the ingredients needed, the step-by-step process, and various tips to ensure great results. I shared methods for baking, storing, and serving your zucchini sticks. These versatile snacks are easy to adjust for different diets and flavors. Remember, fresh herbs and the right cooking methods will enhance your dish. Enjoy your cooking and get creative with your serving ideas!](https://dailydishly.com/wp-content/uploads/2025/07/e6e4c2e6-85fe-4d28-829b-ce9ad5e19088-768x768.webp)