Creamy Feta Pasta Salad Simply Delicious and Fresh
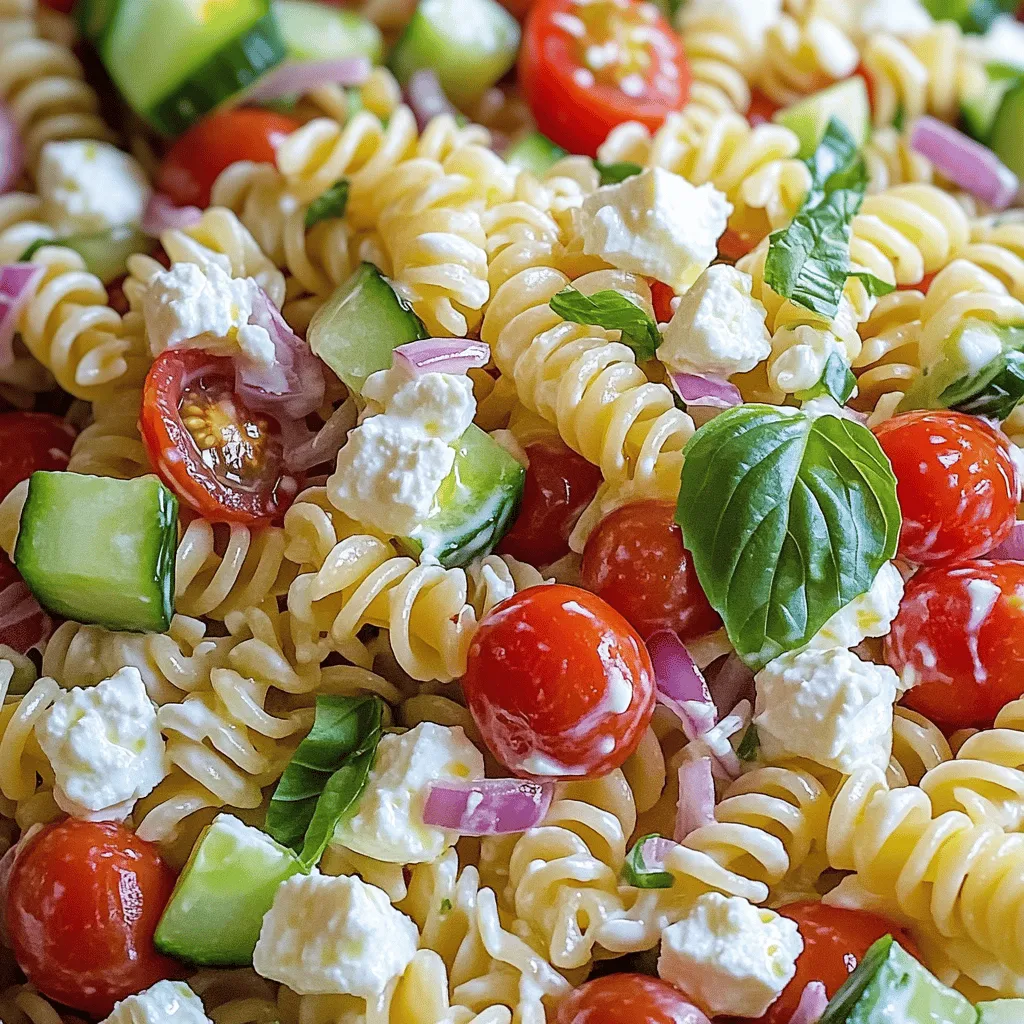
![To make a great creamy feta pasta salad, you'll need a few simple ingredients. Here’s what you should gather: - 8 oz (225 g) fusilli pasta - 1 cup feta cheese, crumbled - 1/2 cup Greek yogurt - 1/4 cup olive oil - 1 tablespoon lemon juice - 1 teaspoon dried oregano - 1/2 teaspoon garlic powder - 1 cup cherry tomatoes, halved - 1 cucumber, diced - 1/4 red onion, finely chopped - Salt and pepper to taste - Fresh basil leaves for garnish Each ingredient brings its own flavor to the dish. The fusilli pasta adds a fun twist, while the feta cheese offers a rich, creamy taste. Greek yogurt makes the dressing smooth and adds a nice tang. Olive oil brings depth, and lemon juice gives a bright kick. Herbs like oregano and garlic powder enhance the taste. The cherry tomatoes and cucumber add freshness, and red onion brings a mild crunch. Finally, salt, pepper, and basil leaves round out this delightful salad. For the full recipe, you can check out the complete instructions. This creamy feta pasta salad is sure to be a hit! To make this creamy feta pasta salad, start by cooking the fusilli. Bring a large pot of salted water to a boil. Add the fusilli and cook it according to the package instructions. I recommend checking the pasta a minute or two early. You want it al dente, meaning it should have a slight bite to it. Once cooked, drain the pasta in a colander. Rinse it under cold water to stop the cooking process. This step cools the pasta quickly and keeps it from becoming mushy. Set it aside while you prepare the dressing. Now, let’s make the creamy dressing. In a medium bowl, combine the crumbled feta cheese and Greek yogurt. Add olive oil, lemon juice, dried oregano, and garlic powder. Use a fork to mash the feta and yogurt together. Mix until you get a creamy texture. Taste the dressing and adjust the seasoning. You may want to add more salt or pepper. This step is key for a flavor-packed salad. In a large mixing bowl, add the cooled fusilli, halved cherry tomatoes, diced cucumber, and chopped red onion. Pour the creamy feta dressing over the pasta and mix gently. Toss until everything is coated well. Chill the salad in the fridge for at least 30 minutes. This time allows the flavors to blend and deepen. Before serving, stir again and garnish with fresh basil leaves. Enjoy your fresh and delicious creamy feta pasta salad! To get the best creamy texture, mix your ingredients well. Start by mashing the feta with a fork. This helps it blend smoothly. Next, add Greek yogurt and olive oil. Use the fork to mix until you see no lumps. This step is key for a silky dressing. When you combine the dressing with the pasta, do it gently. Toss the pasta slowly to coat every piece. If you mix too hard, the pasta may break. You want it smooth, not mushy. To boost the flavor, think about adding fresh herbs. Basil and parsley work well with feta. You can also try adding a dash of chili flakes for some heat. If you're feeling adventurous, a sprinkle of smoked paprika can add depth. You can include optional ingredients too. Consider adding olives for a briny kick. Roasted red peppers can bring sweetness. These add-ins make your salad more exciting and unique. Creamy feta pasta salad pairs nicely with grilled chicken or fish. It also goes great with a side of crusty bread. For a complete meal, serve it alongside a fresh green salad. To make your dish look appealing, use a large, colorful bowl. Garnish with whole basil leaves on top. This not only adds beauty but also enhances the fresh aroma. Enjoy your delicious salad! For the full recipe, check out the [Full Recipe]. {{image_2}} You can switch up the pasta type for your creamy feta pasta salad. Try using penne, rotini, or even whole wheat pasta. Each type brings a new texture to the dish. If you prefer gluten-free options, choose rice or chickpea pasta. These options taste great and work well with the creamy feta dressing. Adding extra veggies and proteins boosts the nutrition of your salad. Consider mixing in spinach, bell peppers, or even artichokes. For protein, grilled chicken or chickpeas are fantastic choices. You can also experiment with cheese. Try adding mozzarella or goat cheese for a different flavor. Seasonal ingredients can change the taste of your pasta salad. In summer, use fresh corn, zucchini, or basil. These bright flavors make a refreshing dish. For winter, think about roasted vegetables like sweet potatoes or Brussels sprouts. The flavors will warm you up and keep the dish hearty. To keep your creamy feta pasta salad fresh, use an airtight container. Make sure it seals well. This will help keep the salad from drying out. You can store it in the fridge for up to three days. If you notice any changes in smell or texture, it is best to throw it away. When reheating the pasta salad, use the microwave. Heat it in short bursts to avoid overcooking. Stir it gently to ensure even warmth. If the salad feels dry, add a little olive oil or a splash of water. This will help bring back its creamy texture. Can you freeze creamy feta pasta salad? It’s not the best option. Freezing can change the texture of the feta and yogurt. If you still want to freeze it, use a freezer-safe container. Make sure to remove as much air as possible. You can keep it in the freezer for up to a month. When ready to eat, thaw it in the fridge overnight before serving. I recommend using classic feta cheese for this salad. Classic feta has a tangy and salty taste. It crumbles well and mixes nicely with the other ingredients. You can also try flavored feta. Flavored feta may include herbs or spices. These add different tastes to your pasta salad. However, classic feta keeps the dish light and fresh. Yes, you can make this pasta salad ahead of time. I suggest preparing it at least two hours before serving. This allows the flavors to mingle well. You can also store it in the fridge overnight. Just be sure to stir it before serving. This will help mix the dressings again. If you don't have Greek yogurt, you can try sour cream. Sour cream gives a similar creamy texture. Another option is cream cheese. Just mix it well to keep it smooth. For dairy-free options, consider using coconut yogurt. Almond or cashew yogurt also works well. These will change the flavor slightly but still taste great. For the complete list of ingredients and instructions, check out the [Full Recipe](#). In this blog post, we explored how to make a delicious creamy feta pasta salad. We covered the key ingredients, including fusilli, feta cheese, and fresh veggies. You learned the best cooking methods and how to create the perfect dressing. I shared tips to enhance flavor and storage advice for leftovers. Ready to impress your friends with this dish? A creamy feta pasta salad will please everyone. Enjoy making it and let the flavors shine!](https://dailydishly.com/wp-content/uploads/2025/07/1e04cd5b-2977-4013-97be-e6e1a5f7ba16.webp)
Are you ready to elevate your pasta salad game? This Creamy Feta Pasta Salad is a delightful blend of fresh ingredients, rich flavors, and creamy textures. It’s not just a dish; it’s a tasty adventure for your taste buds! With simple steps and easy swaps, you can create a vibrant salad that’s perfect for any gathering. Let’s dive in and make your next meal simply delicious and fresh!
Ingredients
To make a great creamy feta pasta salad, you’ll need a few simple ingredients. Here’s what you should gather:
– 8 oz (225 g) fusilli pasta
– 1 cup feta cheese, crumbled
– 1/2 cup Greek yogurt
– 1/4 cup olive oil
– 1 tablespoon lemon juice
– 1 teaspoon dried oregano
– 1/2 teaspoon garlic powder
– 1 cup cherry tomatoes, halved
– 1 cucumber, diced
– 1/4 red onion, finely chopped
– Salt and pepper to taste
– Fresh basil leaves for garnish
Each ingredient brings its own flavor to the dish. The fusilli pasta adds a fun twist, while the feta cheese offers a rich, creamy taste. Greek yogurt makes the dressing smooth and adds a nice tang. Olive oil brings depth, and lemon juice gives a bright kick.
Herbs like oregano and garlic powder enhance the taste. The cherry tomatoes and cucumber add freshness, and red onion brings a mild crunch. Finally, salt, pepper, and basil leaves round out this delightful salad.This creamy feta pasta salad is sure to be a hit!
Step-by-Step Instructions
Cooking the Pasta
To make this creamy feta pasta salad, start by cooking the fusilli. Bring a large pot of salted water to a boil. Add the fusilli and cook it according to the package instructions. I recommend checking the pasta a minute or two early. You want it al dente, meaning it should have a slight bite to it.
Once cooked, drain the pasta in a colander. Rinse it under cold water to stop the cooking process. This step cools the pasta quickly and keeps it from becoming mushy. Set it aside while you prepare the dressing.
Making the Creamy Dressing
Now, let’s make the creamy dressing. In a medium bowl, combine the crumbled feta cheese and Greek yogurt. Add olive oil, lemon juice, dried oregano, and garlic powder. Use a fork to mash the feta and yogurt together. Mix until you get a creamy texture.
Taste the dressing and adjust the seasoning. You may want to add more salt or pepper. This step is key for a flavor-packed salad.
Assembling the Salad
In a large mixing bowl, add the cooled fusilli, halved cherry tomatoes, diced cucumber, and chopped red onion. Pour the creamy feta dressing over the pasta and mix gently. Toss until everything is coated well.
Chill the salad in the fridge for at least 30 minutes. This time allows the flavors to blend and deepen. Before serving, stir again and garnish with fresh basil leaves. Enjoy your fresh and delicious creamy feta pasta salad!
Tips & Tricks
Achieving the Creamiest Texture
To get the best creamy texture, mix your ingredients well. Start by mashing the feta with a fork. This helps it blend smoothly. Next, add Greek yogurt and olive oil. Use the fork to mix until you see no lumps. This step is key for a silky dressing.
When you combine the dressing with the pasta, do it gently. Toss the pasta slowly to coat every piece. If you mix too hard, the pasta may break. You want it smooth, not mushy.
Flavor Enhancements
To boost the flavor, think about adding fresh herbs. Basil and parsley work well with feta. You can also try adding a dash of chili flakes for some heat. If you’re feeling adventurous, a sprinkle of smoked paprika can add depth.
You can include optional ingredients too. Consider adding olives for a briny kick. Roasted red peppers can bring sweetness. These add-ins make your salad more exciting and unique.
Serving Suggestions
Creamy feta pasta salad pairs nicely with grilled chicken or fish. It also goes great with a side of crusty bread. For a complete meal, serve it alongside a fresh green salad.
To make your dish look appealing, use a large, colorful bowl. Garnish with whole basil leaves on top. This not only adds beauty but also enhances the fresh aroma. Enjoy your delicious salad!
Variations
Different Pasta Choices
You can switch up the pasta type for your creamy feta pasta salad. Try using penne, rotini, or even whole wheat pasta. Each type brings a new texture to the dish. If you prefer gluten-free options, choose rice or chickpea pasta. These options taste great and work well with the creamy feta dressing.
Add-Ins for Extra Nutrition
Adding extra veggies and proteins boosts the nutrition of your salad. Consider mixing in spinach, bell peppers, or even artichokes. For protein, grilled chicken or chickpeas are fantastic choices. You can also experiment with cheese. Try adding mozzarella or goat cheese for a different flavor.
Seasonal Variations
Seasonal ingredients can change the taste of your pasta salad. In summer, use fresh corn, zucchini, or basil. These bright flavors make a refreshing dish. For winter, think about roasted vegetables like sweet potatoes or Brussels sprouts. The flavors will warm you up and keep the dish hearty.
Storage Info
How to Store Leftovers
To keep your creamy feta pasta salad fresh, use an airtight container. Make sure it seals well. This will help keep the salad from drying out. You can store it in the fridge for up to three days. If you notice any changes in smell or texture, it is best to throw it away.
Reheating Tips
When reheating the pasta salad, use the microwave. Heat it in short bursts to avoid overcooking. Stir it gently to ensure even warmth. If the salad feels dry, add a little olive oil or a splash of water. This will help bring back its creamy texture.
Freezing Guidance
Can you freeze creamy feta pasta salad? It’s not the best option. Freezing can change the texture of the feta and yogurt. If you still want to freeze it, use a freezer-safe container. Make sure to remove as much air as possible. You can keep it in the freezer for up to a month. When ready to eat, thaw it in the fridge overnight before serving.
FAQs
What type of feta cheese is best to use?
I recommend using classic feta cheese for this salad. Classic feta has a tangy and salty taste. It crumbles well and mixes nicely with the other ingredients. You can also try flavored feta. Flavored feta may include herbs or spices. These add different tastes to your pasta salad. However, classic feta keeps the dish light and fresh.
Can I make this pasta salad ahead of time?
Yes, you can make this pasta salad ahead of time. I suggest preparing it at least two hours before serving. This allows the flavors to mingle well. You can also store it in the fridge overnight. Just be sure to stir it before serving. This will help mix the dressings again.
What are some common substitutions for Greek yogurt?
If you don’t have Greek yogurt, you can try sour cream. Sour cream gives a similar creamy texture. Another option is cream cheese. Just mix it well to keep it smooth. For dairy-free options, consider using coconut yogurt. Almond or cashew yogurt also works well. These will change the flavor slightly but still taste great.
In this blog post, we explored how to make a delicious creamy feta pasta salad. We covered the key ingredients, including fusilli, feta cheese, and fresh veggies. You learned the best cooking methods and how to create the perfect dressing. I shared tips to enhance flavor and storage advice for leftovers.
Ready to impress your friends with this dish? A creamy feta pasta salad will please everyone. Enjoy making it and let the flavors shine!
![To make a great creamy feta pasta salad, you'll need a few simple ingredients. Here’s what you should gather: - 8 oz (225 g) fusilli pasta - 1 cup feta cheese, crumbled - 1/2 cup Greek yogurt - 1/4 cup olive oil - 1 tablespoon lemon juice - 1 teaspoon dried oregano - 1/2 teaspoon garlic powder - 1 cup cherry tomatoes, halved - 1 cucumber, diced - 1/4 red onion, finely chopped - Salt and pepper to taste - Fresh basil leaves for garnish Each ingredient brings its own flavor to the dish. The fusilli pasta adds a fun twist, while the feta cheese offers a rich, creamy taste. Greek yogurt makes the dressing smooth and adds a nice tang. Olive oil brings depth, and lemon juice gives a bright kick. Herbs like oregano and garlic powder enhance the taste. The cherry tomatoes and cucumber add freshness, and red onion brings a mild crunch. Finally, salt, pepper, and basil leaves round out this delightful salad. For the full recipe, you can check out the complete instructions. This creamy feta pasta salad is sure to be a hit! To make this creamy feta pasta salad, start by cooking the fusilli. Bring a large pot of salted water to a boil. Add the fusilli and cook it according to the package instructions. I recommend checking the pasta a minute or two early. You want it al dente, meaning it should have a slight bite to it. Once cooked, drain the pasta in a colander. Rinse it under cold water to stop the cooking process. This step cools the pasta quickly and keeps it from becoming mushy. Set it aside while you prepare the dressing. Now, let’s make the creamy dressing. In a medium bowl, combine the crumbled feta cheese and Greek yogurt. Add olive oil, lemon juice, dried oregano, and garlic powder. Use a fork to mash the feta and yogurt together. Mix until you get a creamy texture. Taste the dressing and adjust the seasoning. You may want to add more salt or pepper. This step is key for a flavor-packed salad. In a large mixing bowl, add the cooled fusilli, halved cherry tomatoes, diced cucumber, and chopped red onion. Pour the creamy feta dressing over the pasta and mix gently. Toss until everything is coated well. Chill the salad in the fridge for at least 30 minutes. This time allows the flavors to blend and deepen. Before serving, stir again and garnish with fresh basil leaves. Enjoy your fresh and delicious creamy feta pasta salad! To get the best creamy texture, mix your ingredients well. Start by mashing the feta with a fork. This helps it blend smoothly. Next, add Greek yogurt and olive oil. Use the fork to mix until you see no lumps. This step is key for a silky dressing. When you combine the dressing with the pasta, do it gently. Toss the pasta slowly to coat every piece. If you mix too hard, the pasta may break. You want it smooth, not mushy. To boost the flavor, think about adding fresh herbs. Basil and parsley work well with feta. You can also try adding a dash of chili flakes for some heat. If you're feeling adventurous, a sprinkle of smoked paprika can add depth. You can include optional ingredients too. Consider adding olives for a briny kick. Roasted red peppers can bring sweetness. These add-ins make your salad more exciting and unique. Creamy feta pasta salad pairs nicely with grilled chicken or fish. It also goes great with a side of crusty bread. For a complete meal, serve it alongside a fresh green salad. To make your dish look appealing, use a large, colorful bowl. Garnish with whole basil leaves on top. This not only adds beauty but also enhances the fresh aroma. Enjoy your delicious salad! For the full recipe, check out the [Full Recipe]. {{image_2}} You can switch up the pasta type for your creamy feta pasta salad. Try using penne, rotini, or even whole wheat pasta. Each type brings a new texture to the dish. If you prefer gluten-free options, choose rice or chickpea pasta. These options taste great and work well with the creamy feta dressing. Adding extra veggies and proteins boosts the nutrition of your salad. Consider mixing in spinach, bell peppers, or even artichokes. For protein, grilled chicken or chickpeas are fantastic choices. You can also experiment with cheese. Try adding mozzarella or goat cheese for a different flavor. Seasonal ingredients can change the taste of your pasta salad. In summer, use fresh corn, zucchini, or basil. These bright flavors make a refreshing dish. For winter, think about roasted vegetables like sweet potatoes or Brussels sprouts. The flavors will warm you up and keep the dish hearty. To keep your creamy feta pasta salad fresh, use an airtight container. Make sure it seals well. This will help keep the salad from drying out. You can store it in the fridge for up to three days. If you notice any changes in smell or texture, it is best to throw it away. When reheating the pasta salad, use the microwave. Heat it in short bursts to avoid overcooking. Stir it gently to ensure even warmth. If the salad feels dry, add a little olive oil or a splash of water. This will help bring back its creamy texture. Can you freeze creamy feta pasta salad? It’s not the best option. Freezing can change the texture of the feta and yogurt. If you still want to freeze it, use a freezer-safe container. Make sure to remove as much air as possible. You can keep it in the freezer for up to a month. When ready to eat, thaw it in the fridge overnight before serving. I recommend using classic feta cheese for this salad. Classic feta has a tangy and salty taste. It crumbles well and mixes nicely with the other ingredients. You can also try flavored feta. Flavored feta may include herbs or spices. These add different tastes to your pasta salad. However, classic feta keeps the dish light and fresh. Yes, you can make this pasta salad ahead of time. I suggest preparing it at least two hours before serving. This allows the flavors to mingle well. You can also store it in the fridge overnight. Just be sure to stir it before serving. This will help mix the dressings again. If you don't have Greek yogurt, you can try sour cream. Sour cream gives a similar creamy texture. Another option is cream cheese. Just mix it well to keep it smooth. For dairy-free options, consider using coconut yogurt. Almond or cashew yogurt also works well. These will change the flavor slightly but still taste great. For the complete list of ingredients and instructions, check out the [Full Recipe](#). In this blog post, we explored how to make a delicious creamy feta pasta salad. We covered the key ingredients, including fusilli, feta cheese, and fresh veggies. You learned the best cooking methods and how to create the perfect dressing. I shared tips to enhance flavor and storage advice for leftovers. Ready to impress your friends with this dish? A creamy feta pasta salad will please everyone. Enjoy making it and let the flavors shine!](https://dailydishly.com/wp-content/uploads/2025/07/1e04cd5b-2977-4013-97be-e6e1a5f7ba16-300x300.webp)
![- 2 cups cooked chicken, shredded - 1 cup shredded cheddar cheese - 1 cup shredded Monterey Jack cheese - 1/2 cup cream cheese, softened - 1/4 cup sour cream The star of this dish is cooked chicken. I love using rotisserie chicken for its ease and flavor. You can shred it quickly. Next, we have the cheeses. Cheddar adds a nice sharpness, and Monterey Jack brings creaminess. Cream cheese and sour cream add richness and help bind everything together. - 1 medium red bell pepper, diced - 1 medium green bell pepper, diced - 1 small red onion, finely chopped For the veggies, I pick bright bell peppers and a red onion. They add color and crunch. Dicing these finely helps them mix well into the filling. You can use other peppers if you like. Feel free to experiment! - 1 tablespoon taco seasoning - 8 large flour tortillas Taco seasoning gives the quesadillas a zesty kick. It’s easy to make your own or buy it pre-made. The tortillas hold all the goodness together. I recommend large flour tortillas for a sturdy base. You can find the full recipe with all the steps right here: [Full Recipe]. Shredding the chicken Start by shredding 2 cups of cooked chicken. I often use rotisserie chicken for this. It saves time and adds great flavor. Use two forks to pull apart the meat into bite-sized pieces. Preparing the vegetables Next, chop up your veggies. Dice 1 medium red bell pepper and 1 medium green bell pepper. Finely chop 1 small red onion. These veggies add color and crunch. Set them aside for later. Layering the filling In a large bowl, mix the shredded chicken with cheese, cream cheese, sour cream, and the chopped veggies. Add 1 tablespoon of taco seasoning to bring it all together. Stir until everything combines well. Creating the quesadilla stacks Lay out 4 large flour tortillas on a flat surface. Spread the chicken filling evenly over each tortilla. Make sure to cover the edges for a tasty bite. Place another tortilla on top of each filled tortilla. Preheating the oven Preheat your oven to 400°F (200°C). This will ensure the quesadillas cook evenly and get that nice golden color. Time and temperature for baking Line a large baking sheet with parchment paper. Carefully transfer the quesadilla stacks to the sheet. Brush the tops with 1 tablespoon of olive oil. Bake for 15-20 minutes until golden brown and the cheese melts. For the full process, check out the Full Recipe. To achieve the right crunch, use high-quality tortillas. Flour tortillas are soft and easy to handle. They also crisp up nicely in the oven. Brush the tops with olive oil before baking. This helps them brown evenly. Bake until golden brown, about 15 to 20 minutes. Let the quesadillas cool for a few minutes. This helps the filling set a bit before you cut them. If you want to mix it up, you can change the protein. Shredded beef or pork works great too. You can even try black beans for a vegetarian option. For cheese, feel free to switch to pepper jack for some heat. You can also use gouda or feta for a different flavor. Just make sure to keep the same amount of cheese. Serve your quesadillas with salsa and guacamole for a fresh touch. You can also add sour cream for extra creaminess. Fresh cilantro makes a great garnish. It adds a pop of color and flavor. Try adding some pickled jalapeños for a spicy kick. These simple sides make your meal even better. Want more ideas? Check out the Full Recipe for more tips! {{image_2}} You can easily change up the taste of your cheesy sheet pan chicken quesadillas. Start by adding spices or herbs. A pinch of cumin or smoked paprika can give a warm, smoky flavor. Fresh herbs like cilantro or parsley add brightness. Try garlic powder for a bold kick. These simple additions can make your dish stand out. Not everyone loves chicken, and that’s okay! You can swap the chicken for beans or veggies. Black beans or pinto beans work great as a protein. Use mushrooms, zucchini, or even spinach for a fresh twist. These vegetarian alternatives are healthy and tasty. You’ll get a whole new dish while keeping it easy and fun. Tortillas don’t have to be boring. You can mix it up by using different types. Try corn tortillas for a gluten-free option. Whole wheat tortillas add extra fiber. You can even use flavored tortillas, like spinach or sun-dried tomato, to add color and taste. These fun twists keep your meal exciting while still being simple to prepare. For the full recipe, be sure to check out the complete details! To keep your cheesy sheet pan chicken quesadillas fresh, store them in an airtight container. Let them cool completely before sealing. This helps prevent sogginess. You can keep them in the fridge for about 3 to 4 days. If you want to enjoy them later, make sure to label the container with the date. If you want to freeze your quesadillas, it’s best to do this before baking. After assembling the quesadillas, wrap each one tightly in plastic wrap. Place the wrapped quesadillas in a freezer bag or container. They can last for up to 3 months in the freezer. When you’re ready to eat, thaw them in the fridge overnight before baking. The best way to reheat quesadillas is in the oven. Preheat your oven to 350°F (175°C). Place the quesadillas on a baking sheet and heat for about 10-15 minutes, or until warm and crisp. You can also use a skillet on the stove. Just heat over medium heat for about 3-4 minutes on each side. This keeps the quesadilla crispy. Avoid using a microwave, as it can make them soggy. Yes, you can use frozen chicken. To thaw it quickly, place the chicken in a sealed bag. Then, submerge the bag in cold water for about 30 minutes. Change the water every 10 minutes to speed up the process. Once thawed, cook the chicken fully before using it in your quesadillas. To make gluten-free quesadillas, use gluten-free tortillas. Many brands offer good options made from corn or rice. Always check the package to ensure they meet your needs. You can find these tortillas at most grocery stores. Quesadillas taste great with many dips. Consider serving them with salsa, guacamole, or sour cream. You can also try a zesty cheese dip for an extra treat. Each dip adds a fun flavor that enhances your meal. Yes, you can make quesadillas ahead of time. Assemble them and store them in the fridge for a day. You can also freeze them for longer storage. Just remember to use parchment paper between layers to keep them from sticking. When ready to eat, just bake them directly from the fridge or freezer. Enjoy your easy dinner delight! For the full recipe, check out the earlier section. In this blog post, I shared how to make delicious quesadillas. We covered the key ingredients like cooked chicken, cheeses, and vibrant veggies. You learned to prep, assemble, and bake your quesadillas perfectly. I also shared tips for crunch, substitutions, and serving ideas. Always remember, you can switch ingredients to suit your taste. Enjoy experimenting with flavors and textures. With these steps, you’ll create satisfying quesadillas that everyone will love. Happy cooking!](https://dailydishly.com/wp-content/uploads/2025/07/9e515845-1856-4bb5-82ee-80ca33afd87d-768x768.webp)