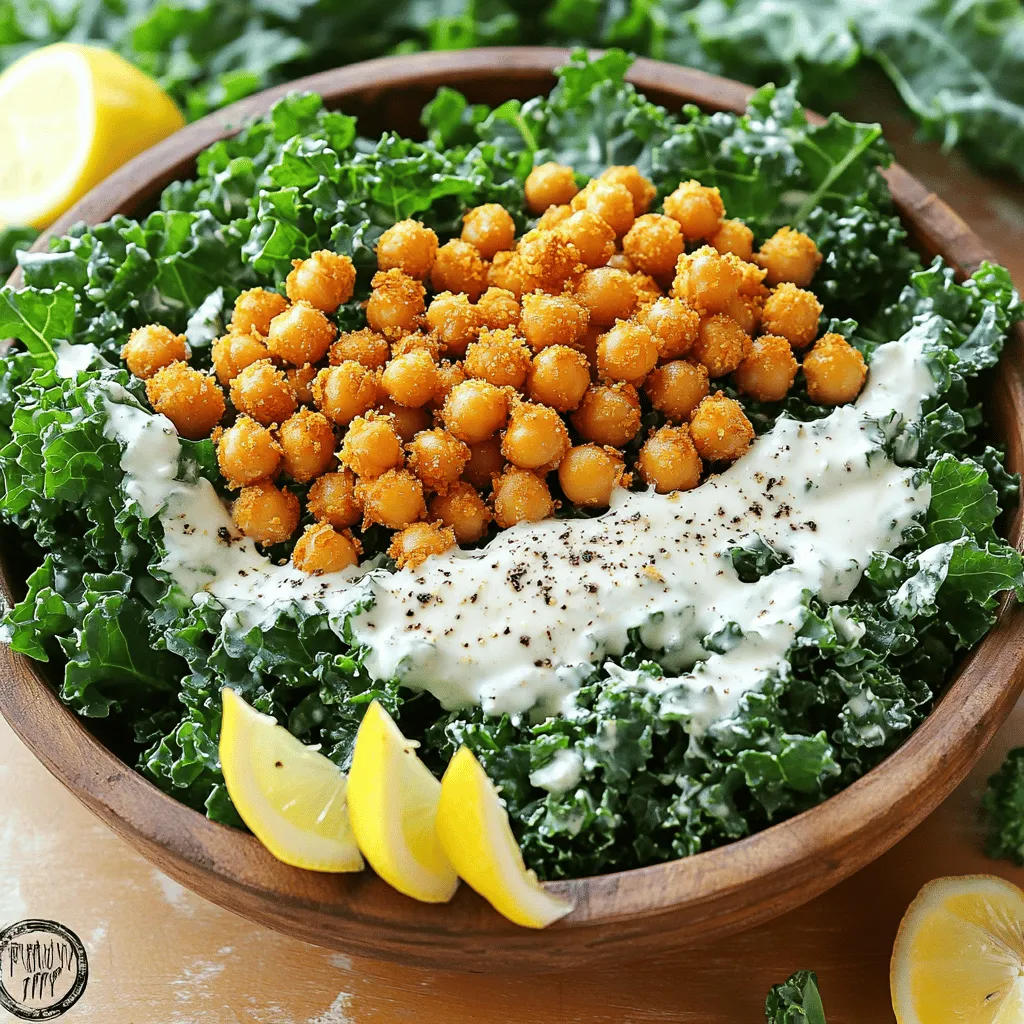
Kale Caesar Salad with Crispy Chickpeas Delight

Ready to enjoy a fresh twist on a classic? This Kale Caesar Salad with Crispy Chickpeas combines crunchy greens and savory flavors in a fun and healthy way. I’ll guide you through easy steps to make this vibrant dish, packed with goodness. Whether you stick to the classic recipe or experiment with toppings, this salad will delight your taste buds. Let’s dive in and get cooking!
Ingredients
List of Ingredients
– 1 bunch of kale, stems removed and leaves chopped
– 1 can (15 oz) chickpeas, drained and rinsed
– 2 tablespoons olive oil (divided)
– Salt and pepper to taste
– 1/4 cup grated Parmesan cheese (or nutritional yeast for a vegan option)
– 1/2 cup Greek yogurt (or a vegan alternative)
– 2 tablespoons lemon juice
– 1 tablespoon Dijon mustard
– 1 clove garlic, minced
– 1/4 cup whole wheat croutons (optional)
– Freshly cracked black pepper for garnish
This list gives you everything you need for a tasty Kale Caesar Salad with Crispy Chickpeas. Fresh kale is the star here, with its sturdy leaves that hold up well. Chickpeas add protein and crunch, making the salad filling.
Olive oil is key to making the chickpeas crispy and adding flavor to the kale. Salt and pepper enhance all the tastes. For a cheesy kick, you can use grated Parmesan cheese or nutritional yeast if you prefer a vegan dish.
The dressing includes Greek yogurt for creaminess, which you can swap for a vegan yogurt if needed. Lemon juice brings brightness, while Dijon mustard and garlic add a punch.
If you want to elevate the salad, consider adding whole wheat croutons for extra texture. Finally, sprinkle freshly cracked black pepper on top to finish it off.
Step-by-Step Instructions
Preparation Overview
First, preheat your oven to 400°F (200°C). This is key for roasting the chickpeas. Next, we need to prepare the kale. Grab a large bowl and add the chopped kale leaves. Drizzle one tablespoon of olive oil over the kale. Now, massage the leaves for about 2-3 minutes. This step makes the kale tender and easier to eat.
Detailed Cooking Steps
For the chickpeas, rinse and drain them well. Place them on a baking sheet. Toss the chickpeas with one tablespoon of olive oil, salt, and pepper. Spread them out evenly on the sheet. Roast them in the oven for 25-30 minutes. They should turn golden brown and crispy. Don’t forget to shake the pan halfway through cooking to ensure even crispiness.
While the chickpeas roast, let’s make the dressing. In a small bowl, mix Greek yogurt, lemon juice, Dijon mustard, minced garlic, and half the grated Parmesan cheese. Whisk until smooth. Taste and adjust with salt and pepper as needed.
Combining Ingredients
Once the chickpeas are crispy, take them out of the oven. Now, toss the massaged kale with the dressing until it’s well coated. Add the crispy chickpeas on top, along with croutons if you want some extra crunch. Mix gently to combine everything. Serve your Kale Caesar Salad with crispy chickpeas topped with the remaining Parmesan cheese and a sprinkle of freshly cracked black pepper. Enjoy this delicious meal!
Tips & Tricks
How to Perfect Crispy Chickpeas
To make crispy chickpeas, start by ensuring they are dry. After draining and rinsing, pat them with a towel. This removes moisture. Next, toss the chickpeas in olive oil, salt, and pepper. Spread them evenly on a baking sheet. Roast them in a preheated oven at 400°F for 25-30 minutes. Shake the pan halfway through to ensure even cooking. You want them golden brown and crunchy.
For seasoning, try adding garlic powder or smoked paprika. These spices add great flavor. Balance is key. You want enough seasoning to taste but not overwhelm the chickpeas.
Enhancing the Salad Flavor
To add more flavor, consider toppings like cherry tomatoes or avocado slices. These fresh ingredients add color and taste. You can also use nuts like almonds or walnuts for crunch.
For a creamy dressing, Greek yogurt is perfect. It adds a rich texture. Mix it with lemon juice, Dijon mustard, and minced garlic. This blend creates a zesty flavor. You can replace Greek yogurt with a vegan alternative if needed.
Presentation Suggestions
When serving, use large bowls or a platter. This creates a family-style meal. Layer the kale and chickpeas for a colorful look. Top with extra crispy chickpeas and lemon wedges. These garnishes add brightness.
For visual appeal, sprinkle freshly cracked black pepper on top. This simple touch enhances the salad’s look and taste. You can also add fresh herbs like parsley for a pop of color. This makes your Kale Caesar Salad with Crispy Chickpeas even more inviting!
Variations
Different Greens
You can switch out kale for other greens. Try romaine, spinach, or even arugula. Each green brings its own taste and crunch. Mixing greens can make your salad fun and unique. You can also add other salad ingredients. Think about cherry tomatoes, cucumbers, or bell peppers. These add color and flavor to your dish.
Protein Additions
Want to make your salad heartier? Add some protein! Grilled chicken works well and adds great flavor. If you’re vegan, try adding tofu. Just sauté it until golden. This way, you create a well-balanced meal. Protein helps you feel full longer. You can also mix in beans or lentils for a plant-based option.
Dressing Alternatives
Switch up your dressing for different flavors. You can use tahini or avocado for a creamy touch. A vinaigrette made from olive oil and balsamic vinegar is also tasty. For a vegan option, mix hummus with water to thin it out. This gives a nice texture and taste. Feel free to experiment with your favorite herbs and spices too!
Storage Info
Proper Storage Techniques
To keep your Kale Caesar Salad fresh, store leftovers in the fridge. Use an airtight container to seal in moisture. You can also separate the crispy chickpeas from the salad. This keeps them crunchy. Storing them together can make the chickpeas soggy. If you have leftover dressing, keep it in a small jar or container.
Shelf Life
The salad components last about three days in the fridge. The kale will stay fresh for longer if you wash it properly. Chickpeas can last up to five days when stored well. Watch for signs of spoilage. If the kale wilts or turns brown, it’s time to toss it. Also, check for a sour smell or strange textures in the dressing.
Reheating Tips
Crispy chickpeas taste best when reheated in the oven. Preheat the oven to 350°F (175°C). Spread the chickpeas on a baking sheet and heat for about 10 minutes. This helps them regain their crunch. Avoid using the microwave, as it makes them chewy. Enjoy your salad fresh, with crispy chickpeas on top for the best flavor and texture.
FAQs
Can I make this salad ahead of time?
Yes, you can prep parts of this salad in advance. Here are some tips:
– Wash and chop the kale a day before. Store it in a sealed bag.
– Roast the chickpeas earlier and keep them in an airtight container.
– Mix your dressing and store it in the fridge. This keeps it fresh.
– Combine the kale, chickpeas, and dressing just before serving. This way, the salad stays crisp.
What can I substitute for Parmesan cheese?
If you want a dairy-free option, try these vegan cheese alternatives:
– Nutritional yeast gives a cheesy flavor. Use it in the same amount as Parmesan.
– Vegan Parmesan is also available in stores. It adds a similar taste.
– Blended cashews can create a creamy texture. Soak them in water and blend until smooth.
These options keep your salad tasty while fitting your dietary needs.
How do I make this recipe gluten-free?
To make this salad gluten-free, follow these options:
– Use gluten-free croutons or skip them altogether. You can add nuts for crunch.
– Ensure that your Dijon mustard is gluten-free. Most brands are, but check the label.
– The rest of the ingredients are naturally gluten-free. This makes the salad easy to adapt.
By making these small changes, you can enjoy a safe, gluten-free meal.
This blog post covered how to make a tasty kale salad with crispy chickpeas. We explored ingredients, step-by-step cooking, tips for great flavor, and storage ideas. You can easily swap out ingredients or add proteins to fit your taste. Remember, making this salad ahead saves time and keeps your meals fresh. Enjoy experimenting with flavors and variations. Happy cooking!

![- 8 oz fusilli or rotini pasta - 1 cup cherry tomatoes, halved - 1 cup cucumber, diced - 1/2 cup red bell pepper, diced - 1/4 cup red onion, finely chopped - 1/2 cup Kalamata olives, pitted and sliced - 1/3 cup fresh basil leaves, torn - 1/4 cup crumbled feta cheese (optional) - 1/4 cup olive oil - 3 tablespoons fresh lemon juice - 1 teaspoon lemon zest - 1 teaspoon honey or maple syrup - Salt and pepper to taste In this Lemon Basil Pasta Salad, I use fresh and vibrant ingredients. The pasta holds the flavors well. I like using fusilli or rotini because they catch the dressing and veggies nicely. Cherry tomatoes add a pop of color and sweetness. They brighten the salad. Cucumbers bring a cool crunch. Red bell pepper adds sweetness and color too. The red onion gives a nice bite, while Kalamata olives add a salty touch. Fresh basil is the star here. Its aroma and flavor are amazing. I often tear the leaves to release their oils. If you want, you can add crumbled feta cheese for a creamy texture. For the dressing, I mix olive oil, fresh lemon juice, lemon zest, and honey or maple syrup. This blend makes the salad bright and zesty. I also add salt and pepper to balance the flavors. Remember, you can find the full recipe at the end of the article. This salad is not just tasty; it looks great too. It’s perfect for gatherings or a simple meal at home! Start by bringing a large pot of salted water to a boil. Use about 1 tablespoon of salt for every 4 quarts of water. Add the pasta once the water is boiling. Cook it according to the package instructions until it is al dente. This usually takes about 8 to 10 minutes. After it cooks, drain the pasta and rinse it under cold water. This helps cool it down quickly, so it won’t cook anymore. While the pasta cooks, chop your vegetables. Use a sharp knife for clean cuts. I like to slice the cherry tomatoes in half and dice the cucumber and bell pepper into small pieces. Finely chop the red onion to add a nice bite. In a large mixing bowl, combine the chopped cherry tomatoes, cucumber, red bell pepper, red onion, and Kalamata olives. This mix brings bright colors and flavors to your salad. In a small bowl, whisk together the olive oil, lemon juice, and lemon zest. Add honey or maple syrup for a touch of sweetness. A pinch of salt and pepper helps balance the flavors. Whisk until all the ingredients blend well. This dressing should be bright and tangy, perfect for your salad. Now, it’s time to mix everything. Add the cooled pasta to the vegetable bowl. Pour the dressing over the pasta and vegetables. Gently toss everything together so that the pasta and veggies are evenly coated. This ensures every bite is full of flavor. Lastly, fold in the torn basil leaves and crumbled feta cheese if you choose to include it. Cover the salad with plastic wrap and place it in the fridge. Let it chill for at least 30 minutes. This waiting time allows the flavors to meld together nicely. For covering, you can also use a large bowl with a lid. Chilling the salad enhances its taste and makes it refreshing when served. For the full recipe, check out the details above. Enjoy your Lemon Basil Pasta Salad! To get the best taste, store the pasta until you’re ready to mix. This keeps it from getting soggy. Rinse the pasta in cold water after cooking. This cools it down and stops the cooking. Adjusting seasoning is key. Always taste your salad before serving. If it needs more flavor, add salt, pepper, or lemon juice. A little extra lemon juice can brighten everything up. For a wow factor, garnish your salad with more fresh basil leaves. Thin lemon slices also add a nice touch. Serve the salad in a big, colorful bowl to catch the eye. Individual plates work well, too, for a personal touch. Pre-preparing ingredients can save time. Chop your veggies the day before. This makes cooking day easier. You can also make the dressing ahead of time. Store it in the fridge until you're ready to mix everything. For quick dressing options, try a simple mix of olive oil and lemon juice. This adds flavor fast and keeps it healthy. You can find the full recipe for Lemon Basil Pasta Salad [Full Recipe]. {{image_2}} You can change the vegetables in your Lemon Basil Pasta Salad. Consider using: - Zucchini, diced small - Spinach, chopped - Broccoli florets, blanched These swaps keep the dish fresh and exciting. You can also try different pasta shapes like: - Penne - Farfalle - Whole wheat pasta These changes can enhance the taste and texture of your salad. To make the salad more filling, add some proteins. Great options include: - Grilled chicken, diced - Shrimp, cooked and peeled - Chickpeas, drained and rinsed If you prefer vegetarian options, try: - Black beans - Edamame - Tofu, cubed and sautéed These additions make the dish heartier while keeping it flavorful. You can play with the dressing to fit your taste. For citrus variations, consider: - Lime juice instead of lemon - Orange juice for a sweet twist If you want a creamy dressing, try: - Greek yogurt mixed with lemon juice - A creamy vinaigrette made with tahini These alternatives can add new layers of flavor to your Lemon Basil Pasta Salad. For the full recipe, check out the detailed instructions above. Enjoy your cooking! To keep Lemon Basil Pasta Salad fresh, store it in an airtight container. This helps prevent drying out. Place the salad in the fridge right after serving. It will stay good for about 3 to 5 days. Keep an eye on the vegetables. If they start to look mushy, it's time to toss them. Yes, you can freeze this salad, but it's best to leave out the fresh herbs and cheese. These ingredients do not freeze well. If you want to freeze it, do so in a freezer-safe container. This way, you can enjoy it later. When you're ready to eat, thaw it in the fridge overnight. This keeps the flavors intact. When you reheat the salad, avoid using the microwave. This can make the pasta too mushy. Instead, let it come to room temperature on its own. You can also serve it cold straight from the fridge. If you want it warm, mix it with a little olive oil in a pan over low heat. This will keep the flavors bright and fresh. You can prepare this salad a day in advance. Store it in an airtight container. Keep it in the fridge. This way, the flavors blend well. When ready to serve, give it a quick toss. If it seems dry, add a bit more olive oil or lemon juice. This pasta salad pairs well with grilled chicken or fish. It also goes great with fresh bread or a side of fruit. You can serve it at picnics or barbecues. It makes a perfect light lunch or dinner. Yes, you can make it your own! Add your favorite veggies or proteins. Try roasted peppers or artichokes for extra flavor. You can even swap the feta for goat cheese. Make it suit your taste! Yes, you can make this salad gluten-free. Use gluten-free pasta like rice or quinoa pasta. These options work well. They will keep the dish delicious and light. The salad lasts about 3 days in the fridge. Store it in a tight container. The flavors will stay fresh, but the veggies may soften. Enjoy it within this time for the best taste. You can find the Full Recipe for more details. This blog post covers how to make a tasty Lemon Basil Pasta Salad. We discussed the best ingredients, how to prepare them, and smart tips for a perfect dish. With simple steps and easy variations, you can customize it to fit your taste. Remember, letting the salad chill enhances its flavor. Enjoy this dish at your next gathering! It’s fresh, easy, and packed with flavor, making it a hit for everyone. Dive in and experiment using your favorite ingredients!](https://dailydishly.com/wp-content/uploads/2025/07/2e0c17ed-3df4-4b24-b113-5392c2bd150f-768x768.webp)