
Slow Cooker Pumpkin Turkey Meatballs Savory Delight
Looking for a delicious, easy recipe? Try my Slow Cooker Pumpkin Turkey Meatballs. This dish combines savory flavors with nutritious pumpkin, making it perfect for any meal. Whether you’re cooking for your family or hosting friends, these meatballs are sure to impress. I’ll share all the ingredients, tips, and tricks you need for a tasty success. Let’s dive in and create a savory delight that you’ll love!
Ingredients
List of Ingredients
– 1 lb ground turkey
– 1 cup canned pumpkin puree
– 1/2 cup breadcrumbs (preferably whole wheat)
– 1/4 cup grated Parmesan cheese
– 1 egg, beaten
– 2 cloves garlic, minced
– 1 teaspoon dried oregano
– 1 teaspoon ground cumin
– 1 teaspoon onion powder
– Salt and pepper to taste
– 1 jar (24 oz) marinara sauce
– Fresh parsley, chopped (for garnish)
Kitchen Tools Needed
To make these meatballs, you will need a few simple tools:
– Large mixing bowl
– Measuring cups and spoons
– Mixing spoon or fork
– Slow cooker
– Non-stick cooking spray
– Baking sheet (optional for shaping)
Optional Ingredients for Customization
You can get creative with your meatballs by adding these ingredients:
– Chopped spinach or kale for extra greens
– Red pepper flakes for some heat
– Different herbs like basil or thyme for flavor
– Cheese like mozzarella for a cheesy twist
Step-by-Step Instructions
Preparing the Meatball Mixture
Start by gathering your ingredients. You will need ground turkey, canned pumpkin, breadcrumbs, Parmesan cheese, an egg, garlic, herbs, salt, and pepper. In a big bowl, mix the ground turkey and pumpkin puree first. Then, add the breadcrumbs and Parmesan cheese for flavor. Next, pour in the beaten egg for binding. Add the minced garlic, oregano, cumin, onion powder, salt, and pepper. Use your hands or a fork to blend everything well. Make sure all parts are combined, so every meatball tastes great.
Shaping the Meatballs
Now it’s time to shape the mixture into meatballs. Take a small amount of the mixture and roll it in your hands. Aim for meatballs about 1.5 inches wide. This size cooks evenly and is easy to eat. Place the meatballs on a clean plate as you shape them. You can keep your hands slightly wet to help prevent sticking. If you want, you can add extra Parmesan on top for more taste.
Cooking in the Slow Cooker
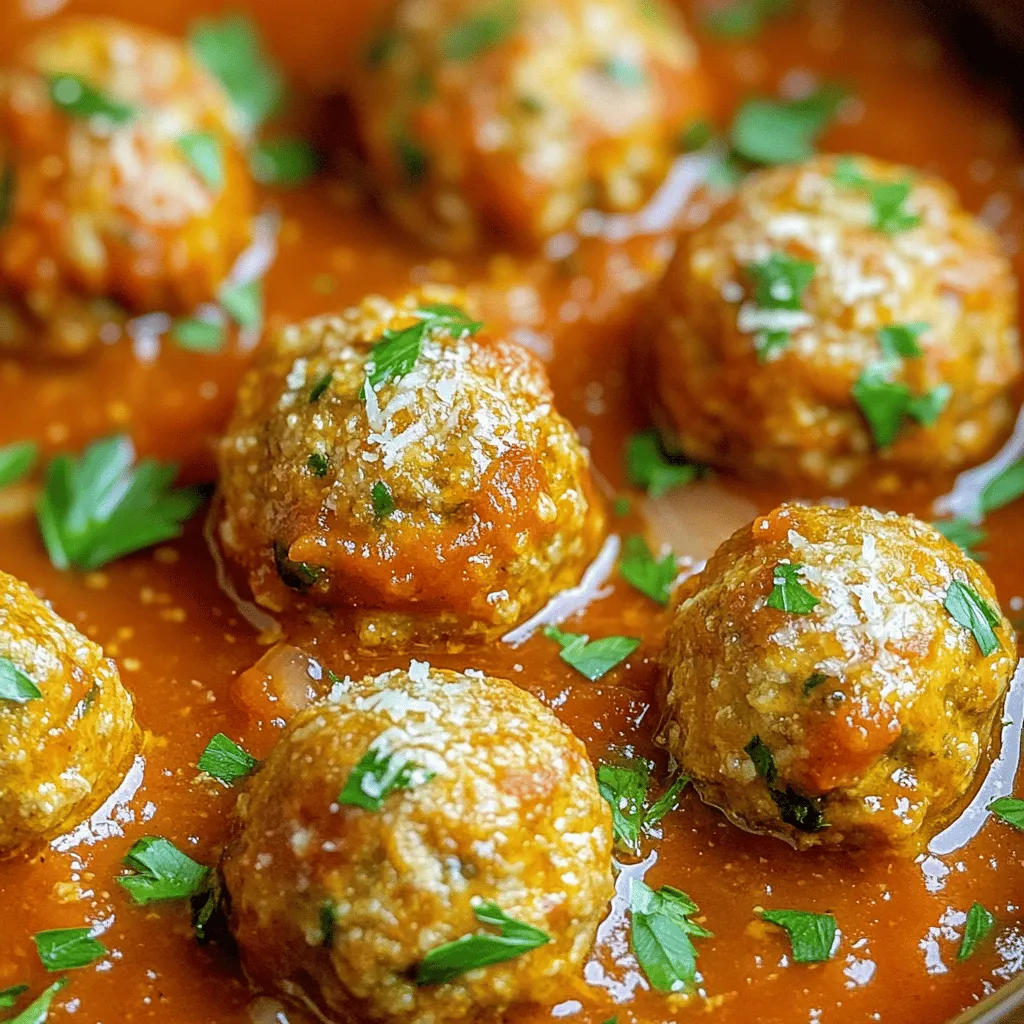
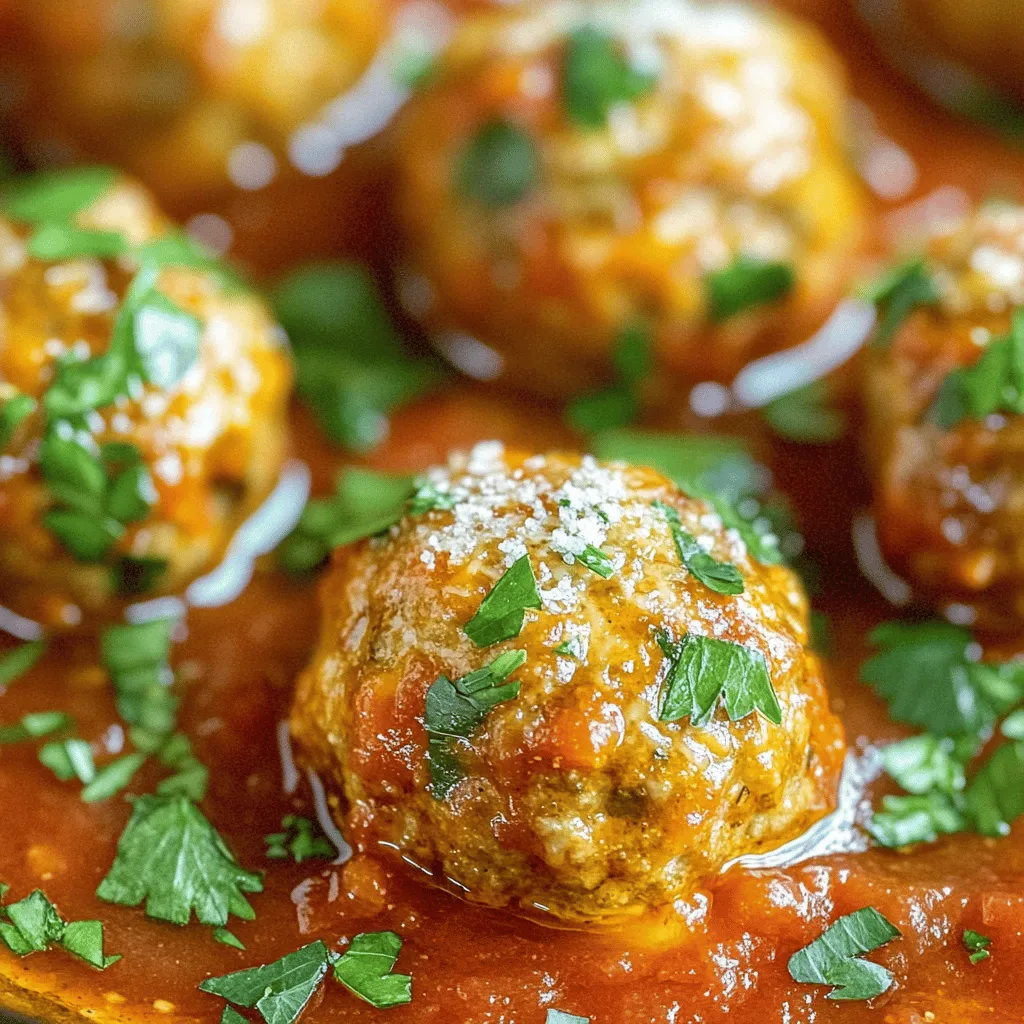
Before cooking, lightly spray the slow cooker with non-stick spray. This step helps prevent the meatballs from sticking. Place the meatballs in a single layer in the slow cooker. Make sure they fit well without crowding. Now, pour the marinara sauce over the meatballs, covering them mostly. The sauce adds moisture and flavor. Cover the slow cooker and set it on low for 6-7 hours, or high for 3-4 hours. Check that the meatballs reach an internal temperature of 165°F to ensure they are cooked through. Once done, gently stir the meatballs in the sauce. This step helps them soak in more flavor. Enjoy a delicious meal!
Tips & Tricks
How to Make Meatballs Moist
To keep your meatballs moist, use canned pumpkin puree. The pumpkin adds moisture and flavor. Avoid overmixing the meatball mixture. This can make them tough. Instead, mix just until it’s blended. Also, don’t skip the egg. It helps bind the ingredients and adds moisture.
Adjusting Seasoning for Taste
Taste is key. Start with the basic seasoning in the recipe. You can add more garlic or spices if you like. If you want it spicier, try red pepper flakes. For a herby flavor, mix in fresh herbs like basil or thyme. Always taste the raw mixture before cooking. This way, you can adjust to your liking.
Serving Suggestions and Pairings
Serve these meatballs with a side of pasta or rice. They also work well in a sub sandwich. Top with extra marinara sauce and some cheese for a tasty twist. Pair with a simple salad for a fresh crunch. Don’t forget to sprinkle fresh parsley on top for color and flavor!
Variations
Substituting Ground Turkey with Other Meats
You can swap ground turkey for other meats. Ground chicken works well and has a mild taste. If you want something richer, use ground beef or pork. These meats add flavor but also more fat. For a lighter option, consider ground chicken or turkey sausage. Each choice offers a unique taste.
Making It Gluten-Free
To make this recipe gluten-free, substitute regular breadcrumbs. Use gluten-free breadcrumbs or crushed gluten-free crackers. You can even use oats as a binder. Just blend them finely before mixing. This way, you keep the texture while making it safe for gluten-sensitive eaters.
Adding Vegetables for Nutritional Boost
Adding vegetables makes these meatballs even better. You can mix in finely chopped spinach or zucchini. These add vitamins and moisture. Carrots or bell peppers are also great choices. Just make sure to chop them small. This keeps the meatballs from falling apart. Experiment with your favorite veggies for extra flavor!
Storage Info
Refrigerating Leftovers
After enjoying your slow cooker pumpkin turkey meatballs, store any leftovers in the fridge. Place them in an airtight container. They will stay fresh for about 3 to 4 days. Be sure to let the meatballs cool down before sealing the container. This helps keep them moist and tasty.
Freezing Meatballs
You can freeze meatballs if you want to save them for later. First, let them cool completely. Then, place the meatballs in a single layer on a baking sheet. Freeze them for about an hour until they are firm. After that, transfer the meatballs to a freezer-safe bag or container. They can last up to 3 months in the freezer. When you’re ready to eat, simply thaw them in the fridge overnight.
Reheating Instructions
To reheat your meatballs, you have a few options. You can use the microwave, the oven, or the stove. For the microwave, place the meatballs in a bowl and cover them. Heat on high for 1-2 minutes, checking to see if they are warm. If using the oven, preheat it to 350°F. Place the meatballs in a baking dish and cover with foil. Heat for about 15-20 minutes. On the stove, add a splash of marinara sauce to a pan and warm it over low heat. Add the meatballs and stir gently until heated through. Enjoy your meal!
FAQs
Can I use fresh pumpkin instead of canned?
Yes, you can use fresh pumpkin. Start by cutting the pumpkin and removing the seeds. Then, roast it until soft. After that, scoop out the flesh and mash it. Use this fresh puree in place of the canned pumpkin. It adds a nice, fresh taste to your meatballs.
How do I know when the meatballs are fully cooked?
The best way to check is with a meat thermometer. Insert it into the center of a meatball. It should read 165°F. If you don’t have a thermometer, look for the meatballs to be firm and not pink inside. They should have a nice golden brown color on the outside.
What can I serve with slow cooker pumpkin turkey meatballs?
There are many great sides! Here are a few ideas:
– Cooked pasta or zucchini noodles
– Rice or quinoa
– A fresh green salad
– Garlic bread or crusty rolls
These options pair well with the rich flavors of the meatballs and sauce. You can mix and match based on your taste!
This article covered how to make delicious slow cooker pumpkin turkey meatballs step by step. We explored the best ingredients, tools, and tips to enhance flavor. Customizing with different meats or veggies makes it your own. Remember to store leftovers properly for later enjoyment.
Cooking can be easy and fun. Enjoy making these meatballs for your family and friends. You’ll impress everyone with your tasty skills!


![To make vegan lentil sloppy joes, these key ingredients are a must: - 1 cup green or brown lentils, rinsed - 1 small onion, finely chopped - 2 cloves garlic, minced - 1 red bell pepper, diced - 1 carrot, grated - 2 tablespoons tomato paste - 1 cup vegetable broth - 1 tablespoon soy sauce or tamari - 2 tablespoons maple syrup - 1 teaspoon smoked paprika - 1 teaspoon cumin - Salt and pepper to taste - 4 whole wheat burger buns - Fresh parsley, chopped (for garnish) These ingredients create a hearty, flavorful mix. The lentils give protein and fiber. The veggies add crunch and sweetness. You can also add these optional ingredients for a twist: - Jalapeños for heat - Mushrooms for umami - Corn for sweetness - Avocado for creaminess These ingredients can elevate your dish. Feel free to mix and match to find your favorite flavor. Lentils are a powerhouse of nutrition. They are high in protein, which is great for vegans. Here are some benefits: - High in Fiber: Helps with digestion and keeps you full. - Rich in Iron: Supports energy levels and overall health. - Low in Fat: A smart choice for heart health. - Packed with Vitamins: Includes B vitamins, which help with metabolism. Incorporating lentils into your meals is a smart move for your health. They make a tasty and nutritious base for this dish. You can find the full recipe above to get started on your tasty vegan adventure! Start by rinsing 1 cup of green or brown lentils. Put them in a medium pot. Add 3 cups of water. Bring the water to a boil. Then, lower the heat to a simmer. Cook the lentils for about 25 to 30 minutes. They should be tender when done. Once cooked, drain any extra water and set the lentils aside. This step is key for a hearty filling. Next, grab a large skillet. Heat a little water or vegetable broth over medium heat. Add the finely chopped onion and minced garlic. Cook them for about 3 to 4 minutes until they soften. Then, stir in the diced red bell pepper and grated carrot. Cook these veggies for another 5 minutes, until they start to soften. This mix adds great flavor and crunch. Now it's time to bring everything together. Add the cooked lentils to the skillet. Then, mix in 2 tablespoons of tomato paste, 1 cup of vegetable broth, and 1 tablespoon of soy sauce. Don’t forget 2 tablespoons of maple syrup for a touch of sweetness. Next, sprinkle in 1 teaspoon of smoked paprika and 1 teaspoon of cumin. Stir well to combine all the flavors. Let the mixture simmer for about 10 to 15 minutes. This will help it thicken nicely. Taste and season with salt and pepper as needed. For the complete recipe, refer to the [Full Recipe]. This dish will make your taste buds dance! To get a thick and hearty Sloppy Joe, you want to simmer the lentil mixture well. After adding all your ingredients, let it cook for about 10-15 minutes. Stir often to avoid sticking. If it gets too thick, add a splash of vegetable broth. This keeps it moist and tasty. The perfect texture is key for a great bite. You can make your Sloppy Joes your own! Try adding different spices, like chili powder or oregano. Want more heat? Add diced jalapeños or a splash of hot sauce. You can also swap the maple syrup for agave nectar. If you love smoky flavors, consider extra smoked paprika. Each twist brings a new flavor, making it fun to explore. Make cooking easier with a few tricks! Chop your veggies ahead of time. You can store them in the fridge for a few days. Also, cook a big batch of lentils and freeze some for later. This meal can be ready in about 30 minutes if you prep smart. For a quick assembly, toast the buns while the mixture simmers. Get the full recipe for more details on each step! {{image_2}} Want some heat? You can turn your lentil sloppy joes into a spicy treat. Add diced jalapeños or a splash of hot sauce to the mix. You can even swap smoked paprika for cayenne for more kick. Spice lovers will enjoy this twist. Adjust the heat to your taste. You can always add more later! If you need a gluten-free meal, don't worry! Use gluten-free buns instead of whole wheat. Many brands offer tasty options. Just check the label to be sure. You can also serve the lentil mix in lettuce wraps. This keeps it light and fresh. Enjoy the same great flavors without the gluten. Looking to cut carbs? Try serving the lentil mix over cauliflower rice. This gives you a tasty base without the bread. Another option is to use portobello mushrooms as buns. They add great flavor and texture. This way, you enjoy all the taste and still stay low-carb. For the full recipe, check out the instructions above. After making your vegan lentil sloppy joes, you can store leftovers easily. Let the mixture cool down first. Transfer it to an airtight container. It will stay fresh for 3 to 5 days in the fridge. Make sure to keep it separate from the buns. This keeps the buns from getting soggy. You can freeze the lentil mixture for later use. Put the cooled lentil mix in a freezer-safe container. It can last for up to 3 months in the freezer. When you're ready to eat, just thaw it in the fridge overnight. This way, you have a quick meal ready on busy days. To reheat, you can use a stovetop or microwave. If using the stovetop, place the lentil mix in a pan over low heat. Stir occasionally until it's hot. If using a microwave, put it in a microwave-safe bowl and heat in short bursts. Stir between each burst for even heating. Make sure to toast the buns again for that perfect crunch. You can enjoy your delicious vegan lentil sloppy joes just like the first time! For the full recipe, check out the previous section. I recommend using green or brown lentils for this recipe. These lentils hold their shape well when cooked. They also have a nice, earthy flavor that works great in sloppy joes. Red lentils can cook down too much and become mushy, so they are not ideal here. Yes, you can make this recipe ahead of time. The lentil mixture stores well in the fridge for up to five days. Just keep it in an airtight container. When you're ready to eat, simply reheat it on the stove or in the microwave. This makes it perfect for meal prep or busy weeknights. To make this dish less spicy, you can adjust the ingredients. Skip the smoked paprika if you find it too strong. You can also reduce the amount of garlic. Adding a little more maple syrup can balance the heat too, making it sweeter. Enjoy it mild or spicy, depending on your taste! For the full recipe, check out the complete guide on Vegan Lentil Sloppy Joes. In this blog post, we explored how to make tasty vegan lentil sloppy joes. We discussed key ingredients and their benefits, prepared the lentils, and combined everything into a delicious sauce. I shared tips for perfecting the dish and offered variations for spice and dietary needs. These sandwiches are easy to store and reheat. Whether you're new to cooking or a pro, this recipe is sure to impress. Enjoy the fun of cooking and savor the flavors you create!](https://dailydishly.com/wp-content/uploads/2025/07/15cadd50-421d-45eb-818a-a88ea76b441c-768x768.webp)


, check out all the steps to create this delicious dish! {{image_2}} You can change the soup’s flavor with different bell pepper colors. Yellow or orange peppers add sweetness. Green peppers give a sharper taste. Each color brings its own twist to the soup. If you want to swap coconut milk, you can use other dairy. Heavy cream makes the soup rich and creamy. For a lighter option, try low-fat milk or yogurt. Each choice brings a unique texture and flavor. Want to make the soup heartier? You can add protein easily. Cooked chicken adds a nice touch. Simply shred or dice it before adding to the soup. If you prefer a plant-based option, try beans. Cannellini or chickpeas blend well with the flavors. They add protein while keeping the dish light. Do you like heat? Add chili peppers for a spicy kick. Jalapeños or serranos can give your soup a nice warmth. Start with a small amount and add more as needed. For extra flavor, consider using different herbs. Fresh thyme or cilantro can brighten the taste. Mixing up herbs adds layers to the soup's flavor. After enjoying your creamy roasted red pepper soup, storing leftovers properly helps keep it fresh. - Refrigerating tips: Let the soup cool to room temperature. Pour it into an airtight container. Store it in the fridge for up to four days. - Freezing for long-term storage: If you want to keep it longer, you can freeze it. Use a freezer-safe container or freezer bags. Leave some space at the top, as the soup will expand when frozen. It should last for about three months in the freezer. Reheating your soup correctly restores its rich flavor. - Best methods to reheat: The stovetop is the best option for reheating. Pour the soup into a pot and heat it over medium heat. Stir often to prevent sticking. You can also use a microwave. Place the soup in a microwave-safe bowl and heat in 30-second intervals, stirring in between. - Maintaining texture and flavor: To keep the soup creamy, add a splash of coconut milk or heavy cream while reheating. This will help it regain its smooth texture. Knowing how long your soup lasts is key to enjoying it safely. - The soup stays good in the fridge for about four days. If frozen, it can remain safe for up to three months. Always check for any off smells or changes in texture before eating. Yes, you can make this soup vegan. To do this, substitute the heavy cream with coconut milk. This keeps the soup rich and creamy. You can also use any plant-based milk if you prefer. For the broth, just stick with vegetable broth. This makes sure your soup stays vegan-friendly. This soup pairs well with many sides. Here are a few ideas: - Grilled cheese sandwiches - Crusty bread or baguette - A fresh garden salad - Garlic bread These dishes complement the soup's rich flavor. Absolutely! You can prepare this soup ahead of time. Here are some tips: - Preparing in advance: Make the soup and let it cool completely. Store it in airtight containers in the fridge. It will stay fresh for about 5 days. - Storing: You can also freeze the soup. Just use freezer-safe containers. It will last up to 3 months. - Reheating: To reheat, warm the soup on the stove. Stir occasionally to keep it smooth. You can also microwave it in a bowl. Heat in short intervals, stirring in between. For the complete detailed recipe, check [here](#). This blog post shared a simple and tasty recipe for Creamy Roasted Red Pepper Soup. We covered the ingredients, preparation, and cooking steps, along with tips for perfecting your dish. Remember, you can swap ingredients and enhance flavors to fit your taste. Proper storage will help keep leftovers fresh. Lastly, this soup is great for meal prep! Enjoy experimenting with this recipe and savor every bowl. You have the tools to create a delicious meal.](https://dailydishly.com/wp-content/uploads/2025/07/498509b4-248c-4237-8f09-48024388df2b-768x768.webp)
