
Slow Cooker Apple Cider Bread Pudding Delight

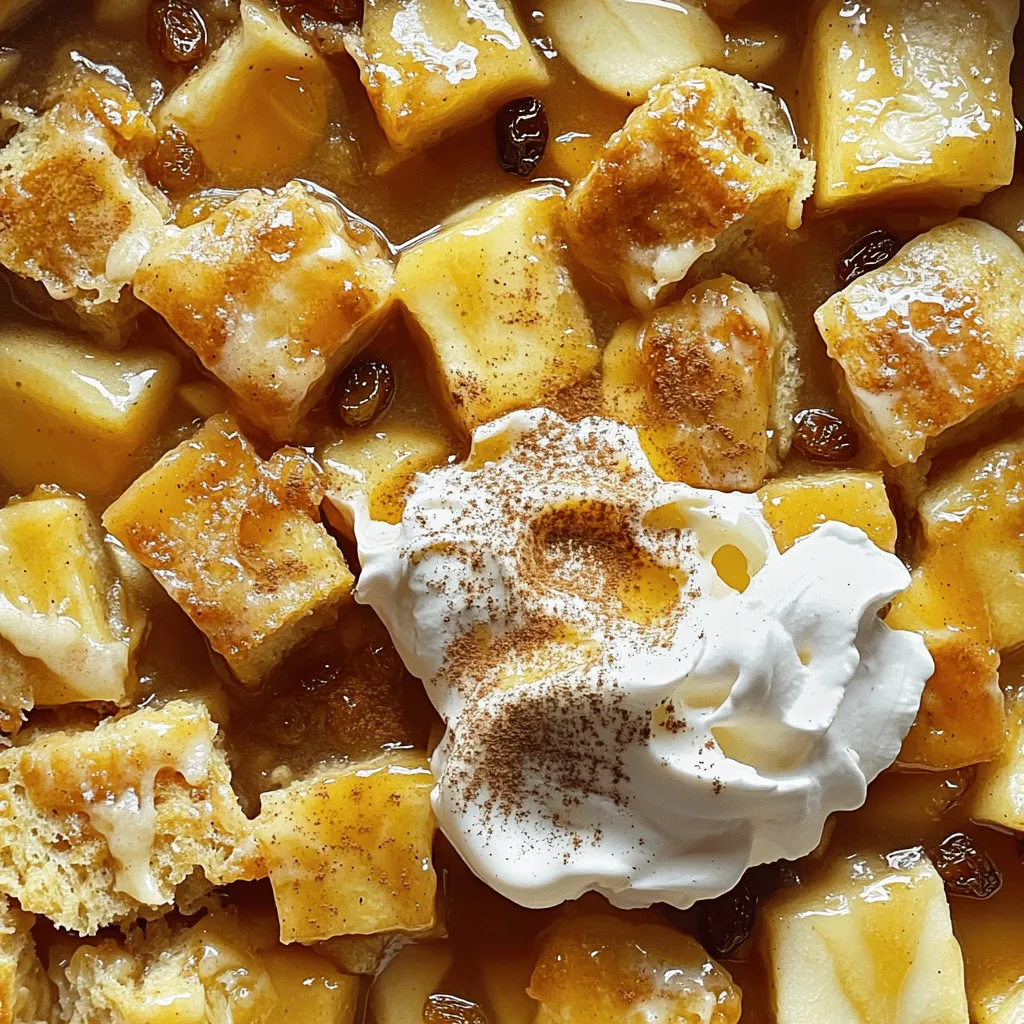
Craving a warm, sweet treat to share with friends or family? You’ll love this Slow Cooker Apple Cider Bread Pudding Delight! This cozy dessert is packed with fall flavors and is super easy to make. I’ll guide you through simple steps to create the perfect pudding that pairs wonderfully with ice cream or whipped cream. Get ready to impress with this delicious recipe that’s also a great way to use up stale bread!
Ingredients
Necessary Ingredients
– Day-old bread options: You can use 6 cups of day-old bread. Challah or brioche works best. These breads soak up the mixture well and give a rich flavor.
– Flavoring components: The magic lies in the mix of 2 cups of apple cider, 1 cup of milk, and 4 large eggs. Add in 3/4 cup of brown sugar and 1 teaspoon each of vanilla extract and ground cinnamon. A dash of nutmeg and a bit of salt complete the flavor base.
– Optional mix-ins: You can add 1 cup of diced Granny Smith apples for a tart bite. If you want, toss in 1/2 cup of raisins and 1/4 cup of chopped pecans or walnuts. These add texture and taste, making every bite delightful.
This combination of ingredients creates a warm, comforting dish. You can easily adjust the flavors based on what you have. Enjoy the process of making this delicious slow cooker apple cider bread pudding.
Step-by-Step Instructions
Prep the Ingredients
Start by making the liquid mix. In a large bowl, whisk together:
– 2 cups apple cider
– 1 cup milk
– 4 large eggs
– 3/4 cup brown sugar
– 1 teaspoon vanilla extract
– 1 teaspoon ground cinnamon
– 1/2 teaspoon ground nutmeg
– 1/4 teaspoon salt
Mix until you see no lumps. This blend gives the bread pudding its rich flavor.
Next, prepare your bread. Use 6 cups of day-old bread, like challah or brioche. Cut it into cubes. Day-old bread absorbs the liquid well, making the pudding soft and tasty.
Combining Ingredients
Once your bread is ready, it’s time to soak it. Place the cubed bread in the slow cooker. Pour the liquid mix over the bread. Make sure every piece gets soaked. This step is key for the best texture.
Now, add in some diced apples. I like using Granny Smith apples for their tartness. You can also mix in 1/2 cup of raisins or 1/4 cup of chopped nuts if you want some extra flavor and crunch. Just gently fold these in.
Cooking Instructions
Set your slow cooker to low. Cover it and cook for 6 to 8 hours. The pudding is done when it’s set and a knife comes out clean from the center.
After cooking, turn off the slow cooker. Let the bread pudding sit for about 15 minutes. This helps it firm up and makes serving easier. Enjoy it warm, drizzled with a bit of apple cider or topped with whipped cream or ice cream if you like!
Tips & Tricks
Achieving the Perfect Texture
Choosing the right bread is key. I love using day-old challah or brioche. These breads soak up the flavors well. They also stay soft and tasty. Make sure to cube the bread into even pieces. This helps them soak equally.
Soaking time can change based on your bread. If you use softer bread, soak it for less time. About 30 minutes is enough. For sturdier bread, you can soak it longer. Just keep an eye on it. You want the bread to be moist but not mushy.
Serving Suggestions
Toppings can make your bread pudding shine. You can serve it with whipped cream or vanilla ice cream. A drizzle of extra apple cider adds a nice touch. For added crunch, sprinkle chopped pecans or walnuts on top.
For sides, consider fresh fruit. A fruit salad or even apple slices works well. You can also serve it with a warm cup of apple cider. This makes a great pairing to highlight the apple flavors in the pudding. Enjoy your tasty creation!
Variations
Flavor Adaptations
You can change up the taste of your slow cooker apple cider bread pudding. Try using different fruits. Pears or peaches work well with apple cider. They add sweetness and different textures. You could also use dried fruits like cranberries or apricots. They bring a nice tartness and chewiness to each bite.
Next, think about spices. Ground ginger or allspice can add a warm kick. If you love a hint of citrus, add some orange or lemon zest. These small changes can create a whole new flavor experience.
Dietary Substitutions
If you need gluten-free options, use gluten-free bread. Many stores sell great gluten-free bread that works well. Just make sure to choose a bread that is dense, like a gluten-free challah or brioche.
For vegan adaptations, replace the eggs with a flaxseed mixture. Mix 1 tablespoon of ground flaxseed with 2.5 tablespoons of water. Let it sit for a few minutes to thicken. Use almond or oat milk instead of regular milk. For sweetening, maple syrup can be a great choice instead of brown sugar.
Storage Info
Storing Leftovers
Store your apple cider bread pudding in an airtight container. This keeps it fresh and tasty. You can keep it in the fridge for up to five days. If you want to keep it longer, freezing is a great option.
Reheating Tips
To reheat, use the microwave for quick warmth. Heat it in short bursts. You can also warm it in the oven at 350°F until hot. If you freeze it, wrap it well to avoid freezer burn. Thaw it in the fridge overnight before reheating. Enjoy your tasty treat again!
FAQs
Common User Questions
Can I make this recipe ahead of time?
Yes, you can prepare this dish ahead of time. Mix the bread and liquid the night before. Store it in the fridge overnight. In the morning, just place it in the slow cooker. This saves time and lets the flavors blend well.
What bread works best for bread pudding?
Day-old bread is key for this recipe. I like using challah or brioche. These breads soak up the apple cider and milk nicely. They add a rich flavor and soft texture. You can also use French bread or even whole wheat. Just make sure it’s a bit stale.
Can I replace apple cider with something else?
Yes, you can swap apple cider for other liquids. Try using fruit juice like pear or white grape. You can also use a mix of milk and a splash of vanilla extract. This change will give you a different flavor but keeps the dish tasty.
This article covered how to make delicious bread pudding. We explored the necessary ingredients, preparation steps, and cooking instructions. I shared tips for texture, serving suggestions, and variations for dietary needs. You learned how to store leftovers and reheat them properly. With these simple steps, you can create a tasty dessert that fits any occasion. Enjoy experimenting with flavors and making this dish your own!


![To make these vegan chocolate chip cookies, you will need a few key ingredients. Each one plays a special role in creating the perfect texture and flavor. Here’s the list of ingredients: - 1 cup almond flour - 1 cup all-purpose flour - 1/2 teaspoon baking soda - 1/2 teaspoon baking powder - 1/4 teaspoon salt - 1/2 cup coconut sugar - 1/2 cup maple syrup - 1/3 cup coconut oil, melted - 1 teaspoon vanilla extract - 1/2 cup vegan chocolate chips - 1/4 cup chopped walnuts (optional) Almond flour adds a nice, nutty flavor and keeps the cookies soft. All-purpose flour gives the cookies structure. Baking soda and baking powder help them rise. Coconut sugar sweetens the cookies while adding a hint of caramel flavor. Maple syrup adds moisture and sweetness. Coconut oil gives a lovely richness and helps with texture. Vanilla extract enhances the flavor of the chocolate chips. Vegan chocolate chips are a must for that classic taste. If you like nuts, walnuts add a crunchy touch. For the full recipe, follow the instructions carefully, and you’ll create cookies that everyone will love! 1. Preheating the oven First, set your oven to 350°F (175°C). This step helps the cookies bake evenly. While the oven heats, get your baking sheet ready by lining it with parchment paper. 2. Mixing dry ingredients In a big bowl, combine the almond flour, all-purpose flour, baking soda, baking powder, and salt. Use a whisk to blend them well. This ensures the leavening agents work when baking. 3. Combining wet ingredients In another bowl, mix the melted coconut oil, coconut sugar, maple syrup, and vanilla extract. Stir until it looks smooth. This mixture brings sweetness and flavor to your cookies. 1. Mixing wet and dry ingredients Pour the wet mix into the dry mix. Stir until no flour streaks show. The dough should be slightly sticky. This texture helps the cookies hold together. 2. Folding in chocolate chips and walnuts Gently fold in the vegan chocolate chips and walnuts if you choose to use them. Make sure they are evenly spread throughout the dough. This adds a delightful crunch and flavor. 1. Shaping the cookies Scoop tablespoon-sized portions of the dough. Roll them into balls and place them on your prepared baking sheet, leaving space between each ball. They will spread as they bake. 2. Baking time and tips for doneness Press each ball down gently with your palm to flatten it a bit. Bake for 10 to 12 minutes. Look for lightly golden edges. The cookies will seem soft but will firm up as they cool. Enjoy the aroma wafting through your kitchen! For the complete recipe, check out the Full Recipe. To get the best texture, start with room-temperature ingredients. When your coconut oil is melted but not hot, it blends well. Cold ingredients can lead to uneven mixing and odd textures. Use baking soda for a nice spread and chewiness. Baking powder adds lift but may make cookies puffier. You want a balance, so stick with 1/2 teaspoon of each, as this recipe suggests. To make your cookies pop, think about adding extracts or spices. A little cinnamon or a dash of nutmeg can elevate the flavor. You can also try almond or orange extract for a fun twist! If you're feeling adventurous, swap out chocolate chips. Try peanut butter chips, white chocolate, or even dried fruit. Each choice brings a new taste to the classic cookie. If your cookies spread too much, check your oven temperature. An oven that runs hot can cause this problem. You can also chill the dough for about 30 minutes before baking. This helps the dough hold its shape better. For cookies that are too crumbly, make sure to measure your flour correctly. Too much flour can lead to a dry texture. Add a small splash of almond milk to bring the dough together if needed. {{image_2}} If you want a gluten-free version of these cookies, you can use different flours. Try using all almond flour or a mix of almond and oat flour. You can also use a gluten-free flour blend. This keeps the texture nice and soft while making it safe for those with gluten sensitivities. Switching up the chocolate chips can bring new life to your cookies. You can use dark chocolate chips, white chocolate chips, or even peanut butter chips. You can also add fruits like dried cranberries or chopped bananas for a twist. If you enjoy nuts, consider adding chopped pecans or hazelnuts for a crunchy bite. Get creative with seasonal flavors! For fall, try adding pumpkin spice to the dough. This gives your cookies a warm and cozy taste. During the holidays, consider using peppermint extract or festive sprinkles. You can even shape the cookies into fun holiday designs. This makes them a perfect treat for any celebration! For the full recipe, check out the [Full Recipe]. To keep your vegan chocolate chip cookies fresh, store them in an airtight container. This method helps retain moisture and keeps them soft. You can place a slice of bread in the container to absorb any excess air. This trick works wonders for keeping cookies fresh longer. If you plan to eat them in a few days, simply store them at room temperature. For longer storage, freezing cookies is a great choice. Let the cookies cool completely before freezing. Place them in a single layer on a baking sheet. Once frozen solid, transfer them to a freezer-safe bag or container. Label the bag with the date. Frozen cookies can last up to three months. When you crave a treat, just pull one out and let it thaw. To enjoy leftover cookies, reheating is key. Preheat your oven to 350°F (175°C). Place the cookies on a baking sheet and warm for about 5 to 8 minutes. This will restore their soft, gooey texture. Alternatively, you can microwave them for 10-15 seconds. Just be careful not to overheat, or they may get tough. Enjoy every bite of those delicious cookies! Can I use regular flour instead of almond flour? Yes, you can use regular flour. However, almond flour adds a nice nutty taste. It also makes the cookies moist. If you swap it out, use a little less all-purpose flour. How long do these cookies last? These cookies can last up to a week in an airtight container. If you want them fresher, store them in the fridge. You can also freeze them for up to three months. Can I substitute maple syrup with another sweetener? Yes, you can use agave syrup or brown sugar. Both will work well. Just remember, each sweetener has its own taste and may change the cookie's texture a bit. What can I use instead of coconut sugar? You can use brown sugar or cane sugar as a substitute. Coconut sugar has a rich flavor, but the others will work in a pinch. Just keep in mind the sweetness level might change slightly. Do I need to chill the dough before baking? No, chilling the dough is not necessary. Chilling can help if you want thicker cookies. But for these cookies, you can bake them right after mixing. Can I add additional toppings to these cookies? Absolutely! You can add nuts, dried fruit, or even more chocolate chips. Feel free to get creative and experiment with flavors. You can create delicious vegan chocolate chip cookies with simple steps and great ingredients. We covered how to mix your dry and wet items, shape your cookies, and bake them perfectly. I shared tips for the best texture and flavor, along with common issues you might face. You now have options for gluten-free variations and how to store your cookies. Bake these cookies and enjoy every bite!](https://dailydishly.com/wp-content/uploads/2025/07/ef525e3c-3cc1-498f-b5ee-30e7bbeeb1ea-768x768.webp)