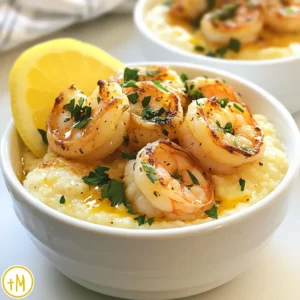
Garlic Herb Shrimp and Grits Delightful Flavor Dish


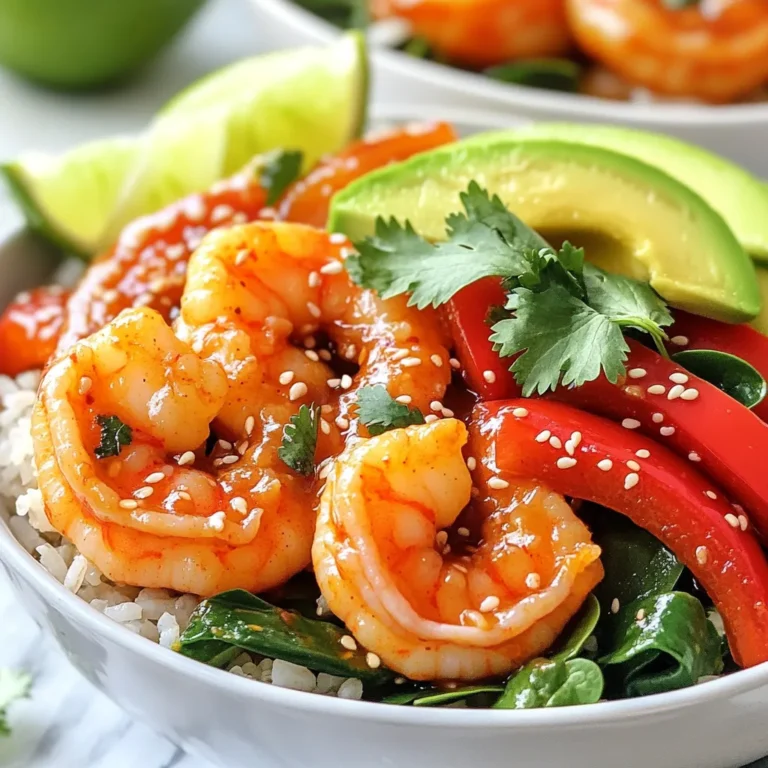
Welcome to the world of Garlic Herb Shrimp and Grits! This dish combines juicy shrimp with creamy grits, creating a meal that delights all your senses. Whether you’re a seasoned cook or just starting, you’ll find easy steps to impress your family or guests. I’ll guide you through each step and share tips. Get ready to enjoy a flavor-packed dish that’s sure to become a favorite!
Why I Love This Recipe
- Comforting Dish: This recipe combines creamy grits with succulent shrimp, making it a perfect comforting meal for any occasion.
- Quick to Prepare: With only 35 minutes from start to finish, this dish is ideal for busy weeknights or last-minute gatherings.
- Flavorful Ingredients: The combination of garlic, herbs, and lemon elevates the dish, bringing bright and bold flavors to every bite.
- Versatile Serving Options: Serve it as a main dish or as a side, and feel free to customize it with your favorite spices or additional vegetables.
Ingredients
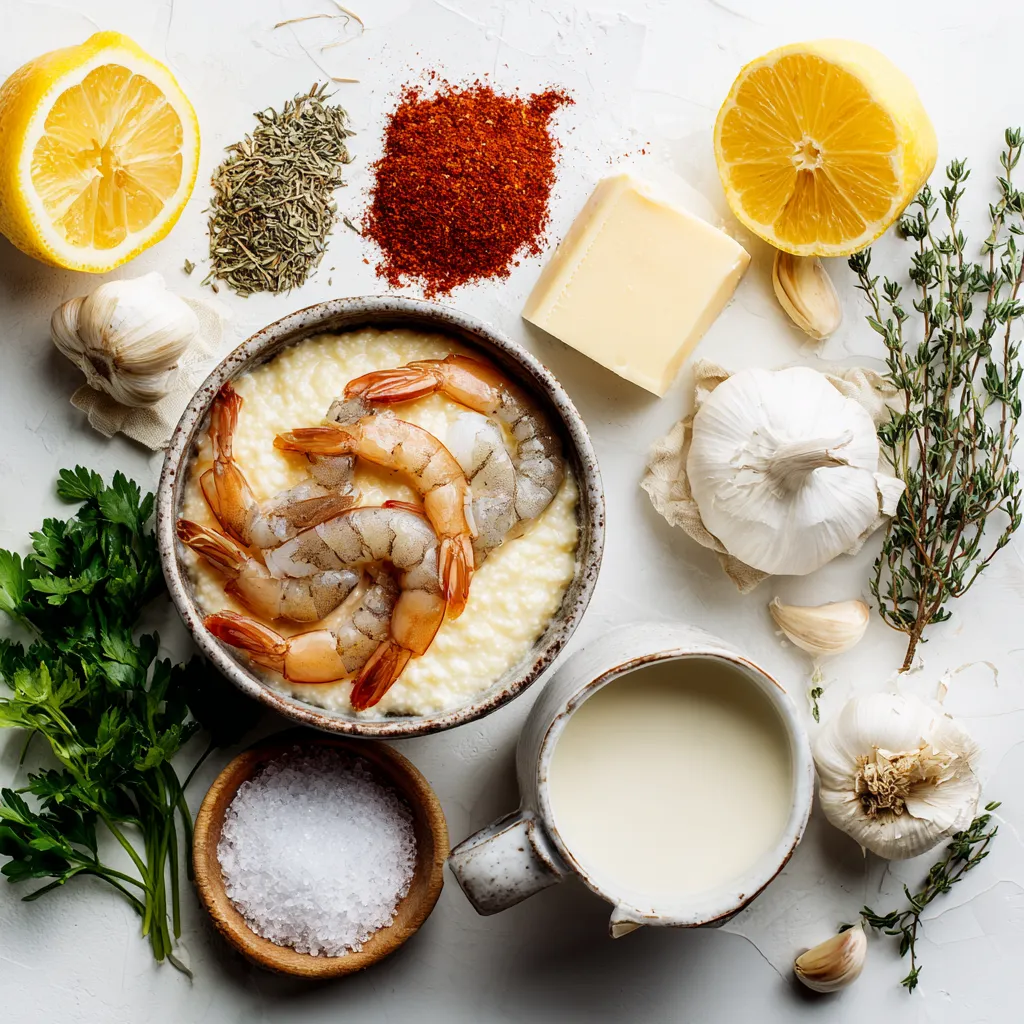
Main Ingredients for Garlic Herb Shrimp and Grits
For this tasty dish, you need:
– 1 cup stone-ground grits
– 4 cups water or chicken broth
– 1 pound large shrimp, peeled and deveined
– 3 tablespoons unsalted butter
– 4 cloves garlic, minced
– 1 teaspoon smoked paprika
– 1 teaspoon dried thyme
– 1 teaspoon dried oregano
– Salt and pepper to taste
– 1/2 cup heavy cream
– 1/4 cup chopped fresh parsley
– Juice of 1 lemon
These ingredients create a rich and creamy meal. The stone-ground grits add a nice texture. The shrimp brings a savory flavor, while the herbs give it depth.
Optional Add-ins or Garnishes
You can make this dish even better. Try adding:
– Grated cheese for a creamy touch
– Crumbled bacon for crunch
– Sliced green onions for a fresh bite
– Extra herbs like basil or cilantro
These add-ins can change the flavor and make it your own. You can mix and match to find your favorite combo.
Suggested Substitutions
If you don’t have some ingredients, here are swaps:
– Use quick-cooking grits instead of stone-ground.
– Substitute shrimp with scallops or chicken.
– Replace heavy cream with coconut milk for a lighter option.
These changes can fit your pantry needs. Don’t be afraid to get creative and adjust as needed!
Step-by-Step Instructions
Cooking the Stone-Ground Grits
To start, grab a medium pot. Pour in 4 cups of water or chicken broth. Bring it to a boil. Once boiling, slowly whisk in 1 cup of stone-ground grits. Reduce the heat to low. Stir the grits often to prevent lumps. Cook for about 20 to 25 minutes. You want them creamy and thick. If they get too thick, add a bit more water or broth. Keep stirring until they reach a smooth texture.
Preparing the Garlic Herb Shrimp
While the grits cook, take a skillet and melt 2 tablespoons of unsalted butter over medium heat. Add 4 cloves of minced garlic and sauté for 1 to 2 minutes. This makes the kitchen smell great! Next, toss in 1 pound of large shrimp, which should be peeled and deveined. Sprinkle on 1 teaspoon of smoked paprika, 1 teaspoon of dried thyme, and 1 teaspoon of dried oregano. Season with salt and pepper to taste. Cook the shrimp for about 2 to 3 minutes until they turn pink and opaque. Flip them halfway through to cook evenly.
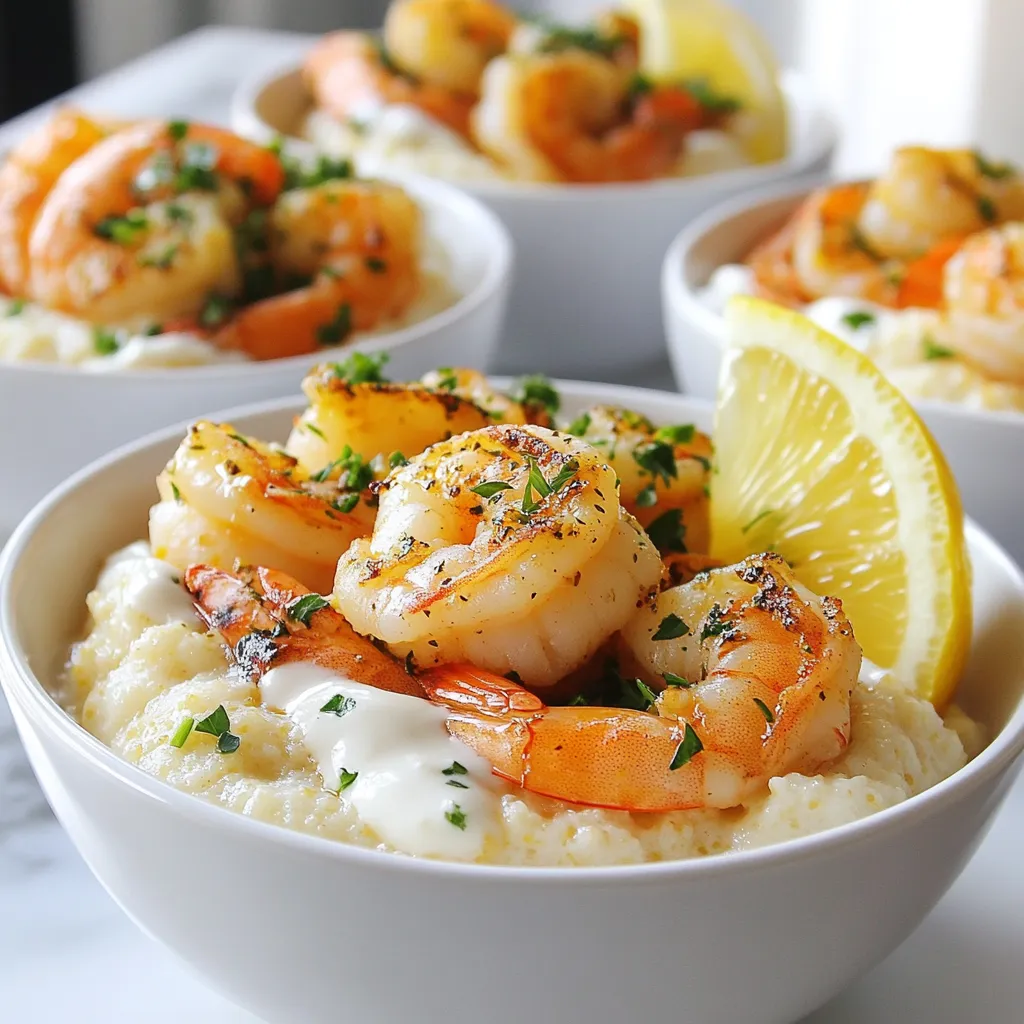
Combining and Serving the Dish
Once the shrimp is ready, reduce the heat to low. Stir in 1/2 cup of heavy cream and let it simmer for 2 minutes. Then, squeeze in the juice of 1 lemon and mix well. By now, the grits should be done! Stir in the remaining tablespoon of butter and season with salt and pepper to taste. To serve, spoon a generous amount of grits onto plates. Top them with the garlic herb shrimp. For a lovely finish, garnish with 1/4 cup of chopped fresh parsley. Enjoy this delightful dish!
Tips & Tricks
How to Perfectly Cook Grits
To cook grits well, use stone-ground grits. They give a rich taste and texture. Start by boiling 4 cups of water or chicken broth. Once boiling, slowly add 1 cup of grits while whisking. This step helps prevent lumps. Lower the heat and stir often. Cook until the grits are creamy, about 20-25 minutes. If they become too thick, add a splash of broth or water. Stir in a tablespoon of butter at the end. This adds creaminess and flavor.
Key Cooking Techniques for Shrimp
Cooking shrimp is quick and easy. First, melt 2 tablespoons of butter in a skillet over medium heat. Add 4 minced garlic cloves and sauté them for 1-2 minutes. Be careful not to brown the garlic, as it can taste bitter. Next, add 1 pound of peeled and deveined shrimp. Sprinkle with smoked paprika, dried thyme, dried oregano, salt, and pepper. Cook the shrimp for 2-3 minutes until they turn pink and opaque. Flip them halfway to cook evenly. Finish by adding 1/2 cup of heavy cream and simmer for 2 minutes.
Suggestions for Flavor Enhancements
To boost flavor, add lemon juice at the end of cooking. The juice of 1 lemon brightens the dish. Fresh herbs also add depth. Consider using basil or cilantro for a twist. If you like spice, add a pinch of cayenne pepper or red pepper flakes. You can even stir in some grated cheese into the grits for a rich taste. Always taste and adjust salt and pepper for the best results.
Pro Tips
- Use Fresh Shrimp: For the best flavor and texture, opt for fresh shrimp over frozen when possible. Fresh shrimp will enhance the overall dish.
- Perfect Grits Consistency: Stir the grits frequently while cooking to prevent clumping and ensure a creamy texture. Adjust water or broth as needed for your preferred consistency.
- Enhance Flavor with Broth: Cooking the grits in chicken broth instead of water adds depth and richness to the dish, elevating the overall flavor profile.
- Garnish for Presentation: Finish your dish with a sprinkle of fresh parsley and a drizzle of lemon juice to add a pop of color and a burst of freshness that complements the shrimp.
Variations
Creamy Vegan or Dairy-Free Options
You can swap heavy cream for coconut milk. This gives a rich and creamy taste. Use vegan butter instead of regular butter. This option keeps it dairy-free but still tasty. You can also use almond milk for a lighter version.
Spicy Garlic Shrimp Additions
If you like heat, add red pepper flakes. Just a pinch can really boost the flavor. You can also use hot sauce to spice things up. Mix in jalapeños for a fresh kick. For even more flavor, try adding chopped fresh chilies during cooking.
Alternative Grain Options for Grits
You can use quinoa or polenta instead of grits. Quinoa adds a nutty flavor and is gluten-free. Polenta gives a smooth texture, close to grits. If you want a healthy twist, try farro. It adds a chewy bite and packs in nutrients.
Storage Info
How to Store Leftover Shrimp and Grits
To store leftover shrimp and grits, allow them to cool first. Then, place them in an airtight container. Make sure to separate the shrimp from the grits if possible. This helps keep the grits from getting soggy. Store the container in the fridge. Use the leftovers within three days for the best flavor.
Reheating Instructions
For reheating, place the shrimp and grits in a saucepan over low heat. Stir them gently while adding a splash of water or broth. This keeps the dish moist and creamy. Heat until warm, about 5-7 minutes. You can also use a microwave. Just cover the dish and heat in short bursts, stirring in between.
Freezing Guidelines for Longer Storage
To freeze, place the cooled shrimp and grits in separate freezer-safe containers. Make sure to label them with the date. The shrimp can last up to three months in the freezer, while the grits are best used within one month. When you’re ready to eat, thaw them overnight in the fridge. Reheat as noted above.
FAQs
What type of shrimp is best for this recipe?
Large shrimp work best for this dish. They are meaty and hold up well during cooking. You can also use medium shrimp if you prefer a smaller size. Fresh shrimp is ideal, but frozen shrimp works too. Just make sure to thaw them before cooking.
Can I use instant grits instead of stone-ground?
Yes, you can use instant grits. They cook faster and may save you time. However, stone-ground grits have a richer flavor and creamier texture. If you choose instant, follow the package instructions for cooking times.
How can I make the dish gluten-free?
This dish can easily be made gluten-free. Ensure your chicken broth is labeled gluten-free. Both the shrimp and grits are naturally gluten-free. Just double-check any added seasonings or sauces for hidden gluten.
What sides pair well with Garlic Herb Shrimp and Grits?
Several sides complement this dish well. A simple green salad with a lemon vinaigrette works nicely. Steamed asparagus or sautéed spinach also pairs beautifully. Consider adding some crusty bread to soak up the delicious sauce.
You now know how to make delicious Garlic Herb Shrimp and Grits. We covered the key ingredients, cooking steps, and tips for perfecting your dish. You can personalize it with variations or find the best ways to store leftovers. Remember, using fresh shrimp and relaxing over stone-ground grits makes all the difference. Enjoy making this dish for yourself and others. It’s a sure hit for any meal. Happy cookin
Garlic Herb Shrimp and Grits
Ingredients
- 1 cup stone-ground grits
- 4 cups water or chicken broth
- 1 pound large shrimp, peeled and deveined
- 3 tablespoons unsalted butter
- 4 cloves garlic, minced
- 1 teaspoon smoked paprika
- 1 teaspoon dried thyme
- 1 teaspoon dried oregano
- to taste salt and pepper
- 1 cup heavy cream
- 1 4 cup chopped fresh parsley
- 1 lemon juice of
Instructions
- In a medium pot, bring the water (or chicken broth) to a boil. Slowly whisk in the stone-ground grits. Reduce heat to low and cook, stirring frequently, until the grits are creamy and thick (about 20-25 minutes). If they get too thick, add more water or broth to reach your desired consistency.
- While the grits are cooking, melt 2 tablespoons of butter in a skillet over medium heat. Add the minced garlic and sauté for 1-2 minutes until fragrant but not browned.
- Add the shrimp to the skillet, then sprinkle with smoked paprika, thyme, oregano, salt, and pepper. Cook for about 2-3 minutes until the shrimp are pink and opaque, flipping them halfway through cooking.
- Reduce the heat to low and stir in the heavy cream. Allow the mixture to simmer for an additional 2 minutes, then remove from heat. Squeeze in the lemon juice and stir to combine.
- Once the grits are done, stir in the remaining tablespoon of butter and season with salt and pepper to taste.
- To serve, spoon a generous amount of grits onto plates and top with the garlic herb shrimp. Garnish with chopped parsley.
![- 2 boneless, skinless chicken breasts, diced - 2 cups broccoli florets For this dish, I love using fresh chicken and broccoli. The chicken gives a nice, juicy bite. The broccoli adds color and crunch. You can cut the chicken into small pieces. This helps it cook evenly and quickly. For the broccoli, I recommend using florets. They will cook just right and look great on your plate. - 8 ounces fettuccine or pasta of choice - 1 tablespoon olive oil - 3 cloves garlic, minced - 1 cup heavy cream - 1 cup grated Parmesan cheese For the pasta, fettuccine works best. It holds the sauce well. You can use any pasta you like. Just remember to cook it al dente. Olive oil keeps the chicken moist. Garlic adds amazing flavor to the dish. Heavy cream and Parmesan cheese create a rich, creamy sauce. Together, they make this meal feel special. - Salt and pepper to taste - 1/2 teaspoon dried Italian herbs - Fresh parsley, chopped (for garnish) Seasoning is key to great flavor. Use salt and pepper to taste. Italian herbs add warmth and depth. I like to finish the dish with fresh parsley for color. It brightens the plate and makes it look fresh. These simple ingredients elevate the dish without being overwhelming. For the full recipe, check out the details above! First, heat 1 tablespoon of olive oil in a large skillet over medium heat. While the oil heats, dice 2 boneless, skinless chicken breasts. Once the oil is hot, add the chicken to the skillet. Season it with salt, pepper, and 1/2 teaspoon of dried Italian herbs. Cook the chicken for about 5 to 7 minutes. Stir it occasionally to brown all sides. When it’s done, it should be golden and cooked through. Remove the chicken from the skillet and set it aside for now. In the same skillet, add 3 cloves of minced garlic. Sauté the garlic for about 1 minute until it smells good. Then, add 2 cups of broccoli florets to the skillet. Stir and cook for 3 to 4 minutes. You want the broccoli to be tender but still bright green. This will keep it crisp and flavorful. Next, cook 8 ounces of fettuccine or your favorite pasta in a separate pot. Follow the package instructions and drain it once it's al dente. Now, back in the skillet with the broccoli, pour in 1 cup of heavy cream. Bring it to a gentle simmer. Stir in 1 cup of grated Parmesan cheese. Keep stirring until the cheese melts and the sauce is smooth. Add the chicken and drained pasta back into the skillet. Toss everything together so it’s coated in the creamy sauce. Let it heat through for 2 to 3 minutes. Adjust the taste with more salt or pepper if needed. Serve hot, and don’t forget to garnish with fresh parsley! For the full recipe, check out the [Full Recipe]. To get juicy chicken, start with diced pieces. This helps them cook evenly. Cook the chicken until it is a nice golden brown. This usually takes about 5 to 7 minutes. Make sure to not overcrowd the skillet. This allows each piece to sear well. After cooking, let the chicken rest for a few minutes. This keeps the juices inside. Broccoli should stay bright green and crisp. Add it to the skillet after the garlic. Sauté for just 3 to 4 minutes. You want it tender but still crunchy. If you cook it too long, it will turn dull. To keep that vibrant color, you can also shock it in cold water after cooking. This method locks in color and nutrition. The sauce should be creamy and smooth. If it’s too thick, add a little pasta water. This water has starch from cooking the pasta. It helps make the sauce silkier. If it’s too thin, let it simmer a bit longer. Stir in more cheese if you want it richer. Taste as you go to get the perfect balance. For the full recipe, check the details above. {{image_2}} You can swap out chicken for other meats. Shrimp works well and cooks quickly. You can also use turkey or even tofu for a vegetarian twist. Each protein adds its unique flavor. Just adjust cooking times to ensure your choice is fully cooked. Broccoli is excellent, but you can mix in other veggies. Bell peppers add sweetness and crunch. Zucchini or spinach also fit well in this dish. Feel free to experiment! Each vegetable brings a new taste and color. Just make sure to adjust cooking time based on what you use. If you need a gluten-free meal, choose gluten-free pasta. Many brands offer great options that taste good. You can also skip pasta and use rice instead. This keeps the dish hearty while meeting dietary needs. Always check labels to ensure your ingredients are gluten-free. For the full recipe, check the section above. You can store leftovers in the fridge. Place the Chicken and Broccoli Alfredo in an airtight container. It stays fresh for up to three days. Make sure to let it cool down before you seal it. This helps keep the flavor and texture. If you want to save some for later, freezing works well. Use a freezer-safe container or bag. Leave some space for expansion. You can freeze it for up to two months. When you're ready to eat, thaw it in the fridge overnight. To reheat, use the stovetop or microwave. If using the stovetop, add a splash of cream or water. This keeps the dish moist. Stir it often over low heat until warm. If using a microwave, cover the dish to trap steam. Heat in short bursts and stir in between. This way, you'll enjoy a creamy meal again! Yes, you can use frozen broccoli. Just add it to the skillet while cooking the garlic. Frozen broccoli may need a few extra minutes to cook. Make sure it is heated through and tender before serving. This option saves time and works well in this dish. Fettuccine is the best choice for this recipe. It holds the creamy sauce well. However, you can use other pasta types too. Penne, rotini, or even whole wheat pasta are great options. Choose what you like or have at home for this meal. To make this dish healthier, consider these tips: - Use whole-grain pasta for more fiber. - Swap heavy cream for low-fat milk or a plant-based cream. - Add more vegetables like bell peppers or spinach for extra nutrients. - Use less cheese or a lighter cheese option to cut calories. These changes can keep the dish tasty while boosting its nutrition. Check out the Full Recipe for even more ideas! This blog post covered how to make Chicken and Broccoli Alfredo. We explored key ingredients, like chicken, pasta, and sauce. I shared step-by-step instructions for cooking and sautéing. You learned tips for perfect chicken and bright broccoli. We also talked about variations, like swapping proteins or veggies. Lastly, I provided storage info to keep leftovers fresh. Try this recipe to impress. Remember, cooking is fun and easy!](https://dailydishly.com/wp-content/uploads/2025/06/4029d33c-44d0-458a-b053-e8bf24c75967-768x768.webp)

![To make zucchini noodles with pesto, gather these main ingredients: - 3 medium zucchinis, spiralized into noodles - 1 cup fresh basil leaves - 1/4 cup pine nuts (toasted) - 1/4 cup grated Parmesan cheese (or nutritional yeast for a vegan option) - 2 garlic cloves, minced - 1/3 cup extra-virgin olive oil - Salt and pepper to taste These ingredients create a fresh and bright dish that is full of flavor. The zucchini noodles serve as a light base, while the pesto adds richness. You can enhance the dish with these optional ingredients: - 1/2 cup sun-dried tomatoes, chopped (in oil for extra flavor) - 1/4 teaspoon crushed red pepper flakes (optional) Adding sun-dried tomatoes gives a nice tang and sweetness. The red pepper flakes can add a bit of heat if you like spice. This dish is not just tasty; it also packs a healthy punch. Here’s a quick look at the nutritional benefits: - Zucchini: Low in calories, high in fiber, and rich in vitamins A and C. - Basil: Contains antioxidants and supports heart health. - Pine Nuts: Offer healthy fats and protein. - Parmesan Cheese: Adds calcium and flavor. - Olive Oil: A good source of healthy fats and antioxidants. Each serving is light yet filling, making it a great choice for lunch or dinner. You can find the full recipe [here]. To make fresh pesto, gather your ingredients. You will need basil leaves, toasted pine nuts, Parmesan cheese, minced garlic, and olive oil. Place these in a food processor. First, pulse the basil, pine nuts, cheese, and garlic together. Add a pinch of salt and pepper. While the processor runs, slowly pour in the olive oil. This helps achieve a smooth and creamy texture. After blending, taste your pesto. Adjust the seasoning to your liking. Set it aside for now. Next, grab your zucchinis. Spiralize them into noodle shapes. In a large skillet, heat a tablespoon of olive oil over medium heat. Add the zucchini noodles once the oil is hot. Sauté for about 2-3 minutes. Keep them slightly crunchy, or al dente. This step is key, as overcooking can make them mushy. Once cooked, remove the skillet from heat. Now, it’s time to mix everything together. Add the pesto to the skillet with the zucchini noodles. Stir well to coat the noodles evenly. This is where the magic happens! Next, add chopped sun-dried tomatoes for extra flavor. If you like spice, sprinkle in crushed red pepper flakes. Toss all the ingredients together until well mixed. Serve your dish right away. Presentation matters, so use a large bowl. Create a nest of zucchini noodles and drizzle extra pesto on top. Garnish with toasted pine nuts for a beautiful finish. Enjoy your flavorful and fresh Zucchini Noodles with Pesto! For the full recipe, check [Full Recipe]. When picking zucchini, look for firm ones that are bright in color. Avoid any with soft spots or wrinkles. Smaller zucchinis taste better and are less watery. Aim for ones about six to eight inches long. This ensures a nice, crisp bite in your dish. You can also check the stem; it should be fresh and green. To make your pesto extra creamy, use a good blender or food processor. Start by blending the basil, pine nuts, and garlic first. Then, slowly add the olive oil while blending. This helps to emulsify the oil, making it smooth. You can add a bit more cheese or even a splash of lemon juice. This brightens the flavor and keeps it fresh. One common mistake is cooking zucchini for too long. Zucchini cooks quickly, so aim for just 2-3 minutes. This keeps it al dente and tasty. Also, avoid adding too much salt at the start. Salt pulls out moisture, making your noodles soggy. Instead, season them lightly before adding your pesto. Finally, don’t overcrowd the pan; cook in batches if needed. For the full recipe, check out the [Full Recipe]. {{image_2}} You can easily make this dish vegan. Instead of Parmesan cheese, use nutritional yeast. This swap gives a cheesy flavor without dairy. You still get a creamy pesto. Blend the rest of the ingredients as usual. This keeps the dish rich and tasty. If you have other dietary needs, don't worry. You can switch out ingredients. For gluten-free options, use gluten-free pasta or spiralized veggies. If you need a nut-free recipe, skip the pine nuts. Use sunflower seeds instead. These simple swaps keep the dish enjoyable for everyone. Zucchini is great, but you can change things up. Try adding fresh herbs like parsley or mint. They give a new twist to the flavor. You can also mix in seasonal veggies. In summer, add cherry tomatoes for sweetness. In fall, try roasted butternut squash for warmth. Each season brings fresh options. Enjoy the tasty variety! Store any leftover zucchini noodles with pesto in an airtight container. You want to keep them fresh and tasty. Place the container in the fridge. They will stay good for about two days. Add a few drops of olive oil to prevent sticking. This keeps the noodles from clumping together. If you used sun-dried tomatoes, they can add extra moisture. So, check for sogginess before storing. To reheat your zucchini noodles, use a skillet. Heat it on low to medium heat. Add a little olive oil to the pan, then toss in the noodles. Stir for about two to three minutes. This warms them up without making them mushy. You can also use a microwave. Put the noodles in a bowl and cover it. Heat on medium for about a minute or two. Check and stir halfway through to ensure even heating. Freezing zucchini noodles is not ideal. They can become watery when thawed. However, you can freeze pesto easily. Put it in ice cube trays for easy use later. Once frozen, pop the cubes into a bag. You can use frozen pesto straight from the freezer. Just add it to hot noodles, and it will melt right in. This way, you can enjoy homemade flavor anytime! For the full recipe, check out the details above. Yes, you can use other veggies. Carrots, bell peppers, or squash work well. Spiralize them just like zucchini. They add nice colors and flavors too. Each will give a new twist to your dish. Just remember to cook them until tender, but not mushy. To make nut-free pesto, skip the pine nuts. Use sunflower seeds instead. They blend nicely and add a good texture. You can also use hemp seeds for a different taste. The rest of the pesto stays the same. Use fresh basil and garlic for that classic flavor. Zucchini noodles with pesto pair well with many sides. A fresh salad adds crunch and brightness. Garlic bread is a great choice for dipping. You could also serve grilled chicken or shrimp on top for protein. Enjoy this dish with a light white wine for a special touch. For more ideas, check the Full Recipe for inspiration. Zucchini noodles with pesto offer a tasty and healthy meal. We covered the key ingredients and how to make them. I shared steps for cooking, tips for selecting fresh zucchini, and variations to suit diets. Proper storage and reheating tips will keep leftovers tasty. Remember, experimenting with flavors makes cooking fun. Enjoy your meal, and don’t hesitate to try new things in the kitchen.](https://dailydishly.com/wp-content/uploads/2025/06/e06d07df-0eee-433f-a13f-76c167ac26ec-768x768.webp)