
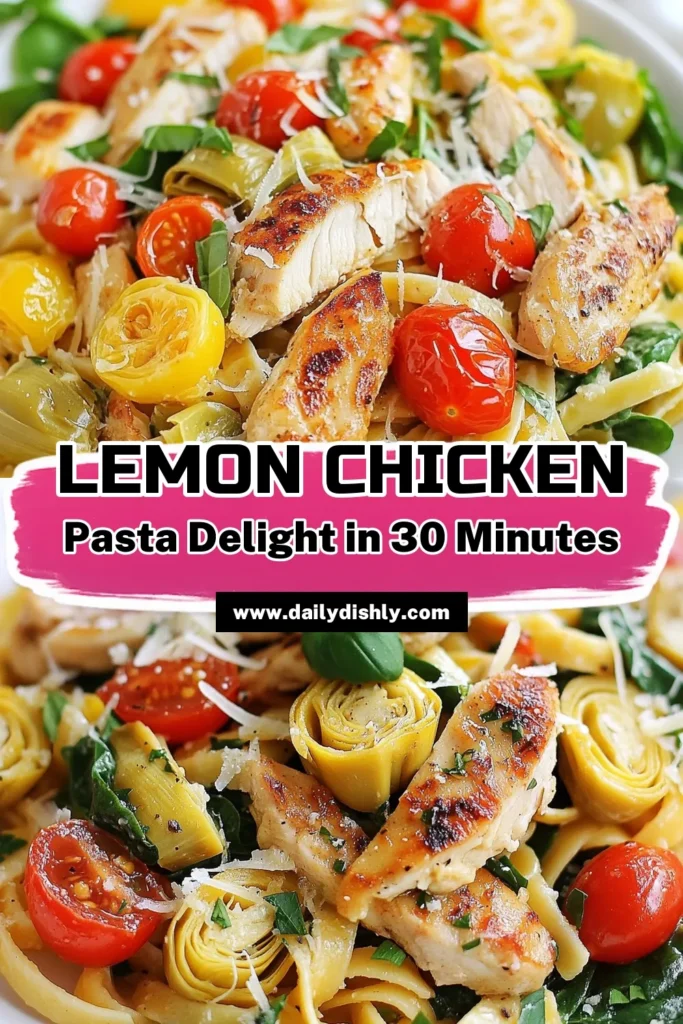
Lemon Artichoke Chicken Pasta Simple and Delicious Meal
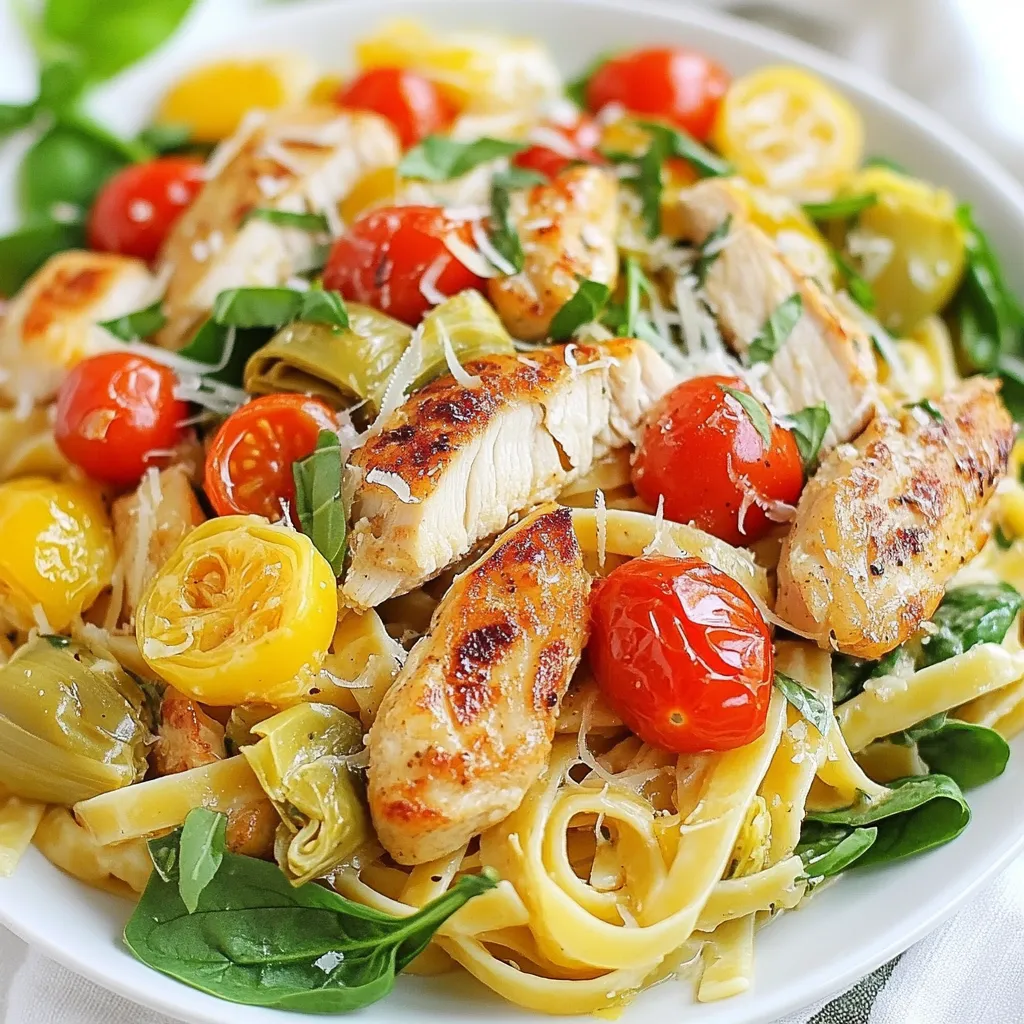
Craving a bright and tasty meal? Let me introduce you to Lemon Artichoke Chicken Pasta. This dish combines juicy chicken, artichokes, and vibrant veggies in a rich lemony sauce. It’s simple, delicious, and perfect for any night of the week. In just a few steps, you can create a delightful meal that will impress your family or friends. Ready to dig in? Let’s get cooking!
Why I Love This Recipe
- Fresh and Flavorful: This dish combines bright lemon and fresh vegetables, creating a vibrant flavor profile that is both refreshing and satisfying.
- Quick and Easy: With a total cooking time of just 30 minutes, this recipe is perfect for busy weeknights when you want a delicious meal without the hassle.
- Healthy Ingredients: Featuring lean chicken, whole grain pasta, and a variety of vegetables, this pasta dish is not only tasty but also packed with nutrients.
- Customizable: You can easily adapt this recipe by adding your favorite vegetables or adjusting the spice level to suit your taste preferences.
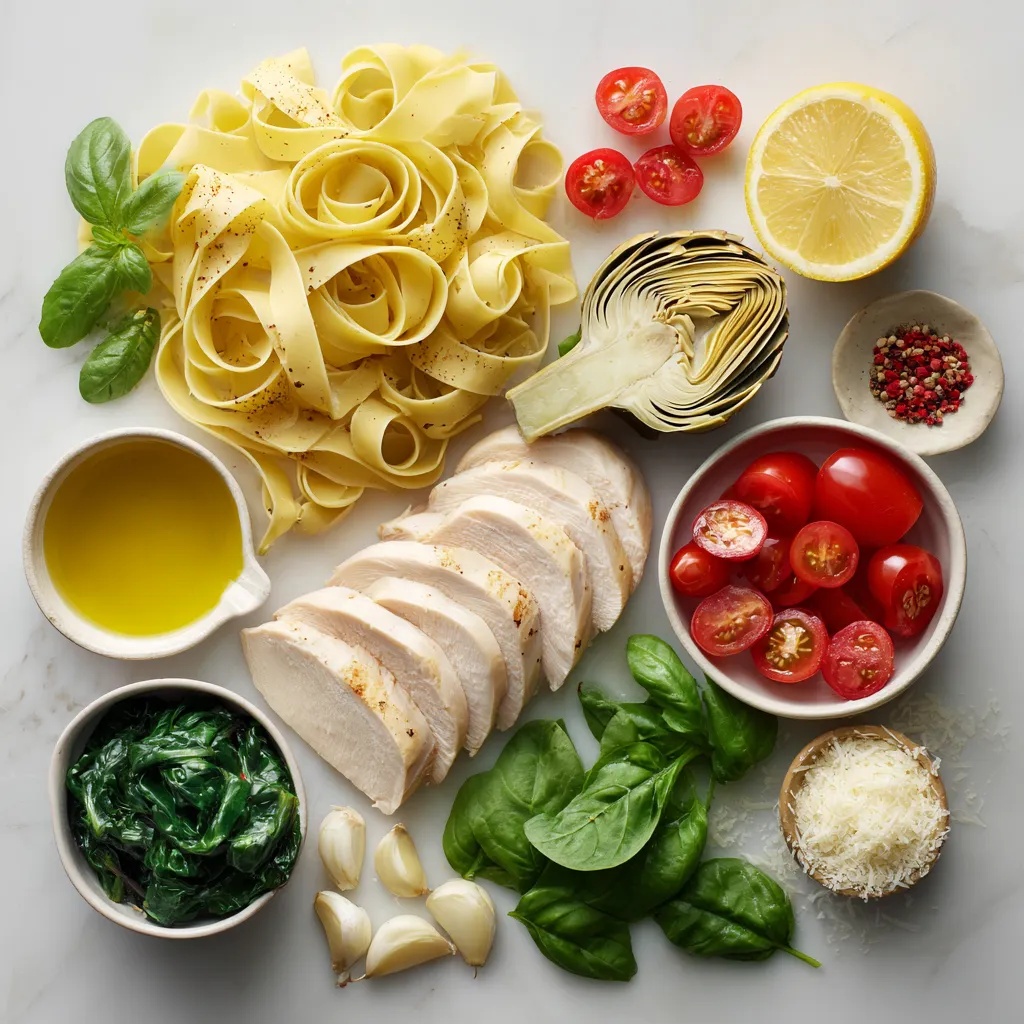
Ingredients
Main Ingredients
– 2 boneless, skinless chicken breasts
– 8 oz fettuccine pasta
– 1 can (14 oz) artichoke hearts, drained and quartered
Flavor Enhancers
– 2 tablespoons olive oil
– 3 cloves garlic, minced
– Zest and juice of 1 lemon
Vegetables and Garnish
– 1 cup cherry tomatoes, halved
– 1 cup spinach, fresh
– Fresh basil for garnish
Optional Seasonings
– 1/4 teaspoon red pepper flakes (optional)
– Salt and pepper to taste
– 1/4 cup grated Parmesan cheese (optional for serving)
When I make Lemon Artichoke Chicken Pasta, I love using fresh and simple ingredients. The main stars are the chicken, pasta, and artichokes.
The chicken breasts give you protein, while the fettuccine pasta provides a great base. The artichoke hearts add a unique taste and texture.
For flavor, I use olive oil, garlic, and lemon. You can’t go wrong with that combo! The lemon zest and juice bring brightness to the dish.
Adding cherry tomatoes and fresh spinach makes it colorful and healthy. I always like to use fresh basil for a lovely garnish.
If you want some heat, red pepper flakes are a nice touch. Finish it off with Parmesan cheese if you like.
This dish is not just simple but also delicious. It’s a perfect meal for any night!
Step-by-Step Instructions
Cooking the Pasta
First, boil water in a large pot. Add the fettuccine and cook until it’s al dente. This means it should still have a little bite. Once done, drain the pasta but save ½ cup of the pasta water. This water will help make the sauce later.
Preparing the Chicken
While the pasta cooks, take the chicken breasts. Season them with salt, pepper, and lemon zest. Heat olive oil in a large skillet over medium heat. Add the chicken breasts and cook for 5 to 6 minutes on each side. Look for a golden brown color and ensure it’s fully cooked. After cooking, let the chicken rest for a few minutes. Then, slice it into thin strips.
Combining Ingredients
Now, it’s time to bring everything together. In the same skillet, add minced garlic and sauté it for about one minute. The smell will be amazing! Next, toss in the artichoke hearts, cherry tomatoes, and fresh spinach. Cook this mix for about 3 to 4 minutes, or until the spinach wilts and the tomatoes soften. Add the cooked pasta and sliced chicken to the skillet. Pour in the lemon juice and any red pepper flakes if you want some heat. Toss everything well, using the reserved pasta water to create a light sauce.
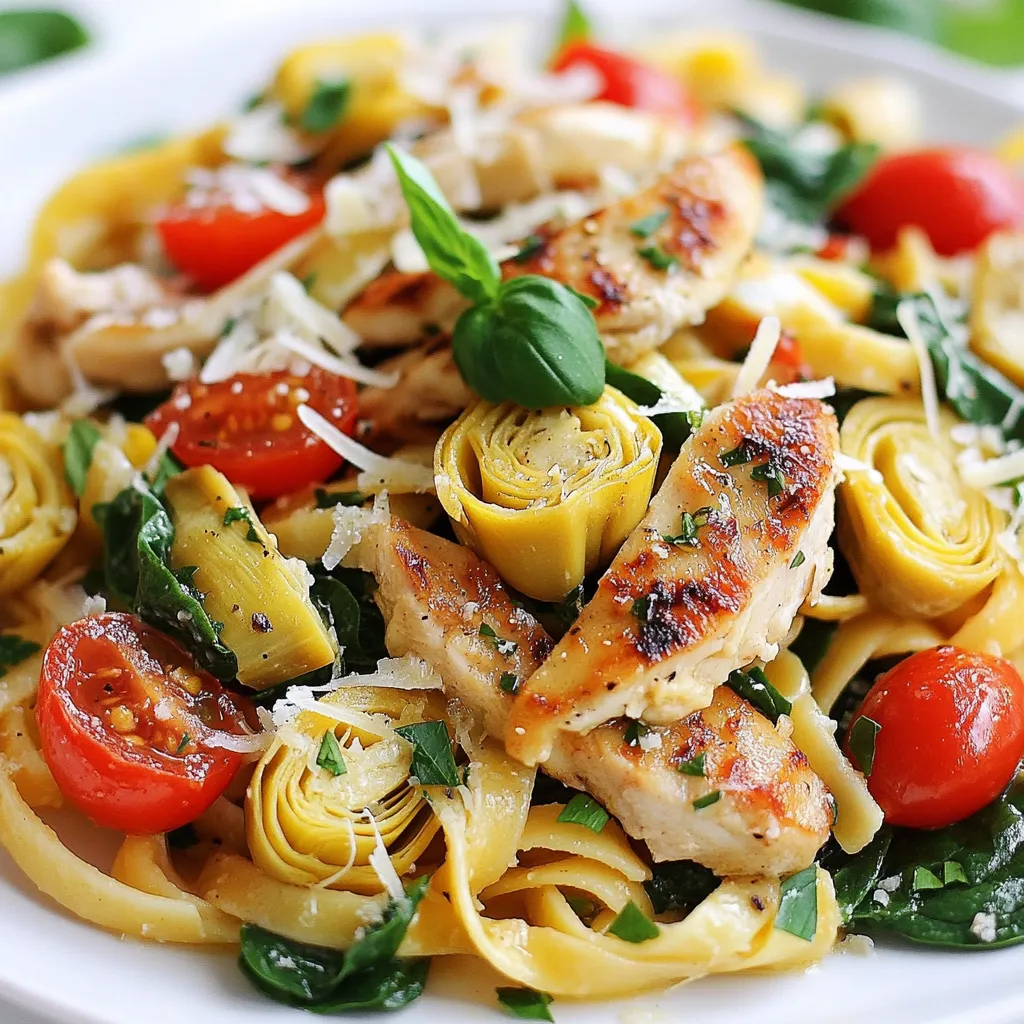
Final Touches
Take a moment to taste your dish. Adjust the seasoning with more salt, pepper, or lemon juice if needed. Once it’s right, remove the skillet from heat. Serve the pasta warm and add grated Parmesan cheese and fresh basil for a delightful finish. Enjoy your Lemon Artichoke Chicken Pasta!
Tips & Tricks
Perfecting the Chicken
To ensure juicy chicken, always start by seasoning well. Use salt, pepper, and lemon zest. This adds flavor right from the start. Cook the chicken in a hot skillet for 5-6 minutes on each side. Use a meat thermometer to check for doneness. The internal temperature should reach 165°F. Let the chicken rest before slicing. This helps keep the juices inside.
Creating the Sauce
Using reserved pasta water is key for a smooth sauce. After cooking the pasta, save about half a cup of this water. It helps to thin out the sauce. When mixing in the pasta, add a little water at a time. This creates a light, flavorful coating. Balancing flavors is crucial. Taste as you go. You may want more lemon juice or salt. A pinch of red pepper flakes adds a nice kick, too.
Serving Suggestions
Presentation makes a big difference. Serve the pasta in wide bowls to showcase its colors. Top with fresh basil and a sprinkle of Parmesan cheese. This adds a gourmet touch. For side dishes, a simple green salad works well. You can also serve garlic bread alongside. This adds flavor and crunch to the meal.
Pro Tips
- Use Fresh Ingredients: Fresh artichoke hearts and tomatoes will elevate the dish, giving it a vibrant flavor and texture.
- Perfectly Cooked Chicken: Ensure the chicken is cooked to an internal temperature of 165°F for safety and to keep it juicy.
- Reserve Pasta Water: The starchy water helps bind the sauce and gives a silky texture to the dish, so don’t forget to save some!
- Garnish Wisely: Fresh basil and Parmesan add not only flavor but also a beautiful presentation to your dish.
Variations
Vegetarian Options
If you want to make this dish vegetarian, you can easily swap chicken for tofu or chickpeas. Both options add protein and texture. Use firm tofu for the best results. You can sauté the tofu until golden brown. Chickpeas provide a nice bite and work well with the sauce.
You can also add other vegetables. Try bell peppers, zucchini, or mushrooms. These add color and flavor. Just sauté them along with the garlic.
Flavor Variations
To change the flavor, consider adding herbs like oregano or thyme. These herbs complement the lemon and artichoke nicely. Fresh herbs bring out the best in your dish.
You can also switch up the pasta. Fettuccine is great, but penne or spaghetti works too. The choice of pasta can change the dish’s look and feel.
Spicy Adaptations
If you like heat, add more spices. Incorporate diced jalapeños or a dash of cayenne pepper. They will give your dish a kick.
You can adjust the red pepper flakes to your taste. Start with a little, then add more if you want it spicier.
Storage Info
Storing Leftovers
To keep your Lemon Artichoke Chicken Pasta fresh, store it in an airtight container. Make sure it cools down before sealing. This dish stays good in the fridge for about 3 to 4 days. If you want to enjoy it later, label the container with the date.
Reheating Tips
When you reheat, the key is not to dry it out. Use a microwave-safe bowl and add a splash of water. Cover it with a lid or a damp paper towel. Heat in short bursts, stirring in between for even warmth. If you prefer the stovetop, place it in a skillet over low heat. Add a little olive oil and stir until warm.
Freezing Guidance
Yes, you can freeze Lemon Artichoke Chicken Pasta. Portion it into freezer-safe containers. It keeps well for about 2 to 3 months. To thaw, move it to the fridge overnight. Reheat as mentioned above, adding a bit of water if needed. Enjoy your tasty meal without any fuss!
FAQs
What is Lemon Artichoke Chicken Pasta?
Lemon Artichoke Chicken Pasta is a bright and tasty dish. It features tender chicken, artichoke hearts, and fresh veggies. The lemon zest and juice add a zesty flavor. This dish is light yet filling, perfect for any meal.
Can I use frozen artichoke hearts?
Yes, you can use frozen artichoke hearts. They are a great option when fresh ones are not available. Just thaw them before cooking. Frozen artichokes save time and still taste good.
What can I substitute for fettuccine pasta?
You can use several pasta types instead of fettuccine. Spaghetti, penne, or even gluten-free pasta work well. Choose what you have on hand or prefer. Each type gives a different texture but tastes great with the sauce.
How can I make this dish gluten-free?
To make this dish gluten-free, choose gluten-free pasta. There are many options made from rice or chickpeas. These options cook well and taste good in this recipe. Just follow the cooking time on the package.
What are the nutritional facts for this recipe?
This dish serves four and is balanced. Each serving has about 400 calories. It has protein from chicken and fiber from veggies. You get healthy fats from olive oil. Adjust the cheese and olive oil for a lighter meal.
This blog post covers how to make Lemon Artichoke Chicken Pasta from scratch. We looked at ingredients, cooking steps, tips for perfect chicken, and fun variations for your dish. You can easily adapt this recipe based on your taste. Don’t forget to store leftovers properly to enjoy them later. I hope you feel ready to create this dish with confidence. Enjoy your cooking and the bright flavors in every bit

Lemon Artichoke Chicken Pasta
Ingredients
- 2 breasts boneless, skinless chicken
- 8 oz fettuccine pasta
- 1 can artichoke hearts, drained and quartered
- 2 tablespoons olive oil
- 3 cloves garlic, minced
- 1 lemon zest and juice
- 1 cup cherry tomatoes, halved
- 1 cup fresh spinach
- 0.25 teaspoon red pepper flakes (optional)
- to taste salt and pepper
- 0.25 cup grated Parmesan cheese (optional for serving)
- to garnish fresh basil
Instructions
- Begin by cooking the fettuccine pasta according to package instructions until al dente. Drain and set aside, reserving 1/2 cup of pasta water.
- While the pasta is cooking, season the chicken breasts with salt, pepper, and lemon zest.
- In a large skillet, heat olive oil over medium heat. Add the seasoned chicken breasts and cook for about 5-6 minutes on each side or until fully cooked through and golden brown. Remove from the skillet and let rest for a few minutes, then slice into thin strips.
- In the same skillet, add minced garlic and sauté for about 1 minute until fragrant.
- Add the quartered artichoke hearts, cherry tomatoes, and spinach to the skillet, cooking until the spinach wilts and the tomatoes soften, about 3-4 minutes.
- Stir in the cooked pasta and sliced chicken, along with the lemon juice and red pepper flakes if using. Toss everything together, adding reserved pasta water as needed to create a light sauce that coats the pasta.
- Taste and adjust seasoning with more salt, pepper, and lemon juice as desired.
- Remove from heat and serve warm, garnished with grated Parmesan cheese and fresh basil.

![To make spicy black bean burgers, you need a few key ingredients: - 1 can (15 oz) black beans, drained and rinsed - 1/2 cup cooked quinoa - 1/2 cup breadcrumbs (gluten-free if needed) These ingredients form the base of the burger. The black beans provide protein and taste. Quinoa adds texture and nutrition. Breadcrumbs help bind the mix together. You can make these burgers your own with some fun additions: - Toppings Suggestions: avocado slices, lettuce, tomato, salsa, or spicy mayo - Spice Enhancements: jalapeño and garlic for extra kick Feel free to swap ingredients based on your taste. Want more heat? Add more jalapeño. Prefer a fresh crunch? Load up on lettuce and tomato. These spicy black bean burgers are not only tasty but also healthy: - Calories per serving: About 180 - Protein: 10g - Fats: 5g - Carbs: 28g This burger packs a punch of flavor while keeping a balanced profile. It is a great option for lunch or dinner. For the full recipe, check out the details above. To make the base, start by mashing the black beans. Use a fork or a potato masher. You want them mostly smooth, but keep some chunks for texture. This adds a nice bite to your burger. Next, add the additional ingredients to the bowl. Combine cooked quinoa, breadcrumbs, chopped red onion, minced jalapeño, minced garlic, cumin, smoked paprika, soy sauce, lime juice, salt, and pepper. Mix well until all ingredients are combined. If the mixture feels too wet, add a bit more breadcrumbs. This step helps hold the patties together. Now, it’s time to shape your burgers. Divide the mixture into equal portions, about four patties. Form each portion into a round shape. If you want them to hold together better, chill the patties in the fridge for 30 minutes. This makes them firmer. For cooking, heat a non-stick skillet or grill over medium heat. Drizzle a bit of olive oil to prevent sticking. Cook the patties for about 4 to 5 minutes on each side. You want them crispy and heated through. The smell will be amazing! When it’s time to serve, choose your toppings wisely. Avocado slices add creaminess, while lettuce and tomato add freshness. Salsa or spicy mayo can enhance the flavor even more. Pair your spicy black bean burgers with a side salad or some crispy fries. This makes for a delicious meal that’s both filling and healthy. You can find the full recipe above for more details on how to make these tasty burgers! To make your spicy black bean burgers great, focus on texture. Start by mashing the black beans well, but leave some chunks. This gives your burgers a nice bite. Chilling the patties is key. After you shape them, put them in the fridge for about 30 minutes. This helps them hold together better during cooking. Baking is a great alternative to frying. Preheat your oven to 375°F (190°C) and place the patties on a baking sheet. Bake for 20-25 minutes, flipping halfway. This method makes them crispy without extra oil. You can also adjust the flavors. Want more heat? Add more jalapeño or a dash of hot sauce. Feel free to mix in fresh herbs like cilantro for a fresh twist. Binding agents are crucial. If your mixture feels too wet, add more breadcrumbs. You can also use flaxseed meal or chia seeds mixed with water for a nice binder. Watch the moisture content closely. If you use canned beans, make sure to drain them well. Excess liquid can turn your patties into a mushy mess. For the full recipe of these tasty spicy black bean burgers, check out the recipe provided above. {{image_2}} You can change the taste of your spicy black bean burgers in fun ways. One option is the Southwest spicy black bean burger. For this, add corn, diced red pepper, and taco seasoning. This gives a bold, zesty flavor. Another tasty choice is the chipotle black bean burger. Mix in chipotle peppers in adobo sauce. This adds a smoky heat that spice lovers will enjoy. If you want a low-carb meal, try lettuce wraps. Instead of buns, use large lettuce leaves. They keep the burger juicy and fresh. You can also make black bean burger bowls. Simply place the patty on a bed of rice or quinoa. Top it with your favorite veggies and salsa for a hearty meal. Making these burgers fit your diet is easy. For gluten-free versions, use gluten-free breadcrumbs. This keeps the burger tasty without the gluten. If you’re vegan, skip the eggs and use mashed flax seeds instead. This keeps the burgers bound together while being plant-based. Whether you’re vegan or vegetarian, these burgers can fit your needs. You can enjoy them without missing out on flavor. For the full recipe, check here: [Full Recipe]. To keep uncooked patties fresh, place them in the fridge. Use an airtight container. They stay good in the fridge for about 2-3 days. If you want to keep them longer, freezing is a great option. Wrap each patty in plastic wrap or parchment paper. Then, put them in a freezer bag. They can last up to 3 months in the freezer. After cooking, let the black bean burgers cool down. Store them in an airtight container. This keeps them moist and flavorful. They can last in the fridge for about 4-5 days. When you want to eat them, simply reheat in a skillet or microwave. For the skillet, heat for about 3-4 minutes on medium. If using the microwave, heat for about 1-2 minutes, checking to avoid overheating. In the fridge, uncooked patties last for 2-3 days. Cooked black bean burgers stay fresh for 4-5 days. Always check for signs of spoilage. If you see mold or an off smell, it’s best to throw them away. Enjoy your spicy black bean burgers while they’re fresh! For the full recipe, check out [Full Recipe]. To make your spicy black bean burgers less mushy, focus on two main areas: ingredient adjustments and binding tips. - Ingredient adjustments: Use less black beans and add more breadcrumbs or quinoa. This helps absorb moisture and creates a firmer texture. - Tips for better binding: Chilling the patties for about 30 minutes in the fridge helps them hold their shape. You can also add a bit of ground flaxseed mixed with water as a natural binder. Yes, you can make these burgers ahead of time! Here are some best practices for meal prep: - Prep the patties: Form the patties and place them on a baking sheet lined with parchment paper. You can freeze them for later use. - Store in the fridge: If you plan to cook them within a day or two, simply cover the patties with plastic wrap and keep them in the fridge. If you want to substitute black beans, here are some great alternatives: - Alternative legumes: Use kidney beans, pinto beans, or chickpeas. Each will give a different taste and texture. - Other ingredients: You can also use lentils or cooked mushrooms for a unique flavor profile. These options provide good nutrition and maintain the burger's heartiness. For a full recipe, check out the Spicy Black Bean Burgers section above! You can create delicious spicy black bean burgers using simple, healthy ingredients. Start with black beans and quinoa, then customize them with tasty toppings. Follow clear steps to make perfect patties, and try different cooking methods. Remember the tips for texture and binding to avoid mushiness. Store uncooked or cooked burgers properly for later meals. In summary, these burgers are easy, versatile, and packed with flavor. Enjoy experimenting with your own twists!](https://dailydishly.com/wp-content/uploads/2025/06/fb468978-fb40-4fbf-9ebe-b248e91fb409-768x768.webp)
![- 400g spaghetti - 6 cloves garlic, thinly sliced - ½ cup extra virgin olive oil - 1 teaspoon red pepper flakes - Grated Parmesan cheese for serving - Freshly cracked black pepper - 1 cup fresh parsley, chopped - 1 lemon (zest and juice) - Salt to taste When making Spaghetti Aglio e Olio, you want to keep it simple. The main ingredients shine through. Start with quality spaghetti, as it forms the base of your dish. I always use 400g for four servings. For that distinct flavor, thinly slice 6 cloves of garlic. The garlic adds a rich aroma and taste as it cooks. Don't forget the olive oil! Use ½ cup of extra virgin olive oil to sauté the garlic. To kick it up a notch, consider some optional ingredients. A teaspoon of red pepper flakes adds heat. Adjust it to fit your spice level. If you love cheese, grated Parmesan is a nice touch for serving. Freshly cracked black pepper adds a lovely finish. For freshness, I like to add a cup of chopped parsley. It brings color and taste to the dish. The zest and juice from one lemon brighten the flavors. Salt is essential for enhancing every ingredient. Feel free to adjust the salt to your preference. This recipe is all about balance and freshness. Gather these ingredients for a quick and delicious meal. For the complete recipe, check out the [Full Recipe]. 1. Boil water and salt: Start by filling a large pot with water. Add a generous amount of salt to make it flavorful. Bring it to a rolling boil. 2. Cook until al dente: Add the spaghetti to the boiling water. Stir occasionally. Cook according to package instructions until it is al dente, which means firm to the bite. 3. Reserve pasta water before draining: Before you drain the pasta, remember to save about one cup of that starchy pasta water. It helps to make the sauce creamy later. 1. Heat olive oil in a skillet: In a large skillet, pour in the olive oil. Turn the heat to medium. Let the oil warm up but not smoke. 2. Sauté garlic until golden: Add the thinly sliced garlic to the warm oil. Cook it gently for about 2-3 minutes. Watch it closely until it turns golden and fragrant. Be careful not to let it burn. 3. Mix in red pepper flakes: Stir in the red pepper flakes. Let them cook for an extra minute. This step adds a nice kick to the oil. 1. Toss spaghetti with garlic oil: Add the drained spaghetti to the skillet with the garlic oil. Toss it well to coat every strand. 2. Add reserved pasta water: Pour in a bit of the reserved pasta water. This helps to keep the spaghetti moist and binds the flavors. 3. Incorporate parsley, lemon, and seasoning: Off the heat, mix in the chopped parsley, lemon zest, and juice. Taste it and adjust the salt if needed. This easy recipe gives you a simple yet flavorful dish. For the full recipe, check out the details above. Enjoy every bite of your savory spaghetti aglio e olio! - Avoid overcooking pasta: Cook spaghetti until it's al dente. This means it should be firm when you bite into it. This texture helps the pasta hold up better when you mix it with the sauce. - Importance of seasoning the boiling water: Always add salt to your boiling water. This helps flavor the pasta from the inside. Use about 1-2 tablespoons for every 4 quarts of water. - Timing for sautéing garlic: Add sliced garlic to the oil once it’s hot. Cook it for about 2-3 minutes. This timing helps unlock its rich flavor without going too far. - How to avoid burning garlic: Keep an eye on the garlic as it cooks. If it starts to turn brown too quickly, lower the heat. Burnt garlic can taste bitter and ruin your dish. - Presentation tips for a restaurant-style dish: Serve your spaghetti on warmed plates. This keeps the pasta hot longer. Add a sprinkle of fresh parsley on top for color. A lemon wedge on the side adds a nice touch. - Pairing options for sides or drinks: A simple green salad pairs well with spaghetti. You can also serve it with garlic bread for a full meal. For drinks, a glass of white wine complements the flavors nicely. For more details on how to make this dish, check out the Full Recipe. {{image_2}} You can change some ingredients to fit your needs. If you want gluten-free spaghetti, you can find many great options in stores. These work well in this recipe. If you prefer garlic-infused oil, use it instead of plain olive oil. This option adds even more garlic flavor to your dish. Adding vegetables makes this dish even better. Try mixing in fresh spinach or sweet cherry tomatoes. These add color and nutrients. You can also mix in proteins like shrimp or grilled chicken. Both options create a heartier meal and offer more flavors. Fresh herbs can brighten up this dish. Basil or oregano are great choices. Just chop them finely and mix them in at the end. If you like heat, adjust the spice level. Use different types of peppers, like jalapeños or serranos, to switch things up. Each pepper brings its own unique flavor to your spaghetti. For the Full Recipe, check out the complete details! To keep your Spaghetti Aglio e Olio fresh, store it in the fridge. Place the leftover pasta in an airtight container. This helps to keep moisture in and prevents the pasta from drying out. You can also cover the container tightly with plastic wrap. The best containers for storage are glass or BPA-free plastic. Glass containers allow you to see the food inside. They also do not absorb odors. Plastic containers are lightweight and easy to stack. Just make sure they seal well. When it's time to eat your leftovers, you have two options: the microwave or the stove. The microwave is quick. Place the pasta in a microwave-safe dish. Cover it with a lid or damp paper towel to keep moisture in. Heat for 1-2 minutes, stirring halfway through. Using the stove gives you better results. Add a splash of olive oil or water to a skillet. Heat over low to medium heat. Stir gently until warm. This method helps keep the pasta moist. Yes, you can freeze Spaghetti Aglio e Olio! Freezing is great for making meals ahead of time. First, let the pasta cool completely. Then, place it in a freezer-safe container. Make sure to leave some space at the top for expansion. To freeze, follow these steps: 1. Portion the pasta into single servings. 2. Seal each portion tightly in a plastic bag or container. 3. Label the bags with the date for easy tracking. When you want to eat it, thaw it in the fridge overnight. Reheat as described above. Enjoy your easy dinner later! For the full recipe, check the Full Recipe section above. Spaghetti Aglio e Olio can last in the fridge for up to three days. Store it in an airtight container to keep it fresh. It’s best to eat it within this time for the best flavor. Yes, you can make Spaghetti Aglio e Olio ahead of time. Cook the pasta and sauce, then cool them down. You can store them separately in the fridge. When ready to serve, just reheat and combine. This dish is quick to prepare, so making it fresh is great too. You can serve Spaghetti Aglio e Olio with many tasty options. Consider garlic bread for a crunchy side. A simple salad with fresh greens works well too. You might also enjoy antipasto or bruschetta to start your meal. To reheat Spaghetti Aglio e Olio, follow these steps: 1. Place the pasta in a skillet over low heat. 2. Add a splash of reserved pasta water or olive oil to prevent sticking. 3. Stir gently until heated through, about 5 minutes. 4. Serve hot to enjoy the full flavor of the dish. For the full recipe, check out the detailed instructions for a perfect dish every time! Spaghetti Aglio e Olio is simple yet flavorful. We covered the main and optional ingredients, how to cook and combine them, plus tips for the best results. Variations allow for personal twists, making this dish your own. Proper storage and reheating ensure you enjoy it later. Whether you stick to tradition or experiment, this dish will impress. Enjoy cooking and sharing this tasty meal!](https://dailydishly.com/wp-content/uploads/2025/05/5a127dfa-b261-495f-ad6e-6f110f891143-768x768.webp)
