Greek Chicken Souvlaki Skewers Flavorful Recipe Guide

Craving a taste of Greece? My Greek Chicken Souvlaki Skewers recipe is just what you need! These flavorful, juicy skewers are perfect for any gathering or weeknight dinner. I’ll guide you step-by-step through the marinating process, expert grilling tips, and mouth-watering serving ideas. Whether you’re a cooking novice or a seasoned chef, this guide will help you create a dish that’s sure to impress. Let’s get started on this delicious adventure!
Ingredients
Main Ingredients for Greek Chicken Souvlaki
To make Greek chicken souvlaki, you will need:
– 1 lb (450g) boneless, skinless chicken breast, cut into 1-inch cubes
– 3 tablespoons olive oil
– 3 tablespoons lemon juice
– 2 teaspoons dried oregano
– 2 teaspoons garlic powder
– 1 teaspoon onion powder
– Salt and pepper, to taste
– Wooden or metal skewers (if using wooden skewers, soak them in water for 30 minutes)
These ingredients create a tasty base for your skewers. The chicken gives a nice, juicy bite, while olive oil and lemon juice add flavor and moisture.
Marinade Components
The marinade is key to great flavor. It includes:
– Olive oil
– Lemon juice
– Dried oregano
– Garlic powder
– Onion powder
– Salt and pepper
Mix these ingredients well in a bowl. The acid from the lemon juice helps tenderize the chicken. Oregano adds a fresh taste, and garlic powder gives depth.
Tips for Selecting Fresh Chicken
When picking chicken, look for these signs:
– Firm texture
– Pink color
– No strong smell
Fresh chicken should feel cold to the touch and have no signs of discoloration. Always check the expiration date. If possible, buy from local farms for added quality and flavor.
Step-by-Step Instructions
Preparing the Marinade
To start, you need to make the marinade. In a large bowl, whisk together these ingredients:
– 3 tablespoons olive oil
– 3 tablespoons lemon juice
– 2 teaspoons dried oregano
– 2 teaspoons garlic powder
– 1 teaspoon onion powder
– Salt and pepper, to taste
Mix them well. The olive oil adds richness. The lemon juice gives a bright flavor. Oregano brings that lovely Greek taste. Garlic and onion powders add depth.
Marinating the Chicken
Now, it’s time to marinate the chicken. Cut 1 pound of boneless, skinless chicken breast into 1-inch cubes. Add the chicken to the marinade. Stir until each piece is coated. Cover the bowl with plastic wrap. Refrigerate for at least 30 minutes. You can leave it for up to 4 hours for even more flavor. The longer it sits, the better it tastes.
Skewering and Grilling the Chicken
When you’re ready to cook, preheat your grill or grill pan over medium-high heat. If you’re using wooden skewers, soak them in water for 30 minutes first. This prevents them from burning on the grill.
Next, thread the marinated chicken onto the skewers. Leave a small space between each piece. This helps them cook evenly. Place the skewers on the grill. Cook for about 10-12 minutes. Turn them occasionally so they get nice grill marks. Check that the internal temperature reaches 165°F (75°C).
Once cooked, take the skewers off the grill and let them rest for a few minutes. This helps keep them juicy. Enjoy your flavorful Greek chicken souvlaki skewers!
Tips & Tricks
Achieving Perfectly Grilled Chicken
To get juicy, tender chicken, focus on the grill’s heat. Preheat your grill to medium-high. This helps to sear the chicken well. Keep an eye on your skewers as they cook. Turn them every few minutes. This ensures even cooking and nice grill marks. The chicken should reach an internal temperature of 165°F (75°C) when done.
Best Practices for Marinating
Marinating is key for great flavor. Start by mixing olive oil, lemon juice, oregano, garlic powder, onion powder, salt, and pepper in a bowl. Add the chicken cubes and coat them fully. Cover the bowl and refrigerate for at least 30 minutes. For even better flavor, marinate for up to 4 hours. This lets the chicken soak up all the good flavors.
Serving Suggestions and Pairings
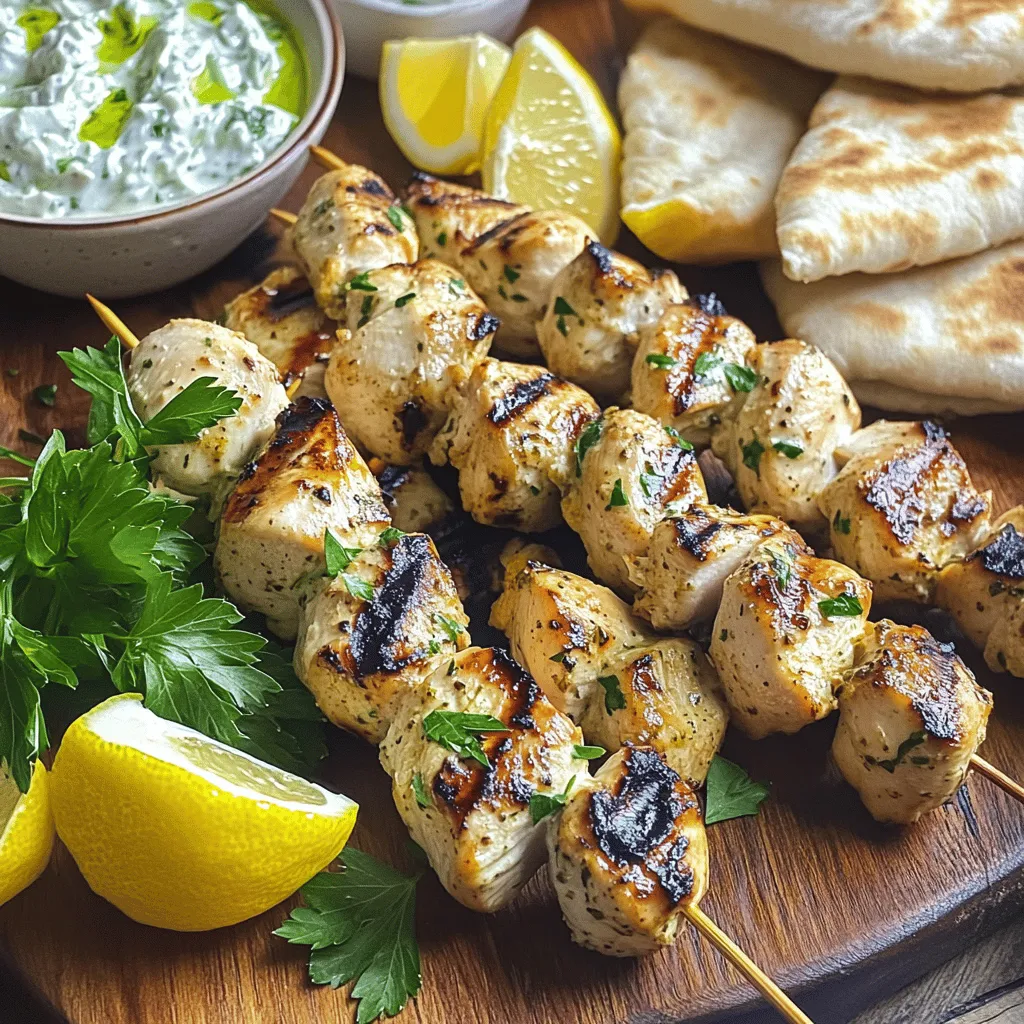
Serve your souvlaki skewers on a big platter. Garnish with fresh lemon wedges and chopped parsley. A side of tzatziki sauce is a must for dipping. Pair the skewers with warm pita bread and a simple Greek salad. This makes a colorful and tasty meal that everyone will enjoy.

Variations
Vegetarian Alternatives
If you want a veggie version of Greek chicken souvlaki, try using tofu or halloumi cheese. Both options soak up flavors well. Cut tofu or halloumi into cubes. Marinate them just like the chicken. Grill until they get golden brown and crisp. You can also use veggies like bell peppers, zucchini, or mushrooms. Just cut them into bite-sized pieces and marinate. Skewering a mix of these items makes a colorful and tasty dish.
Spice and Herb Variations
Feel free to play with spices and herbs. Instead of oregano, try thyme or rosemary for a different flavor. You can add smoked paprika for a hint of smokiness. For some heat, add red pepper flakes or cayenne pepper. If you love citrus, include lime juice instead of lemon. Each choice gives a new twist to your souvlaki. Mix and match until you find your favorite blend!
Sides to Complement the Skewers
To make your meal complete, serve sides that pair well with souvlaki. A classic Greek salad is a great choice. Combine tomatoes, cucumbers, red onion, and feta cheese. Drizzle olive oil and lemon juice on top for flavor. You can also serve warm pita bread or tzatziki sauce for dipping. This creamy sauce made of yogurt, cucumber, and garlic adds a refreshing touch. Add some roasted vegetables or rice for a filling meal.
Storage Info
Storing Leftovers
To store leftover Greek chicken souvlaki skewers, let them cool first. Place them in an airtight container. This keeps the chicken fresh and tasty. You can keep them in the fridge for up to 3 days. If you have a lot, separate them into smaller portions for easy meals later.
Reheating Tips
When you’re ready to eat your leftovers, the best way to reheat them is in the oven. Preheat your oven to 350°F (175°C). Place the skewers on a baking sheet. Heat them for about 10-15 minutes or until they are warm. This method keeps the chicken juicy. You can also use a microwave, but it might dry them out. Heat in short bursts, checking often.
Freezing and Thawing Instructions
If you want to save the skewers for later, you can freeze them. Wrap each skewer tightly in plastic wrap. Then put them in a freezer bag. They can last for about 3 months in the freezer. To thaw, move them to the fridge overnight. For a quick thaw, place them in cold water for an hour. After thawing, reheat as mentioned above. Enjoy your meal anytime!
FAQs
What is the best way to prevent chicken from drying out on the grill?
To keep chicken moist, use a good marinade. The olive oil and lemon juice in the marinade help lock in moisture. Make sure to not overcook the chicken. Use a meat thermometer to check that it reaches 165°F (75°C). Grilling at medium-high heat also helps, as it cooks the chicken quickly while keeping the inside juicy.
Can I use other proteins for this recipe?
Yes, you can use other proteins! Pork, beef, or shrimp work well. Just adjust the cooking times. For shrimp, grill for about 3-4 minutes. For pork or beef, use similar marinating and grilling times as the chicken. Make sure they also reach the right internal temperature for safety.
How long should I marinate the chicken for optimal flavor?
Marinate the chicken for at least 30 minutes. This allows the flavors to soak in. For a deeper taste, marinate for up to 4 hours. Avoid marinating too long, as the acid in lemon juice can change the chicken’s texture.
This article covered key parts of making Greek chicken souvlaki. We explored the main ingredients, including the marinade, and how to select fresh chicken. You learned to prepare, marinate, skewer, and grill the chicken like a pro. We also shared tips for perfect grilling, serving ideas, and variations for everyone. Remember to store leftovers correctly and reheat them well. Enjoy trying this tasty dish. With these steps, you’ll create a meal that impresses. Delicious Greek souvlaki awaits you.


![To make this vibrant salad, you need fresh and colorful ingredients. Here’s what you will need: - 8 oz rice noodles (or your favorite noodle) - 1 cup red cabbage, shredded - 1 cup carrots, julienned - 1 cup bell peppers (mixed colors), sliced - 1 cup sugar snap peas, trimmed - 1 cucumber, julienned - 1 cup edamame, shelled - ¼ cup fresh cilantro, chopped - ¼ cup green onions, sliced - ¼ cup peanuts, crushed (optional for garnish) These ingredients bring crispness and bright colors to the dish. They also add a mix of textures that make every bite fun. The dressing ties all the flavors together. You will need these simple ingredients: - 3 tablespoons soy sauce (or tamari for gluten-free) - 2 tablespoons sesame oil - 1 tablespoon rice vinegar - 1 tablespoon honey (or maple syrup for vegan) - 1 teaspoon ginger, grated - 1 clove garlic, minced - 1 teaspoon chili paste (adjust to taste) Mixing these ingredients creates a tasty dressing that adds depth to the salad. The balance of salty, sweet, and a little spice is what makes this dish stand out. Want to make your salad even better? Here are some fun add-ins: - Sliced avocado for creaminess - Grilled chicken or tofu for protein - Sesame seeds for extra crunch - Fresh herbs like mint or basil for a fresh twist These additions can take your Rainbow Asian Noodle Salad to the next level. Feel free to mix and match based on your taste! For the complete recipe, check the [Full Recipe]. Start by boiling a pot of water. Use enough water to cover the noodles. Once the water boils, add 8 oz of rice noodles. Cook them according to the package instructions. I usually check for an al dente texture. This means they should be firm, not mushy. After cooking, drain the noodles in a colander. Rinse them under cold water. This step cools them and stops the cooking process. Set them aside for later. Grab a large mixing bowl. Add 1 cup of shredded red cabbage. Next, add 1 cup of julienned carrots. Then, toss in 1 cup of sliced bell peppers in mixed colors. Don't forget 1 cup of trimmed sugar snap peas. They add a nice crunch! Now, add 1 julienned cucumber and 1 cup of shelled edamame. Finally, mix in ¼ cup of chopped cilantro and ¼ cup of sliced green onions. These fresh veggies make your salad colorful and tasty. In a small bowl, combine the dressing ingredients. Start with 3 tablespoons of soy sauce. If you are gluten-free, use tamari instead. Next, add 2 tablespoons of sesame oil and 1 tablespoon of rice vinegar. Then, mix in 1 tablespoon of honey or maple syrup for a vegan option. Add 1 teaspoon of grated ginger and 1 clove of minced garlic. Finally, add 1 teaspoon of chili paste, adjusting to your spice level. Whisk all the ingredients together until well combined. Now, it’s time to bring everything together. Add the cooked noodles to your bowl of fresh vegetables. Pour the dressing over the top. Toss everything gently to mix. Make sure each noodle and veggie is coated well. This mixing helps all the flavors blend together for a delicious bite. After mixing, taste your salad. If you want it sweeter, add a little more honey. For extra spice, add more chili paste. Adjust the flavors to suit your liking. This salad should be a reflection of your taste. Feel free to experiment until it’s perfect for you. To make your Rainbow Asian Noodle Salad pop, use a large, shallow platter. This helps showcase the bright colors. Layer the noodles first, then pile on the veggies. Drizzle dressing on top, and finish with a sprinkle of cilantro and crushed peanuts. This creates a stunning look that draws everyone in. To keep your salad fresh, store it in an airtight container. Keep the dressing separate until you’re ready to eat. This prevents the noodles and veggies from getting soggy. You can also add a little lemon juice to the salad. This helps maintain color and crunch. Leftover salad is great for lunch! Consider adding protein like grilled chicken or tofu for a filling meal. You can also use the salad as a filling for lettuce wraps. Just scoop some salad into large lettuce leaves. This adds a fun twist and keeps it fresh. If you want to make it spicy, add more chili paste to the leftovers. {{image_2}} You can easily make this salad gluten-free. Just swap regular noodles for rice noodles. Use tamari instead of soy sauce. This keeps the flavor while avoiding gluten. If you want a vegan version, replace honey with maple syrup in the dressing. This simple swap keeps your salad sweet while staying plant-based. You can also add tofu for extra texture and protein. For those who want more protein, consider adding cooked chicken or shrimp. Both work well with the flavors in this salad. You can also use chickpeas or lentils for a hearty twist. Each option adds nutrition and keeps the dish filling. If you want the full recipe, you can find it above. To keep your Rainbow Asian Noodle Salad fresh, store it in the fridge. Place the salad in an airtight container. If you have leftover dressing, store it separately to prevent sogginess. This way, the noodles and veggies stay crisp. Use glass containers or high-quality plastic ones with tight lids. Glass is great because it does not stain or retain odors. Make sure the container is large enough to hold all the ingredients without squishing them together. Your salad can last for about 3 to 5 days in the fridge. The veggies will stay fresh, but the noodles may soften over time. To enjoy the best taste, eat it within the first few days. Always check for any changes in smell or texture before eating. For the full recipe, refer to the earlier sections. I love using rice noodles for their light texture. They soak up the flavors well. You can also use soba noodles or any thin pasta. Just cook them until they are al dente. Rinse under cold water to stop the cooking. This keeps them from getting mushy. Absolutely! You can prep the salad a day in advance. Just keep the dressing separate until you are ready to serve. This helps keep the veggies crisp. If you mix everything too early, the noodles may soak up the dressing. Yes, this salad is packed with veggies. Each ingredient adds nutrients. The colorful mix provides vitamins and minerals. You get fiber from the noodles and veggies too. This salad is a great option for a light meal or side dish. You can easily change the dressing to suit your taste. Add more honey for sweetness or extra chili paste for heat. You might try lime juice instead of rice vinegar for a zingy twist. Fresh herbs like mint or basil can add a bright flavor. Yes! Grilled chicken, shrimp, or tofu are great options. Just make sure to cook them first. Slice the meat thin before adding it to the salad. This adds protein and makes the dish more filling. You can check the Full Recipe for ideas on how to include them. You learned how to make a tasty Rainbow Asian Noodle Salad. We covered the key ingredients, from the noodles to the fresh veggies and zesty dressing. I shared easy steps to prepare and combine everything for the best flavor. You also found tips for presentation and storage to keep your salad fresh. Experiment with variations like gluten-free or vegan options. Remember, this dish is flexible and fun! Enjoy your colorful salad and make it your way.](https://dailydishly.com/wp-content/uploads/2025/06/34dc854e-6038-45bb-afdc-1af709707800-768x768.webp)


![Fresh spinach is the star of this soup. You will need 2 cups of roughly chopped spinach. This leafy green adds color and nutrients. Spinach is rich in vitamins A and C, making your soup healthy and vibrant. When you cook it, the spinach wilts and blends well with the other flavors. Tortellini brings heartiness to the soup. You can use fresh or frozen cheese tortellini, about 2 cups. Fresh tortellini cooks quickly, usually in 3-5 minutes. Frozen tortellini takes a bit longer. Whichever you choose, the soft pasta adds texture and a delightful bite to the creamy broth. Aromatics build the flavor base. You will need a medium onion, diced, and 3 minced garlic cloves. These add savory depth to the soup. A grated carrot, about one medium-sized, gives a touch of sweetness. Together, they create a warm, inviting aroma that fills your kitchen. Don't forget the olive oil! You will need 2 tablespoons to sauté the aromatics to perfection. For the full recipe, see the details above. To start, grab a large pot. Heat 2 tablespoons of olive oil over medium heat. Add 1 diced onion and sauté it until it softens, about 4-5 minutes. Next, stir in 3 minced garlic cloves and 1 grated carrot. Cook this mix for another 2-3 minutes. The garlic should smell great at this point. This base gives the soup a rich flavor. Now, pour in 4 cups of vegetable broth. Bring it to a gentle boil. Once boiling, add 2 cups of cheese tortellini. Follow the package instructions to cook them. Fresh tortellini usually takes about 3-5 minutes. You know they are ready when they float to the top. Reduce the heat to low. Stir in 2 cups of roughly chopped spinach, 1 cup of heavy cream, 1 teaspoon of dried basil, 1 teaspoon of salt, and 1/2 teaspoon of black pepper. Let the soup simmer for 5-7 minutes. This allows the spinach to wilt and the flavors to meld. Taste the soup and adjust the seasoning if needed. Serve it hot, topped with grated Parmesan cheese and fresh basil leaves if you wish. For the complete recipe, see the [Full Recipe]. To boost flavor, don't skip the onions and garlic. Sauté them well; it adds depth. A touch of dried basil brings warmth, while salt and pepper brighten all the tastes. If you want more zing, consider red pepper flakes. They give a lovely kick without overpowering the soup. Fresh herbs are also a great choice. Toss in some fresh basil or parsley right before serving for a fresh burst. If you like a thicker soup, add less broth or more cream. You can also use less tortellini. If the soup feels too thick, just stir in a bit more broth or water. This lets you control how creamy or brothy you want your soup. Using a hand blender can also help. Blend just a little bit to create a smoother base while keeping some chunks for texture. Cook the tortellini according to the package instructions. Fresh tortellini usually takes about 3-5 minutes. If you use frozen, check for the right cooking time. Adding them to boiling broth helps them cook quickly and evenly. They are done when they float to the top. Don’t forget to add them at the right time. If they overcook, they'll become mushy and lose their shape. Follow these tips to enjoy the perfect tortellini in your creamy soup. For more details, check the Full Recipe. {{image_2}} You can easily add protein to your creamy spinach tortellini soup. Chicken, turkey, or sausage work well. If you like shrimp, toss some in during the last few minutes of cooking. For a meatless option, try cooked lentils or chickpeas. These additions make your soup heartier and more filling. To make this soup vegan, swap out the heavy cream for coconut milk or cashew cream. Use vegetable broth instead of chicken broth for a rich base. Look for vegan tortellini in stores, or make your own with flour and water. Nutritional yeast can give a cheesy flavor without dairy. Feel free to mix in other veggies. Carrots and peas add sweetness and color. Zucchini or bell peppers can bring in fresh flavors. You can use frozen vegetables for convenience. Just add them during the cooking process so they heat through and blend well with the soup. For the full recipe, see the section above. After making the creamy spinach tortellini soup, let it cool to room temperature. Then, transfer it to an airtight container. Store it in the fridge for up to three days. If you want to enjoy it later, make sure you seal it well. This keeps the flavors fresh and tasty. You can freeze this soup for longer storage. First, let the soup cool completely. Then, pour it into freezer-safe containers. Leave some space at the top for expansion. The soup can freeze for up to three months. When you’re ready to eat it, just thaw it in the fridge overnight. To reheat, pour the soup into a pot over medium heat. Stir often to avoid sticking. Heat until it’s warm all the way through. If the soup is too thick, add a little broth or water. This will help restore its creamy texture. Enjoy this comforting meal again, just like the first time. For the full recipe, check out the earlier sections. Yes, you can use frozen spinach. Just thaw it first and drain excess water. Frozen spinach is often picked at peak freshness, so it can taste great. However, fresh spinach offers a brighter taste and texture. If you like a more vibrant green, go for fresh. You can thicken the soup in a few ways. One method is to add a cornstarch slurry. Mix one tablespoon of cornstarch with two tablespoons of cold water. Stir this into the soup and heat until it thickens. Another option is to blend part of the soup using an immersion blender. This keeps it creamy and rich. Parmesan cheese is a fantastic choice for adding flavor. It melts well and gives a nice salty kick. You can also try adding cream cheese for extra creaminess. If you want a stronger flavor, consider using sharp cheddar. Just sprinkle it in while the soup simmers for a delicious twist. For the complete recipe, check out the Full Recipe section. In this post, I covered the essentials for a delicious tortellini soup. We discussed key ingredients like fresh spinach, various tortellini, and aromatics. I provided step-by-step instructions for preparing and cooking your dish. I shared tips for enhancing flavors and adjusting texture. You also learned about tasty variations and proper storage methods. Remember, small swaps can greatly change your soup. Enjoy trying new flavors and make it your own! Your perfect tortellini soup awaits.](https://dailydishly.com/wp-content/uploads/2025/06/4c17d0e8-c88c-41b6-a4f3-bfc90cf6bf08-768x768.webp)
