Taco Stuffed Sweet Potatoes Flavorful and Nutritious

Looking for a tasty and healthy meal? Try Taco Stuffed Sweet Potatoes! This dish is full of flavor, packed with nutrients, and easy to make. You’ll love how sweet potatoes blend with spicy protein and fresh veggies. In this post, I’ll guide you through simple steps to create a satisfying meal. Let’s dive in and discover how to make this delicious dish come to life!
Why I Love This Recipe
- Healthy Twist: This recipe uses sweet potatoes as a base, providing a nutritious alternative to traditional taco shells.
- Flavor Packed: The combination of spices and ingredients creates a deliciously bold flavor profile that satisfies cravings.
- Easy to Customize: You can easily swap out ground turkey for beef or add your favorite toppings to make it your own.
- Quick Preparation: With a total time of just one hour, this dish is perfect for a busy weeknight dinner.
Ingredients
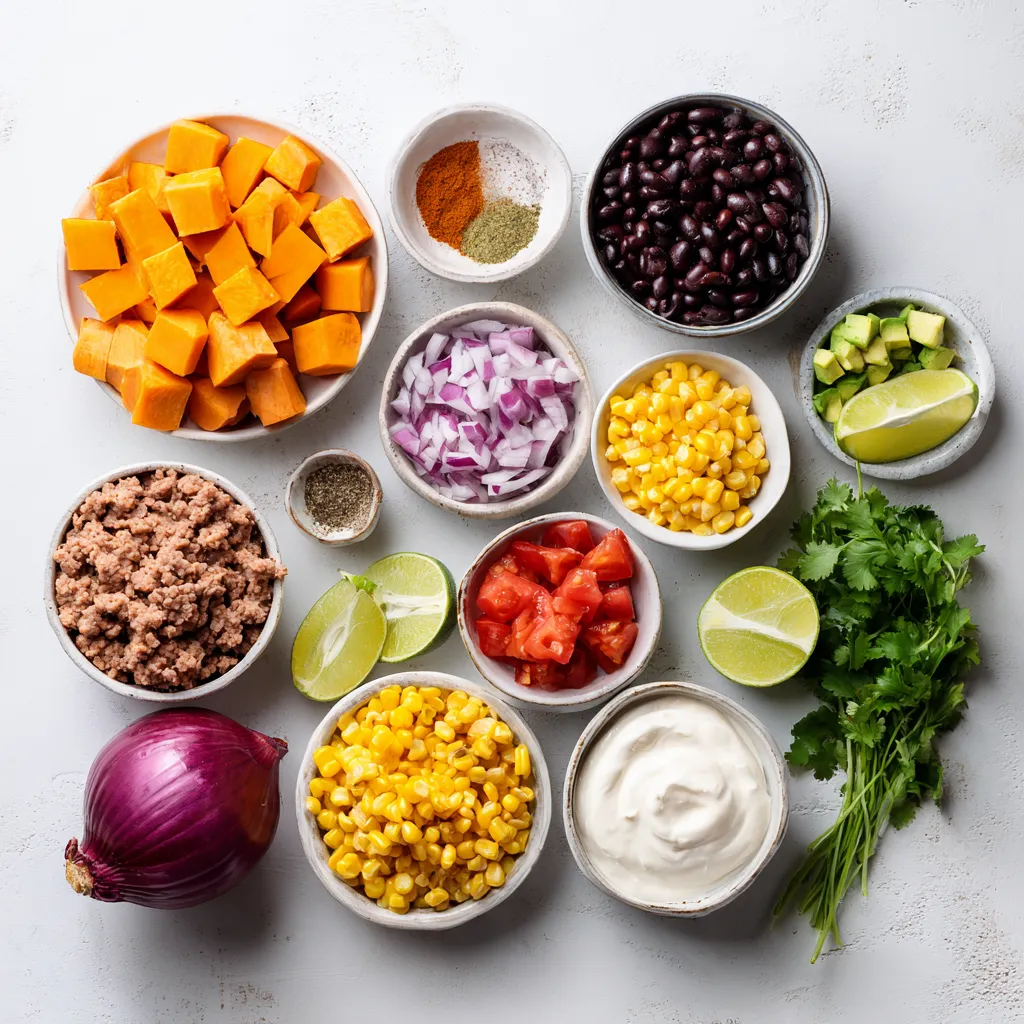
List of Ingredients
– 4 medium sweet potatoes
– 1 lb ground turkey (or beef)
– 1 can (15 oz) black beans, rinsed and drained
– 1 cup corn (fresh, frozen, or canned)
– 1 small red onion, diced
– 2 cloves garlic, minced
– 1 tablespoon taco seasoning
– 1 teaspoon cumin
– 1 teaspoon paprika
– Salt and pepper to taste
– 1 cup diced tomatoes (fresh or canned, drained)
– 1 avocado, diced
– ½ cup Greek yogurt or sour cream (for topping)
– Fresh cilantro, chopped (for garnish)
– Lime wedges (for serving)
In this recipe, you will need sweet potatoes, which are sweet and nutritious. They give a great base for the taco filling. You can choose either ground turkey or beef as your protein. I often opt for turkey to keep it leaner.
Next, we add vegetables and legumes. Black beans add protein and fiber. Corn brings sweetness and crunch. Diced red onion and minced garlic enhance the flavor burst.
Spices and seasonings are important to bring everything together. Taco seasoning, cumin, and paprika create that classic taco taste. Don’t forget salt and pepper to balance the flavors.
Finally, for toppings and garnishes, we have diced tomatoes for freshness, avocado for creaminess, and Greek yogurt or sour cream for tang. Fresh cilantro adds a nice touch, while lime wedges give a bright finish. Each ingredient plays a role in making these taco stuffed sweet potatoes a hit!
Step-by-Step Instructions
Baking the Sweet Potatoes
– Preheating the oven: Start by setting your oven to 400°F (200°C). This heat will cook the sweet potatoes just right.
– Preparing the sweet potatoes: Take four medium sweet potatoes. Use a fork to poke them several times. This step helps steam escape while baking. Place them on a baking sheet and slide them into the oven. Bake for 45 to 60 minutes. Check if they are soft by piercing them with a knife.
Cooking the Taco Filling
– Sautéing red onion and garlic: While the sweet potatoes bake, heat a large skillet over medium heat. Add one small diced red onion and sauté for about 3 to 4 minutes. Wait until the onion softens and turns a bit clear.
– Browning the meat: Next, add two minced garlic cloves and one pound of ground turkey or beef to the skillet. Cook this for about 6 to 8 minutes. Break the meat apart as it cooks. Make sure it is browned all over.
– Mixing in spices and vegetables: Now, stir in one tablespoon of taco seasoning, one teaspoon of cumin, and one teaspoon of paprika. Add salt and pepper to taste. Mix well to coat the meat. Then, add one can of rinsed and drained black beans, one cup of corn, and one cup of diced tomatoes. Stir this mixture and let it simmer for 5 to 7 minutes. This allows all the flavors to blend nicely.
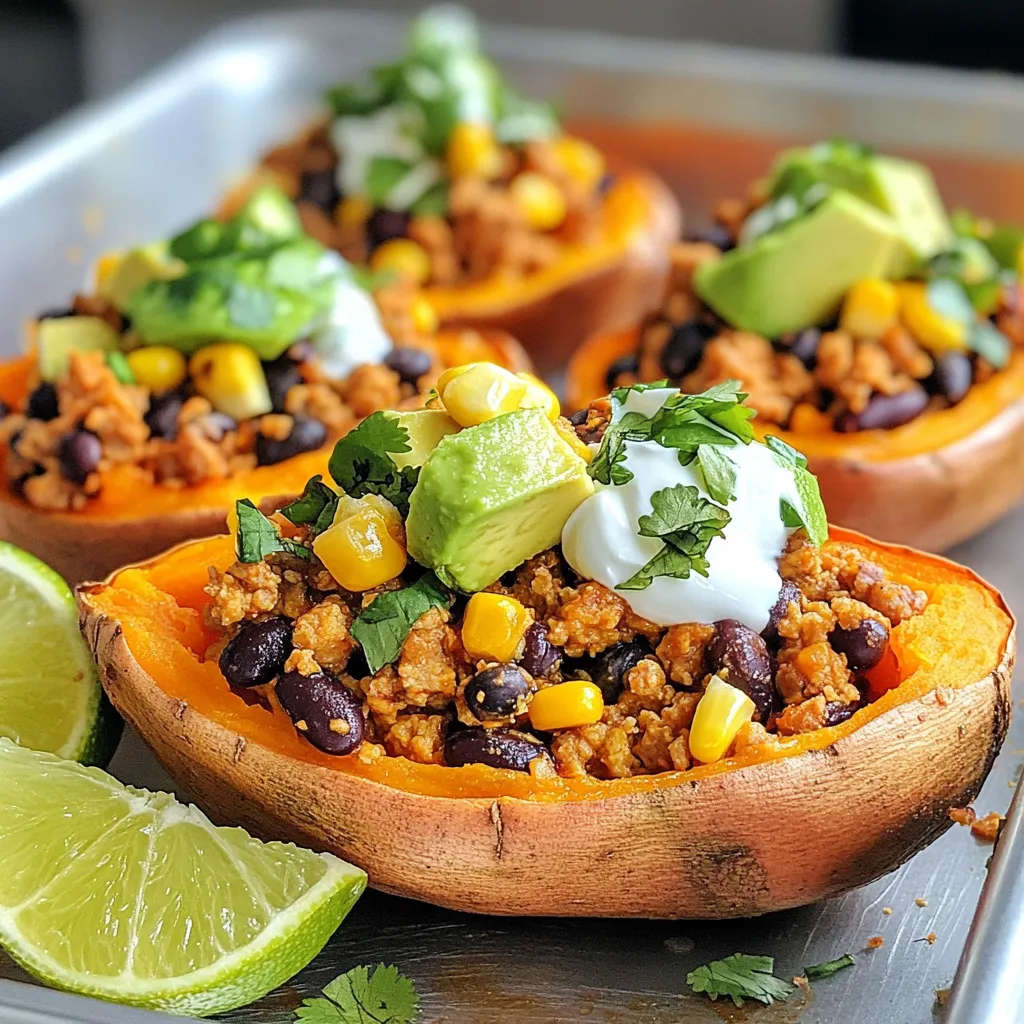
Assembling the Taco Stuffed Sweet Potatoes
– Slicing and mashing sweet potatoes: Once the sweet potatoes are baked, take them out of the oven. Let them cool for a bit. Slice each potato open lengthwise, but do not cut all the way through.
– Filling the potatoes: Use a fork to gently mash the insides of the sweet potatoes. This creates space for the taco filling. Scoop the taco mixture into each sweet potato.
– Adding toppings: Top each potato with diced avocado and a dollop of Greek yogurt or sour cream. Finish with fresh chopped cilantro and serve with lime wedges. Enjoy your tasty and colorful meal!
Tips & Tricks
How to Achieve Perfectly Baked Sweet Potatoes
To bake sweet potatoes just right, set your oven to 400°F (200°C). This temperature ensures nice, soft potatoes. Pierce each potato with a fork several times. This helps steam escape during baking. Place the sweet potatoes on a baking sheet. Bake them for 45 to 60 minutes. Check them by piercing with a knife. They should feel soft and tender.
For even cooking, try to choose sweet potatoes of similar size. This helps them bake evenly. If you have larger potatoes, you may need to increase the time.
Enhancing Flavor in the Taco Filling
To boost the flavor of your taco filling, adjust the spices. You can add more taco seasoning if you like it spicy. Fresh herbs like cilantro or parsley add brightness. Chop them finely and mix them in at the end.
Another idea is to use lime juice in the filling. It gives a fresh, zesty taste. You can also experiment with other spices, like chili powder or cayenne for heat, based on your taste.
Serving Suggestions
Serve your taco stuffed sweet potatoes warm for the best flavor. They taste great right out of the oven. Pair them with lime wedges. Squeezing fresh lime juice on top adds a nice zing.
For a complete meal, consider adding a side salad or some tortilla chips. The crunch of the chips balances the soft texture of the sweet potatoes. Enjoy your delicious meal!
Pro Tips
- Choose the Right Sweet Potatoes: Opt for medium-sized sweet potatoes for the perfect balance of sweetness and texture. They cook evenly and provide ample filling space.
- Enhance Flavor with Fresh Herbs: Adding fresh cilantro not only garnishes your dish but also elevates the flavor profile. Consider mixing in other herbs like parsley or green onions for added freshness.
- Customize Your Toppings: Feel free to mix and match toppings. Consider adding shredded cheese, jalapeños, or a homemade salsa for different flavor dimensions.
- Meal Prep for the Week: Prepare the taco mixture in advance and store it in the fridge. Stuff the sweet potatoes when you’re ready to eat for a quick and delicious meal.

Variations
Vegetarian Options
You can make taco stuffed sweet potatoes vegetarian by swapping the meat. Use black beans or lentils instead of ground turkey or beef. Both give great protein and flavor.
Add more vegetables to the mix. Try bell peppers, zucchini, or mushrooms. These will add texture and nutrients. You can also toss in some spinach or kale for extra greens.
Different Toppings
Toppings can change the game for your sweet potatoes. Use shredded cheese, salsa, or pico de gallo for a fresh kick.
For a twist, try pickled onions or jalapeños. They add a nice crunch and zing. You can also use guacamole for creamy goodness.
Spicy Adaptations
Love heat? Kick it up a notch with jalapeños or hot sauce in the taco mix. A sprinkle of cayenne works well, too.
For toppings, use spicy salsa or a drizzle of chili oil. These will give your dish a fiery edge. If you want to cool it down, serve with lime wedges to balance the spice.
Storage Info
How to Store Leftovers
Store your taco stuffed sweet potatoes in the fridge. Use an airtight container for best results. This keeps them fresh for up to four days. If you have extra taco filling, store it separately. This way, the sweet potatoes stay soft and tasty.
Reheating Instructions
You can reheat the sweet potatoes in the microwave or oven. For the microwave, place the potato on a plate. Heat for about 1-2 minutes. If using the oven, preheat it to 350°F (175°C). Wrap the sweet potato in foil and heat for about 15-20 minutes. This helps keep the skin crisp and the inside soft.
Freezing Recommendations
Yes, you can freeze taco stuffed sweet potatoes! To freeze, let them cool completely first. Wrap each potato tightly in plastic wrap. Then, place in a freezer bag. They can stay in the freezer for about three months. To thaw, leave them in the fridge overnight. Reheat as mentioned above for best taste.
FAQs
Can I use other types of potatoes?
Yes, you can use other potatoes. Russet or Yukon gold work well. They have a nice texture and flavor. However, sweet potatoes add a sweet taste that pairs great with taco fillings. If you prefer, just keep the cooking time in mind. They may need longer to bake than sweet potatoes.
How do I make this dish gluten-free?
This dish is easy to make gluten-free. The main ingredients are already gluten-free. Just ensure your taco seasoning does not have gluten. Many brands offer gluten-free options. Always check the labels.
What can I substitute for Greek yogurt or sour cream?
If you don’t have Greek yogurt or sour cream, try these swaps. Use cottage cheese for a similar texture. You can also use mashed avocado for creaminess. Another option is to use a dairy-free yogurt. Just make sure it’s unsweetened for the best taste.
In this post, we explored making taco stuffed sweet potatoes. We covered the key ingredients, step-by-step cooking, and helpful tips. You can use your favorite proteins and spices. Remember, creativity matters in toppings and variations.
Finally, enjoy experimenting with leftovers or trying new herbs. This dish is fun, easy, and versatile. You now have all the tools to make it your own. Happy cookin

Taco Stuffed Sweet Potatoes
Ingredients
- 4 medium sweet potatoes
- 1 lb ground turkey (or beef)
- 1 can black beans, rinsed and drained
- 1 cup corn (fresh, frozen, or canned)
- 1 small red onion, diced
- 2 cloves garlic, minced
- 1 tablespoon taco seasoning
- 1 teaspoon cumin
- 1 teaspoon paprika
- to taste salt and pepper
- 1 cup diced tomatoes (fresh or canned, drained)
- 1 whole avocado, diced
- 0.5 cup Greek yogurt or sour cream (for topping)
- to garnish fresh cilantro, chopped
- to serve lime wedges
Instructions
- Preheat your oven to 400°F (200°C).
- Pierce each sweet potato several times with a fork and place them on a baking sheet. Bake for 45-60 minutes, or until they are easily pierced with a knife.
- While the sweet potatoes are baking, heat a large skillet over medium heat. Add the diced red onion and sauté for 3-4 minutes until they begin to soften.
- Add the minced garlic and ground turkey to the skillet. Cook until browned and fully cooked through, breaking up the meat as you go (about 6-8 minutes).
- Stir in taco seasoning, cumin, paprika, salt, and pepper, mixing well to coat the meat.
- Add the black beans, corn, and diced tomatoes to the skillet. Stir and let simmer for 5-7 minutes to heat through and absorb flavors.
- Once the sweet potatoes are done, remove them from the oven and let them cool slightly. Slice each potato open lengthwise, being careful not to cut all the way through.
- Gently mash the insides of the sweet potatoes with a fork to create space for the filling.
- Scoop the taco mixture into each sweet potato generously. Top with diced avocado and a dollop of Greek yogurt or sour cream.
- Garnish with fresh cilantro and serve with lime wedges on the side for squeezing.


![To make this dish, you need a few key items. Here is what you’ll need: - 1 pound large shrimp, peeled and deveined - 4 tablespoons unsalted butter - 4 cloves garlic, minced - 1 teaspoon red pepper flakes (adjust to taste) - 1 lemon, zested and juiced - 1/4 cup chicken broth or vegetable broth - 8 ounces linguine or spaghetti - 1/4 cup fresh parsley, chopped - Salt and pepper to taste - Lemon wedges, for serving These ingredients create a rich and tasty sauce that makes the shrimp shine. You will need some tools to help you cook this dish well. Here are the main ones: - Large skillet - Pot for boiling pasta - Colander for draining pasta - Zester or grater for the lemon - Cutting board and knife for garlic and parsley Having these tools makes cooking easier and more fun. If you don't have some ingredients, don't worry! Here are a few swaps you can try: - Shrimp: Use scallops or chicken if you prefer. - Butter: Olive oil can replace butter for a lighter option. - Pasta: Any pasta works, like penne or fettuccine. - Broth: Water can work, but broth adds more flavor. These substitutions help you customize the dish to your taste while keeping it delicious. First, fill a large pot with water. Add salt to the water to season it. Bring the water to a boil over high heat. Add 8 ounces of linguine or spaghetti. Cook according to the package instructions until it is al dente. This usually takes about 8-10 minutes. Once cooked, drain the pasta and set it aside. Make sure to save a little pasta water for later. In a large skillet, melt 2 tablespoons of unsalted butter over medium heat. Wait until it is completely melted. Then, add 4 cloves of minced garlic and 1 teaspoon of red pepper flakes to the skillet. Stir the mixture and sauté for 1-2 minutes. Watch the garlic closely to prevent it from burning. When it smells fragrant, it’s ready for the shrimp. Add 1 pound of peeled and deveined large shrimp to the skillet. Sprinkle salt and pepper over the shrimp to season it. Cook the shrimp for about 3-4 minutes on each side. They should turn pink and opaque when done. After cooking, pour in 1/4 cup of chicken broth and the juice and zest of 1 lemon. Stir everything together and let it simmer for 2-3 minutes. This step helps the flavors meld perfectly. Finally, reduce the heat to low, add the remaining 2 tablespoons of butter, and stir until it melts and makes a glossy sauce. Toss in the cooked pasta and mix well, adding a splash of reserved pasta water if the sauce seems too thick. Stir in 1/4 cup of chopped parsley for a fresh touch. Serve hot with lemon wedges on the side. This dish comes together quickly, making it a great option for busy nights. For the complete recipe, refer to the [Full Recipe]. To cook shrimp well, start with fresh or thawed shrimp. Pat them dry to avoid too much water in the pan. Heat your skillet over medium heat and add butter. Once the butter melts, add the shrimp. Cook for 3-4 minutes on each side. Look for a pink color and opaque texture. This tells you the shrimp are done. Overcooked shrimp become rubbery, so watch closely. If you like spice, add more red pepper flakes. Start with one teaspoon, then taste. You can always add more. For less heat, skip the flakes or use just a pinch. A squeeze of lemon juice can balance the spice. It adds zest without heat. Adjusting spice makes the dish yours. Fresh garlic is key to great flavor. Use a sharp knife to chop or mince garlic cloves. For a stronger taste, mince them finely. You can also use a garlic press for ease. Heat the garlic in butter until fragrant, but don’t let it burn. Burned garlic tastes bitter and ruins the dish. For the full recipe, check out the Garlic Butter Shrimp Scampi section. {{image_2}} You can switch shrimp for many other proteins. Chicken is a great choice. Use boneless chicken thighs or breasts for a hearty dish. Just adjust the cooking time. Another option is scallops. They cook fast and add a sweet flavor. You can also try fish like tilapia or cod. Just remember, cooking times will vary based on the protein you choose. Adding veggies boosts flavor and nutrition. Try spinach for a fresh taste. It wilts nicely and blends well with the sauce. Cherry tomatoes add a pop of color and sweetness. You can also use asparagus or bell peppers. Sauté them with garlic for extra taste. Feel free to mix and match based on your favorites. While linguine is classic, you can use any pasta you like. Spaghetti works well too. For a twist, try penne or fettuccine. You can even use whole wheat or gluten-free pasta. Each type gives a unique texture and flavor. Just cook according to package directions for the best results. For a full recipe, check out the Garlic Butter Shrimp Scampi 🧄! Store any leftover garlic butter shrimp scampi in an airtight container. Make sure to let it cool first. Place it in the fridge. This dish can stay fresh for up to three days. To reheat, use a skillet over low heat. Add a splash of broth or water to prevent drying. Stir often until heated through. You can also use a microwave. Heat it in short bursts, stirring in between. You can freeze garlic butter shrimp scampi, but shrimp is best fresh. If you decide to freeze it, use a freezer-safe bag. Remove as much air as possible. Label it with the date. It will last for about two months. Thaw in the fridge overnight before reheating. Enjoy the Full Recipe for the perfect shrimp scampi! Garlic butter shrimp scampi lasts about 2-3 days in the fridge. Store it in an airtight container. When you reheat it, do so gently. This will keep the shrimp tender and the flavors intact. Yes, you can use frozen shrimp for this dish. Just thaw them first. Place the frozen shrimp in cold water for about 15-20 minutes. After thawing, they will cook just as well as fresh shrimp. You can serve garlic butter shrimp scampi with various sides. Here are some great options: - Crusty bread to soak up the sauce - A fresh green salad for crunch - Garlic bread for extra flavor - Steamed vegetables for a healthy touch These pairings enhance the meal and make it more satisfying. For the full recipe, check out the complete guide! Garlic butter shrimp scampi is a tasty dish you can cook at home. We covered key ingredients, tools, and steps to make this meal. I shared tips for cooking shrimp and ways to change the recipe. Proper storage and reheating tips help keep your leftovers fresh. Enjoy experimenting with variations and flavors. This dish is simple and fun to make. With practice, you’ll impress everyone at your table. Happy cooking!](https://dailydishly.com/wp-content/uploads/2025/06/9dcab216-770d-481a-a268-3e480fcb1d58-768x768.webp)
![To make a tasty spiced lentil soup, gather these key ingredients: - 1 cup green or brown lentils, rinsed - 1 tablespoon olive oil - 1 medium onion, diced - 2 cloves garlic, minced - 2 medium carrots, diced - 2 celery stalks, diced - 1 teaspoon ground cumin - 1 teaspoon ground coriander - 1/2 teaspoon smoked paprika - 1/4 teaspoon cayenne pepper (adjust to taste) - 1 can (14 oz) diced tomatoes - 6 cups vegetable broth - 1 bay leaf - Salt and pepper to taste - Fresh cilantro, chopped (for garnish) - Lemon wedges (for serving) These ingredients create a warm and filling soup. The lentils are the star, giving protein and fiber. The spices add a nice kick and depth of flavor. You can make your soup even better with extra touches. Here are some fun ideas: - Avocado slices for creaminess - Chopped green onions for a fresh crunch - A dollop of yogurt for richness - A sprinkle of feta cheese for a tangy twist These add-ins not only add flavor but also make the soup look pretty. If you need to change the amounts, here are some quick tips: - 1 cup equals 240 ml - 1 tablespoon equals 15 ml - 1 teaspoon equals 5 ml If you want to double the recipe, just multiply each amount by two. This way, you can share the joy of this soup with more people! For the full recipe, check out the complete guide. Start by heating the olive oil in a large pot over medium heat. This oil adds great flavor. Add the diced onion and sauté it for about 5 minutes. You want it to turn soft and clear. Next, stir in the minced garlic, diced carrots, and diced celery. Cook these for another 5 minutes. Stir them often until the veggies soften. This mix of aromatics forms the base of your soup. Once your aromatics are ready, it's time to add the lentils. Pour in the rinsed green or brown lentils. Then, add the canned diced tomatoes with their juice. Next, pour in the vegetable broth and add the bay leaf. This broth gives your soup deep taste. Bring the mix to a boil, and then reduce the heat. Let it simmer uncovered for about 30 to 35 minutes. Stir occasionally until the lentils are tender. After the lentils cook, remove the bay leaf. This step is important, as the leaf does not taste good. Season your soup with salt and pepper. If it seems too thick, you can add more broth. Adjust it to your liking. Finally, serve the soup hot. Garnish with fresh cilantro and a squeeze of lemon juice for added flavor. Enjoy your warm, spiced lentil soup! You can find the full recipe [here]. To get the richest taste, use fresh spices. Ground spices lose their kick over time. I recommend buying whole spices and grinding them. This adds a nice depth to your soup. Also, let your spices toast for a minute before adding liquid. This step brings out their natural oils and flavors. Cooking lentils is easy. Rinse them well to remove dirt. I prefer green or brown lentils for this soup. They hold their shape better. Always check the cooking time on the package. Most lentils need 20 to 30 minutes. If you overcook them, they can turn mushy. Serve the soup hot for the best experience. A dollop of yogurt or sour cream adds creaminess. Fresh cilantro brightens the dish and adds flavor. You can also squeeze some lemon juice on top. For a complete meal, pair it with crusty bread or a salad. This soup is filling and perfect for any day. Try the [Full Recipe] for more details! {{image_2}} This spiced lentil soup is naturally vegetarian and vegan. You can keep it plant-based by using vegetable broth. If you want creaminess, add a dollop of coconut milk. It gives the soup a rich taste without losing its core flavors. You can also add more veggies, like spinach or kale, for added nutrition. If you want to boost the protein, there are great options. You can add cooked chickpeas or diced tofu. Both mix well with the flavors. If you enjoy meat, try adding shredded chicken or turkey. This addition can make the soup heartier and more filling. You can change the soup's flavor by using different spices. Try adding turmeric for a warm, earthy taste. A splash of soy sauce or a bit of ginger can bring a new twist. Experiment with fresh herbs like thyme or rosemary. Each change adds a unique flavor to your bowl. To store leftover spiced lentil soup, let it cool first. Then, pour the soup into an airtight container. Make sure to seal it tightly. You can keep it in the fridge for up to five days. Label the container with the date so you remember when you made it. When you're ready to enjoy your soup again, take it out of the fridge. Pour the soup into a pot. Heat it over medium heat, stirring often. If the soup seems too thick, add a bit of water or broth to thin it out. You can also microwave it. Place it in a microwave-safe bowl and cover it loosely. Heat for one to two minutes, stirring halfway through. If you want to save your spiced lentil soup for later, freezing is a great option. Use freezer-safe containers or bags. Leave some space at the top, as soup expands when frozen. It will stay fresh for up to three months. When you're ready to eat it, thaw it overnight in the fridge. Then, reheat as mentioned before. Enjoy the flavors of your delicious soup again! For the full recipe, check out the details above. Yes, you can use various lentils in this soup. Green and brown lentils work best. They hold their shape well during cooking. Red lentils cook faster and become soft, creating a creamier texture. If you use red lentils, reduce the cooking time by about 10 minutes. Mixing lentils can also add unique flavors and textures. This spiced lentil soup is naturally gluten-free! The ingredients, like lentils and vegetables, do not contain gluten. Always check your vegetable broth to ensure it is gluten-free. Some broths may have added ingredients that contain gluten. As long as you select the right broth, you can enjoy this soup worry-free. Here are a few common mistakes to watch out for: - Not rinsing lentils: Rinse them well before cooking to remove dust and debris. - Overcooking the lentils: Keep an eye on them to avoid mushiness. - Skipping the spices: The spices add depth, so don’t skip them! - Not seasoning enough: Taste as you go and adjust the salt and pepper. By avoiding these mistakes, you’ll create a flavorful and nourishing soup. For the full recipe, check the section above. This blog post walks you through making spiced lentil soup, from essential ingredients to cooking tips. You learned how to prepare the soup with aromatics, finish it with flavorful seasonings, and serve it perfectly. With variations for different diets and easy storage tips, you'll enjoy this dish anytime. Remember, cooking is about exploring flavors, so have fun with it. Enjoy your warm, hearty bowl of spiced lentil soup!](https://dailydishly.com/wp-content/uploads/2025/06/8505bcbc-e76d-49ee-a85a-9fa1b9dff162-768x768.webp)