Teriyaki Tofu Bowls Flavorful and Easy Weeknight Meal

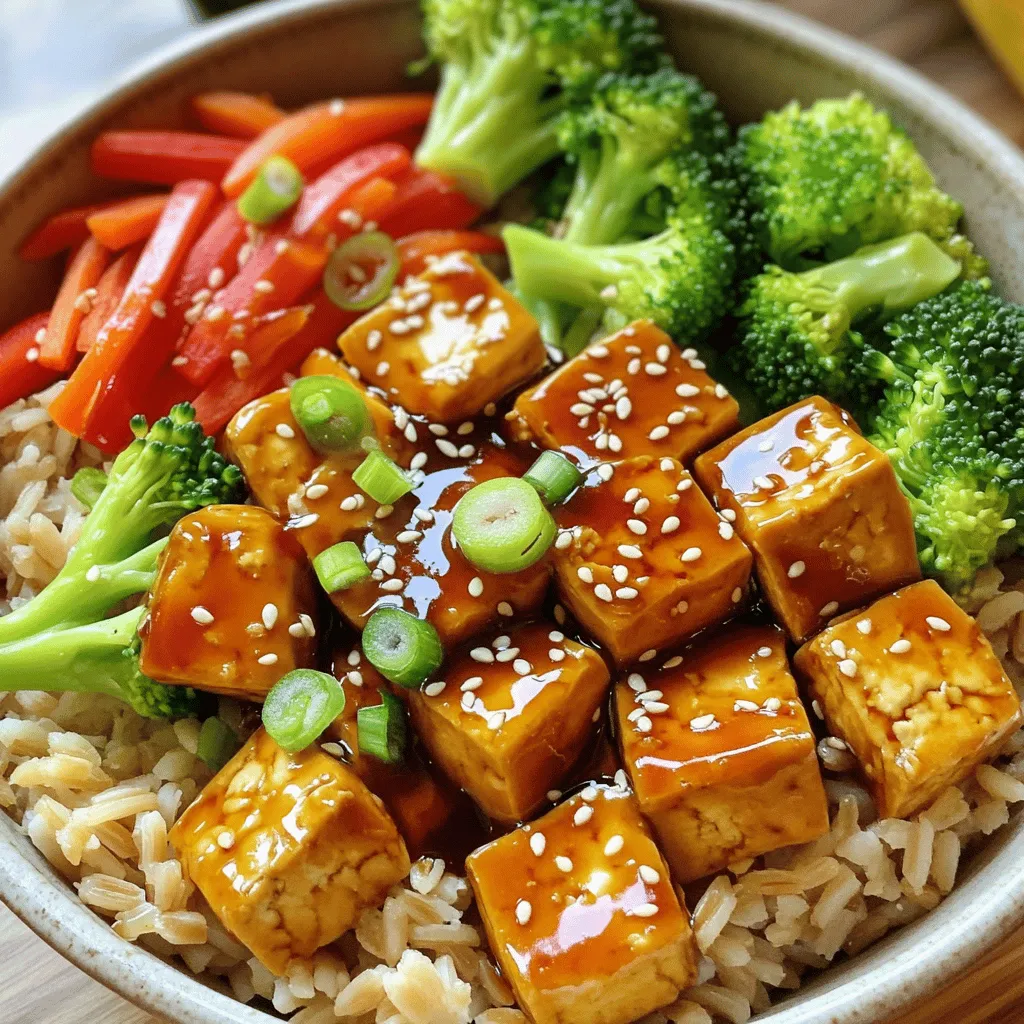
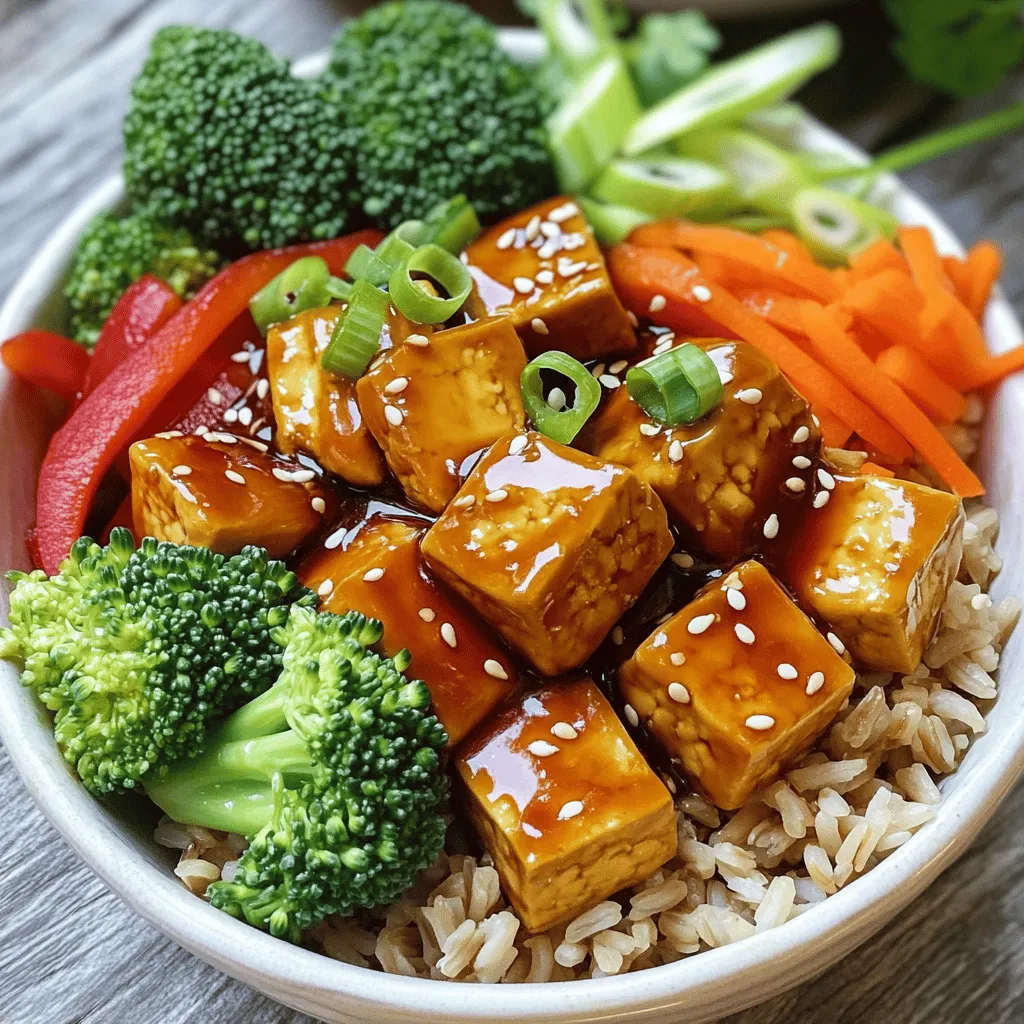
Are you looking for a quick and tasty weeknight meal? Try my Teriyaki Tofu Bowls! This dish combines firm tofu, bright veggies, and a sweet soy sauce glaze. It’s simple, healthy, and packed with flavor. In no time, you’ll have a satisfying meal that’s perfect for busy nights. Let me show you how to whip this up with minimal fuss!
Ingredients
List of Ingredients
– 1 block firm tofu, pressed and cubed
– 1 cup brown rice
– 2 tablespoons sesame oil
– 1 cup broccoli florets
– 1 red bell pepper, sliced
– 1 carrot, julienned
– 3 green onions, sliced
– 2 cloves garlic, minced
– 1-inch piece ginger, grated
– 1/4 cup soy sauce
– 2 tablespoons honey or maple syrup
– 1 tablespoon rice vinegar
– 1 tablespoon cornstarch mixed with 2 tablespoons water
– Sesame seeds, for garnish
When I make teriyaki tofu bowls, I love using fresh ingredients. The combo of tofu and veggies gives a great taste. Tofu is my go-to for protein. It is firm and holds its shape well when cooked. Pressing the tofu helps to remove excess water. This way, it absorbs more flavor. I like to cube it into bite-sized pieces.
Brown rice serves as a hearty base. It adds a nutty flavor and is good for you. Broccoli, bell pepper, and carrot add color and crunch. They cook quickly but stay crisp. The green onions give a fresh bite and look nice on top.
The sauce is where the magic happens. Soy sauce adds saltiness. Honey or maple syrup brings sweetness. Rice vinegar adds a little tang. Ginger and garlic boost the flavor profile. Lastly, cornstarch thickens the sauce. It makes everything stick together nicely.
This recipe is not just tasty; it is also packed with nutrients. Each serving has a good balance of protein, fats, and carbs.
Step-by-Step Instructions
Cooking the Rice
To cook brown rice, start by rinsing it under cold water. This helps remove excess starch. Use a pot and add one cup of rice and two cups of water. Bring it to a boil, then reduce the heat. Cover and simmer for about 40-45 minutes. Once done, let it sit for 10 minutes before fluffing with a fork. For fluffy rice, avoid lifting the lid too often. This keeps the steam inside.
Preparing the Tofu
Press the tofu to remove extra moisture. Wrap it in a clean kitchen towel and place a heavy object on top. After about 15-20 minutes, cube the tofu into bite-sized pieces. For a nice golden color, heat sesame oil in a skillet over medium heat. Add the tofu cubes in a single layer. Cook for about 8-10 minutes, flipping them halfway through.
Stir-Frying the Ingredients
Once your tofu is golden, it’s time to add the vegetables. Start with the sliced red bell pepper and cook for 2 minutes. Next, add broccoli florets and julienned carrots. Stir-fry everything for about 5 minutes until the veggies are tender-crisp. Timing is key; you want them to keep their color and crunch. Finally, pour the teriyaki sauce over the mixture. Stir well and let it simmer for a few minutes. Your Teriyaki Tofu Bowls will be ready to serve with rice!
Tips & Tricks
Enhancing Flavor
To make your teriyaki tofu bowls pop, try adding different seasonings. A splash of lime juice adds brightness. You can also sprinkle in red pepper flakes for some heat. For a twist, swap soy sauce with tamari for a gluten-free option. If you love a sweet tang, add a splash of orange juice to your sauce. You can even mix in pineapple juice for a tropical flavor!
Cooking Techniques
Frying tofu can be tricky, but I have a simple method. First, press the tofu to remove water. This step helps it brown nicely. Use a non-stick skillet or cast-iron pan for best results. Heat your skillet before adding oil. This helps the tofu get crispy on the outside. Cook the tofu for about 8-10 minutes until golden brown.
Meal Prep Suggestions
Preparing ahead makes life easy. You can chop vegetables a day in advance. Store them in airtight containers in the fridge. Cook the rice ahead of time, too, and keep it in a separate container. For leftovers, cool the bowls before storing. They will stay fresh for up to three days. Reheat in the microwave or on the stove. This way, you can enjoy a tasty meal anytime!

Variations
Ingredient Substitutions
You can use tempeh or seitan instead of tofu. These proteins add different textures and flavors. Tempeh is nutty, while seitan has a meaty taste. You can also change up the veggies. Try snap peas, zucchini, or mushrooms for variety. They pair well with the teriyaki sauce.
Dietary Adaptations
This recipe is vegan and vegetarian-friendly. Just make sure to use maple syrup instead of honey. For gluten-free options, choose tamari instead of soy sauce. You can still enjoy the same great taste without the gluten.
Serving Suggestions
Top your teriyaki tofu bowls with sliced avocado or chopped nuts. A sprinkle of sesame seeds adds crunch and flavor. You can serve them with a side of edamame or a light salad. These add freshness and balance to your meal. For a fun twist, try serving with sushi rolls or miso soup on the side.
Storage Information
Storing Leftovers
To keep your teriyaki tofu bowls fresh, use airtight containers. Glass containers work best. They prevent odors and keep your food safe. Store the bowls in the fridge. They stay good for up to three days. After that, the tofu may get soggy.
Freezing Instructions
To freeze teriyaki tofu bowls, follow these steps:
1. Let the bowls cool completely.
2. Divide the meal into portions.
3. Place each portion in a freezer-safe container or bag.
4. Remove as much air as possible before sealing.
These bowls can freeze well for up to three months. When you want to eat them, thaw them in the fridge overnight. For reheating, microwave them for 2-3 minutes. Stir well to heat evenly. Enjoy your meal without waste!
FAQs
How long does it take to make teriyaki tofu bowls?
Making teriyaki tofu bowls takes about 30 minutes in total. You will spend around 15 minutes preparing the ingredients. Cooking the rice and stir-frying the tofu and veggies will take about 15 more minutes. This quick time makes it great for busy weeknights.
Can I make this recipe ahead of time?
Yes, you can prepare this recipe ahead of time. You can cook the brown rice and store it in the fridge for up to four days. You can also prepare the tofu and vegetables in advance. Store them in a sealed container. Just heat everything before serving.
What can I serve with teriyaki tofu bowls?
Teriyaki tofu bowls pair well with many side dishes. Here are some ideas:
– Steamed edamame
– A fresh green salad
– Miso soup
– Sliced cucumbers with rice vinegar
– Green tea or sparkling water
These sides add flavor and balance to your meal.
Is this recipe suitable for meal prep?
Absolutely! This recipe is perfect for meal prep. You can make a big batch and portion it into containers. It stores well in the fridge. You can even freeze it for longer storage. This makes it easy to grab a healthy meal during a busy week. For the best flavor, reheat the bowls gently.
This recipe for teriyaki tofu bowls is easy and satisfying. You learned how to cook brown rice, prepare tofu, and stir-fry fresh veggies. I shared tips to enhance flavors and variations for dietary needs. Proper storage extends your meals’ lifespan. You can adjust this recipe to fit your taste and needs. With these steps, you can enjoy healthy, delicious meals throughout the week. Dig in and savor the flavors!


![To make spicy black bean burgers, you need a few key ingredients: - 1 can (15 oz) black beans, drained and rinsed - 1/2 cup cooked quinoa - 1/2 cup breadcrumbs (gluten-free if needed) These ingredients form the base of the burger. The black beans provide protein and taste. Quinoa adds texture and nutrition. Breadcrumbs help bind the mix together. You can make these burgers your own with some fun additions: - Toppings Suggestions: avocado slices, lettuce, tomato, salsa, or spicy mayo - Spice Enhancements: jalapeño and garlic for extra kick Feel free to swap ingredients based on your taste. Want more heat? Add more jalapeño. Prefer a fresh crunch? Load up on lettuce and tomato. These spicy black bean burgers are not only tasty but also healthy: - Calories per serving: About 180 - Protein: 10g - Fats: 5g - Carbs: 28g This burger packs a punch of flavor while keeping a balanced profile. It is a great option for lunch or dinner. For the full recipe, check out the details above. To make the base, start by mashing the black beans. Use a fork or a potato masher. You want them mostly smooth, but keep some chunks for texture. This adds a nice bite to your burger. Next, add the additional ingredients to the bowl. Combine cooked quinoa, breadcrumbs, chopped red onion, minced jalapeño, minced garlic, cumin, smoked paprika, soy sauce, lime juice, salt, and pepper. Mix well until all ingredients are combined. If the mixture feels too wet, add a bit more breadcrumbs. This step helps hold the patties together. Now, it’s time to shape your burgers. Divide the mixture into equal portions, about four patties. Form each portion into a round shape. If you want them to hold together better, chill the patties in the fridge for 30 minutes. This makes them firmer. For cooking, heat a non-stick skillet or grill over medium heat. Drizzle a bit of olive oil to prevent sticking. Cook the patties for about 4 to 5 minutes on each side. You want them crispy and heated through. The smell will be amazing! When it’s time to serve, choose your toppings wisely. Avocado slices add creaminess, while lettuce and tomato add freshness. Salsa or spicy mayo can enhance the flavor even more. Pair your spicy black bean burgers with a side salad or some crispy fries. This makes for a delicious meal that’s both filling and healthy. You can find the full recipe above for more details on how to make these tasty burgers! To make your spicy black bean burgers great, focus on texture. Start by mashing the black beans well, but leave some chunks. This gives your burgers a nice bite. Chilling the patties is key. After you shape them, put them in the fridge for about 30 minutes. This helps them hold together better during cooking. Baking is a great alternative to frying. Preheat your oven to 375°F (190°C) and place the patties on a baking sheet. Bake for 20-25 minutes, flipping halfway. This method makes them crispy without extra oil. You can also adjust the flavors. Want more heat? Add more jalapeño or a dash of hot sauce. Feel free to mix in fresh herbs like cilantro for a fresh twist. Binding agents are crucial. If your mixture feels too wet, add more breadcrumbs. You can also use flaxseed meal or chia seeds mixed with water for a nice binder. Watch the moisture content closely. If you use canned beans, make sure to drain them well. Excess liquid can turn your patties into a mushy mess. For the full recipe of these tasty spicy black bean burgers, check out the recipe provided above. {{image_2}} You can change the taste of your spicy black bean burgers in fun ways. One option is the Southwest spicy black bean burger. For this, add corn, diced red pepper, and taco seasoning. This gives a bold, zesty flavor. Another tasty choice is the chipotle black bean burger. Mix in chipotle peppers in adobo sauce. This adds a smoky heat that spice lovers will enjoy. If you want a low-carb meal, try lettuce wraps. Instead of buns, use large lettuce leaves. They keep the burger juicy and fresh. You can also make black bean burger bowls. Simply place the patty on a bed of rice or quinoa. Top it with your favorite veggies and salsa for a hearty meal. Making these burgers fit your diet is easy. For gluten-free versions, use gluten-free breadcrumbs. This keeps the burger tasty without the gluten. If you’re vegan, skip the eggs and use mashed flax seeds instead. This keeps the burgers bound together while being plant-based. Whether you’re vegan or vegetarian, these burgers can fit your needs. You can enjoy them without missing out on flavor. For the full recipe, check here: [Full Recipe]. To keep uncooked patties fresh, place them in the fridge. Use an airtight container. They stay good in the fridge for about 2-3 days. If you want to keep them longer, freezing is a great option. Wrap each patty in plastic wrap or parchment paper. Then, put them in a freezer bag. They can last up to 3 months in the freezer. After cooking, let the black bean burgers cool down. Store them in an airtight container. This keeps them moist and flavorful. They can last in the fridge for about 4-5 days. When you want to eat them, simply reheat in a skillet or microwave. For the skillet, heat for about 3-4 minutes on medium. If using the microwave, heat for about 1-2 minutes, checking to avoid overheating. In the fridge, uncooked patties last for 2-3 days. Cooked black bean burgers stay fresh for 4-5 days. Always check for signs of spoilage. If you see mold or an off smell, it’s best to throw them away. Enjoy your spicy black bean burgers while they’re fresh! For the full recipe, check out [Full Recipe]. To make your spicy black bean burgers less mushy, focus on two main areas: ingredient adjustments and binding tips. - Ingredient adjustments: Use less black beans and add more breadcrumbs or quinoa. This helps absorb moisture and creates a firmer texture. - Tips for better binding: Chilling the patties for about 30 minutes in the fridge helps them hold their shape. You can also add a bit of ground flaxseed mixed with water as a natural binder. Yes, you can make these burgers ahead of time! Here are some best practices for meal prep: - Prep the patties: Form the patties and place them on a baking sheet lined with parchment paper. You can freeze them for later use. - Store in the fridge: If you plan to cook them within a day or two, simply cover the patties with plastic wrap and keep them in the fridge. If you want to substitute black beans, here are some great alternatives: - Alternative legumes: Use kidney beans, pinto beans, or chickpeas. Each will give a different taste and texture. - Other ingredients: You can also use lentils or cooked mushrooms for a unique flavor profile. These options provide good nutrition and maintain the burger's heartiness. For a full recipe, check out the Spicy Black Bean Burgers section above! You can create delicious spicy black bean burgers using simple, healthy ingredients. Start with black beans and quinoa, then customize them with tasty toppings. Follow clear steps to make perfect patties, and try different cooking methods. Remember the tips for texture and binding to avoid mushiness. Store uncooked or cooked burgers properly for later meals. In summary, these burgers are easy, versatile, and packed with flavor. Enjoy experimenting with your own twists!](https://dailydishly.com/wp-content/uploads/2025/06/fb468978-fb40-4fbf-9ebe-b248e91fb409-768x768.webp)
![- 1 lb boneless, skinless chicken thighs - 1/2 cup cornstarch - 1/4 teaspoon black pepper - 1 cup panko breadcrumbs - 1/4 cup sesame seeds - 1/4 cup soy sauce - 1/4 cup honey - 1 tablespoon apple cider vinegar - 1 teaspoon ginger paste - 1 garlic clove, minced - Green onions, finely sliced - Toasted sesame seeds To make crispy sesame chicken, gather all your ingredients first. This helps you stay organized and enjoy the cooking process. The chicken thighs offer a tender bite while the cornstarch provides that essential crunch. Panko breadcrumbs and sesame seeds create a delightful texture and nutty flavor. For the sauce, soy sauce and honey blend perfectly. Apple cider vinegar adds a hint of tang, while ginger and garlic bring warmth and depth. These simple ingredients make a sauce that truly elevates your dish. Don’t forget your garnishes! Finely sliced green onions and toasted sesame seeds add a pop of color and flavor. When you plate your dish, it not only looks great but also tastes amazing. This is the key to making crispy sesame chicken irresistible. For the detailed steps on how to combine these ingredients, check out the Full Recipe. To start, mix the dry ingredients. In a bowl, combine 1/2 cup cornstarch, 1/2 teaspoon salt, and 1/4 teaspoon black pepper. This mix will help the chicken get crispy. Next, bread the chicken. Take 1 lb of cut chicken thighs. Dip each piece into the cornstarch mix, then into a beaten large egg. Finally, coat each piece with a mix of 1 cup panko breadcrumbs and 1/4 cup sesame seeds. Make sure the coating is even. This step is key for that crunchy texture. Now, heat oil for frying. In a deep skillet, add enough vegetable oil to cover the chicken pieces. Heat it over medium-high heat. Once the oil is hot, fry the chicken in batches. Cook for about 5-7 minutes until each piece is golden brown and crispy. Drain the fried chicken on paper towels. This keeps it from getting soggy. For the sauce, grab a separate saucepan. Combine 1/4 cup soy sauce, 1/4 cup honey, 1 tablespoon apple cider vinegar, 1 teaspoon ginger paste, and a minced garlic clove. Heat the mixture over medium heat. Stir and bring it to a simmer for 3-4 minutes. This thickens your sauce and blends the flavors nicely. Once the chicken is fried, drizzle or toss the sauce over it. Make sure each piece is well-coated. Enjoy your crispy sesame chicken! For more details, check out the Full Recipe. To make your chicken crispy, use cornstarch and panko breadcrumbs. Cornstarch helps absorb moisture, while panko adds crunch. - Use 1/2 cup of cornstarch. - Mix it with 1/2 teaspoon salt and 1/4 teaspoon black pepper. - Coat each chicken piece well before frying. Frying temperature matters too. Heat your vegetable oil to medium-high. The right heat cooks the chicken fast and keeps it crispy. - Fry in small batches. - Cook each batch for about 5-7 minutes. - Drain on paper towels to remove excess oil. To boost flavor, adjust the sauce. This sauce is a mix of sweet and savory, but you can change it to your taste. - Add more honey for sweetness or soy sauce for saltiness. - Try using fresh garlic and ginger. Fresh ingredients add a lively taste and aroma. Use 1 teaspoon of ginger paste and 1 minced garlic clove in your sauce. This makes it more vibrant and tasty. How you serve your chicken makes a big difference. For an attractive plate, use a large platter. - Drizzle extra sauce over the chicken. - Garnish with sliced green onions and toasted sesame seeds for color and texture. This makes your Crispy Sesame Chicken look as good as it tastes! For more tips and the full recipe, check the [Full Recipe]. {{image_2}} You can make Crispy Sesame Chicken lighter. Instead of frying, try baking. Bake the chicken at 400°F for 20-25 minutes. This method keeps the crunch without extra oil. If you want low-sodium soy sauce, use tamari or coconut aminos. Both give a similar flavor but with less salt. You can add spices to the coating for extra flavor. Try paprika or cayenne for a little heat. A pinch of garlic powder adds a nice touch too. To mix things up, use different sauces. Sweet chili sauce or teriyaki sauce can give a fun twist. You can also try a spicy mustard sauce for a zing. Pair your Crispy Sesame Chicken with tasty sides. Steamed broccoli or stir-fried vegetables work well. They add color and nutrition. You can also serve it with rice. Jasmine or brown rice both complement the dish. For a fresh touch, add a side salad with sesame dressing. Enjoy your meal with a mix of flavors and textures! To keep your Crispy Sesame Chicken fresh, refrigerate it right away. Place the chicken in a shallow container. This helps it cool down faster. Cover the container tightly with a lid or plastic wrap. This keeps the chicken from drying out. Use it within three days for the best taste. Use airtight containers for storing leftovers. Glass containers work great since they do not stain. You can also use BPA-free plastic containers. Make sure they are safe for food use. Label your containers with the date. This helps you track how long they have been stored. To enjoy your Crispy Sesame Chicken again, you need to reheat it carefully. The oven is the best choice. Preheat your oven to 350°F (175°C). Place the chicken on a baking sheet. Heat for about 10-15 minutes. This keeps the chicken crispy. The microwave is faster but can make the chicken soggy. If you must use it, heat in short bursts. Check after every 30 seconds to avoid overcooking. Yes, you can freeze Crispy Sesame Chicken! First, let it cool completely. Then, wrap each piece tightly in plastic wrap. Place the wrapped pieces in a freezer bag. Squeeze out the air and seal it. This prevents freezer burn. To thaw, move the chicken to the fridge overnight. This keeps it safe. You can also use the microwave for a quick thaw. Use the defrost setting, checking often. Once thawed, reheat in the oven for the best results. Enjoy your delicious meal again! For the complete recipe, check out the Full Recipe section. You can use chicken breasts as a substitute for chicken thighs. They are leaner but still work well. You may also try chicken tenders, which are tender and cook quickly. For vegetarian options, consider using tofu or tempeh. They absorb flavors well and provide a nice texture when cooked. Look for a golden brown color on the chicken. The coating should be crispy and firm. You can use a meat thermometer to check the temperature. Chicken should reach 165°F (75°C) to be safe to eat. If you do not have a thermometer, cut into a piece. The meat should be white with no pink inside. Yes, you can make the sauce in advance. Just mix all the sauce ingredients in a saucepan. Cook it over medium heat until it thickens slightly. Allow it to cool, then store it in an airtight container. When ready to use, reheat it gently on the stove. You can also microwave it for a quick option. This blog post recaps the steps to make Crispy Sesame Chicken. We covered the ingredients, cooking methods, and tips for perfect results. Whether you fry or bake, the key is achieving crispiness. I shared flavorful sauce ideas and garnishing tips to enhance your dish. Remember to store and reheat leftovers properly for best taste. With simple variations, you can easily adapt this recipe. Enjoy your cooking adventure with these helpful insights, and impress everyone with your delicious meal!](https://dailydishly.com/wp-content/uploads/2025/07/12f93f23-c091-4c02-8196-bfe71a37e11f-768x768.webp)

. 1. Heat 1 tablespoon of olive oil in a large pot over medium heat. 2. Add 1 medium diced onion and sauté until it turns translucent, about 5 minutes. 3. Next, add 2 minced garlic cloves and cook for 1 more minute. 1. Pour in 1 can (28 oz) of crushed tomatoes and 4 cups of vegetable broth. 2. Add 1 teaspoon of dried oregano, 1 teaspoon of dried basil, salt, and pepper. 3. Bring the mixture to a simmer, letting the flavors blend. 4. Once simmering, add 9 oz of fresh cheese tortellini. Cook it according to the package, usually about 3-5 minutes. 1. Reduce the heat to low. Stir in 1 cup of heavy cream until mixed well. 2. Let the soup heat for an additional 2-3 minutes, but don’t let it boil. 3. Taste the soup and adjust the seasoning if needed. 4. Serve hot, garnished with fresh basil leaves and grated Parmesan cheese. For the full recipe, refer to the earlier section for all details. Enjoy your cooking! To make the best creamy tomato tortellini soup, cook the tortellini just right. Follow the package instructions closely. Fresh tortellini cooks quickly, usually in just 3-5 minutes. Stir gently to avoid breaking them. You can adjust the creaminess and flavor easily. If you want a richer taste, add more heavy cream. For a lighter option, use coconut milk. Taste the soup before serving. Adjust salt and pepper to suit your liking. One common mistake is overcooking the tortellini. This makes them mushy and loses their shape. Keep an eye on the timer to prevent this. Another mistake is skipping seasoning adjustments. Each ingredient plays a role in flavor. After cooking, taste your soup. You might need more salt, pepper, or herbs to enhance the taste. To add depth, try a splash of balsamic vinegar. This little tweak can brighten the flavors. Just a teaspoon can work wonders. Using fresh herbs for garnish is another great way to boost flavor. Fresh basil leaves add a nice touch and a burst of color. They bring freshness that makes each bowl inviting. For the full recipe, check the earlier section and enjoy making this comforting meal! {{image_2}} Adding spinach makes this soup even better. You can use fresh or frozen spinach. If you have fresh, chop it up and add it right before serving. For frozen, just stir it in when the soup is hot. It will wilt nicely and give a pop of green. This adds nutrients and a nice flavor to the soup. For a heartier meal, try adding cooked Italian sausage. Brown the sausage in the pot before you add the onion. This step adds a rich flavor that blends well with the tomatoes. After cooking the sausage, follow the rest of the recipe as usual. The sausage will make the soup more filling and tasty. You can easily make this soup vegan and gluten-free. Use gluten-free pasta instead of regular tortellini. There are many great options available today. For the creamy base, substitute heavy cream with coconut milk. It gives a nice texture and a hint of sweetness. Be sure to use vegetable broth for the best flavors. This way, everyone can enjoy this soup! For the full recipe, check out the complete guide. To keep your creamy tomato tortellini soup fresh, use an airtight container. This helps prevent spills and keeps out air. You can store it in the fridge for up to three days. If you need more time, consider freezing it. Make sure to cool the soup before storing. This prevents steam buildup in the container. Freezing the soup is easy and a great way to save it for later. Pour the cooled soup into freezer-safe bags or containers. Remove as much air as possible before sealing. This helps avoid freezer burn. You can freeze it for up to three months. When you’re ready to enjoy it, let it thaw in the fridge overnight. To reheat without losing texture, do it slowly. Pour the soup into a pot and warm it over low heat. Stir often to prevent sticking. If it seems too thick, add a splash of broth or water. For the best flavor, avoid boiling it. This keeps the creamy texture just right. When choosing tortellini, I prefer fresh cheese tortellini. It cooks quickly and adds a creamy texture. Cheese tortellini pairs well with the soup’s flavors. Meat tortellini works too, but it can change the taste. Stick with cheese for a classic, comforting soup. Yes, you can make this soup ahead of time. To meal prep, cook the soup without adding the tortellini. Store it in an airtight container in the fridge. When ready to eat, heat it up and add the tortellini. This keeps the pasta from getting mushy. You can store the soup in the fridge for up to three days. If you freeze it, it lasts for about three months. When you reheat it, add a little water or broth. This helps keep the soup creamy and fresh. In this blog post, we explored how to make a delicious creamy tomato tortellini soup. We discussed key ingredients like olive oil, crushed tomatoes, and fresh tortellini. You learned easy steps for preparation, cooking, and final touches. We shared tips for avoiding common mistakes and enhancing flavors. You also discovered tasty variations and proper storage methods. With these insights, you can create a comforting meal that warms the heart. Enjoy making this soup as much as I do!](https://dailydishly.com/wp-content/uploads/2025/06/f157e764-c4a1-4324-a22a-5668ebbc8ae4-768x768.webp)
