
Cheesy Cauliflower Au Gratin Savory and Simple Recipe


Are you ready to dig into a dish that’s creamy, cheesy, and oh-so-satisfying? My Cheesy Cauliflower Au Gratin is not only delicious but also simple to make. This recipe transforms humble cauliflower into a decadent side dish perfect for any meal. In this post, I’ll guide you through easy steps, share tips to elevate your gratin, and present delightful variations. Let’s make your next dinner unforgettable!
Why I Love This Recipe
- Cheesy Goodness: This dish combines two types of cheese, creating a rich and creamy texture that is irresistible.
- Vegetable Delight: Cauliflower is a healthy vegetable that takes on the flavors of the cheese sauce beautifully.
- Comfort Food: This Au Gratin recipe is the ultimate comfort food, perfect for family gatherings or cozy nights in.
- Easy to Prepare: With simple ingredients and straightforward steps, this recipe is accessible for cooks of all skill levels.
Ingredients
Essential Ingredients for Cheesy Cauliflower Au Gratin
To make a tasty Cheesy Cauliflower Au Gratin, you need a few key items. Here’s the list:
– 1 large head of cauliflower, cut into florets
– 2 cups shredded sharp cheddar cheese
– 1 cup grated Parmesan cheese
– 1 cup heavy cream
– 2 tablespoons unsalted butter
– 3 cloves garlic, minced
– 1 teaspoon Dijon mustard
– 1/2 teaspoon nutmeg
– Salt and pepper to taste
– 1/2 cup breadcrumbs
– Fresh parsley, chopped (for garnish)
These ingredients create a creamy, cheesy dish that everyone will love. The sharp cheddar cheese gives it a strong taste, while the Parmesan adds a nice twist.
Optional Add-ins to Enhance Flavor
You can add more flavor to your dish with some extra ingredients. Try these options:
– Cooked bacon bits for a smoky crunch
– Chopped green onions for a fresh bite
– Sautéed mushrooms for an earthy taste
– Spinach for extra greens and color
These add-ins can make your Cheesy Cauliflower Au Gratin even more delicious. Feel free to experiment and find your favorite mix.
Suggested Substitutions for Dietary Preferences
If you have specific dietary needs, you can still enjoy this dish. Here are some substitutes:
– Use almond milk instead of heavy cream for a lighter version.
– Swap cheddar cheese for a dairy-free cheese to make it vegan.
– Use gluten-free breadcrumbs for a gluten-free option.
These substitutions make this recipe flexible. You can enjoy it no matter your dietary needs.

Step-by-Step Instructions
Prepping the Cauliflower Florets
First, you need a large head of cauliflower. Cut it into small florets. This helps the cauliflower cook well. Next, boil a large pot of salted water. Once it’s boiling, add the florets and blanch for five minutes. This makes them tender but still crisp. After five minutes, drain the florets in a colander. Set them aside to cool.
Making the Cheese Sauce
Now, let’s make the cheese sauce. Start by melting two tablespoons of unsalted butter in a medium saucepan over medium heat. Once melted, add three minced garlic cloves. Sauté for one minute until it smells great. Next, pour in one cup of heavy cream and stir well. Add one teaspoon of Dijon mustard and half of the sharp cheddar cheese. This is two cups total, so use one cup now. Mix until the cheese melts and the sauce is smooth. Season with salt and pepper to taste. Finally, add half a teaspoon of nutmeg for warmth.
Combining Ingredients and Baking Instructions
In a large mixing bowl, combine the blanched cauliflower and cheese sauce. Stir well to coat all the florets. Then, pour this mixture into a greased 9×13 inch baking dish. Spread it out evenly. Next, sprinkle the remaining sharp cheddar cheese and all of the grated Parmesan over the top. In a small bowl, mix half a cup of breadcrumbs with a drizzle of olive oil. Sprinkle this breadcrumb mix evenly over the cheese layer.
Now, it’s time to bake. Preheat your oven to 375°F (190°C). Place the dish in the oven and bake for 25 to 30 minutes. You want the top to be golden brown and bubbly. After baking, let it cool for a few minutes. Garnish with fresh parsley before serving. Enjoy your cheesy delight!
Tips & Tricks
How to Achieve the Perfect Cheese Sauce Consistency
To make a good cheese sauce, you need the right mix. Start by melting the butter and adding garlic. Cook it just until you smell it. Then, pour in the heavy cream and stir. Add half of the cheese slowly. This helps the cheese melt well. If the sauce is too thick, add a bit more cream. If it’s too thin, let it cook longer. You want it to be smooth and creamy.
Pro Tips for Baking Evenly
Baking your dish evenly is key. First, spread the cauliflower and cheese mix in the pan evenly. This helps it cook all the way through. Make sure your oven is at the right temperature before you put it in. Use an oven thermometer if needed. Check your dish halfway through baking. If one side is browning fast, you can rotate the pan. This will help it bake nice and even.
Garnishing Ideas to Elevate Presentation
Garnish can make your dish look great. Fresh parsley adds a nice green touch. You can chop it finely and sprinkle it on top after baking. Another fun idea is to add a sprinkle of paprika. This gives color and a bit of spice. You can also lay a few slices of lemon next to the dish for brightness. This makes it look more inviting and fresh.
Pro Tips
- Adjust the Cheese Blend: Use a mix of cheeses like Gruyère or fontina for a more complex flavor profile.
- Perfectly Blanch the Cauliflower: Ensure you do not over-blanch the cauliflower; it should be just tender to maintain some crunch after baking.
- Breadcrumb Topping Variations: Experiment with different types of breadcrumbs, such as panko, for extra crunch, or add herbs for added flavor.
- Make Ahead: This dish can be prepared a day in advance; simply assemble and refrigerate, then bake when ready to serve.

Variations
Adding Protein: Chicken or Bacon Options
You can make Cheesy Cauliflower Au Gratin heartier by adding protein. I love using cooked chicken or crispy bacon. Simply chop cooked chicken into bite-sized pieces and mix it into the cheesy sauce before adding the cauliflower. For bacon, cook strips until crispy, then crumble them into the sauce. This adds a nice smoky flavor and extra crunch. The dish becomes a full meal with either choice.
Vegetarian and Vegan Alternatives
If you prefer a vegetarian option, you can skip the meat but keep the flavor strong. Use mushrooms or spinach for depth. For a vegan twist, swap the heavy cream for coconut cream. Use vegan cheese instead of dairy cheese. Nutritional yeast can give a cheesy flavor too. This way, you keep the dish creamy and satisfying without any animal products.
Seasonal Vegetable Additions for Extra Nutrition
Adding seasonal veggies boosts nutrition and flavor. Think about adding broccoli, asparagus, or zucchini. Just chop them into small pieces and blanch them with the cauliflower. This makes the dish colorful and adds more vitamins. You can change the veggies each season to keep it fresh and exciting.
Storage Info
Best Practices for Storing Leftovers
To keep your Cheesy Cauliflower Au Gratin fresh, let it cool first. Use a container with a tight lid. Store it in the fridge for up to three days. Make sure the dish is airtight. This helps keep the flavors intact. If you have a lot left, consider portioning it out. This makes it easier to enjoy later.
How to Reheat for Optimal Taste
When you’re ready to eat, you can easily reheat it. Preheat your oven to 350°F (175°C). Place the gratin in an oven-safe dish. Cover it with foil to keep it moist. Heat for about 20 minutes. If you prefer a crisp top, remove the foil for the last five minutes. You can also use a microwave. Heat in short bursts, stirring in between. This helps it warm evenly.
Freezing Cheesy Cauliflower Au Gratin: Tips and Tricks
Freezing is a great option if you want to save some for later. First, cool it completely. Then, use a freezer-safe container. Leave some space at the top for expansion. It can last in the freezer for up to three months. To reheat, let it thaw overnight in the fridge. Then, follow the reheating tips mentioned above. Enjoy your cheesy dish whenever you want!
FAQs
Can I make Cheesy Cauliflower Au Gratin ahead of time?
Yes, you can make Cheesy Cauliflower Au Gratin ahead of time. Prepare the dish up to the baking step. Cover it and store it in the fridge for up to two days. When ready to bake, let it sit at room temperature for about 30 minutes. Preheat your oven and bake as directed. This method saves time and gives the flavors a chance to blend.
What cheese works best for this recipe?
For this recipe, I recommend using sharp cheddar cheese. It gives a rich flavor that pairs well with cauliflower. You can also mix in Gruyère or fontina cheese for a different taste. Parmesan cheese adds a nice salty touch, so don’t skip that! Feel free to adjust the cheese types based on your taste.
How can I make this dish gluten-free?
To make Cheesy Cauliflower Au Gratin gluten-free, simply replace the breadcrumbs with gluten-free crumbs. You can also use crushed gluten-free crackers or even ground nuts. Ensure all other ingredients, like cheese and cream, are gluten-free as well. This way, you can enjoy a creamy, cheesy dish without any gluten worries.
This recipe for Cheesy Cauliflower Au Gratin offers easy steps to a delicious meal. You learned about essential ingredients and tasty options to boost flavor. I shared tips to achieve the perfect cheese sauce and bake it right. You can also try various add-ins or dietary swaps.
Remember, you can make this dish ahead and store leftovers well. With these ideas, you can enjoy a creamy, cheesy side that fits your taste and needs. Happy cookin

Cheesy Cauliflower Au Gratin
Ingredients
- 1 large head cauliflower, cut into florets
- 2 cups shredded sharp cheddar cheese
- 1 cup grated Parmesan cheese
- 1 cup heavy cream
- 2 tablespoons unsalted butter
- 3 cloves garlic, minced
- 1 teaspoon Dijon mustard
- 0.5 teaspoon nutmeg
- to taste salt and pepper
- 0.5 cup breadcrumbs
- for garnish fresh parsley, chopped
Instructions
- Preheat your oven to 375°F (190°C).
- In a large pot of boiling salted water, blanch the cauliflower florets for 5 minutes, until just tender. Drain and set aside.
- In a medium saucepan over medium heat, melt the butter. Add minced garlic and sauté for about 1 minute until fragrant.
- Stir in the heavy cream, Dijon mustard, nutmeg, and half of the sharp cheddar cheese (1 cup). Mix until the cheese is melted and the sauce is smooth. Season with salt and pepper to taste.
- In a large mixing bowl, combine the blanched cauliflower florets with the cheesy sauce. Stir until all the cauliflower is coated.
- Pour the cauliflower mixture into a greased 9x13 inch baking dish, spreading it evenly.
- Sprinkle the remaining cheddar cheese and all of the Parmesan cheese over the top.
- In a small bowl, combine the breadcrumbs with a drizzle of olive oil and mix until coated. Sprinkle the breadcrumb mixture evenly over the cheese layer.
- Bake in the preheated oven for 25-30 minutes, or until the top is golden brown and bubbling.
- Once baked, let it cool for a few minutes before garnishing with chopped parsley.
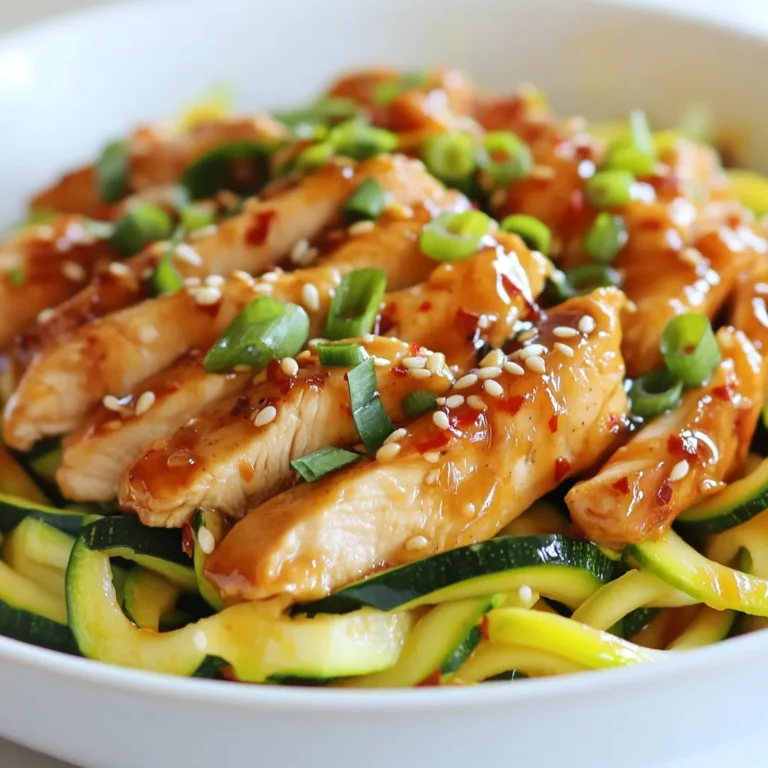

![To make this vibrant salad, you need fresh and colorful ingredients. Here’s what you will need: - 8 oz rice noodles (or your favorite noodle) - 1 cup red cabbage, shredded - 1 cup carrots, julienned - 1 cup bell peppers (mixed colors), sliced - 1 cup sugar snap peas, trimmed - 1 cucumber, julienned - 1 cup edamame, shelled - ¼ cup fresh cilantro, chopped - ¼ cup green onions, sliced - ¼ cup peanuts, crushed (optional for garnish) These ingredients bring crispness and bright colors to the dish. They also add a mix of textures that make every bite fun. The dressing ties all the flavors together. You will need these simple ingredients: - 3 tablespoons soy sauce (or tamari for gluten-free) - 2 tablespoons sesame oil - 1 tablespoon rice vinegar - 1 tablespoon honey (or maple syrup for vegan) - 1 teaspoon ginger, grated - 1 clove garlic, minced - 1 teaspoon chili paste (adjust to taste) Mixing these ingredients creates a tasty dressing that adds depth to the salad. The balance of salty, sweet, and a little spice is what makes this dish stand out. Want to make your salad even better? Here are some fun add-ins: - Sliced avocado for creaminess - Grilled chicken or tofu for protein - Sesame seeds for extra crunch - Fresh herbs like mint or basil for a fresh twist These additions can take your Rainbow Asian Noodle Salad to the next level. Feel free to mix and match based on your taste! For the complete recipe, check the [Full Recipe]. Start by boiling a pot of water. Use enough water to cover the noodles. Once the water boils, add 8 oz of rice noodles. Cook them according to the package instructions. I usually check for an al dente texture. This means they should be firm, not mushy. After cooking, drain the noodles in a colander. Rinse them under cold water. This step cools them and stops the cooking process. Set them aside for later. Grab a large mixing bowl. Add 1 cup of shredded red cabbage. Next, add 1 cup of julienned carrots. Then, toss in 1 cup of sliced bell peppers in mixed colors. Don't forget 1 cup of trimmed sugar snap peas. They add a nice crunch! Now, add 1 julienned cucumber and 1 cup of shelled edamame. Finally, mix in ¼ cup of chopped cilantro and ¼ cup of sliced green onions. These fresh veggies make your salad colorful and tasty. In a small bowl, combine the dressing ingredients. Start with 3 tablespoons of soy sauce. If you are gluten-free, use tamari instead. Next, add 2 tablespoons of sesame oil and 1 tablespoon of rice vinegar. Then, mix in 1 tablespoon of honey or maple syrup for a vegan option. Add 1 teaspoon of grated ginger and 1 clove of minced garlic. Finally, add 1 teaspoon of chili paste, adjusting to your spice level. Whisk all the ingredients together until well combined. Now, it’s time to bring everything together. Add the cooked noodles to your bowl of fresh vegetables. Pour the dressing over the top. Toss everything gently to mix. Make sure each noodle and veggie is coated well. This mixing helps all the flavors blend together for a delicious bite. After mixing, taste your salad. If you want it sweeter, add a little more honey. For extra spice, add more chili paste. Adjust the flavors to suit your liking. This salad should be a reflection of your taste. Feel free to experiment until it’s perfect for you. To make your Rainbow Asian Noodle Salad pop, use a large, shallow platter. This helps showcase the bright colors. Layer the noodles first, then pile on the veggies. Drizzle dressing on top, and finish with a sprinkle of cilantro and crushed peanuts. This creates a stunning look that draws everyone in. To keep your salad fresh, store it in an airtight container. Keep the dressing separate until you’re ready to eat. This prevents the noodles and veggies from getting soggy. You can also add a little lemon juice to the salad. This helps maintain color and crunch. Leftover salad is great for lunch! Consider adding protein like grilled chicken or tofu for a filling meal. You can also use the salad as a filling for lettuce wraps. Just scoop some salad into large lettuce leaves. This adds a fun twist and keeps it fresh. If you want to make it spicy, add more chili paste to the leftovers. {{image_2}} You can easily make this salad gluten-free. Just swap regular noodles for rice noodles. Use tamari instead of soy sauce. This keeps the flavor while avoiding gluten. If you want a vegan version, replace honey with maple syrup in the dressing. This simple swap keeps your salad sweet while staying plant-based. You can also add tofu for extra texture and protein. For those who want more protein, consider adding cooked chicken or shrimp. Both work well with the flavors in this salad. You can also use chickpeas or lentils for a hearty twist. Each option adds nutrition and keeps the dish filling. If you want the full recipe, you can find it above. To keep your Rainbow Asian Noodle Salad fresh, store it in the fridge. Place the salad in an airtight container. If you have leftover dressing, store it separately to prevent sogginess. This way, the noodles and veggies stay crisp. Use glass containers or high-quality plastic ones with tight lids. Glass is great because it does not stain or retain odors. Make sure the container is large enough to hold all the ingredients without squishing them together. Your salad can last for about 3 to 5 days in the fridge. The veggies will stay fresh, but the noodles may soften over time. To enjoy the best taste, eat it within the first few days. Always check for any changes in smell or texture before eating. For the full recipe, refer to the earlier sections. I love using rice noodles for their light texture. They soak up the flavors well. You can also use soba noodles or any thin pasta. Just cook them until they are al dente. Rinse under cold water to stop the cooking. This keeps them from getting mushy. Absolutely! You can prep the salad a day in advance. Just keep the dressing separate until you are ready to serve. This helps keep the veggies crisp. If you mix everything too early, the noodles may soak up the dressing. Yes, this salad is packed with veggies. Each ingredient adds nutrients. The colorful mix provides vitamins and minerals. You get fiber from the noodles and veggies too. This salad is a great option for a light meal or side dish. You can easily change the dressing to suit your taste. Add more honey for sweetness or extra chili paste for heat. You might try lime juice instead of rice vinegar for a zingy twist. Fresh herbs like mint or basil can add a bright flavor. Yes! Grilled chicken, shrimp, or tofu are great options. Just make sure to cook them first. Slice the meat thin before adding it to the salad. This adds protein and makes the dish more filling. You can check the Full Recipe for ideas on how to include them. You learned how to make a tasty Rainbow Asian Noodle Salad. We covered the key ingredients, from the noodles to the fresh veggies and zesty dressing. I shared easy steps to prepare and combine everything for the best flavor. You also found tips for presentation and storage to keep your salad fresh. Experiment with variations like gluten-free or vegan options. Remember, this dish is flexible and fun! Enjoy your colorful salad and make it your way.](https://dailydishly.com/wp-content/uploads/2025/06/34dc854e-6038-45bb-afdc-1af709707800-768x768.webp)
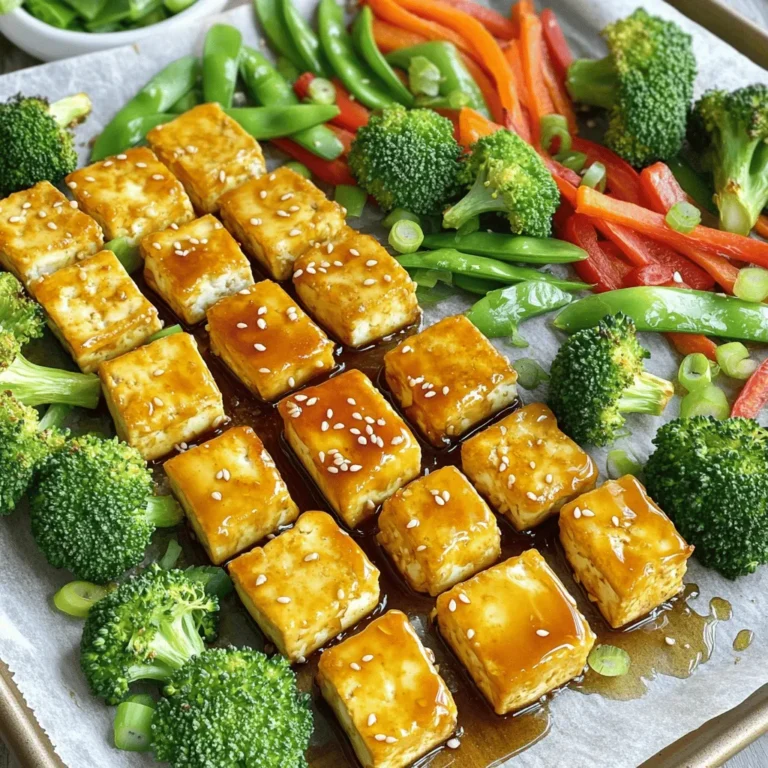
![- 1 pound ground turkey - 1/4 cup breadcrumbs - 1 tablespoon soy sauce - 1 tablespoon sesame oil Ground turkey is the star here. It gives a lean, juicy bite. Breadcrumbs help bind the meatballs. Soy sauce adds depth and umami. Sesame oil brings a nutty flavor that rounds it all out. - 1 tablespoon grated fresh ginger - 2 cloves garlic, minced - 1/4 cup green onions, finely chopped Fresh ginger adds warmth and spice. Minced garlic gives a savory kick. Chopped green onions add a fresh crunch. Together, these flavors make the meatballs sing. - 1/4 cup teriyaki sauce - 1 tablespoon honey - 1 teaspoon rice vinegar - 1 teaspoon cornstarch (optional) Teriyaki sauce is key for that sweet, tangy glaze. Honey enhances the sweetness. Rice vinegar adds a touch of acidity. Cornstarch thickens the sauce if you prefer a sticky coating. For the full recipe, check the [Full Recipe] link. To make the meatballs, start by combining the ingredients. In a large bowl, mix together these items: - 1 pound ground turkey - 1/4 cup breadcrumbs - 1 tablespoon soy sauce - 1 tablespoon sesame oil - 1 tablespoon grated fresh ginger - 2 cloves garlic, minced - 1/4 cup green onions, finely chopped - 1/4 teaspoon black pepper Mix well until everything is blended. You want a smooth and even mixture. Now, it's time to form the meatballs. With wet hands, take small amounts of the mixture and roll them into balls. Aim for about 1 inch in diameter. This size helps them cook evenly. Place the meatballs on a baking sheet lined with parchment paper. Next, preheat your oven to 400°F (200°C). This ensures the meatballs cook through and get nice and golden. Once the oven is ready, bake the meatballs for 20 minutes. Keep an eye on them. They should be golden brown and fully cooked. You can use a meat thermometer if you want to check; the internal temperature should reach 165°F (74°C). While the meatballs bake, you can make the teriyaki glaze. In a small saucepan, combine these ingredients: - 1/4 cup teriyaki sauce - 1 tablespoon honey - 1 teaspoon rice vinegar - 1 teaspoon cornstarch (optional, for thickening) Heat the mixture over medium heat. Stir it often until it starts to simmer. This means the sauce is thickening nicely. Once the meatballs are done, toss them in the warm teriyaki sauce until they are fully coated. This step adds all the flavor! Find the full recipe for more details on how to enjoy these teriyaki turkey meatballs! To get the best texture for your meatballs, keep some tips in mind. Use fresh ground turkey for moisture and flavor. Mixing the ingredients well helps bind them together. Avoid overmixing, as it can make the meatballs tough. For even cooking, use a uniform size. Aim for each meatball to be about one inch. This size cooks in about 20 minutes at 400°F (200°C). Use a baking sheet lined with parchment paper to prevent sticking and ensure even browning. You can easily adjust the teriyaki sauce to your taste. If you like it sweeter, add more honey. For a spicy kick, mix in some red pepper flakes. If you want to swap ingredients, try using coconut aminos instead of soy sauce for a different flavor. For a thicker sauce, add cornstarch to the mix. Make sure to stir the sauce while it cooks to avoid lumps. Garnish your teriyaki turkey meatballs with extra chopped green onions for color and crunch. You can also sprinkle sesame seeds on top for added flavor. Pair these meatballs with steamed rice or quinoa for a complete meal. Roasted veggies or a fresh salad also make great side dishes. For a fun touch, serve them in lettuce wraps! You can find the full recipe for Teriyaki Turkey Meatballs in the main article. {{image_2}} You can swap ground turkey for other proteins. Chicken works great, too. Use ground chicken for a lighter taste. Beef meatballs add a richer flavor. Just keep in mind that cooking times may change. If you prefer a veggie option, try using lentils or chickpeas. Blend them with spices and breadcrumbs. This makes a tasty meatball without meat. You can enjoy all the teriyaki flavor while keeping it plant-based. The teriyaki sauce is key here, but you can mix it up. Sweet and sour sauce gives a tangy twist. It pairs well with the meatballs. You can also try different Asian BBQ sauces. These bring a smoky flavor that is simply delicious. Feel free to experiment with your favorite sauces. Each option opens a new taste experience. Batch cooking is perfect for busy days. Make a big batch of meatballs and freeze them. They freeze well and are easy to reheat. This way, you can have a quick meal ready in no time. Pair your meatballs with rice or noodles for a full meal. Add steamed veggies for extra nutrition. Mixing and matching helps keep dinners exciting. Check out the Full Recipe for all the details. You can store leftover teriyaki turkey meatballs in the fridge. They last for about 3 to 4 days. Make sure to use airtight containers. This keeps them fresh and safe to eat. If you use a glass container, it helps avoid odors. If you want to store meatballs for longer, freezing is a great choice. Place the meatballs on a baking sheet to freeze them first. This step stops them from sticking together. After they are frozen, move them to a freezer-safe bag. They can last up to 3 months in the freezer. To thaw, place the meatballs in the fridge overnight. You can also use the microwave for a quick thaw. Just be careful to avoid cooking them too much. This way, you keep the great texture. You can reheat your meatballs in the oven or microwave. To use the oven, preheat it to 350°F. Place the meatballs on a baking tray and cover them with foil. This keeps them moist. Heat for about 15 minutes. In the microwave, place them on a plate. Cover them with a damp paper towel. This keeps them from drying out. Heat in short bursts of 30 seconds. Check often to ensure they are hot but not overcooked. For the best taste, always reheat with the teriyaki sauce. It adds flavor and moisture back to the meatballs. Enjoy your meal! To check if your meatballs are done, you need to look for two key signs: - Cooking temperature indicators: The meatballs should reach an internal temperature of 165°F (74°C). This is safe for ground turkey. - Checking for doneness: Cut one meatball in half. The inside should be no longer pink, and the juices should run clear. If you see pink, they need more time. Yes, you can easily make this recipe gluten-free by swapping out a few ingredients: - Gluten-free alternatives for sauces and breadcrumbs: Use gluten-free breadcrumbs or crushed rice crackers instead of regular breadcrumbs. For the sauce, choose a gluten-free soy sauce or tamari instead of standard soy sauce. This keeps all the flavor while making it safe for those with gluten sensitivities. Pairing side dishes with your meatballs can enhance your meal. Here are some great options: - Recommended side dishes and accompaniments: Serve with steamed rice or quinoa for a filling meal. You can also add stir-fried vegetables for a colorful plate. A fresh salad with a light dressing makes a nice, crisp side. If you like, top your meatballs with extra green onions for added flavor and crunch. For the complete recipe, check out the Full Recipe. In this post, I shared how to make Teriyaki Turkey Meatballs. We explored main ingredients like ground turkey and breadcrumbs, and flavor enhancers like ginger and garlic. I also explained how to prepare and bake the meatballs, and create a delicious teriyaki glaze. Don't forget to customize your sauce and try different proteins or sides. Whether for a quick meal or meal prep, these meatballs offer great taste and flexibility. Enjoy making this recipe and share it with friends for a tasty meal!](https://dailydishly.com/wp-content/uploads/2025/07/96065441-bacf-48e9-8896-75bdb8bd513a-768x768.webp)
![To make this dish, you need the right ingredients. Here’s what to gather: - 4 boneless, skinless chicken thighs - 1 cup teriyaki sauce (store-bought or homemade) - 1/2 fresh pineapple, sliced into rings - 2 tablespoons soy sauce - 1 tablespoon brown sugar - 1 teaspoon grated fresh ginger - 2 cloves garlic, minced - 1 tablespoon sesame oil - 1 tablespoon rice vinegar These ingredients create a great balance of flavors. The chicken thighs are juicy and soak up the teriyaki sauce well. Pineapple adds sweetness and a hint of tartness. You can make the dish even better with some simple garnishes. Consider adding: - 2 green onions, chopped (for garnish) - Sesame seeds (for garnish) These garnishes enhance the look and taste of your meal. The green onions add a fresh crunch, while sesame seeds give a nice texture. Choosing the right chicken and pineapple makes a big difference. Here are some tips: - Chicken: Look for thighs that are firm and have a nice pink color. They should not smell bad. Fresh chicken tastes much better when grilled. - Pineapple: Pick a pineapple that smells sweet at the base. The skin should be golden and slightly soft when you press it. This means it is ripe and ready to use. Using quality ingredients helps you create a dish that tastes great. For the complete preparation process, check the Full Recipe. Start by mixing the teriyaki sauce, soy sauce, brown sugar, ginger, garlic, sesame oil, and rice vinegar in a bowl. Whisk until everything blends well. Add the chicken thighs and coat them with the marinade. Cover the bowl and put it in the fridge for at least 30 minutes. For even more flavor, let it marinate for up to 2 hours. Next, you need to heat your grill. Set it to medium-high heat. If you use charcoal, wait until the coals glow red and are evenly heated. This helps get nice grill marks on the chicken and pineapple. While the grill heats, brush the pineapple rings with a bit of teriyaki sauce. Once the grill is hot, place the pineapple on it. Grill each side for 3-4 minutes, until you see nice marks and the pineapple caramelizes. Remove them when done. Now, take the marinated chicken and shake off extra sauce. Place the chicken on the grill. Cook it for 5-7 minutes on each side. The chicken should reach 165°F (75°C) and be nicely browned. Brush some marinade on the chicken during the last few minutes for added flavor. When the chicken is ready, remove it from the grill. Let it rest for a few minutes. To plate your dish, put a grilled pineapple ring on a plate. Top it with a piece of grilled chicken. Finally, add chopped green onions and sprinkle sesame seeds for a tasty finish. Enjoy your flavorful creation! For the complete recipe, check out the Full Recipe. Grilling is an art. To make your grilled pineapple teriyaki chicken shine, follow these tips: - Prepare Your Grill: Make sure your grill is clean. A good grill helps prevent sticking. - Heat Control: Preheat to medium-high heat. This helps cook the chicken evenly and prevents burning. - Use Oil: Lightly oil the grill grates to help your chicken and pineapple lift off easily. Marinating is key. Here’s how to get the most flavor: - Timing Matters: Marinate your chicken for at least 30 minutes. For deeper flavor, go up to 2 hours. - Use Fresh Ingredients: Fresh ginger and garlic boost flavor. They make your dish vibrant and aromatic. - Reserve Some Marinade: Set aside a bit of marinade before adding chicken. Brush it on during grilling for extra flavor. Grill marks make your dish look great. To achieve them: - Don’t Move the Chicken: Place the chicken on the grill and let it sit. Moving it too soon can ruin those marks. - Rotate the Chicken: After a few minutes, rotate the chicken 90 degrees. This creates a crosshatch pattern. - Check for Color: Look for a nice golden brown before flipping. This means you have good grill marks! For the complete recipe, check out the [Full Recipe]. {{image_2}} You can swap chicken for other meats. Try pork or shrimp for a tasty twist. Both cook nicely with teriyaki sauce. Just adjust the cooking time. Pork should reach 145°F (63°C) and shrimp cooks quickly, about 2-3 minutes per side. If you prefer plant-based meals, use tofu or tempeh. Both soak up the teriyaki sauce well. Cut them into cubes and marinate just like chicken. Grill until they are golden brown. You can also try seitan for a meat-like texture. Adding vegetables brightens up this dish. Grilled bell peppers, zucchini, or asparagus work great. Chop them into bite-sized pieces and toss them in the marinade. Grill alongside the chicken for a colorful plate. This not only adds flavor but also boosts nutrition. For a fun twist, grill corn on the cob for a sweet crunch. To store leftovers, let the grilled chicken and pineapple cool to room temperature. Place them in an airtight container. You can keep them in the fridge for up to three days. Make sure to separate the chicken from the pineapple if possible. This keeps the flavors fresh. For reheating, you can use the microwave or oven. If using a microwave, cover the dish to retain moisture. Heat on medium for about 2-3 minutes. If using an oven, preheat it to 350°F (175°C). Place the chicken and pineapple in an oven-safe dish. Heat for about 10-15 minutes until warm. Always check the temperature; it should reach 165°F (75°C) for safe eating. You can freeze grilled chicken and pineapple for later use. Wrap each piece tightly in plastic wrap. Then, place them in a freezer bag. This will help prevent freezer burn. They can last up to three months in the freezer. When ready to eat, thaw in the fridge overnight before reheating. Enjoy the same great taste! For the full recipe, check out the instructions above. Yes, you can use chicken breast. Thighs have more fat, making them juicier. Breasts may dry out faster, so watch the cooking time closely. Marinate the chicken for at least 30 minutes. For best taste, marinate for up to 2 hours. This helps the flavors soak in deeply. You can serve it with rice or quinoa. Steamed veggies and salad also pair well. Add some grilled corn for a summer twist. Yes, making teriyaki sauce is easy. Combine soy sauce, sugar, ginger, and garlic. Simmer it to thicken, and you have a tasty sauce. Check the internal temperature with a meat thermometer. It should reach 165°F (75°C). The chicken should also be golden brown on the outside. Grilled pineapple teriyaki chicken is tasty and fun to make. You learned about key ingredients, including chicken and pineapple. I shared tips for grilling and storing leftovers. You can try different proteins or add veggies too. Cooking should be enjoyable. With these steps and ideas, you can create a great dish. Don't hesitate to experiment with flavors. Enjoy your cooking adventure and impress your friends!](https://dailydishly.com/wp-content/uploads/2025/06/0924d723-9b8a-4a49-9695-7d965ac302d4-768x768.webp)