Air Fryer Avocado Fries with Chipotle Dip Delight

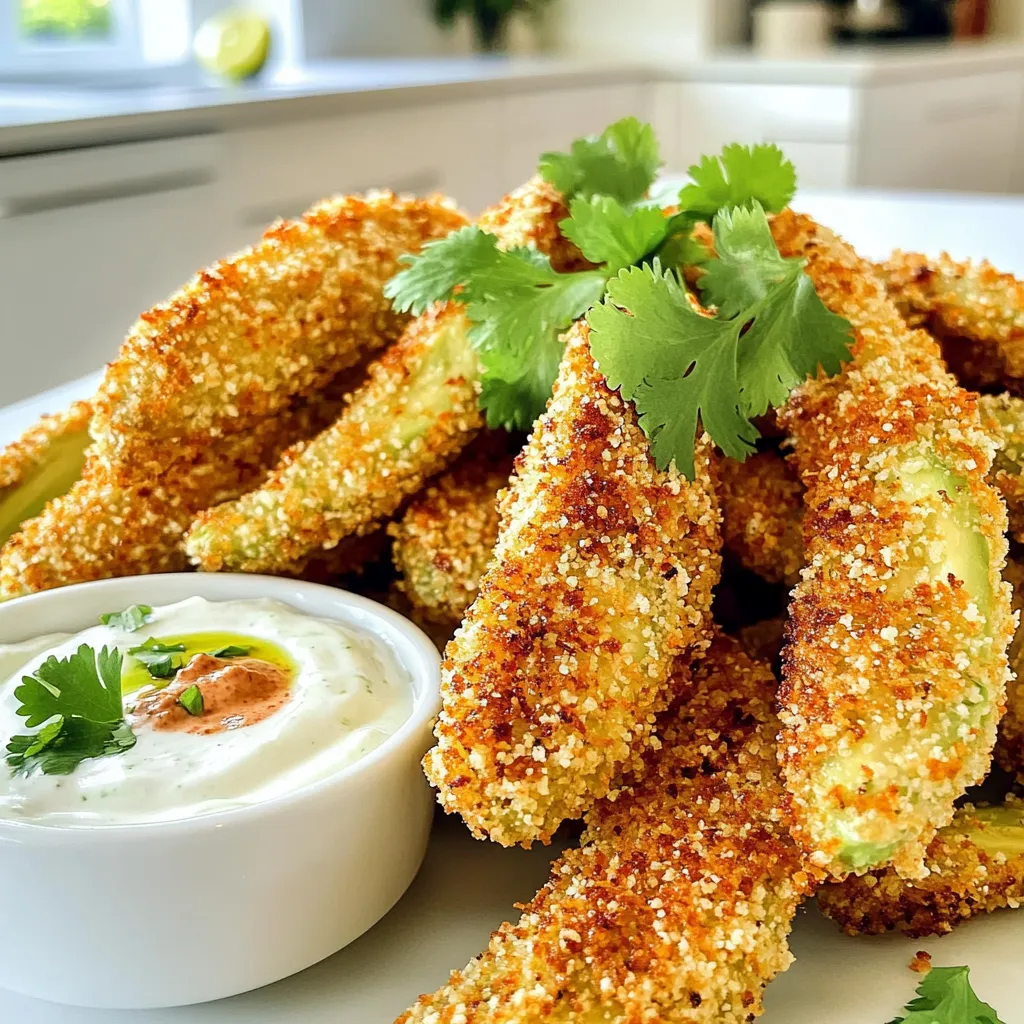
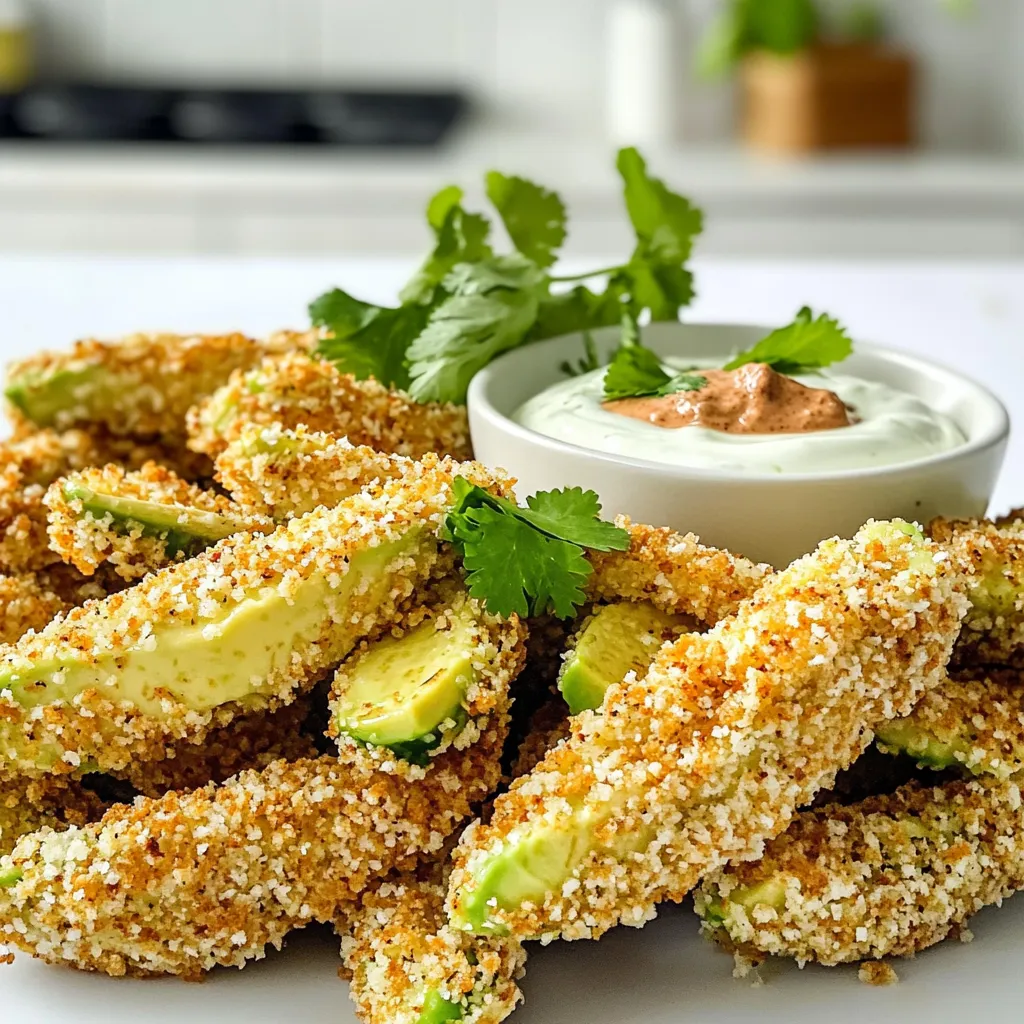
Are you ready to spice up your snack game? Let’s dive into the world of Air Fryer Avocado Fries with Chipotle Dip! This easy recipe delivers crispy, delicious bites that are totally addictive. With just a few simple ingredients, you can impress your friends and family. Follow me as we explore how to make this tasty treat that’s perfect for any occasion! Trust me, you won’t want to miss it.
Ingredients
Avocado Fries Ingredients
– 2 ripe avocados, sliced into wedges
– 1 cup breadcrumbs (panko for extra crunch)
– 1/2 cup all-purpose flour
– 2 large eggs, beaten
– 1 teaspoon garlic powder
– 1 teaspoon smoked paprika
– 1/2 teaspoon cayenne pepper (optional for heat)
– Salt and pepper to taste
– Cooking spray
Chipotle Dip Ingredients
– 1/2 cup Greek yogurt
– 1 tablespoon chipotle in adobo sauce, minced (adjust to taste)
– 1 tablespoon lime juice
– Salt to taste
Optional Add-ins and Seasonings
You can customize your dip and fries with some fun add-ins. Try adding fresh cilantro or lime zest to your chipotle dip for a zesty twist. For the fries, consider adding a pinch of cumin or onion powder for a deeper flavor. If you like heat, add more cayenne pepper to the breading mix. Experimenting with your own touches can make this dish even more enjoyable.
Step-by-Step Instructions
Prepping the Air Fryer
Start by preheating your air fryer to 375°F (190°C). This step is key for getting crispy fries. If your air fryer has a preheat setting, use it. If not, run it for about 5 minutes. This heat helps the fries cook evenly and get that golden brown color.
Creating the Breading Station
Next, set up your breading station. You need three bowls:
– First Bowl: Fill it with 1/2 cup all-purpose flour. Add salt, pepper, 1 teaspoon garlic powder, and 1 teaspoon smoked paprika to the flour.
– Second Bowl: Beat two large eggs until mixed well.
– Third Bowl: Pour 1 cup of panko breadcrumbs into the bowl. If you like it spicy, add 1/2 teaspoon cayenne pepper to the breadcrumbs.
This setup will help you coat the avocado wedges evenly.
Breading and Air Frying the Avocado Wedges
1. Coat the Wedges: Take each avocado wedge and dip it into the flour mix first. Make sure it’s fully covered. Shake off any extra flour.
2. Egg Bath: Next, dip the floured wedge into the beaten eggs. Let any excess egg drip off.
3. Breadcrumb Coating: Now roll the wedge in the panko breadcrumbs. Press gently to help the crumbs stick well.
4. Arrange in the Air Fryer: Place the breaded avocado fries in a single layer in the air fryer basket. Do not overcrowd them. This helps them cook evenly.
5. Spray for Crispiness: Lightly spray the fries with cooking spray. This adds extra crunch.
6. Cooking Time: Air fry the wedges for about 10-12 minutes. Flip them halfway through to ensure they brown evenly. Look for a golden and crispy finish.
While the fries cook, you can prepare the chipotle dip. Mix 1/2 cup Greek yogurt, 1 tablespoon minced chipotle, 1 tablespoon lime juice, and salt to taste in a small bowl. Adjust the chipotle amount to suit your heat preference.
Once the fries are done, take them out and let them cool for a minute. Enjoy them hot with your chipotle dip!
Tips & Tricks
Achieving the Perfect Crunch
To get the best crunch on your avocado fries, follow these steps. Use fresh, ripe avocados. Slice them into even wedges. This helps them cook evenly. Coat each wedge well in flour, then egg, and finally in panko breadcrumbs. Panko gives you that extra crunch. Lightly spray the fries with cooking spray before air frying. This adds crispiness and a golden color.
Common Mistakes to Avoid
Avoid these common mistakes to ensure great avocado fries. Don’t overcrowd the air fryer basket. This can make them soggy. Fry in batches if needed. Be sure to shake off excess flour and egg. This helps the coating stick better. Also, don’t skip the cooking spray. It’s key for getting that crunchy finish.
Best Practices for Fresh Avocados
Choosing the right avocado is crucial. Look for avocados with a dark green skin and slight give when you press them. If they feel too soft, they may be overripe. Store unripe avocados at room temperature. Once ripe, keep them in the fridge to slow down spoilage. Use ripe avocados for the best flavor in your fries.

Variations
Spicy Avocado Fries with Different Dips
You can easily spice up your avocado fries. Try adding more cayenne pepper to the breading. This will give your fries a nice kick. Pair them with a zesty lime dip or a creamy ranch dressing. You can also use a spicy salsa for a fresh twist. Each dip can change the whole vibe of your dish.
Vegan and Gluten-Free Alternatives
If you want a vegan version, swap the eggs for a flax egg. Mix one tablespoon of ground flaxseed with three tablespoons of water. Let it sit until it thickens. For gluten-free options, use gluten-free breadcrumbs and flour. This way, you can enjoy these fries without any worries.
Add-ins for Extra Flavorings
You can boost the flavor in many ways. Add some shredded cheese to your breadcrumbs for extra richness. Try mixing in some chopped herbs, like cilantro or parsley, into the breading. A sprinkle of nutritional yeast can also add a savory kick. Feel free to mix and match to find your favorite flavor combinations.
Storage Info
How to Store Leftover Avocado Fries
To keep your leftover avocado fries fresh, store them in an airtight container. Place a paper towel at the bottom to absorb moisture. This helps prevent sogginess. Seal the container tightly and store it in the fridge. Use them within two days for the best taste and texture.
Reheating Guidelines
When you want to enjoy your leftover avocado fries, reheating them properly is key. Preheat your air fryer to 350°F (175°C). Place the fries in the basket in a single layer. Air fry for about 5-7 minutes until they are hot and crispy again. This method keeps them crunchy and delicious.
Shelf Life and Freezing Options
Avocado fries have a short shelf life. In the fridge, they last about two days. If you want to keep them longer, consider freezing them. To freeze, arrange the breaded fries in a single layer on a baking sheet. Freeze until firm, then transfer them to a freezer bag. They can last up to three months in the freezer. When ready to cook, you can air fry them directly from frozen; just add a few extra minutes to the cooking time.
FAQs
Can I use regular breadcrumbs instead of panko?
Yes, you can use regular breadcrumbs. However, panko gives a crispier texture. Regular breadcrumbs may not provide the same crunch. If you prefer a lighter bite, stick with panko.
How do I know if my avocados are ripe?
To check if avocados are ripe, gently squeeze them in your hand. They should feel slightly soft but not mushy. If they feel hard, they need more time to ripen. If they feel very soft, they might be overripe. You can also look for dark green to black skin as an indicator.
What can I serve with Air Fryer Avocado Fries?
Air Fryer Avocado Fries pair well with various dips. The chipotle dip is a great choice, but you can also try salsa, ranch, or a tangy yogurt dip. For a complete meal, serve these fries with tacos or a fresh salad. They also make a fun snack at parties!
In this article, we covered how to make delicious air fryer avocado fries and a chipotle dip. You learned about the key ingredients and how to prepare them. I shared tips for getting the perfect crunch and avoiding common mistakes. You can even try variations like spicy fries or vegan options. Lastly, we discussed storing leftovers and reheating them.
Enjoy making these tasty snacks that are simple and fun!


![To make crispy vegetable spring rolls, you need a few fresh ingredients. Here’s a list: - 1 cup cabbage, finely shredded - 1 carrot, julienned - 1 bell pepper (any color), julienned - 1 cup bean sprouts - 2 green onions, finely chopped - 1 clove garlic, minced - 1 teaspoon ginger, grated - 1 tablespoon soy sauce - 1 teaspoon sesame oil - 10-12 spring roll wrappers - Vegetable oil for frying - Salt and pepper to taste Choosing fresh ingredients is key for great taste. Look for vibrant colors in your veggies. The cabbage should feel crisp and firm. Fresh carrots are bright and firm too. Bell peppers should have smooth skin. Avoid any that are wrinkled or soft. For the garlic and ginger, choose firm roots with no dark spots. Fresh herbs can also add a nice touch. Quality ingredients make your spring rolls taste even better. You can add optional ingredients for more flavor. Try adding: - Mushrooms for an earthy taste - Spinach for extra greens - Fresh herbs like cilantro or mint - A splash of lime juice for brightness - Chopped chili for spice These extras can enhance the taste and make your spring rolls unique. Mix and match to find your favorite combination! Start by gathering your ingredients. You will need cabbage, carrots, bell peppers, bean sprouts, green onions, garlic, ginger, soy sauce, and sesame oil. Slice all your veggies into small pieces. This helps them cook evenly. In a large bowl, mix the shredded cabbage, julienned carrot, bell pepper, bean sprouts, and chopped green onions. Add the minced garlic and grated ginger. Drizzle the soy sauce and sesame oil over the filling. Season with salt and pepper. Mix everything well until it’s nicely combined. This veggie mix is full of flavor and crunch. Now, it's time to roll! Take a spring roll wrapper and lay it flat on a clean surface. Point one corner toward you. Spoon about 2 tablespoons of your vegetable filling onto the wrapper, about 2 inches from the corner. Fold the corner over the filling. Next, fold in the sides. Roll the wrapper tightly away from you. Use a bit of water on the edge to seal it if needed. Repeat this for all the wrappers. Make sure each spring roll is sealed well so they don’t open while cooking. For crispy spring rolls, proper frying is key. Heat vegetable oil in a large frying pan or deep skillet over medium-high heat. You need enough oil to cover the rolls. Once the oil is hot, carefully add a few spring rolls. Don’t crowd the pan; this helps them fry evenly. Fry each side for about 3-4 minutes until golden brown. Use a slotted spoon to take them out. Place the cooked spring rolls on a paper towel to drain excess oil. Enjoy your crispy spring rolls hot, paired with sweet chili sauce or soy sauce for dipping. To make your spring rolls crispy, use the right oil. Vegetable oil works great. Heat the oil to the right temperature before frying. If it’s too cold, the rolls will soak up oil. If it’s too hot, they will burn. Aim for a temperature around 350°F. Fry in small batches to avoid crowding. This ensures even cooking and crispiness. Once golden brown, place them on paper towels to absorb extra oil. One common mistake is using too much filling. Overstuffed rolls can burst open while frying. It's best to use about two tablespoons of filling per roll. Another error is not sealing the edges well. Use water to help the wrapper stick. Lastly, skip the flour or cornstarch for dusting your surface. It can cause the rolls to stick, making it hard to roll them up tightly. Serve your crispy vegetable spring rolls with a side of sweet chili sauce or soy sauce. These dips add a nice kick and enhance the flavor. You can also add a fresh salad on the side. A simple salad with cucumber and carrots works well. It adds a refreshing crunch. If you want something extra, use a sprinkle of sesame seeds on top. This adds a nice touch and makes your dish look great! For more ideas, check out the Full Recipe. {{image_2}} You can change the veggies in your spring rolls. Try using spinach, mushrooms, or zucchini. These add new flavors and textures. You can also add herbs like basil or cilantro. They give a fresh taste that brightens the rolls. For a protein boost, add tofu or chicken to your filling. Tofu is a great choice for a vegetarian option. Just cube it and fry it lightly before mixing. If you prefer chicken, cook and shred it first. This adds heartiness to your rolls and makes them more filling. If you love heat, add chili paste or slices of jalapeño to your mix. This gives your spring rolls a spicy kick. You can also use chili oil while frying for extra flavor. Experiment with sauces like sriracha or hoisin for dipping. These add layers of taste that make each bite exciting. For the full recipe, check out the [Full Recipe]. To store leftover spring rolls, place them in an airtight container. Make sure they are completely cool before sealing the container. This helps keep them fresh. Store them in the fridge. They can last up to three days. If you want to enjoy them later, consider freezing. Reheating spring rolls can be tricky. You want them crispy, not soggy. The best way is to use an oven or air fryer. Preheat your oven to 375°F (190°C). Place the rolls on a baking sheet. Heat for about 10 minutes, turning halfway. In an air fryer, set it to 350°F (175°C) and heat for about 5-7 minutes. This keeps them crispy. To freeze spring rolls, wrap them tightly in plastic wrap. Then, place them in a freezer bag. Make sure to remove as much air as possible from the bag. They can stay frozen for up to three months. When ready to eat, thaw them in the fridge overnight before reheating. Enjoy your crispy vegetable spring rolls later with full flavors! For the detailed process, check out the Full Recipe. To make crispy vegetable spring rolls, gather your ingredients first. You need cabbage, carrots, bell pepper, bean sprouts, green onions, garlic, ginger, soy sauce, sesame oil, spring roll wrappers, and oil for frying. 1. Mix the filling: In a bowl, combine the cabbage, carrots, bell pepper, bean sprouts, green onions, garlic, and ginger. 2. Season: Add soy sauce and sesame oil. Stir well. 3. Roll the spring rolls: Place a spring roll wrapper on a flat surface. Put about 2 tablespoons of the filling on it. Fold the bottom corner over the filling, then fold in the sides, and roll tightly. 4. Fry: Heat oil in a pan. Fry the rolls until golden and crispy, about 3-4 minutes per side. You can dip spring rolls in many tasty sauces. Sweet chili sauce is a popular choice. Soy sauce also works well. For a kick, try sriracha or a spicy peanut dip. Each dip adds a new flavor to your rolls. Yes, you can bake spring rolls! Preheat your oven to 400°F (200°C). Brush the rolls with oil. Place them on a baking sheet. Bake for about 20-25 minutes or until they are golden and crispy. Baking is a healthier option than frying. You can find crispy vegetable spring rolls in many grocery stores. Check the frozen food aisle for pre-made options. Asian markets often have fresh spring rolls. Restaurants that serve Asian cuisine usually offer them as appetizers. You can easily customize your spring rolls. Add your favorite veggies, like zucchini or mushrooms. For protein, include tofu, shrimp, or chicken. Spices like chili flakes or herbs can also enhance the flavor. Get creative and make it your own! For more details on making these delicious rolls, check out the Full Recipe. In this blog post, we explored the key ingredients for making spring rolls, focusing on freshness and quality. You learned step-by-step how to prepare the filling, roll the spring rolls, and fry them for a crispy finish. I shared tips to avoid common mistakes and suggested various serving options. We also discussed delicious variations, storage tips, and answered common questions. In closing, making spring rolls is fun and rewarding. With the right ingredients and techniques, you will enjoy tasty snacks that everyone loves. Try it out!](https://dailydishly.com/wp-content/uploads/2025/06/947db9c4-fe2b-4e58-90c7-1de163361a05-768x768.webp)


![For this fresh and tasty grilled peach caprese salad, gather these ingredients: - 2 ripe peaches, halved and pitted - 8 ounces fresh mozzarella, sliced - 2 cups mixed greens (like arugula, spinach, or baby kale) - 1 cup cherry tomatoes, halved - 1/4 cup fresh basil leaves, torn To enhance the flavors, use these seasonings and dressings: - 2 tablespoons balsamic glaze - 1 tablespoon olive oil - Salt and pepper to taste You will need some key tools: - A grill or grill pan - A brush for oiling the peaches - A sharp knife for slicing - A large serving platter to arrange the salad This simple list will help you create a vibrant dish. The mix of sweet peaches and creamy mozzarella makes this salad shine. You can find the full recipe in our guide. Start by preheating your grill to medium-high heat. This step is key for good grill marks. Cut the peaches in half and remove the pits. Brush the cut sides with olive oil. This helps the peaches not stick to the grill. Place the peach halves cut side down on the grill. Grill them for about 3-4 minutes. You'll know they are ready when you see nice grill marks and they feel a bit soft. Once done, take them off the grill and let them cool for a minute. Take a large serving platter. Arrange the mixed greens as a nice bed for your salad. Next, place the grilled peach halves on top. Spread them out evenly for a lovely look. Add the fresh mozzarella slices next. Scatter the cherry tomato halves around the peaches. Finally, sprinkle the torn basil leaves over the top. This adds a fresh touch. Drizzle the balsamic glaze over the whole salad. Finish with a sprinkle of salt and pepper to taste. Serve the salad right away for the best flavor. You can also chill it slightly if you prefer. Pair it with grilled chicken or fish for a complete meal. This salad makes a great side dish too. For a fun twist, add some nuts or seeds for extra crunch. Enjoy the balance of sweet peaches and creamy mozzarella! For the full recipe, check out the [Full Recipe]. To get those beautiful grill marks, start with ripe peaches. Choose peaches that are firm but yield slightly to pressure. Brush the cut sides with olive oil. This keeps them from sticking to the grill. Preheat your grill to medium-high heat. Place the peaches cut side down. Grill them for 3-4 minutes. You’ll see lovely marks form, and they will soften just right. Flip them only if needed. Fresh mozzarella is key for this dish. Look for mozzarella packed in water or brine. This keeps it moist and flavorful. The texture should be soft and slightly springy. You can tear it into pieces for a rustic look. Aim for a good balance between peach sweetness and mozzarella creaminess. It enhances the overall taste of the salad. Add depth to your salad with a few simple extras. A sprinkle of salt brings out the peach flavor. Fresh basil adds a nice aroma and taste. For a bit of heat, consider adding sliced jalapeños. Drizzle with balsamic glaze to balance the sweetness. If you want more crunch, toss in some nuts like walnuts or pistachios. These pair well with the soft mozzarella and juicy peaches. For the full recipe, check out the details above. {{image_2}} You can change this salad based on what’s fresh and in season. Try using nectarines instead of peaches for a different taste. In fall, add sliced apples or pears for sweetness. In winter, you might want to use roasted butternut squash. This gives a warm touch to the dish. Each swap brings new flavors and fun to your table. If you want a vegan version, swap the mozzarella with vegan cheese or avocado slices. Both options add creaminess. You can also use a nut-based cheese for a rich flavor. Make sure the balsamic glaze is vegan too, as some contain honey. This way, everyone can enjoy the salad without missing out. Want to add more zest? Try adding prosciutto or crispy bacon for a savory bite. Nuts, like sliced almonds or walnuts, give a nice crunch and healthy fats. A sprinkle of chili flakes can add a kick if you like spice. You can mix and match these options to create your own unique twist on the grilled peach Caprese salad. For the full recipe, check out the entire process above! If you have leftover Grilled Peach Caprese Salad, store it right. First, let the salad cool to room temperature. Then, place it in a container. Keep the dressing separate if possible. This helps keep the greens crisp. You can use this salad within two days for the best taste. Choose an airtight container for storage. Glass containers work well and do not retain odors. Plastic containers are also fine, but make sure they seal tightly. Avoid storing in a bowl covered with plastic wrap. This can let air in and spoil your salad faster. The shelf life of your salad depends on the ingredients. Grilled peaches can last up to three days in the fridge. Fresh mozzarella should be used within two days. Mixed greens are best consumed within one day. Always check for any signs of spoilage before eating. Enjoy your delicious salad while it’s fresh! Yes, you can make the salad ahead of time. I suggest grilling the peaches just before serving. If you grill them too early, they may lose some of their charm. You can prepare the salad base, like mixed greens and tomatoes, and store them in the fridge. Just add the peaches and drizzle the glaze when you are ready to eat. If you do not have balsamic glaze, you can use balsamic vinegar instead. Just drizzle a bit more to get that sweet flavor. Honey or maple syrup can also work in a pinch. Mix them with some olive oil for a tasty dressing. This will add a new twist to your salad. To find ripe peaches, look for a sweet smell and a slight softness. If the peach gives a bit when you press it gently, it is ready. Avoid hard peaches, as they will not grill well. Choose peaches with a golden hue and a bit of redness for the best flavor. In this article, we explored how to make a delicious peach salad. We covered the best fresh ingredients, seasonings, and tools you need for success. You learned step-by-step how to prepare and serve your salad. We also shared tips for perfect grill marks and flavor pairings. Don’t forget to try the variations for a unique touch. Finally, proper storage keeps leftovers fresh and tasty. Enjoy creating this bright dish that anyone can love!](https://dailydishly.com/wp-content/uploads/2025/06/c765deb6-47e2-46b1-bbfc-9b058c8c2a51-768x768.webp)
![- 1 bag (12 oz) tortilla chips - 1 cup black beans, rinsed and drained - 1 cup corn kernels (fresh or frozen) - 1 medium bell pepper, diced (any color) - 1 medium red onion, finely chopped - 1 jalapeño, sliced (seeds removed for less heat) - 1 ripe avocado, diced - 1 cup cherry tomatoes, halved - 1 cup shredded cheese (cheddar or a vegan alternative) - 1 tablespoon olive oil - 1 teaspoon chili powder - 1 teaspoon cumin - Salt and pepper to taste - Fresh cilantro, for garnish - Lime wedges, for serving Gathering fresh ingredients makes a big difference. Tortilla chips form the crunchy base. Black beans add protein and fiber. Sweet corn brings a pop of color and crunch. Diced bell pepper and red onion add flavor and texture. Slice jalapeños for some heat. Diced avocado gives a creamy touch. Halved cherry tomatoes offer freshness. Shredded cheese melts beautifully over the nachos. Olive oil helps sauté the veggies. Chili powder and cumin bring warmth. Lastly, season with salt and pepper for balance. Fresh cilantro and lime wedges are essential for that final zing. For the full recipe, check out the details above. - Preheat the oven: Set your oven to 400°F (200°C). This helps the nachos bake evenly. - Prepare the veggies: In a large skillet, heat one tablespoon of olive oil over medium heat. Add the finely chopped red onion and diced bell pepper. Sauté them for about 3-4 minutes. They should start to soften. Next, add the corn, rinsed black beans, sliced jalapeño, chili powder, cumin, salt, and pepper. Cook this mix for another 2-3 minutes, stirring now and then. This warms everything through and blends the flavors well. - Assemble the nachos: Grab a large baking sheet. Spread the tortilla chips in a single layer. Evenly spoon the sautéed veggie mix over the chips. Finish by sprinkling shredded cheese on top. - Place nachos in the oven: Carefully slide the baking sheet into your preheated oven. - Determine baking time: Let the nachos bake for 10-12 minutes. Keep an eye on them until the cheese melts and bubbles. - Add fresh toppings: Once baked, take the nachos out of the oven. Top them with diced avocado, halved cherry tomatoes, and fresh cilantro. - Serve with lime wedges: Place lime wedges on the side. A squeeze of lime adds a bright flavor to your nachos. Enjoy this loaded veggie nachos recipe! For the full recipe, refer to the above details. To enhance the flavors of your Loaded Veggie Nachos, focus on fresh ingredients. Fresh veggies add brightness. Use ripe avocados and sweet cherry tomatoes for the best taste. Sautéing veggies is key to good nachos. Start with olive oil in a hot pan. Add onions first, and wait until they soften. Then, add bell peppers and corn. This method brings out their natural sweetness. Remember, don’t overcrowd the pan. Give each piece room to cook. Garnishing your nachos makes them look great. Use fresh cilantro for a pop of green. Squeeze lime juice over the top for a fresh taste. You can also add a dollop of sour cream or a drizzle of salsa for color and flavor. When serving, stack the nachos high on a large platter. This makes them fun and inviting. You can also place lime wedges around the nachos for easy access. If you want vegan cheese, look for brands that melt well. Nutritional yeast is a good option for a cheesy flavor without dairy. For toppings, consider your diet. You can swap black beans for chickpeas. Add spinach or kale for more greens. If you want heat, try pickled jalapeños instead of fresh. Explore the [Full Recipe] to get cooking! {{image_2}} You can change up the veggies in loaded veggie nachos to fit the season. In summer, try fresh zucchini or squash. In fall, use roasted sweet potatoes for a sweet taste. Leafy greens, like spinach or kale, add flavor and nutrition. Just toss them in with other veggies before baking. They will wilt nicely and blend in well. Spices and herbs can really change nachos. Try adding smoked paprika or garlic powder for depth. Fresh herbs like cilantro or chives add brightness. For cheese, mix different types. A pepper jack offers heat, while a sharp cheddar gives bite. Vegan cheese can also melt beautifully, making it a great choice. You don't always need tortilla chips. Try baked veggie chips or even pita chips for a twist. Want to go even healthier? Use baked sweet potato slices or cauliflower chips. You can layer nachos on rice or quinoa for a filling meal. Get creative with the base to suit your tastes. For the complete recipe, check out the Full Recipe. To keep your leftover nachos fresh, use airtight containers. Glass or plastic containers work well. You can also wrap them tightly in aluminum foil. Store them in the fridge for up to three days. After that, the chips may get too soggy. To reheat nachos and keep them crunchy, use the oven. Preheat the oven to 350°F (175°C). Spread the nachos on a baking sheet. Heat them for about 10 minutes. This method helps maintain that crispy texture. For toppings, add fresh ingredients like diced avocado or tomatoes after reheating. This keeps them vibrant and tasty. You can freeze nachos before cooking. Just layer the chips and toppings in a freezer-safe bag. Remove all the air to prevent freezer burn. For baked nachos, cool them first. Then, wrap them tightly in plastic wrap and foil. You can store baked nachos for up to two months. To enjoy, just reheat them in the oven. For the full recipe, check out the guide above. Yes, you can prep Loaded Veggie Nachos ahead. Here are some tips for meal prep: - Prep the Veggies: Chop the bell pepper, onion, and other veggies. Store them in airtight containers. - Cook the Mixture: You can sauté the veggie mix in advance. Just reheat it before assembling. - Keep Chips Separate: Store tortilla chips in a sealed bag to keep them crispy. - Layer Right Before Serving: Assemble nachos just before baking for the best crunch. Nachos taste great with various dips. Here are some suggestions: - Guacamole: Creamy and fresh, it pairs well with the flavors. - Sour Cream: A classic choice that adds tanginess. - Salsa: Fresh or cooked, it adds a zesty kick. - Cheese Sauce: For extra creaminess, drizzle warm cheese sauce on top. Yes, you can make Loaded Veggie Nachos gluten-free. Here are some options: - Gluten-Free Chips: Look for tortilla chips labeled gluten-free. Many brands offer this. - Fresh Veggies: Use fresh vegetables, which are naturally gluten-free. - Check Ingredients: Always read labels on sauces and dips to ensure they are gluten-free. For the full recipe with all the steps, check out Loaded Veggie Nachos. Loaded veggie nachos are a fun and tasty dish. You saw the main ingredients, preparation steps, and baking process. With tips on presentation and storage, nachos can be an easy treat. I shared ideas for variations like different veggies or dips. You can even adapt them for any diet. Try making them ahead or freezing leftovers. These nachos can brighten your meal day anytime. Now it’s your turn to enjoy this fun dish!](https://dailydishly.com/wp-content/uploads/2025/07/20e01eb2-8eec-42a8-b556-644040b9c2c2-768x768.webp)