Air Fryer Everything Bagel Salmon Bites Delight

Are you ready to elevate your snack game? These Air Fryer Everything Bagel Salmon Bites are not just tasty; they’re easy to make! I’ll guide you through step-by-step instructions, ensuring you get the perfect crunch and flavor every time. Plus, with tips and variations, you can customize them to suit your taste. Let’s dive in and create a delicious treat that impresses everyone!
Ingredients
Fresh Salmon Fillet
Start with 1 pound of fresh salmon fillet. Remove the skin first. Cut the salmon into bite-sized pieces. This makes it easy to cook and eat.
Seasonings and Flavorings
You will need:
– 2 tablespoons olive oil
– 2 tablespoons everything bagel seasoning
– 1 tablespoon lemon juice
– 1 tablespoon fresh dill, chopped (or 1 teaspoon dried dill)
– Salt and pepper to taste
Mix these ingredients well. The olive oil helps the seasoning stick. Everything bagel seasoning adds great flavor. Lemon juice gives a nice tang, and dill adds freshness.
Optional Dipping Sauce
For extra flavor, you can add cream cheese for dipping. It pairs well with the salmon bites. The creaminess of the cheese balances the spices. Enjoy it as a tasty side!
Step-by-Step Instructions
Preparation of Salmon Bites
To make the salmon bites, start with fresh salmon fillet. Remove the skin and cut it into bite-sized pieces. In a large bowl, mix the salmon with olive oil, everything bagel seasoning, lemon juice, dill, salt, and pepper. Toss gently to coat the salmon well. The seasoning adds a nice crunch and flavor.
Preheating the Air Fryer
Next, preheat your air fryer to 400°F (200°C). This step takes about 5 minutes. Preheating ensures the salmon cooks evenly and gets that crisp texture we love. Don’t skip this step!
Cooking Process in the Air Fryer
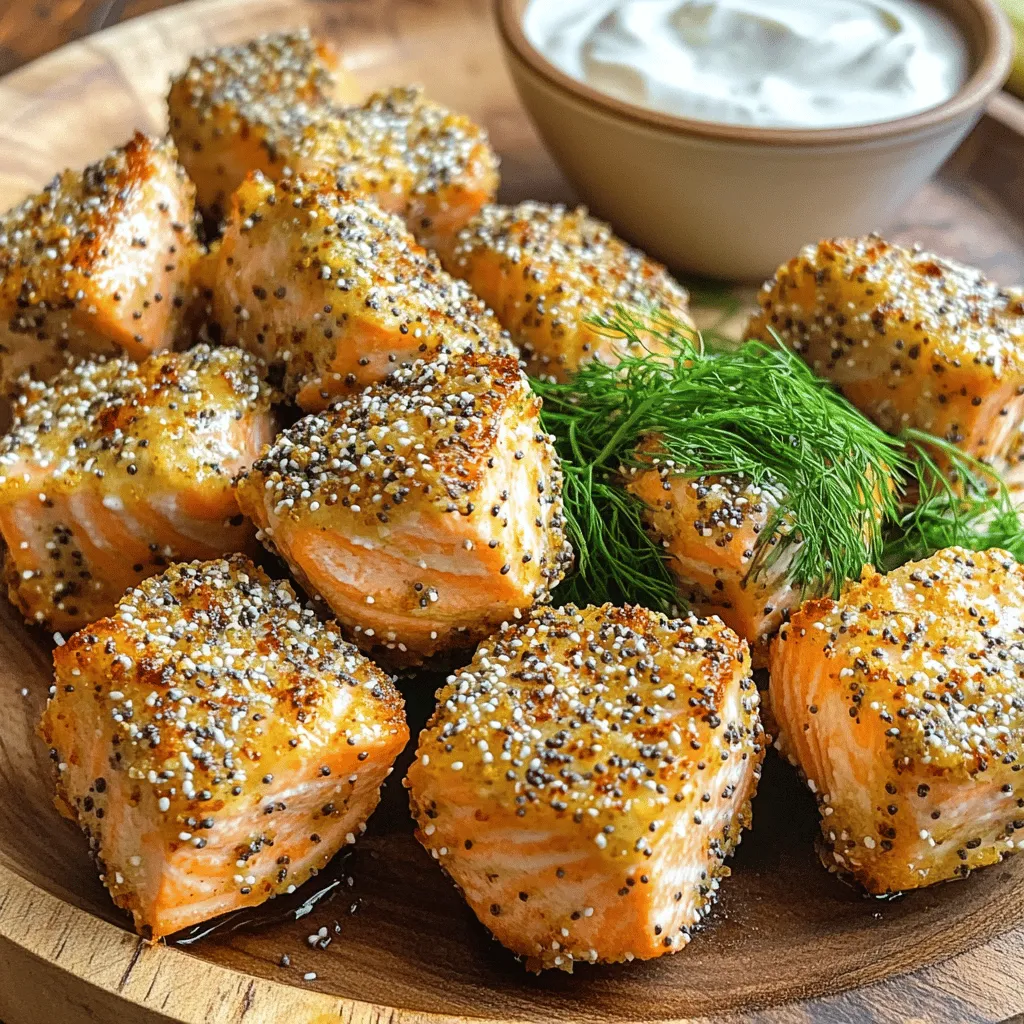
Once the air fryer is ready, place the salmon bites in a single layer in the basket. Make sure they have space between them. This helps them cook evenly. Cook the salmon for 8-10 minutes. At 8 minutes, check to see if they are done. You want them cooked through and slightly crispy. After cooking, take them out and let them rest for a minute. Serve them on a platter and enjoy! Optionally, add cream cheese for dipping to enhance the flavor.
Tips & Tricks
Ensuring Perfectly Cooked Salmon Bites
To get the best salmon bites, I use fresh salmon fillet. Remove the skin for a better texture. Cut it into bite-sized pieces. This ensures even cooking. Preheat your air fryer to 400°F (200°C) for about 5 minutes. This step helps the salmon cook well. Cook the bites for 8-10 minutes. Check them at the 8-minute mark. You want them just cooked through and lightly crispy on the outside.
Adjusting Seasoning to Taste
I love to play with flavors. The everything bagel seasoning gives a great taste. You can adjust it based on your preference. If you like more spice, add extra seasoning. Fresh dill or dried dill can also change the flavor. Add salt and pepper to taste. This lets you create a flavor that works for you.
Recommended Serving Suggestions
These salmon bites shine on their own. I love to serve them on a platter. You can add a side of cream cheese for dipping. This adds a nice creamy touch. Pair them with fresh veggies for a colorful plate. They also go well with a crisp salad. Enjoy them as a snack or part of a meal!

Variations
Alternative Seasonings for Custom Flavors
You can switch up the flavor with different seasonings. Try using garlic powder, smoked paprika, or even Cajun spice for a kick. Mix and match to find your favorite blend. Just remember, keep the balance in mind. Too much spice can overpower the salmon’s taste.
Using Different Types of Fish
Salmon is tasty, but other fish can work too. Cod, tilapia, or even trout can be great substitutes. Cut them into bite-sized pieces like you would with salmon. Adjust the cooking time if needed, as some fish cook faster than salmon.
Vegan or Vegetarian Alternatives
If you want a plant-based option, try using tofu or chickpeas. For tofu, press it to remove excess water, then cut it into bites. Season it just like the salmon. For chickpeas, toss them with olive oil and everything bagel seasoning. Air fry until crispy for a fun twist.
Storage Info
Best Practices for Storing Leftovers
To keep your salmon bites fresh, let them cool first. Place them in an airtight container. They stay good in the fridge for up to three days. If you want to enjoy them later, don’t forget to label the container. This way, you know when they were made.
Reheating Methods for Salmon Bites
Reheating salmon bites is easy. You can use an air fryer or an oven. For the air fryer, set it to 350°F (175°C) and heat for about 5 minutes. Check them often to avoid drying out. If using an oven, preheat it to 350°F and bake the bites for around 10 minutes. This keeps them crispy and tasty.
Freezing Options and Guidelines
You can freeze salmon bites for future meals. Place them in a single layer on a baking sheet. Freeze them for about an hour. Once firm, transfer them into a freezer bag. Remove as much air as possible. They can stay frozen for up to two months. When ready to eat, thaw in the fridge overnight before reheating.
FAQs
How long do you cook salmon in an air fryer?
You cook salmon bites in an air fryer for 8-10 minutes. I recommend checking at 8 minutes to avoid overcooking. The salmon should be just cooked through and slightly crispy outside. The air fryer gives a nice texture while keeping it juicy inside.
Can I use frozen salmon for this recipe?
Yes, you can use frozen salmon, but plan for extra time. Thaw the salmon first for even cooking. If you cook it from frozen, you may need to add 2-4 minutes to the cooking time. Always check that it’s fully cooked before serving.
What’s the best way to season salmon for air frying?
The best way to season salmon is with olive oil and everything bagel seasoning. The lemon juice adds a nice zing, and dill brings freshness. You can also add salt and pepper to taste. Mix the salmon well to coat every piece evenly for great flavor.
This blog post covered how to make tasty salmon bites in an air fryer. You learned about ingredients, step-by-step cooking, and storage tips. Remember to adjust seasonings to match your taste. You can even try different fish or vegan options for variety. Enjoy sharing your delicious bites and feel free to experiment with flavors. With these tips and tricks, your salmon bites will be a hit every time!


![- 2 pounds chicken wings - 1/2 cup honey - 1/4 cup low-sodium soy sauce - 3 tablespoons minced garlic - 1 tablespoon fresh ginger, grated - 1 tablespoon rice vinegar - 1 teaspoon sesame oil - 1/2 teaspoon black pepper - 1 tablespoon cornstarch (optional for thickening) - 2 tablespoons green onions (for garnish) - Sesame seeds (for garnish) Let's dive into why these ingredients make Honey Garlic Chicken Wings so special. First, the chicken wings give a great base. They are juicy and perfect for absorbing flavors. Next, honey adds sweetness and a sticky texture. It caramelizes beautifully when cooked. The low-sodium soy sauce brings a savory taste that balances the honey. This mix creates a flavor that will make your taste buds dance. Now, let's talk about the flavor enhancers. Minced garlic gives a strong, aromatic kick. Fresh ginger adds warmth and depth. Rice vinegar brightens the sauce, cutting through the sweetness. Together, they create a rich, well-rounded flavor profile. For the additional ingredients, sesame oil adds a nutty note. Black pepper gives a subtle heat. If you want a thicker sauce, cornstarch can help. Finally, the green onions and sesame seeds make a lovely garnish. They add color and a fresh crunch. You can find the full recipe here, and you'll see how easy it is to make these tasty wings. - Preheat the oven to 400°F (200°C). - Rinse and dry the chicken wings thoroughly. This helps them get crispy. - In a bowl, whisk together: - 1/2 cup honey - 1/4 cup soy sauce - 3 tablespoons minced garlic - 1 tablespoon fresh ginger, grated - 1 tablespoon rice vinegar - 1 teaspoon sesame oil - 1/2 teaspoon black pepper - Optionally, add 1 tablespoon of cornstarch for thickening. - Place the wings in a bowl, then pour the marinade over them. - Make sure each wing is fully coated. Cover and refrigerate for 30 minutes to 2 hours. - Arrange wings on a wire rack over a baking sheet. Bake for 25-30 minutes, flipping halfway. - In the last 5 minutes, pour remaining marinade into a saucepan. Heat it until boiling, then simmer for 3-5 minutes until thickened. - Brush the baked wings with the glaze for extra flavor. - Garnish with chopped green onions and sesame seeds before serving. Enjoy your sticky honey garlic chicken wings! For the full recipe, see above. - Choose the right type of chicken wings: Look for fresh or frozen wings that are meaty and plump. Split wings or whole wings work well. Both have their charm. - Importance of drying wings for crispness: After rinsing, pat the wings dry with paper towels. This helps them get crispy when cooked. Moisture is the enemy of crispiness. - Marination time tips for optimal taste: Marinate your wings for at least 30 minutes. For the best flavor, aim for 2 hours. This allows the honey garlic mix to soak in well. - How to balance sweetness and savoriness in the sauce: Use the right amount of soy sauce and honey. A half-cup of honey balances with a quarter-cup of soy sauce. This mix gives you both sweet and salty. - Alternative cooking methods: You can grill or fry the wings. Grilling gives a nice smokey flavor. Frying makes them extra crispy. Both options are tasty. - Tips for monitoring doneness and crispiness: Use a meat thermometer for doneness. The wings should reach 165°F. Keep an eye on the color. They should be golden brown and crispy. For the full recipe, check out the [Full Recipe]. {{image_2}} You can easily change up the taste of your honey garlic chicken wings. One option is to add chili flakes for a spicy kick. This addition pairs well with the sweet honey. If you want an Asian twist, add some sesame oil and chopped green onions. These flavors make the wings even more special and delicious. You can cook wings in different ways. Oven-baking is a popular method. It gives the wings a nice crispness. You can also use an air fryer. This method cooks wings faster while keeping them juicy. For an easier prep, try slow cooking. Just set it and forget it while the flavors blend together. When serving these wings, think about side dishes. Coleslaw adds a crunchy texture. Potato wedges are another great choice for a hearty meal. For dipping, offer a variety of sauces. Ranch or blue cheese can balance the sweetness of the wings. You can find the full recipe for these tasty wings [Full Recipe]. After you enjoy your honey garlic chicken wings, store any leftovers. First, let them cool to room temperature. This helps keep them fresh. Use an airtight container for storage. These containers keep air out and prevent the wings from drying. You can refrigerate cooked wings for up to three days. If you want them to last longer, freezing is a great option. To reheat your wings, you want them crispy again. The oven is the best method for this. Preheat your oven to 375°F (190°C). Place the wings on a baking sheet lined with foil. Heat them for about 10-15 minutes, flipping halfway through. This helps them crisp up nicely. If you are in a hurry, you can use the microwave. But be careful; it may make them a bit soggy. Heat them in a microwave-safe dish for 1-2 minutes. Check them often to avoid overcooking. You can freeze both raw and cooked chicken wings. If freezing raw wings, keep them in their original packaging. Wrap them well in plastic wrap or foil. This helps prevent freezer burn. You can store them this way for up to six months. For cooked wings, let them cool first. Place them in an airtight container or freezer bag. You can freeze cooked wings for up to three months. When you are ready to eat, just thaw them in the fridge overnight before reheating. For the full recipe, check out the Sticky Honey Garlic Chicken Wings. Honey garlic chicken wings are not spicy. They have a sweet and savory flavor. However, you can add heat if you like spice. Just stir in some red pepper flakes or a dash of hot sauce into the marinade. Start with a small amount. You can always add more heat later. Yes, you can use frozen chicken wings. Make sure to thaw them before cooking. To thaw, place the wings in the fridge overnight. If you're short on time, you can use the cold water method. Seal the wings in a bag and submerge them in cold water for about an hour. Once thawed, follow the recipe as normal. Check the internal temperature of the wings. They should reach 165°F (74°C). You can use a meat thermometer for this. Look for a nice golden brown color on the outside. The juices should run clear when you cut into them. If they're still pink, they need more time. These wings pair well with several side dishes. Consider serving coleslaw for crunch and freshness. Potato wedges also work great. You can try a simple salad for balance. If you want something fun, serve with crispy onion rings. Each of these sides adds a tasty touch to your meal. Yes, you can bake the wings in advance. Cook them, then let them cool completely. Store them in an airtight container in the fridge. To reheat, place them on a baking sheet. Bake at 350°F (175°C) for about 10-15 minutes. This keeps them crispy and tasty. For the best flavor, brush them with extra glaze before serving. For the full recipe, check out the sticky honey garlic chicken wings section. This blog post detailed how to make Honey Garlic Chicken Wings from start to finish. You learned about the key ingredients and steps needed to create the perfect marinade. I also shared tips to enhance flavor and achieve that ideal crispiness. Remember, you can easily alter recipes to suit your taste. Serve these wings with your favorite sides for a complete meal. Enjoy the process and have fun experimenting with different flavors!](https://dailydishly.com/wp-content/uploads/2025/06/2feb3bb2-4133-459b-bb32-a04192496237-768x768.webp)


![When making Buffalo chicken meatballs, you need fresh and tasty ingredients. Here’s a detailed list of what you will need: - Ground chicken: 1 pound gives the meatballs their base. - Breadcrumbs and cheese: 1/2 cup breadcrumbs and 1/4 cup grated Parmesan cheese add flavor and texture. - Spices and seasonings: You’ll need garlic powder, onion powder, salt, and black pepper. These make the meatballs tasty. - Optional serving items: Consider celery sticks and ranch dressing. They pair well for dipping. This mix of ingredients makes for a delicious meal. You get protein from the chicken and flavor from the spices. The cheese adds a nice touch too. If you want to spice things up, you can add more hot sauce. For the full recipe, check out the instructions to make these tasty bites! Prepping the baking sheet Start by preheating your oven to 400°F (200°C). Line a baking sheet with parchment paper. This step keeps the meatballs from sticking and makes cleanup easy. Mixing ingredients In a large bowl, add the ground chicken, breadcrumbs, green onions, and Parmesan cheese. Crack in one large egg. Next, pour in the hot sauce, and sprinkle in the garlic powder, onion powder, salt, and black pepper. Mix everything well with your hands. Make sure the spices and sauces blend into the chicken evenly. Shaping the meatballs Once mixed, take a small scoop of the mixture. Form it into a ball about 1 inch wide. Place each meatball on the prepared baking sheet, leaving some space between them. This helps them cook evenly. Baking the meatballs Drizzle a bit of olive oil over the meatballs. This helps them brown nicely. Now, place the baking sheet in the oven. Bake for 20 to 25 minutes. The meatballs should be golden brown and cooked through. Additional tips for flavor enhancement If you want more heat, toss the baked meatballs in extra hot sauce just before serving. This adds a tasty kick. Serve them warm with celery sticks and ranch dressing for dipping. Enjoy your Buffalo chicken meatballs! For the full recipe, check out the earlier section. Mixing is key for great meatballs. Combine your ground chicken and other ingredients gently. If you mix too much, the meatballs get tough. Aim for a light touch. This helps keep them soft and juicy. Oven temperature matters too. Preheat your oven to 400°F (200°C). This hot oven helps brown the meatballs well. If the oven is too cool, the meatballs may dry out. Avoid overmixing your meatball mix. Overmixing makes the meatballs dense. On the flip side, under-mixing can cause them to fall apart. Find a balance to create a perfect texture. Baking time is important. If the meatballs are too big, they need more time. If they’re small, check them early. Use a meat thermometer to ensure they're cooked through. Aim for 165°F (75°C) for safe eating. For more tips and the full recipe, check the article. {{image_2}} You can play with flavors in Buffalo chicken meatballs. Instead of hot sauce, try BBQ sauce for a sweet twist. You can add spices like smoked paprika or cayenne for extra heat. Mixing in fresh herbs, like parsley or cilantro, brightens the flavor. You can also sneak in some finely chopped vegetables. Diced bell peppers or shredded carrots add crunch and nutrition. These small changes let you create a unique taste each time you make them. If you need gluten-free options, use gluten-free breadcrumbs. They work just as well and keep the meatballs tasty. You can also swap out ground chicken for ground turkey or a plant-based option. For low-carb alternatives, skip the breadcrumbs and use almond flour instead. This keeps the meatballs light and healthy. You can also serve them with veggies, instead of bread, for a filling meal. With these variations, you can customize Buffalo chicken meatballs to suit your needs and tastes. Make sure to check the Full Recipe for more tips! To keep your buffalo chicken meatballs fresh, use simple storage methods. First, let the meatballs cool completely. Then, place them in an airtight container. Refrigerate them for up to three days. Make sure they stay sealed to prevent drying out. If you want to save them longer, freezing works well. Arrange the meatballs in a single layer on a baking sheet. Freeze them until solid, about two hours. Once frozen, transfer them to a freezer bag. They can last up to three months in the freezer. Just remember to label the bag with the date. You can reheat buffalo chicken meatballs in two ways: microwave or oven. The microwave is quick. Place a few meatballs on a microwave-safe plate. Cover them with a damp paper towel to keep them moist. Heat for about 30 seconds or until warm. If you prefer the oven, preheat it to 350°F (175°C). Arrange the meatballs on a baking sheet. Cover them with foil to lock in moisture. Heat for 10-15 minutes, or until heated through. This method keeps them crispy and delicious. For the best taste, avoid overcooking. Check the meatballs regularly to ensure they stay juicy. Enjoy your tasty meal again with ease! Don't forget to make some buffalo chicken meatballs from the Full Recipe. How long do they take to cook? The meatballs cook in about 20 to 25 minutes. You want them golden brown and cooked through. Keep an eye on them as they bake to avoid overcooking. Can I make them ahead of time? Yes, you can make these meatballs ahead of time. Prepare them, then store them in the fridge. You can bake them later, or freeze them for up to a month. What to serve with Buffalo chicken meatballs? Serve them with celery sticks and ranch dressing. These crunchy sides balance the heat of the meatballs. You can also pair them with a fresh salad or some crusty bread. Is this recipe gluten-free? No, the recipe is not gluten-free as it uses breadcrumbs. However, you can substitute gluten-free breadcrumbs to make them suitable for a gluten-free diet. This small change keeps the flavor intact while making them friendly for more diets. For the complete recipe, check out the [Full Recipe]. This blog post covered everything you need for buffalo chicken meatballs. I shared ingredients like ground chicken, breadcrumbs, and seasonings. You learned the step-by-step process to mix, shape, and bake these tasty bites. I also shared tips for perfect meatballs and common mistakes to avoid. Don't forget the flavorful variations and how to store or reheat leftovers. Enjoy making your own buffalo chicken meatballs and impress everyone with your skills!](https://dailydishly.com/wp-content/uploads/2025/06/4347ed53-b30a-4529-9040-7c93ba67935a-768x768.webp)

![For a vibrant and tasty treat, use a mix of colorful fruits. Here’s what you need: - 1 cup strawberries, hulled - 1 cup orange segments - 1 cup pineapple chunks - 1 cup green grapes - 1 cup blueberries - 1 cup purple grapes or blackberries These fruits not only look great, but they also pack in vitamins. Each fruit adds its own flavor and texture. You can choose fresh, ripe fruits for the best taste. If you want to add a bit of sweetness, consider these options: - 2 tablespoons honey (optional) Honey brings a natural sweetness to the skewers. Drizzle it on before serving. It works well with all the fruits. Garnishing makes your skewers look even better. Use fresh mint leaves for a pop of color. Arrange the skewers on a platter for a fun display. You can also place them in a glass jar for a playful touch. This way, everyone can grab their own skewer! For the full recipe, check the detailed steps to make these beautiful treats. Start by washing all the fruits well. Rinse strawberries, grapes, blueberries, and oranges under cool water. Hull the strawberries, removing the green tops. Cut large strawberries in half for easier skewering. Peel the oranges and break them into segments. For the pineapple, slice it into bite-sized pieces. Finally, rinse the green and purple grapes. Grab wooden skewers and now it’s time to thread the fruits. Begin with a strawberry, then add an orange segment. Next, add a pineapple chunk and follow with a green grape. Then, add a blueberry and finish with a purple grape or blackberry. Aim for a vibrant pattern with all the colors of the rainbow. Each skewer should look fun and inviting! If you want to add a bit of sweetness, drizzle honey over the skewers. This step is optional, but it can enhance the flavors. For a refreshing treat, chill the skewers in the fridge for about 30 minutes before serving. Arrange them on a lovely platter and add fresh mint leaves for a pop of color. These simple steps make your rainbow fruit skewers look and taste amazing. For more detailed instructions, check the Full Recipe. Choosing ripe fruits is key for tasty skewers. Look for bright colors and firm texture. For strawberries, pick those that are deep red. Oranges should feel heavy and have smooth skin. Pineapples should have a sweet smell and give slightly when pressed. Grapes are ripe when they are plump and not wrinkled. Blueberries should be deep blue, while purple grapes should show no signs of green. When skewering, use sturdy wooden sticks or metal skewers. Start with a strawberry at the bottom. Follow with an orange segment and then a pineapple chunk. Next, add a green grape and a blueberry. Finish with a purple grape or blackberry on top. This order keeps the colors bright and fun. Space the fruits a bit apart to allow for easy eating. For parties, arrange your skewers on a big platter. Display them upright in a tall glass or jar. This makes them easy to grab. You can add a small bowl of honey for dipping. Fresh mint leaves add a nice touch and flavor. Guests will love the colors and the taste! For more ideas, check out the Full Recipe. {{image_2}} You can switch up the fruits in your skewers. Try using kiwi instead of orange for a tangy taste. Swap in mango for a sweeter flavor, or use raspberries for a tart kick. Here are some great options: - Kiwi - Mango - Raspberries - Peaches - Apples These fruits add different colors, flavors, and textures. You can mix and match based on what you like. Get creative with your combinations! Dips can make your fruit skewers even more fun. You can serve them with yogurt or chocolate sauce. Here are some tasty ideas: - Vanilla yogurt - Honey yogurt - Chocolate sauce - Nut butter Dipping adds a new layer of flavor. You can make a small bowl for each dip. This way, everyone can enjoy their favorite! Make your skewers special for holidays or parties. For a birthday, use colorful sprinkles on your yogurt dip. For summer picnics, create a “beach” theme with coconut flakes. You can also arrange the fruits in shapes, like stars or hearts. This adds a fun touch to your dish. For more details on making these colorful treats, check the Full Recipe. To keep your rainbow fruit skewers fresh, store them in the fridge. Place them in an airtight container. This helps prevent the fruits from drying out or absorbing odors. If you plan to serve them later, keep the honey separate until just before serving. This way, the skewers stay crisp and colorful. When prepping your skewers, wash and cut your fruits ahead of time. Keep them in separate containers for easy access. This makes it simple to assemble the skewers when you’re ready. If you want to make them in advance, prepare them a few hours before serving. Just remember to refrigerate them to keep them fresh. Most fruits have a good shelf life when stored correctly. Here’s a quick guide: - Strawberries: 3–5 days - Oranges: 1–2 weeks - Pineapple: 3–5 days - Grapes: 1 week - Blueberries: 1 week - Blackberries: 3–5 days Always check for freshness before using any fruit. By following these tips, your rainbow fruit skewers will stay vibrant, tasty, and ready to enjoy! For the full recipe, check back on the main article. Yes, you can use frozen fruits for skewers. However, they may not hold their shape well. Frozen fruits often lose some water when thawed. This can make them mushy. If you want to use them, let them thaw first. Pat them dry with a towel to reduce excess moisture. This way, they won’t drip and make a mess. To boost the nutrition of your rainbow fruit skewers, consider these tips: - Add a source of protein. Use yogurt, cheese cubes, or nuts. - Include seeds. Sprinkle chia or flaxseed on the fruit. - Use whole fruits instead of fruit juice. Whole fruits have more fiber. - Mix in some veggies. Cherry tomatoes or cucumber slices can add crunch. These small changes can make your skewers even healthier without losing flavor. For a summer picnic, the best fruits are those that are sweet and refreshing. Here are some great choices: - Strawberries: Juicy and easy to eat. - Watermelon: Hydrating and fun to slice. - Pineapple: Sweet and tangy. - Grapes: Bite-sized and portable. - Blueberries: Packed with antioxidants. - Raspberries: Tart and flavorful. These fruits not only taste great but also look beautiful on your skewers. You can find the full recipe for rainbow fruit skewers [here]. Enjoy! Rainbow fruit skewers are fun and easy to make. We covered the best fruits, optional sweeteners, and cool presentation ideas. You learned how to prep the fruit and assemble the skewers step by step. I shared tips on choosing ripe fruit and serving them at gatherings. We also explored variations, like adding dips and themed designs. Finally, I discussed how to store your skewers for freshness. Now, grab your favorites and get creative with your skewers! Enjoy these tasty treats while having fun with friends and family.](https://dailydishly.com/wp-content/uploads/2025/06/1f4123b9-dd53-4d15-af26-e58167d567ef-768x768.webp)