Air Fryer Garlic Parmesan Brussels Sprouts Recipe

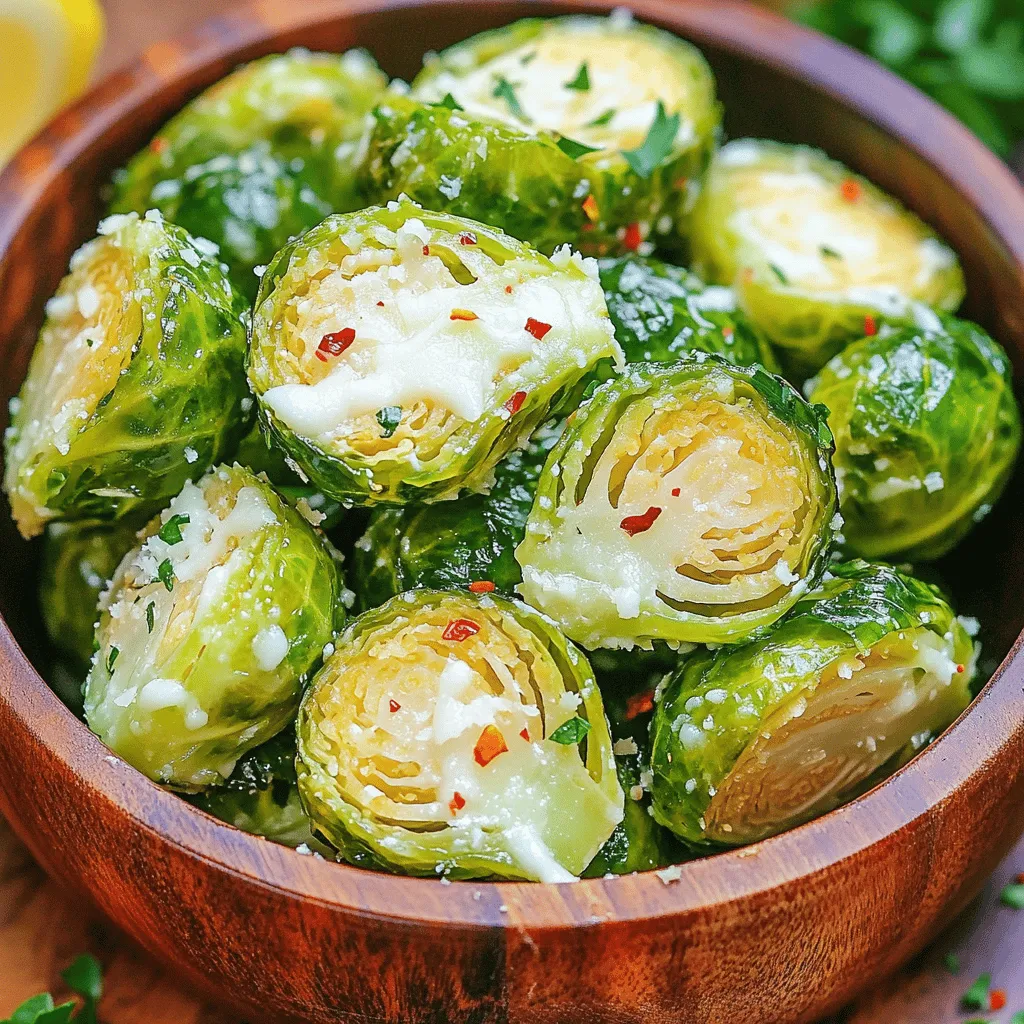
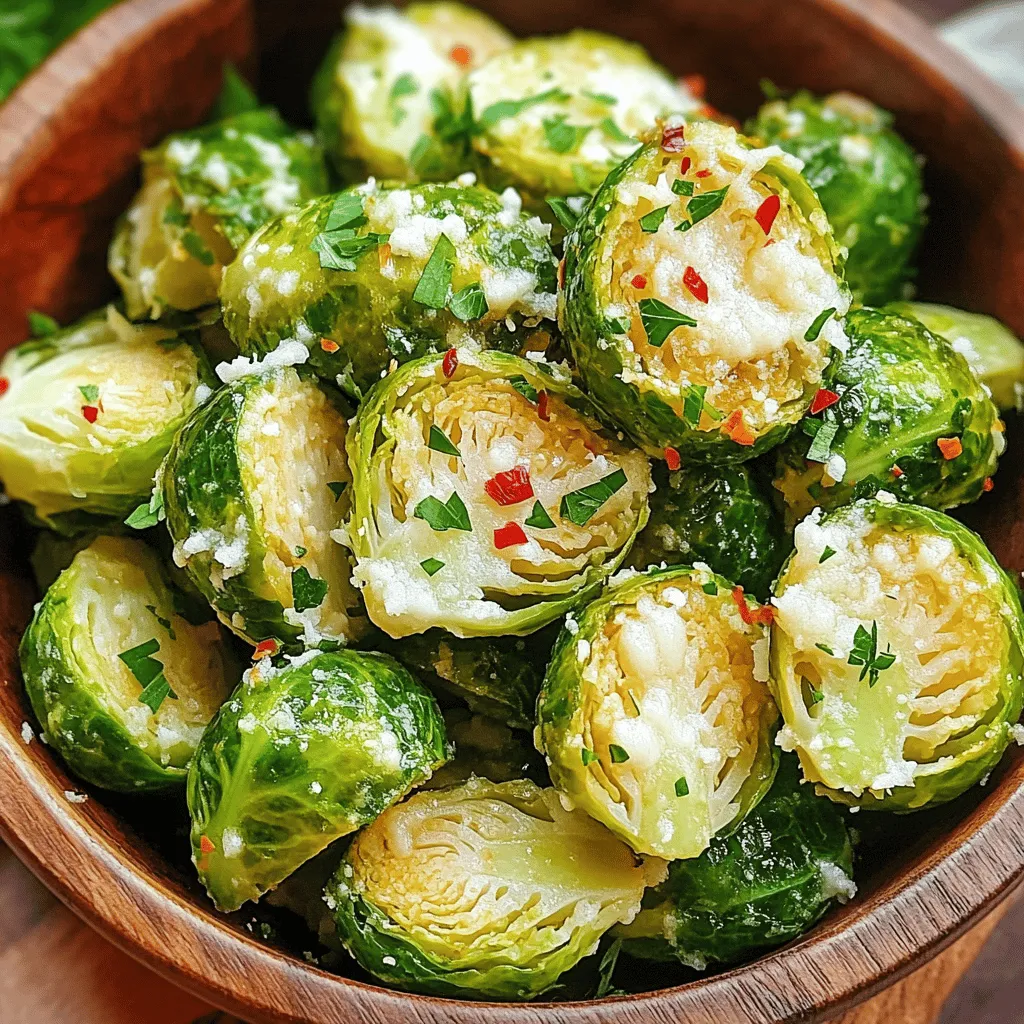
If you’re craving a tasty and healthy side dish, look no further! My Air Fryer Garlic Parmesan Brussels Sprouts recipe is your perfect solution. With crispy edges and savory garlic flavor, these sprouts are a game-changer for any meal. Plus, they’re quick to whip up using just a few simple ingredients. Ready to impress your family or guests? Let’s dive into the recipe that’s sure to become a favorite!
Ingredients
Main Ingredients
– 1 lb Brussels sprouts, trimmed and halved
– 3 tablespoons olive oil
– 4 cloves garlic, minced
The main ingredients are key to the flavor. Brussels sprouts have a nice crunch. Olive oil adds moisture and helps with cooking. Garlic gives a strong, tasty kick.
Seasonings
– 1/2 teaspoon salt
– 1/4 teaspoon black pepper
– 1/4 teaspoon red pepper flakes (optional)
Seasonings bring the dish to life. Salt enhances the taste. Black pepper adds warmth. Red pepper flakes give a little heat, if you want it.
Toppings
– 1/2 cup grated Parmesan cheese
– 1 tablespoon lemon juice
– Fresh parsley, chopped (for garnish)
Toppings are the final touch. Parmesan cheese melts and creates a nice crust. Lemon juice brightens flavors. Fresh parsley adds color and freshness to your plate.
Step-by-Step Instructions
Preheat the Air Fryer
Set your air fryer to 375°F (190°C). This step takes about 5 minutes. Preheating helps cook the Brussels sprouts evenly and makes them crispy.
Prepare the Brussels Sprouts
In a large bowl, combine these ingredients:
– 1 lb Brussels sprouts, trimmed and halved
– 3 tablespoons olive oil
– 4 cloves garlic, minced
– 1/2 teaspoon salt
– 1/4 teaspoon black pepper
– 1/4 teaspoon red pepper flakes (optional)
Toss everything well. Make sure each sprout gets coated in the oil and seasonings. This adds flavor and helps achieve that golden crisp.
Cooking Process
Place the Brussels sprouts in the air fryer basket. Make sure they are in a single layer. This helps them crisp up nicely. You might need to cook them in batches if your fryer is small.
Air fry the Brussels sprouts for 10-12 minutes. Shake the basket halfway through cooking. This ensures even crisping on all sides.
Adding the Cheese
Once the sprouts are golden and crispy, sprinkle on 1/2 cup of grated Parmesan cheese. Return the basket to the air fryer for an extra 2 minutes. This lets the cheese melt and become slightly crispy, adding a delicious finish.
Tips & Tricks
Ensuring Maximum Crispiness
To get the best crunch, always cook the Brussels sprouts in a single layer. This step is key. If they overlap, they won’t crisp up well. I recommend frying them in batches if your air fryer is small.
Shaking the basket halfway through cooking helps too. It moves the sprouts around, ensuring they cook evenly. This simple trick is very effective for great results.
Enhancing Flavor
To boost flavor, consider adding spices like smoked paprika or garlic powder. These can add a nice twist. If you want a kick, try more red pepper flakes.
If you don’t have Parmesan cheese, you can use other cheeses. Feta or pecorino can work well too. Feel free to adjust the recipe to fit your taste.
Air Fryer Tips
Set your air fryer to 375°F (190°C) for this recipe. It’s the perfect temperature for crispiness. Cooking time is around 10-12 minutes, but check for golden color.
For better results, I recommend reliable air fryer models like the Philips or Ninja. They cook evenly and are easy to use. Having a good air fryer makes a big difference in your cooking.

Variations
Flavor Variations
You can easily switch up the flavor of your Brussels sprouts. Adding spices can change everything. Try smoked paprika for a warm, smoky taste. Garlic powder gives a nice punch too. If you want some crunch, nuts or seeds work well. Chopped almonds or sunflower seeds add texture and flavor.
Cheese Alternatives
If you want to mix it up, try different cheeses. Feta cheese adds a tangy taste that contrasts well with the sprouts. Pecorino cheese is another great choice. It has a strong flavor that pairs nicely with the garlic.
Vegan Option
Want to make this dish vegan? It’s simple! Just swap out the cheese for nutritional yeast. This gives a cheesy flavor without using dairy. Vegan cheese can also work well. Just make sure to check the package for melting instructions.
Storage Info
How to Store
To keep your Air Fryer Garlic Parmesan Brussels sprouts fresh, store them in an airtight container. This helps to lock in moisture and flavor. Allow the sprouts to cool completely before sealing them. They can stay good for about three days in the fridge.
Reheating Instructions
To reheat your Brussels sprouts while keeping them crispy, use the air fryer. Preheat it to 350°F (175°C). Place the sprouts in the basket and heat for about 5-7 minutes. This method revives their crunchiness and prevents sogginess.
Freezing Tips
You can freeze cooked Brussels sprouts, but they may lose some texture. Place them in a single layer on a baking sheet to freeze. Once frozen, transfer them to a freezer bag. Use them within three months for best quality. Thaw in the fridge overnight before reheating.
FAQs
How do I make Brussels sprouts crispy in an air fryer?
To make Brussels sprouts crispy, follow these key tips:
– Use fresh Brussels sprouts: Fresh sprouts have more moisture, which helps them crisp up.
– Cut them evenly: Halving each sprout helps them cook at the same rate.
– Toss with oil: Use olive oil to coat the sprouts. This helps them crisp and adds flavor.
– Don’t overcrowd the basket: Place sprouts in a single layer. Air needs room to circulate for crispiness.
– Shake halfway through: This ensures even cooking and browning on all sides.
Can I use frozen Brussels sprouts for this recipe?
You can use frozen Brussels sprouts, but fresh is better. Here’s how to use them:
– Thaw first: Thaw frozen sprouts in the fridge or microwave before cooking. This helps them cook evenly.
– Dry them well: Pat them with a towel to remove excess moisture. This prevents sogginess.
– Adjust cooking time: Frozen sprouts may need a bit longer to cook. Check for crispness.
What to serve with Air Fryer Garlic Parmesan Brussels Sprouts?
These Brussels sprouts pair well with many dishes. Here are some great options:
– Grilled chicken: The savory flavor complements the sprouts well.
– Pasta: Toss the sprouts with pasta for a hearty meal.
– Steak or pork: The rich flavors of meat balance the bright taste of the sprouts.
– Quinoa or rice: Add a healthy grain for a filling side.
Feel free to mix and match based on what you like!
In this blog post, we explored how to make crispy Air Fryer Garlic Parmesan Brussels sprouts. We covered key ingredients, from sprouts to seasonings, and step-by-step cooking tips. I shared ways to enhance flavors, suggested variations, and provided storage and reheating tips.
Try these methods and make Brussels sprouts a fun side dish. Enjoy experimenting with flavors and toppings to fit your taste. You’ll find that crispy, flavorful Brussels sprouts can be easy and quick to make. Happy cooking!


![- 2 pounds baby potatoes, halved - 1/2 cup grated Parmesan cheese - 3 tablespoons olive oil These main ingredients form the base of your dish. The baby potatoes bring a creamy texture when cooked. Grated Parmesan adds a rich, salty flavor. Olive oil helps the potatoes crisp up nicely in the oven. - 2 teaspoons dried oregano - 2 teaspoons dried thyme - 1 teaspoon garlic powder - Salt and pepper to taste The herbs and seasonings elevate the taste. Oregano and thyme provide earthy notes. Garlic powder adds a punch of flavor. Adjust salt and pepper to your liking for the best balance. - Fresh parsley or chives for garnish Using fresh parsley or chives as a garnish adds color and freshness. It makes the dish look more appealing. You can skip this step if you prefer a simpler look. For the full recipe, check out [Full Recipe]. - Preheat the oven to 425°F (220°C). - Prepare the baking sheet with parchment paper. First, set your oven. This will help the potatoes cook well. Next, line your baking sheet with parchment paper. This keeps the potatoes from sticking and makes cleaning easy. - Combine baby potatoes and olive oil. - Add herbs, spices, and stir until well-coated. In a large bowl, add the halved baby potatoes. Pour the olive oil over them. Next, sprinkle in the dried oregano, dried thyme, garlic powder, salt, and pepper. Now, toss everything together. You want the potatoes to be well-coated in the oil and spices. - Sprinkle Parmesan cheese and distribute evenly. - Spread on baking sheet and roast. Now, it's time for the cheese! Sprinkle the grated Parmesan over the potatoes. Stir gently to make sure it spreads evenly. Then, spread the seasoned potatoes on your baking sheet. Make sure they are in a single layer. Roast them in the oven for 25 to 30 minutes. Halfway through, toss the potatoes to ensure even cooking. When they turn golden brown and crispy, they are done. Enjoy these tasty bites with your favorite meal. For the full recipe, check out the link. To get those potatoes nice and crispy, you should toss them halfway through cooking. This helps them brown evenly. Spread the potatoes in a single layer on your baking sheet. Crowding them will make them steam instead of roast, which means less crunch. Before roasting, taste your potato mix. Adjust the salt and pepper to your liking. Don’t be afraid to try new herbs! You can add rosemary or basil for a fun twist. Each herb brings its unique flavor to the dish. The best potatoes for roasting are baby potatoes. Their small size makes them tender and quick to cook. You can also use Yukon Gold or red potatoes for a different texture. Baby potatoes are waxy, while other types may be more starchy. This difference affects how they cook and taste. {{image_2}} You can change the taste of your Parmesan herb roasted potatoes by adding different cheeses. Try cheddar or mozzarella for a creamy twist. You can also spice things up. Adding smoked paprika gives a nice smoky flavor. Cumin adds a warm, earthy taste. Experiment with these options to find your favorite. Mixing in other root vegetables can add color and flavor. Carrots and sweet potatoes roast well and taste great. You can also slice bell peppers or onions to include. These vegetables not only add taste but also make the dish more colorful and fun. Want to make it vegan? Use nutritional yeast instead of Parmesan cheese. This gives a cheesy flavor without dairy. You can also swap olive oil for other oils. Avocado or coconut oil can add unique flavors. These tweaks make the dish fit your diet while keeping it tasty. For the full recipe, you can refer to the main recipe section. To store your leftover Parmesan herb roasted potatoes, let them cool first. Place them in an airtight container. This helps keep them fresh. Glass or plastic containers with tight lids work best. You can also use a resealable bag. Just make sure to squeeze out the air. If you want to save your roasted potatoes for later, freezing is a great option. Spread the cooled potatoes in a single layer on a baking sheet. Freeze them for about an hour until they are firm. Then transfer them to a freezer bag. This helps prevent them from sticking together. When you are ready to eat, thaw them in the fridge overnight. Reheat in the oven at 350°F (175°C) until hot and crispy. Roasted potatoes can last in the fridge for about 3 to 5 days. Check for signs of spoilage before eating. Look for a strange smell or an off texture. If they feel mushy or slimy, it’s best to throw them out. Enjoy your Parmesan herb roasted potatoes with peace of mind! You can find the full recipe [here](#). To get your potatoes crispy, follow these tips: - Cut even pieces: Make sure all potato halves are the same size. This helps them cook evenly. - Dry the potatoes: Before mixing with oil, pat them dry. Less moisture means more crispiness. - Use high heat: Roasting at 425°F (220°C) creates a nice crunch. - Toss halfway: Stir the potatoes halfway through cooking for even browning. - Don’t crowd the pan: Spread the potatoes in a single layer. This allows hot air to reach all sides. Yes, you can prep ahead. Here’s how: - Wash and cut potatoes: You can halve the potatoes a few hours before cooking. Store them in cold water to keep them fresh. - Mix with oil and spices: You can combine the potatoes with olive oil and seasonings up to a day in advance. Just keep them in the fridge. - Add cheese later: Sprinkle the Parmesan right before roasting for best results. These potatoes make a great side for many meals: - Grilled chicken: The herbs complement the chicken's flavors. - Steak: The rich flavors of steak pair nicely with the crispy potatoes. - Roasted vegetables: Serve with mixed roasted veggies for a colorful plate. - Fish: Light fish dishes, like salmon, balance the hearty potatoes. You can find the full recipe for Parmesan Herb Roasted Potatoes in the [Full Recipe]. This will guide you through each step to achieve perfect potatoes! This blog post covered how to make delicious Parmesan Herb Roasted Potatoes. We discussed the key ingredients like baby potatoes, Parmesan cheese, and essential herbs. I shared step-by-step instructions for perfect results, along with tips for crispiness and seasoning. You can even make tasty variations and store leftovers properly. Enjoying this dish is easy and fun. With these simple steps, you’ll impress at any meal. Happy cooking!](https://dailydishly.com/wp-content/uploads/2025/07/9ae8b793-096d-4d00-8893-cd2d2c486076-768x768.webp)
![- 2 cups diced apples - 1 cup celery, chopped - 1 cup grapes, halved - 1 cup walnuts, toasted - 1/2 cup raisins - 1/2 cup plain Greek yogurt - 2 tablespoons mayonnaise - 1 tablespoon lemon juice - Salt and pepper to taste - Fresh mint leaves for garnish The main ingredients create a great mix of flavors and textures. I love using tart apples, like Granny Smith. Their crunch adds freshness to the salad. Celery adds a nice crunch, while grapes bring sweetness. Toasted walnuts give a rich, nutty flavor. Raisins add little bursts of sweetness throughout. - Yogurt alternatives (like sour cream or vegan yogurt) - Different nut options (like pecans or almonds) - Additional fruits (like oranges or pears) Feel free to switch things up! You can use sour cream or vegan yogurt if you prefer. Pecans and almonds also work great if you want different nuts. Adding fruits like oranges or pears can give the salad a unique twist. For the full recipe, check [Full Recipe]. Start by dicing the apples into small, even pieces. I like using Granny Smith for a nice tart flavor. Next, chop the celery into thin slices. This adds a great crunch to the salad. Then, halve the grapes. You can use red or green grapes, depending on your preference. This will add sweetness and color. Finally, toast the walnuts in a dry pan on medium heat. Stir them often until they smell nutty. This step brings out their flavor. In a small bowl, mix the Greek yogurt and mayonnaise. Add the lemon juice, salt, and pepper. Whisk until smooth and creamy. This dressing adds a tangy taste that pairs well with the fruit. In a large mixing bowl, combine the fruit and nut mixture with the dressing. Gently mix everything until the apples and grapes are evenly coated. This ensures every bite is flavorful. Next, chill the salad in the refrigerator for at least 30 minutes. This helps the flavors meld together. Just before serving, toss the salad lightly and garnish with fresh mint leaves. Enjoy your Classic Waldorf Salad! For the full recipe, check out the details above. Choosing the right apple is key. I love using Granny Smith apples. They give the salad a tart flavor that contrasts well with the sweet grapes. Other options include Honeycrisp or Fuji for a sweeter taste. Always pick crisp apples for the best crunch. Toasting walnuts can boost their flavor. Start by placing them in a dry pan over medium heat. Stir them often for about 5-7 minutes. Watch for a golden color and a nutty smell. This step adds depth to your salad. You can add simple spices or herbs to elevate the taste. A pinch of cinnamon or nutmeg can add warmth. Fresh herbs like parsley or dill can brighten your dish. Experiment with a bit of fresh lemon zest for a zesty kick. For sweetness, consider using honey or maple syrup. A teaspoon of honey can balance the tartness of the apples. Maple syrup offers a unique flavor and a touch of earthiness. Adjust the sweetness to your taste, but don't overdo it. You want a nice balance. For the full recipe, check out the Classic Waldorf Salad recipe. {{image_2}} You can make the Waldorf salad your own. Adding protein is a great option. Cooked chicken or shrimp works well. This change adds heartiness and makes it more filling. You can also make a vegan version. Use chickpeas or tofu instead of yogurt and mayo. This keeps the salad creamy and tasty without dairy. Switching up the fruits can change the whole flavor. In fall, use crisp pears or sweet figs. In summer, try fresh berries for a juicy twist. You can also change the dressing. A light vinaigrette can give it a new taste. Or, try adding a hint of honey for extra sweetness. These variations keep your Waldorf salad fresh and exciting. For the classic recipe, check out the Full Recipe. To keep your Waldorf salad fresh, store it in the fridge. Use an airtight container. This helps to keep the salad cool and crisp. Avoid using metal containers, as they can react with the ingredients. Glass or plastic works best. You can keep the salad in the fridge for up to three days. After that, the fruits may lose their crunch. It is not a good idea to freeze Waldorf salad. The texture of the apples and grapes changes when frozen. Enjoy it fresh for the best taste! For the full recipe, check out the earlier section. Waldorf Salad started in the late 1800s. A chef at the Waldorf Astoria Hotel in New York created it. It was first served at a charity ball in 1896. The salad features apples, celery, and walnuts. Over time, it has become a classic dish. It mixes sweet and crunchy flavors, making it popular. Yes, you can prepare Waldorf Salad ahead. This dish tastes even better after sitting in the fridge. To do this, chop the fruits and mix them with the dressing. Store it in an airtight container for up to 24 hours. Just remember to add the nuts just before serving. This keeps them crunchy and fresh. Waldorf Salad pairs well with many dishes. It makes a great side for roasted chicken or turkey. You can also serve it alongside sandwiches for lunch. The salad’s fresh taste balances rich flavors nicely. Try it with grilled fish for a light dinner option. To make Waldorf Salad healthier, you can swap some ingredients. Use low-fat yogurt instead of regular mayo. You can also add more fruits, like berries or oranges. For a nut-free version, try sunflower seeds. These changes help cut calories while keeping the flavor. You can find the full recipe for Classic Waldorf Salad right here. It includes all the details you need to create this tasty dish. Enjoy making it at home! Waldorf salad is a tasty mix of fruits, nuts, and creamy dressing. You now know the key ingredients, how to prepare them, and some handy tips for extra flavor. Think about adding your favorite fruits or proteins to make it unique. Remember, it’s easy to store and great for meal prep. Enjoy sharing this delicious dish with family and friends or serving it at your next gathering. Your tasty, fresh Waldorf salad will impress!](https://dailydishly.com/wp-content/uploads/2025/06/915437da-33d1-4ffb-bb72-5bb8c719e96d-768x768.webp)


![- 2 medium zucchinis - 1 cup breadcrumbs (preferably whole wheat) - 1/2 cup grated parmesan cheese - 2 tablespoons fresh parsley, chopped - 1 tablespoon fresh basil, chopped - 1 teaspoon garlic powder - 1/2 teaspoon onion powder - Salt and pepper to taste - 2 large eggs - Olive oil spray or 2 tablespoons olive oil The ingredients for herb crusted zucchini sticks are simple yet flavorful. Zucchini is a great base because it’s mild and absorbs spices well. You want to use fresh herbs like parsley and basil to boost taste. Whole wheat breadcrumbs add a nice crunch, and parmesan brings a cheesy depth. For the coating, garlic and onion powder add savory notes. Make sure to season with salt and pepper to enhance all the flavors. You will need eggs to help the breadcrumbs stick to the zucchini. Olive oil ensures the sticks get crispy in the oven. I recommend you gather everything before you start cooking. This will help you stay organized and make the process smoother. You can find the full recipe below to guide you through this delicious snack. 1. Preheat your oven to 425°F (220°C). This step is vital for crispiness. 2. Line a baking sheet with parchment paper. It helps with easy cleanup. 3. In a shallow bowl, combine the breadcrumbs, parmesan cheese, chopped parsley, basil, garlic powder, onion powder, salt, and pepper. Mix well to blend the flavors. 4. In a separate bowl, whisk the eggs until smooth and fully combined. 1. Take each zucchini stick and dip it in the egg mixture. Let the extra egg drip off. 2. Next, roll the zucchini stick in the breadcrumb mixture. Press gently to coat evenly. 1. Arrange the coated zucchini sticks on the prepared baking sheet. Give them space to crisp. 2. Lightly spray the zucchini sticks with olive oil or drizzle them with olive oil. This adds flavor and helps with browning. 3. Bake in the preheated oven for 20-25 minutes. Turn them halfway through for even crispiness. Look for a golden color as a sign they are done. 4. Remove from the oven and let them cool slightly before serving. Enjoy these crispy delights! For the complete recipe, refer to the [Full Recipe]. To make your herb crusted zucchini sticks crispy, use fresh herbs. Fresh parsley and basil add great flavor. Dried herbs can work, but fresh gives a better taste. For the perfect coating, press the zucchini sticks into the breadcrumb mix. This helps the crumbs stick well. A light spray of olive oil before baking also boosts crispiness. You can bake zucchini sticks or try an air fryer. An air fryer cooks them faster and can make them even crispier. If you use an air fryer, set it to 400°F (200°C) for about 10-15 minutes. Turn them halfway for even cooking. If you prefer baking, keep the temperature at 425°F (220°C) and bake for 20-25 minutes. Adjust the cook time based on how crispy you want them. For dips, ranch dressing or marinara sauce pairs well with zucchini sticks. You can also try a spicy aioli for a kick. As for side dishes, serve them with a fresh salad or alongside grilled chicken for a nice meal. These sticks can be a great snack or a fun side to any dish. {{image_2}} You can make your herb crusted zucchini sticks even tastier! Try adding spices like paprika or chili flakes. This gives a nice kick and makes them more exciting. You can also mix in cheese variations. Feta adds a tangy flavor, while mozzarella gives a creamy touch. Both options will enhance your dish and please your taste buds. Want to make this recipe fit your diet? You can use gluten-free breadcrumbs to keep it safe for those with gluten issues. Just look for certified gluten-free brands. If you’re vegan, replace the eggs with a mixture of ground flaxseed and water. This will help the breadcrumbs stick without using eggs. These zucchini sticks work great as appetizers or party snacks. Serve them with dips like ranch or marinara for extra fun. You can also mix them with other veggies for a colorful platter. Carrots, bell peppers, and cucumbers pair well and add variety to your snack table. Check out the Full Recipe for more ideas! To keep your zucchini sticks fresh, place them in an airtight container. This helps lock in moisture and flavor. If you want the best taste, eat them within three days. After that, they may lose some crispiness and flavor. For the best results, reheat your zucchini sticks in the oven. Preheat the oven to 375°F (190°C). Place the sticks on a baking sheet for about 10 minutes. This method keeps them crispy and tasty. If you need a quick option, the microwave works too. Heat them for 30 seconds. Check if they need more time. Note that they may not be as crispy in the microwave. Yes, you can freeze zucchini sticks! To do this properly, first, let them cool completely. Next, place them in a single layer on a baking sheet. Freeze for about two hours. Once frozen, transfer them to a freezer bag. Make sure to remove as much air as possible. They can last up to three months in the freezer. Just remember to bake them straight from frozen when you are ready to enjoy! For more details, check the Full Recipe. How do I know when the zucchini sticks are done? You can tell the zucchini sticks are done when they turn golden brown and crispy. They should feel firm to the touch. Bake them for 20 to 25 minutes at 425°F (220°C), turning them halfway through cooking. This helps them cook evenly. If you want extra crunch, keep an eye on them during the last few minutes. Can I use frozen zucchini for this recipe? I do not recommend using frozen zucchini for this recipe. Frozen zucchini tends to lose water and becomes mushy when cooked. Fresh zucchini gives the best texture and flavor. If you only have frozen zucchini, try to drain it well before using it. However, it may still not give you the same crispy result. What can I substitute for parmesan cheese? If you want to substitute parmesan cheese, try using nutritional yeast for a vegan option. It adds a nice cheesy flavor. You can also use other cheeses like Pecorino Romano or Grana Padano. Just remember that different cheeses may change the flavor a bit. Can I use regular breadcrumbs instead of whole wheat? Yes, you can use regular breadcrumbs instead of whole wheat. Both types will work well in this recipe. Just remember that whole wheat breadcrumbs add a bit more fiber and a heartier taste. Use what you have on hand for the best results. How can I make my zucchini less watery? To make zucchini less watery, you can salt the sticks before cooking. Cut them and sprinkle salt on them. Let them sit for about 15 minutes, then rinse and pat them dry. This helps remove excess moisture. You can also try using smaller zucchinis, as they tend to be firmer. Can I bake these zucchini sticks without oil? Yes, you can bake zucchini sticks without oil. Just be aware that they may not be as crispy. You can use a light spray of cooking oil for better results, but if you want to skip it, they will still cook fine. Keep an eye on them to prevent burning. In this blog post, we explored how to make crispy zucchini sticks. We covered the ingredients needed, the step-by-step process, and various tips to ensure great results. I shared methods for baking, storing, and serving your zucchini sticks. These versatile snacks are easy to adjust for different diets and flavors. Remember, fresh herbs and the right cooking methods will enhance your dish. Enjoy your cooking and get creative with your serving ideas!](https://dailydishly.com/wp-content/uploads/2025/07/e6e4c2e6-85fe-4d28-829b-ce9ad5e19088-768x768.webp)