Almond Joy Protein Balls Tasty and Simple Treat

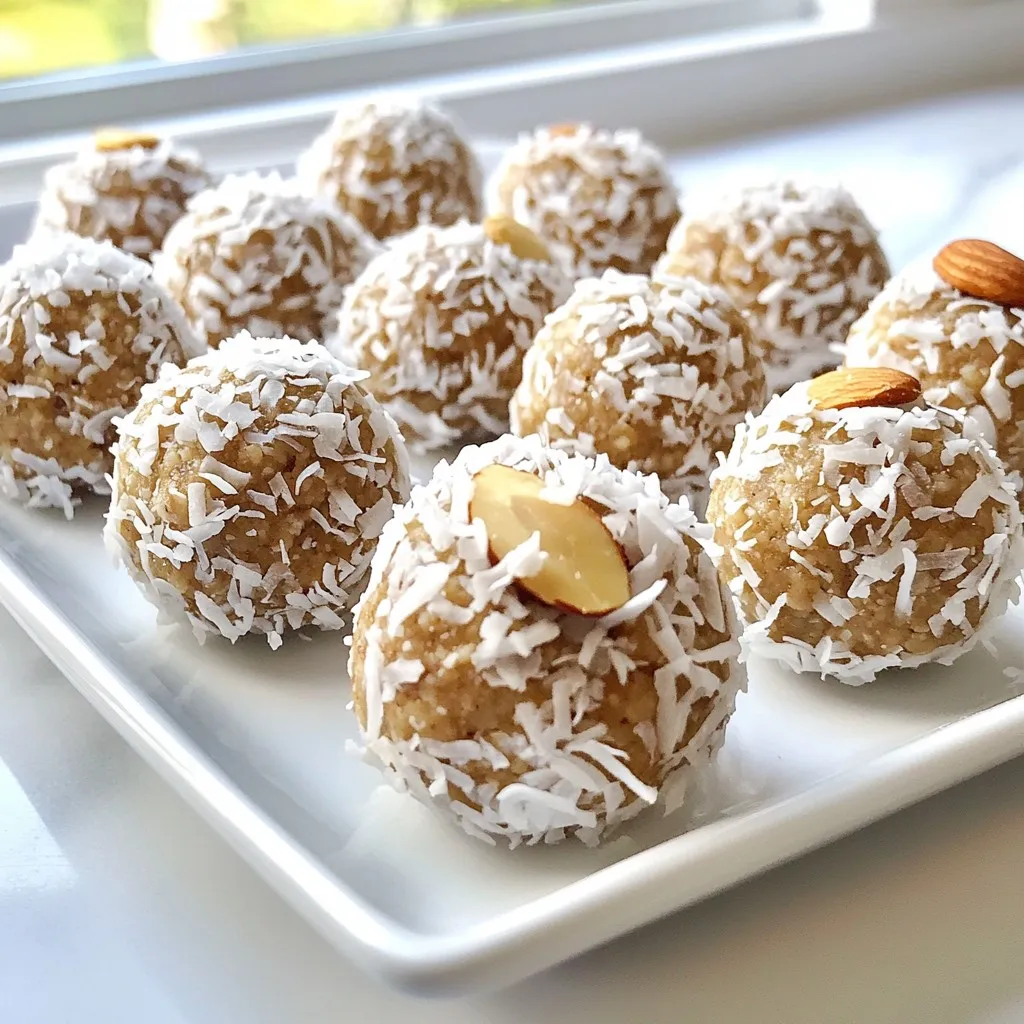
Looking for a quick, tasty, and healthy snack? You’re in the right place! My Almond Joy Protein Balls are simple to make and packed with flavor. With almond flour, coconut, almond butter, and a touch of chocolate, these treats are both nutritious and satisfying. Plus, they’re perfect for kids and adults alike! Let’s dive into the easy steps to whip up this delightful snack!
Why I Love This Recipe
- Healthy Ingredients: This recipe uses almond flour and shredded coconut, providing a nutritious base that’s high in protein and healthy fats.
- Quick and Easy: With just 10 minutes of prep time, these protein balls are a simple and speedy snack option.
- Customizable: You can easily swap out ingredients to suit your taste, such as using different nut butters or sweeteners.
- Perfect for Meal Prep: These protein balls can be made in bulk and stored in the fridge, making them a convenient grab-and-go snack.
Ingredients
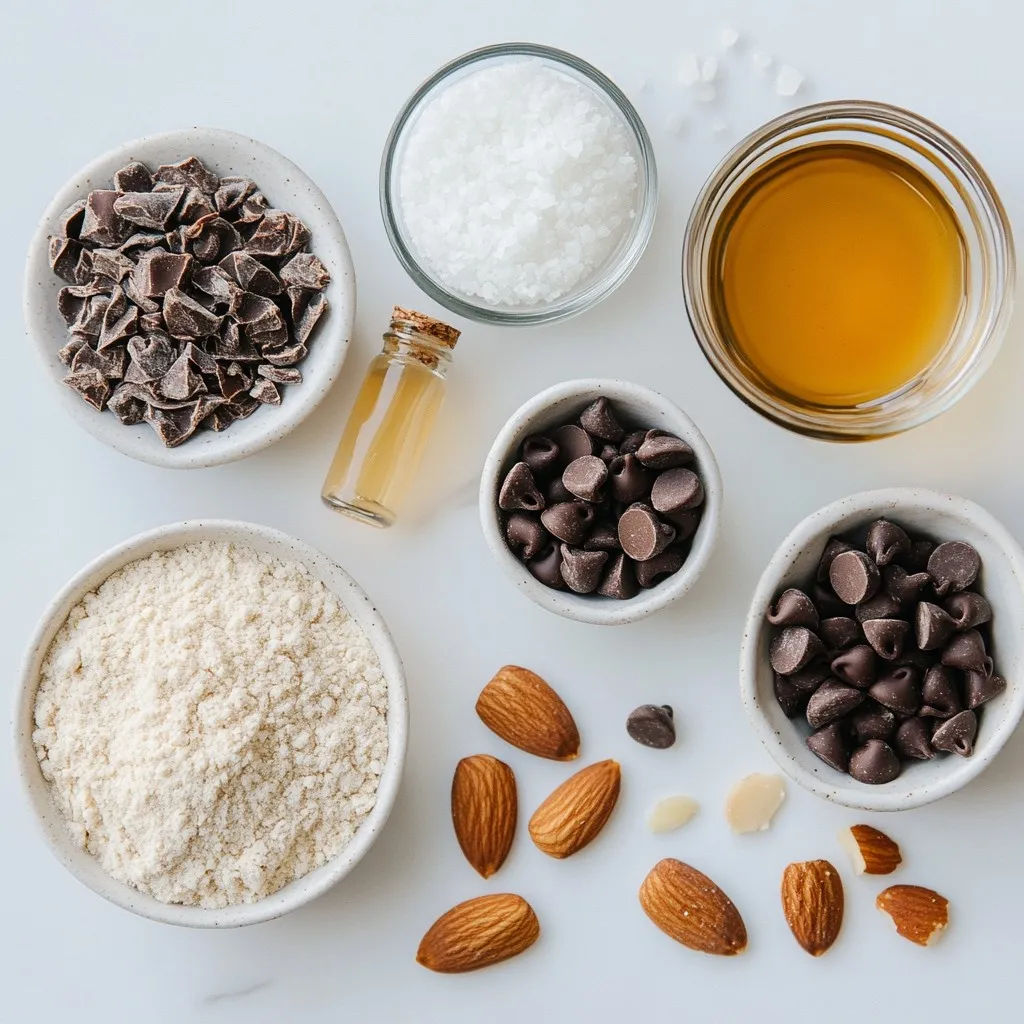
List of Essential Ingredients
– 1 cup almond flour
– 1/2 cup unsweetened shredded coconut
– 1/4 cup raw honey or maple syrup
– 1/4 cup almond butter
– 1/2 teaspoon vanilla extract
– 1/4 teaspoon salt
– 1/3 cup dark chocolate chips
– 1/4 cup whole almonds (for topping)
To make Almond Joy Protein Balls, gather these simple ingredients. Almond flour forms the base and gives a nutty flavor. Unsweetened shredded coconut adds texture and a tropical touch. Choose either raw honey or maple syrup for sweetness. Almond butter binds it all together and adds creaminess.
Vanilla extract enhances the taste. A pinch of salt balances the sweetness and brings out the flavors. Dark chocolate chips offer a rich chocolate flavor, making these bites irresistible. Finally, whole almonds on top give a crunchy finish.
These ingredients work together to create a delicious and nutritious snack. You’ll love how easy it is to make these protein balls. Plus, they provide energy for your day!

Step-by-Step Instructions
Prep and Mixing
First, grab a large mixing bowl. Combine 1 cup of almond flour and 1/2 cup of unsweetened shredded coconut. Mix them well. Next, add 1/4 cup of raw honey or maple syrup. Then, add 1/4 cup of almond butter, 1/2 teaspoon of vanilla extract, and 1/4 teaspoon of salt. Stir until the mixture becomes sticky and dough-like.
Forming the Protein Balls
After mixing, fold in 1/3 cup of dark chocolate chips. This adds a rich flavor. Now, take about 1 tablespoon of the mixture and roll it into a ball. Place each ball on a parchment-lined baking sheet. Make sure they have space between them.
Final Touches
To finish, press a whole almond into the top of each protein ball. This gives them a nice crunch. Once you’re done, put the baking sheet in the refrigerator. Let the balls chill for at least 30 minutes. This helps them firm up before you serve them. Enjoy your tasty Almond Joy Protein Balls!
Tips & Tricks
Best Practices for Smooth Texture
To get the best texture, mix the ingredients very well. I like to use my hands to ensure everything blends. If your mixture feels too dry, add more almond flour. If it’s too sticky, you can add a bit of honey or maple syrup. Finding the right balance is key to making these treats enjoyable.
Chocolate Options
You can switch up the chocolate chips to suit your taste. Try milk chocolate or even white chocolate if you prefer. If you want a richer flavor, consider using cocoa powder instead of chocolate chips. Just remember to adjust the sweetness level to match.
Making it Child-Friendly
Kids love to help in the kitchen! Get them involved in rolling the protein balls. It’s a great way to bond and have fun. You can also let them choose toppings. Try using crushed nuts, sprinkles, or even mini chocolate chips. This makes the snack more exciting for them.
Pro Tips
- Store Properly: Keep your protein balls in an airtight container in the refrigerator to maintain freshness for up to a week.
- Customize Your Sweetness: Adjust the amount of honey or maple syrup based on your personal preference for sweetness.
- Nut Variations: Feel free to experiment with different nuts or nut butters for varied flavors and textures.
- Protein Boost: Add a scoop of your favorite protein powder to the mixture for an extra protein kick.

Variations
Different Flavor Profiles
You can easily change the taste of your Almond Joy Protein Balls. Adding a few drops of vanilla or almond extract brings a nice twist. These simple flavors make your snack even more delightful. You might also try spices like cinnamon or nutmeg. A pinch can give your balls a warm, cozy taste.
Dietary Adjustments
If you want to make these protein balls vegan, swap out honey for maple syrup. It works well and keeps the sweetness. For those with gluten concerns, use certified gluten-free almond flour. This way, everyone can enjoy these tasty treats without worry.
Nut-Free Options
Nut allergies shouldn’t keep anyone from enjoying these protein balls. You can substitute almond butter with sunflower seed butter. This swap keeps the creamy texture while being safe for all. If you need to avoid whole almonds, just leave them off. Your protein balls will still taste great without them!
Storage Info
Best Practices for Storing Protein Balls
To keep your Almond Joy Protein Balls fresh, use an airtight container. This helps maintain their texture and taste. I recommend glass or BPA-free plastic containers. You can store them in the fridge or freezer. The fridge is best for short-term storage. The freezer works well for longer periods.
Shelf Life
Almond Joy Protein Balls last about one week in the refrigerator. Make sure to seal them well. For longer storage, freeze them. They can stay good for up to three months in the freezer. Just wrap each ball in plastic wrap or place them in a freezer bag.
Reheating Instructions
If you want to refresh frozen protein balls, take them out of the freezer. Let them sit at room temperature for about 15 minutes. This helps soften them. You can also warm them slightly in the microwave for a few seconds if you prefer. Enjoy your snack at your own pace!
FAQs
How to make Almond Joy Protein Balls with no sugar?
You can use natural sweeteners like stevia or monk fruit. These options add sweetness without sugar. I like to blend them with almond butter for a rich taste. This keeps your protein balls tasty and healthy. You can adjust the amount based on your taste.
Can I substitute almond flour with other nut flours?
Yes, you can! Cashew flour or hazelnut flour works well. These flours add a unique flavor. They also keep the protein balls gluten-free. Just keep in mind that the texture may change slightly. You might need to adjust the amount based on the flour you choose.
What is the protein content per serving?
Each Almond Joy Protein Ball has about 3 grams of protein. This comes mainly from almond flour and almond butter. These ingredients not only add protein but also healthy fats. This makes them a great snack, especially after a workout.
Are Almond Joy Protein Balls suitable for meal prep?
Absolutely! These protein balls are perfect for meal prep. You can make a batch and store them in the fridge. They last up to a week, making them a convenient snack. You can also freeze them for longer storage. Just let them thaw before enjoying!
In this post, we explored how to make Almond Joy Protein Balls. We covered essential ingredients like almond flour and dark chocolate chips, plus easy steps for mixing and rolling. I shared tips for smooth texture, child-friendly ideas, and ways to adjust flavors or make it nut-free. Remember to store them properly for the best shelf life. These protein balls are tasty, fun to make, and great for snacking. Try them out, and enjoy your healthy and delicious trea

Almond Joy Protein Balls
Ingredients
- 1 cup almond flour
- 0.5 cup unsweetened shredded coconut
- 0.25 cup raw honey or maple syrup
- 0.25 cup almond butter
- 0.5 teaspoon vanilla extract
- 0.25 teaspoon salt
- 0.33 cup dark chocolate chips
- 0.25 cup whole almonds (for topping)
Instructions
- In a large mixing bowl, combine the almond flour and shredded coconut. Mix until well combined.
- Add in the raw honey (or maple syrup), almond butter, vanilla extract, and salt. Stir until the mixture forms a sticky, dough-like consistency.
- Fold in the dark chocolate chips to evenly distribute throughout the mixture.
- With clean hands, scoop out about 1 tablespoon of the mixture and roll it into a ball. Place the ball on a parchment-lined baking sheet.
- Press a whole almond into the top of each protein ball for added crunch and flavor.
- Repeat until all the mixture is formed into balls. You should get about 12-15 protein balls.
- Once all the balls are formed, place the baking sheet in the refrigerator for at least 30 minutes to firm up.
- After chilling, enjoy your Almond Joy Protein Balls as a nutritious snack or post-workout treat!


![To make delicious lemon blueberry muffins, you will need: - 1 ½ cups all-purpose flour - 1 cup fresh blueberries (or frozen, thawed) - ½ cup granulated sugar - 2 teaspoons baking powder - ½ teaspoon baking soda - ½ teaspoon salt - Zest of 1 lemon - ½ cup plain yogurt (Greek or regular) - 1/3 cup vegetable oil - 2 large eggs - 2 tablespoons fresh lemon juice - 1 teaspoon vanilla extract - Optional: Turbinado sugar for topping When baking, accurate measurements matter. Use a kitchen scale for the best results. If you don’t have all-purpose flour, you can try whole wheat flour. It adds a nutty taste. For sugar, you may use brown sugar for a deeper flavor. If you need to swap yogurt, sour cream works well too. Fresh blueberries give a burst of flavor and color. They are juicy and plump. Frozen blueberries are convenient and save time. They work well too, just make sure to thaw them first. Always toss blueberries in flour before adding to the batter. This helps them stay suspended and not sink to the bottom. For the best flavor, use what you have on hand. Enjoy every bite of these muffins! For the Full Recipe, follow the detailed instructions to create these tasty treats. First, I start by getting my muffin tin ready. Preheat your oven to 375°F (190°C). Line the muffin tin with paper liners or spray it lightly with cooking spray. This helps the muffins come out easily. Next, I grab a medium bowl. Here, I whisk together 1 ½ cups of all-purpose flour, 2 teaspoons of baking powder, ½ teaspoon of baking soda, ½ teaspoon of salt, and the zest of 1 lemon. Mixing these ingredients well ensures an even rise in the muffins. In a large bowl, I mix ½ cup of granulated sugar with 2 large eggs. I whisk this until it looks smooth. Then, I add ½ cup of plain yogurt, ⅓ cup of vegetable oil, 2 tablespoons of fresh lemon juice, and 1 teaspoon of vanilla extract. I keep whisking until everything blends nicely. Now comes the fun part! I take the dry mix and add it to the wet mix. I stir gently until just combined. It’s important not to overmix, or the muffins can become tough. Next, I fold in 1 cup of fresh blueberries carefully. This way, I keep them whole and evenly spread in the batter. I divide the batter evenly into the muffin cups, filling each about two-thirds full. If I want a crunchy topping, I sprinkle a pinch of turbinado sugar on top of each muffin. I bake them for 18-20 minutes. I know they’re done when a toothpick comes out clean. After baking, I let the muffins cool in the pan for about 5 minutes before moving them to a wire rack. For the complete recipe, check out the Full Recipe. To get that perfect muffin texture, you want a light and fluffy bite. Start with the right flour. All-purpose flour works well. Be careful not to overmix the batter. Stir until just combined. This keeps the muffins airy. Using yogurt is a great trick for moist muffins. It adds creaminess without extra fat. I prefer plain yogurt. Greek yogurt works, too, if you want a thicker texture. The acidity in yogurt also enhances the flavor. Mixing batter can be tricky. First, always mix dry and wet ingredients in separate bowls. This helps in even mixing. When you combine them, use a gentle folding motion. This keeps air in the batter. Avoid using a whisk at this stage. A spatula works best to maintain fluffiness. Toppings can elevate your muffins. A sprinkle of turbinado sugar gives a nice crunch. You can also try lemon zest on top for extra zing. If you like, add a drizzle of glaze made from lemon juice and powdered sugar. It adds sweetness and makes them look fancy. For the full recipe, check out the Lemon Blueberry Bliss Muffins 🫐. {{image_2}} Lemon blueberry muffins are delicious as they are, but you can try fun twists. Here are some great ideas to mix things up. Add a nutty flavor by mixing in sliced almonds. They give a nice crunch. Just fold in 1/2 cup of sliced almonds when you add the blueberries. This adds texture and a hint of almond taste. The almonds pair well with the lemon and blueberries. You can make these muffins gluten-free easily. Swap the all-purpose flour for a gluten-free flour blend. Look for a blend with xanthan gum for the best results. Follow the same recipe, and you’ll get tasty muffins without gluten. These muffins taste just as good as the original. For a vegan option, replace eggs and yogurt. Use flax eggs instead. Mix 1 tablespoon of ground flaxseed with 2.5 tablespoons of water to replace one egg. For yogurt, use plant-based yogurt, either soy or almond. The muffins will still be fluffy and moist, bursting with flavor. Feel free to explore these variations to suit your taste! You can find the full recipe for the original version to get started. To keep your lemon blueberry muffins fresh, place them in an airtight container. This helps keep them soft and moist. Store them at room temperature for up to three days. If you want to keep them longer, consider freezing. Freezing is a great way to save muffins for later. After the muffins cool completely, wrap each one in plastic wrap. Then, place them in a freezer-safe bag or container. They can last up to three months in the freezer. To enjoy, just take out the muffins and let them thaw at room temperature. When you are ready to eat your muffins, reheating them is easy. You can use the microwave for quick warming. Heat them for about 15-20 seconds. For a crispier muffin, use the oven. Preheat the oven to 350°F (175°C), and heat for about 5-10 minutes. This method brings back their fresh-baked taste. Enjoy your muffins from the [Full Recipe] with your favorite drink! Yes, you can swap blueberries for other fruits. Raspberries, strawberries, or blackberries work well. Just make sure to adjust the amount if the fruit is larger or smaller. Mixing in lemon zest adds a nice zing to any fruit you choose. Check your muffins at 18 minutes. Insert a toothpick into the center of a muffin. If it comes out clean or with a few crumbs, your muffins are ready. Overbaking can dry them out, so keep an eye on them. Dense muffins may come from overmixing the batter. Mix just until combined. Another reason could be too much flour. Use a kitchen scale to measure flour for accuracy. Adding an extra egg or more yogurt can also help lighten the texture. Absolutely! Use a mini muffin tin instead of a regular one. Fill each cup about halfway and bake for 10-12 minutes. They make great snacks or party treats! You can find the full recipe in the previous sections. This blog post detailed how to make lemon blueberry muffins, from ingredients to storage. We explored the key ingredients, the best techniques, and even tasty variations. Remember, fresh blueberries add the best flavor, but frozen ones work too. Don't forget the tips to achieve a perfect texture and how to store your muffins for later. Baking can be fun, so get creative with flavors and enjoy making these delicious treats! Happy baking!](https://dailydishly.com/wp-content/uploads/2025/06/1bf09e67-92cf-4ebe-bc60-9e869fac49a4-768x768.webp)


