Apple Cider Bread Pudding with Caramel Delight

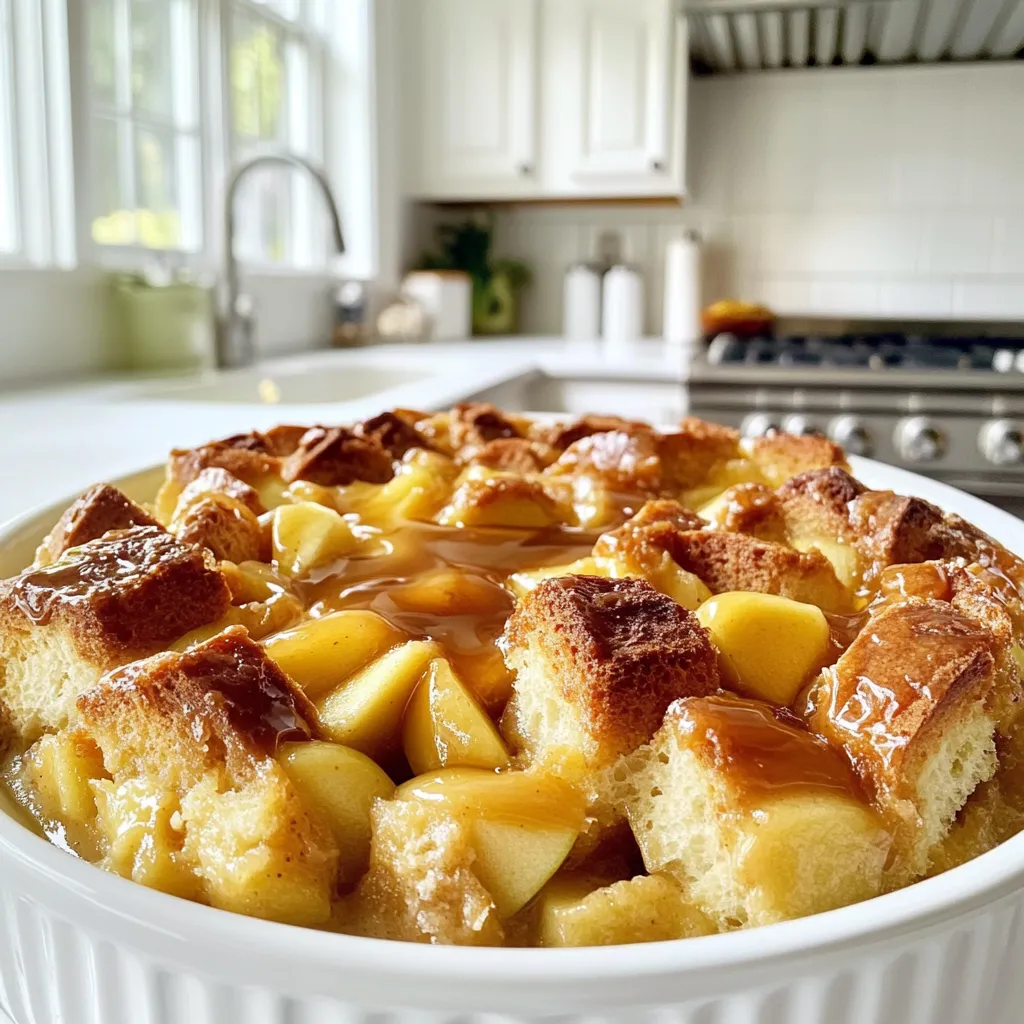
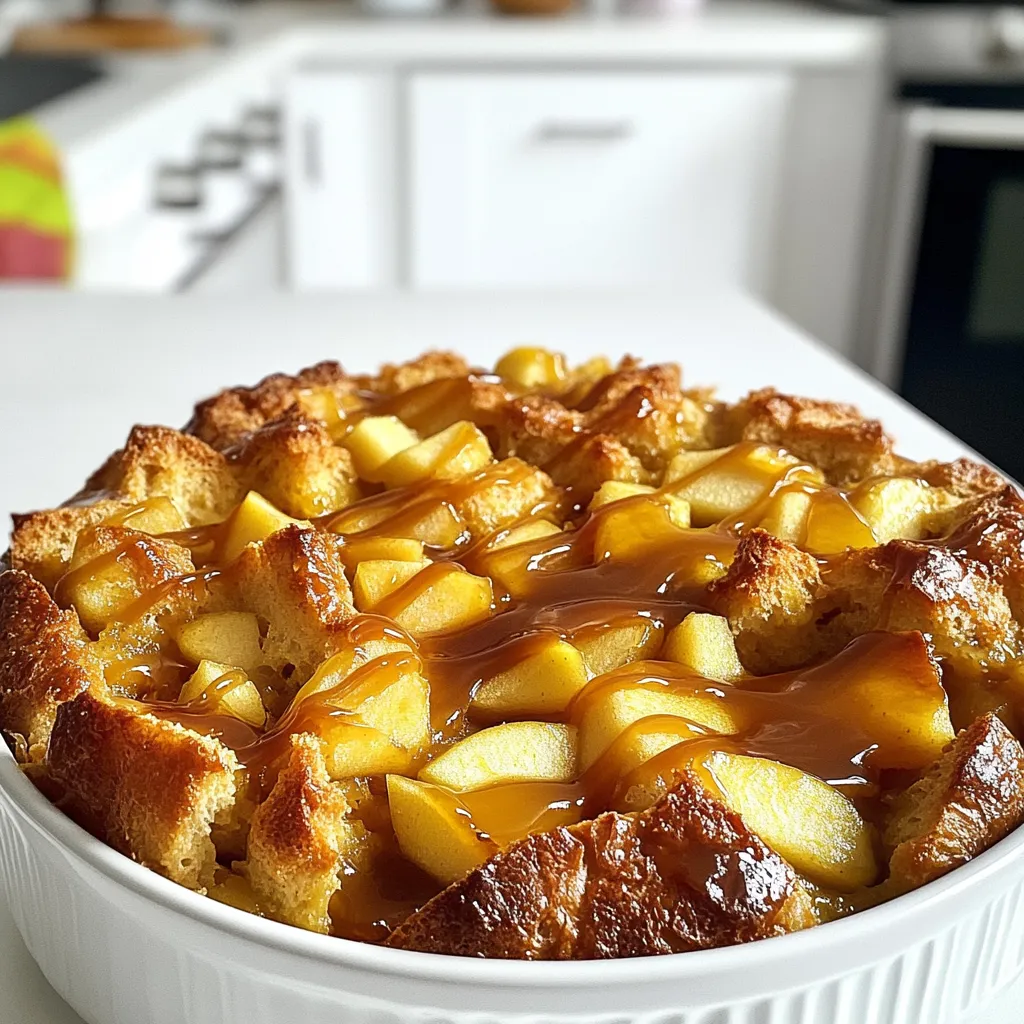
Fall is here, and it’s time to indulge in a warm dessert that captures the season: Apple Cider Bread Pudding with Caramel Delight. This cozy treat combines sweet apples, rich caramel, and spiced bread for the perfect comfort food. You’ll love how easy it is to make this delicious dish! Let’s dive into the simple steps and tips to create a crowd-pleaser everyone will devour.
Ingredients
Main Ingredients
– 6 cups day-old brioche or challah bread, cut into cubes
– 2 cups apple cider
– 1 cup whole milk
– 3 large eggs
For this recipe, using day-old bread is key. It absorbs the custard without getting too soggy. Brioche or challah gives the best flavor and texture. Apple cider adds a nice, sweet twist to the dish. Whole milk makes the pudding creamy and rich. Eggs help bind everything together, creating a lovely custard.
Seasonings and Flavors
– 1/2 cup granulated sugar
– 1 teaspoon vanilla extract
– 1 teaspoon ground cinnamon
– 1/4 teaspoon nutmeg
Granulated sugar sweetens the pudding. Vanilla extract adds warmth and depth. Ground cinnamon and nutmeg bring a cozy, spiced flavor that complements the apple cider perfectly. These spices enhance the overall aroma and taste of the dessert.
Additional Components
– 1/2 cup chopped apples (preferably Granny Smith or Honeycrisp)
– 1/2 cup caramel sauce (store-bought or homemade) for drizzling
Chopped apples add texture and a slight tartness. I recommend using Granny Smith or Honeycrisp for their crispness. Drizzling with caramel sauce before serving adds an indulgent touch. It makes each bite feel like a treat, balancing the flavors and enhancing the sweetness.
Step-by-Step Instructions
Prepping the Oven and Baking Dish
First, you need to set the stage for your bread pudding. Preheat your oven to 350°F (175°C). This helps ensure even baking. Next, take a 9×13-inch baking dish and grease it. You can use butter or cooking spray. This step keeps the pudding from sticking.
Simmering the Apple Cider
Now, let’s make that apple cider shine. Pour 2 cups of apple cider into a medium saucepan. Set the heat to medium and bring it to a simmer. This means small bubbles will form on the surface. Let it simmer for about 10-15 minutes. You want it slightly thickened. After this, remove it from the heat and let it cool a bit.
Mixing the Custard
While the cider cools, it’s time to mix your custard. In a large bowl, whisk together 1 cup of whole milk, 3 large eggs, and 1/2 cup of granulated sugar. Add 1 teaspoon of vanilla extract, 1 teaspoon of ground cinnamon, and 1/4 teaspoon of nutmeg. Finally, mix in 1/4 cup of melted unsalted butter. Whisk until smooth and creamy.
Incorporating Bread and Apples
Now, once your apple cider has cooled, stir it into the custard mixture. Make sure it blends well. Next, grab 6 cups of day-old brioche or challah bread, cut into cubes. Add this along with 1/2 cup of chopped apples to the bowl. Gently fold the bread and apples into the custard. You want every piece of bread soaked.
Baking the Pudding
It’s baking time! Pour the mixture into your prepared baking dish. Press down lightly to make sure it’s even. Place the dish in your preheated oven. Bake for 40-45 minutes. The top should turn golden brown. A toothpick inserted in the center should come out clean. After baking, let it cool for about 10 minutes before serving. Drizzle with caramel sauce for that sweet finish. Enjoy!
Tips & Tricks
Ensuring Perfect Consistency
To make the best apple cider bread pudding, avoid soggy bread. Use day-old bread. Fresh bread can soak too much liquid. Cut the bread into even cubes. This helps them soak up the custard evenly. Press the bread down lightly in the dish. This ensures it cooks well. Bake until the top is golden brown. A toothpick should come out clean. If it’s undercooked, it may be too wet.
Best Practices for Infusing Flavor
To enhance the apple cider flavor, simmer it first. This helps the flavors deepen. Use good quality apple cider for a rich taste. Add spices like cinnamon and nutmeg to the custard mix. These spices pair well with apple flavors. For caramel, drizzle it on right before serving. This adds a sweet touch. You can use store-bought caramel or make your own for a special treat.
Presentation Ideas
Serve the bread pudding warm for the best taste. Place it in bowls or on plates. Top each serving with a scoop of vanilla ice cream. This adds creaminess to the dessert. Drizzle extra caramel sauce over the top. This makes it look appealing and delicious. Garnish with a sprinkle of cinnamon for a nice finish. Enjoy the warm and cozy feel of this dessert!

Variations
Alternative Breads
You can use many types of bread for this recipe. Each type adds a unique texture. For example, sourdough gives a tangy flavor. White bread offers a soft, light base. Rye bread can add a rich, earthy taste. Experiment with different breads to find your favorite.
Flavor Additions
Adding nuts and dried fruits can boost the flavor of your bread pudding. Chopped pecans or walnuts add a nice crunch. Dried cranberries or raisins offer sweetness and chewiness. Mix in your favorite nuts or fruits for a fun twist.
Dietary Adjustments
You can easily adjust this recipe for special diets. For gluten-free options, use gluten-free bread. Almond milk or oat milk can replace whole milk for a dairy-free version. Always check labels to ensure that your ingredients fit your dietary needs.
Storage Info
Storing Leftovers
To keep your apple cider bread pudding fresh, store leftovers in the fridge. First, let it cool to room temperature. Then, cover it tightly with plastic wrap or aluminum foil. This helps to keep moisture in and prevent it from drying out. You can also use an airtight container for storage. The bread pudding will stay fresh for up to three days.
Reheating Instructions
To reheat bread pudding without losing its texture, use the oven. Preheat your oven to 350°F (175°C). Place the bread pudding in a baking dish and cover it with foil. Heat it for about 15-20 minutes. This method warms it evenly and keeps it soft. If you prefer, you can use a microwave. Place a slice on a microwave-safe plate and heat for about 30 seconds. Check and repeat if needed.
Freezing Options
If you want to save some for later, you can freeze bread pudding. First, let it cool completely. Cut it into portions and wrap each piece in plastic wrap. Then, place the wrapped pieces in a freezer-safe bag or container. This way, it won’t get freezer burn. When you’re ready to eat it, take a piece out and thaw it in the fridge overnight. Reheat it in the oven or microwave as mentioned above.
FAQs
Can I use fresh bread instead of day-old?
Using fresh bread changes the texture and flavor. Fresh bread is too soft. It can make your pudding soggy. Day-old bread is drier and absorbs the liquid better. This gives you a firm, custardy base. For best results, always use day-old brioche or challah.
What type of apples are best for this recipe?
For this recipe, I suggest Granny Smith or Honeycrisp apples. Granny Smith offers a tart bite, balancing the sweetness of the pudding. Honeycrisp adds a sweet and crisp flavor, enhancing the dish. You can mix both for a complex taste. Choose apples that hold their shape when baked.
How do I make homemade caramel sauce?
Making homemade caramel sauce is easy. Start by heating 1 cup of sugar in a medium pot over medium heat. Stir gently until the sugar melts and turns golden brown. Then, carefully add 1/2 cup of heavy cream. Stir until smooth. Remove from heat and add a pinch of salt for flavor. Let it cool before drizzling on your pudding.
Can I prepare this recipe in advance?
Yes, you can prepare this recipe in advance. Mix the custard and bread the night before. Cover it and store it in the fridge. When you are ready, just bake it. This saves time and lets the flavors blend. It’s a great way to enjoy warm pudding without stress!
Bread pudding is a rich, warm dessert that shines with simple ingredients: day-old bread, apple cider, and spices. You’ll enjoy the great flavors from fresh apples and caramel. Follow the steps carefully for the best texture. Try variations to make it your own.
Remember, storing leftovers keeps it fresh for later. I hope you love baking and sharing this delightful dish. Enjoy every bite!


![- 1 ½ cups all-purpose flour - 1 teaspoon baking powder - ½ teaspoon baking soda - ¼ teaspoon salt - ½ cup unsalted butter, softened - 1 cup granulated sugar - 2 large eggs - ½ cup plain yogurt - 2 tablespoons lemon zest (from about 2 lemons) - ¼ cup fresh lemon juice - 3 tablespoons poppy seeds - Optional: Glaze made from ½ cup powdered sugar and 2 tablespoons lemon juice When making Lemon Poppy Seed Bread, I find that using fresh ingredients makes the biggest difference. Fresh lemons give your bread a bright flavor. You want ripe lemons for zest and juice. Look for lemons that feel heavy for their size and have a smooth skin. These lemons are juicy and full of flavor. For yogurt, I prefer plain yogurt. It adds moisture and a slight tang. Greek yogurt works well too, but regular plain yogurt keeps the texture light. If you want to switch things up, consider using sour cream instead. It can give your bread a rich flavor. - Selecting ripe lemons for zest and juice: Look for heavy, smooth-skinned lemons. - The best type of yogurt to use: Use plain yogurt or sour cream for moisture. If you need gluten-free options, try using a gluten-free flour blend. Mix it with a bit of xanthan gum for texture. For a vegan version, substitute unsalted butter with coconut oil or a vegan butter. You can replace eggs with a mashed banana or unsweetened applesauce. This will still keep the bread moist and tasty. Let’s make cooking easier and more fun with these simple tips! If you want to dive deeper into the recipe, check out the Full Recipe for all the steps. 1. Preheat your oven to 350°F (175°C). Grease and flour a 9x5 inch loaf pan. This step helps the bread rise well and not stick. 2. In a medium bowl, whisk together the dry ingredients: flour, baking powder, baking soda, and salt. Set this mix aside for later. 3. In a large bowl, cream the softened butter and granulated sugar together. Use an electric mixer on medium speed for about 3 to 4 minutes. This makes the mixture light and fluffy. 4. Add the eggs one at a time, mixing well after each. This helps to blend everything smoothly. 5. Stir in the yogurt, lemon zest, and lemon juice until fully mixed. Each ingredient adds a burst of flavor to the bread. 6. Gradually add the dry ingredients to the wet mixture. Stir gently until just combined. Do not overmix; this keeps the bread soft. 7. Fold in the poppy seeds, being careful not to overmix again. They add a nice crunch and visual appeal. 1. Pour the batter into the prepared loaf pan. Smooth out the top with a spatula to ensure even baking. 2. Bake in the oven for about 55 to 60 minutes. Check if it's done by inserting a toothpick into the center. If it comes out clean, your bread is ready! 1. Let the bread cool in the pan for about 10 minutes. This makes it easier to remove without breaking. 2. Transfer it to a wire rack to cool completely. This prevents sogginess and keeps the crust nice. 3. Slice the bread and serve it on a platter. If you like, drizzle the optional glaze over the top. Garnish with thin lemon slices and a sprinkle of poppy seeds for a beautiful finish. For the complete recipe, refer to the [Full Recipe]. Enjoy your baking! To bake the best Lemon Poppy Seed Bread, avoid common mistakes. First, do not skip the baking powder or baking soda. They help the bread rise and stay fluffy. Mix the dry and wet ingredients gently. Overmixing can make the bread tough. Make sure your butter is softened, not melted. This helps create the right texture. A beautiful presentation makes your bread shine. Slice the bread and arrange it on a nice platter. Drizzle a glaze on top for extra flair. You can make the glaze by mixing powdered sugar and lemon juice. Garnish with thin lemon slices and a sprinkle of poppy seeds. This adds color and makes it look fancy. Want a stronger lemon flavor? Use lemon extract in addition to fresh juice. This boosts the citrus taste. You can also add mix-ins like chopped nuts or dried fruit. These add texture and flavor. Feel free to explore your own ideas to customize your bread! For the full recipe, check out the complete guide. {{image_2}} To make gluten-free lemon poppy seed bread, start with a good flour blend. Look for blends that contain rice flour, almond flour, or tapioca starch. These work well in most recipes. You may need to adjust the liquid in your recipe. Gluten-free flours often absorb more moisture. So, add a little extra yogurt or lemon juice if needed. For a vegan version, swap out the eggs and butter. Use flaxseed meal mixed with water as an egg substitute. One tablespoon of flaxseed meal mixed with three tablespoons of water equals one egg. For butter, use coconut oil or a vegan alternative. This keeps your bread moist and tasty. To maintain the batter's texture, ensure you mix well, so it remains light and fluffy. You can add nuts or dried fruits for extra flavor. Walnuts or almonds give a nice crunch. Dried cranberries or blueberries add sweetness. If you want more citrus, try adding orange or lime zest. This will brighten the flavor of the bread. You can even mix different citrus fruits for a unique twist. Don't hesitate to experiment, and see what flavors you love best! To keep your Lemon Poppy Seed Bread fresh, you have two main options: room temperature and refrigeration. Storing it at room temperature is best if you plan to eat it within a few days. Place the bread in an airtight container. This keeps it soft and moist. If you want to store it longer, refrigeration works too. Just know that it may dry out a bit. Using airtight containers is key. They block air and moisture. This helps prevent your bread from going stale. If you choose to refrigerate it, wrap the bread tightly in plastic wrap first. Then, place it in the container. This double layer helps keep the bread fresh. Freezing is a great way to save your Lemon Poppy Seed Bread for later. To freeze it, let the bread cool completely first. Once cool, slice it into pieces if you prefer. Wrap each slice in plastic wrap. Then, place the wrapped slices in a freezer-safe bag or container. This method saves space and makes it easy to grab a slice when you want one. When you’re ready to enjoy it, thaw the bread in the fridge overnight. If you want it warm, you can reheat it in the oven. Preheat the oven to 350°F (175°C) and bake for about 10 to 15 minutes. This brings back its fresh-from-the-oven taste. For optimal flavor and freshness, Lemon Poppy Seed Bread lasts about 3 to 4 days at room temperature. If refrigerated, it can last up to a week. However, freezing extends its shelf life to about 2 to 3 months. Keep an eye out for signs of spoilage. If you see mold or if the bread smells off, it's time to toss it. Freshness is key to enjoying this delightful bread. Always trust your senses! Lemon poppy seed bread stays fresh for about 3 to 5 days at room temperature. To keep it fresh longer, store it in an airtight container. You can also wrap it tightly in plastic wrap or foil. This helps block out air and moisture. If you want to enjoy it later, freeze it for up to three months. Yes, you can make this bread ahead of time. Bake it and let it cool completely. Then, wrap it tightly and store it in the fridge for up to a week. For longer storage, freeze it. Just remember to slice it before freezing. This makes it easy to grab a slice whenever you want. Lemon poppy seed bread pairs well with many items. For breakfast, try it with fresh fruit or yogurt. You can also enjoy it with coffee or tea. For dessert, a scoop of vanilla ice cream or a dollop of whipped cream adds a nice touch. You can even drizzle some honey or jam on top for extra flavor. Absolutely! To make mini loaves, use small loaf pans. Adjust the baking time to about 30 to 40 minutes. Check for doneness with a toothpick. It should come out clean when the bread is done. This way, you can share or gift smaller portions easily. In this blog post, we've covered everything about Lemon Poppy Seed Bread. You learned the full list of ingredients and tips for choosing fresh ones. You also found step-by-step instructions for baking, plus tips and tricks for perfect results. Variations like gluten-free and vegan options were discussed, along with storage tips to keep your bread fresh. Enjoy making this tasty loaf that gives you bright flavors. With these ideas, you can bake with confidence and impress anyone who tries your bread. Happy baking!](https://dailydishly.com/wp-content/uploads/2025/06/d333cd57-b5c0-4704-bdd2-e8fc2d1dc8a6-768x768.webp)


