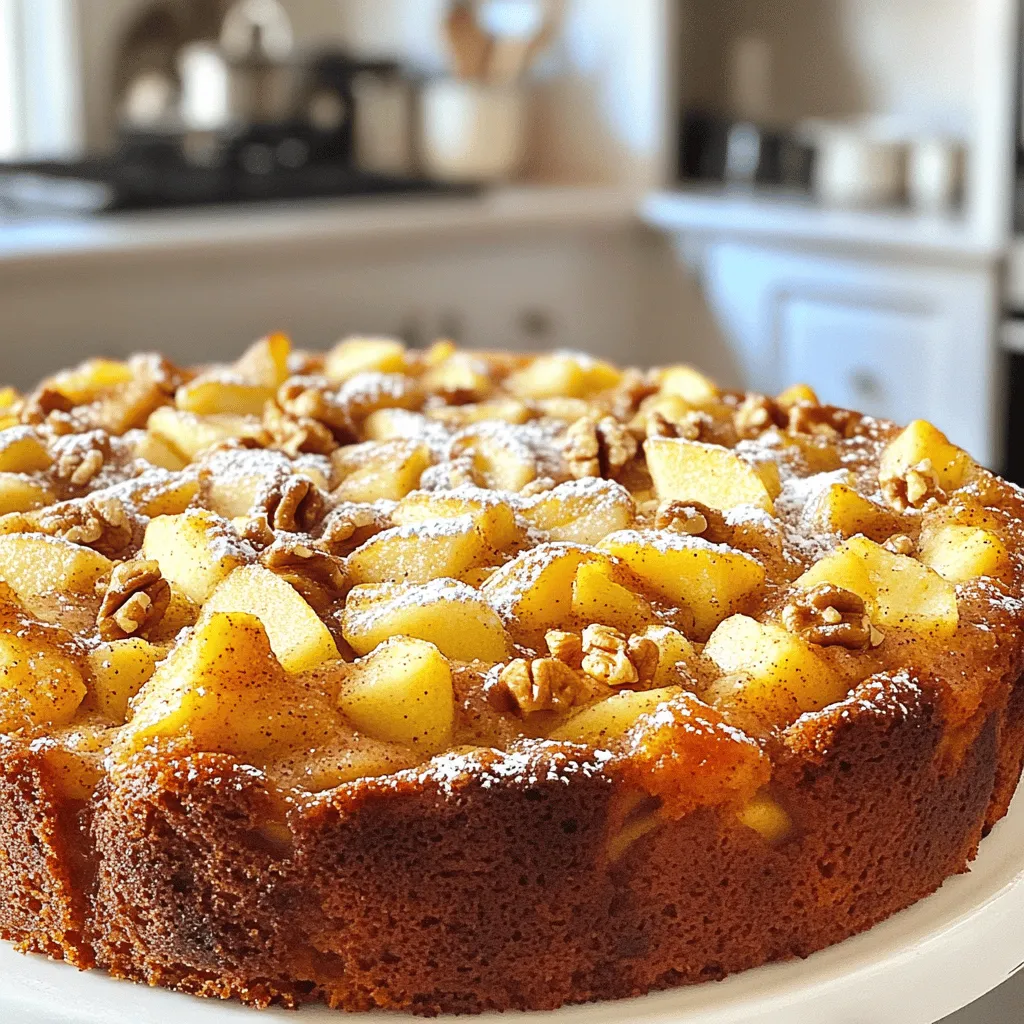
If you love the warm, cozy flavors of fall, you’re in for a treat! This Apple Cinnamon Coffee Cake Bakery Style recipe brings sweet apples and spicy cinnamon together in a soft, delicious cake. Perfect for breakfast or a snack, this coffee cake is easy to bake and tastes like something from your favorite bakery. Join me as I guide you through each step to create this delightful masterpiece!
Ingredients
Gathering your ingredients is the first step to creating a delicious apple cinnamon coffee cake. Here’s what you need:
– 2 cups all-purpose flour
– 1 cup granulated sugar
– 1/2 cup unsalted butter, softened
– 1 cup sour cream
– 3 large eggs
– 1 teaspoon vanilla extract
– 1 teaspoon baking powder
– 1/2 teaspoon baking soda
– 1/2 teaspoon salt
– 2 cups peeled and diced apples (preferably Granny Smith)
– 1 teaspoon ground cinnamon
– 1/2 cup brown sugar, packed
– 1/2 cup chopped walnuts (optional)
– Powdered sugar for dusting (optional)
Each ingredient plays a key role. The all-purpose flour gives structure. The granulated sugar adds sweetness. Unsalted butter makes it rich and moist. Sour cream keeps it tender and adds a nice tang.
Using large eggs helps bind the cake, while vanilla extract enhances the flavor. Baking powder and baking soda provide lift, making the cake fluffy.
Granny Smith apples offer a tart contrast to the sweet cake. Ground cinnamon adds warmth and depth, while brown sugar gives a lovely caramel note. Walnuts, if you choose to add them, bring crunch. Finally, a dusting of powdered sugar makes for a beautiful finish.
Now, you have everything you need to make this delightful coffee cake!
Step-by-Step Instructions
Prepping the Oven and Baking Pan
– Preheat your oven to 350°F (175°C).
– Grease and flour a 9×13 inch baking pan.
Start by setting your oven. This ensures the cake bakes evenly. Greasing and flouring the pan helps the cake come out easily. It also prevents sticking.
Mixing the Batter
– Creaming the butter and sugar
– Adding eggs and vanilla
– Combining dry ingredients with wet mixture
In a large bowl, cream the softened butter and granulated sugar. Mix until it feels light and fluffy. This should take about 3-4 minutes. Next, add the eggs, one at a time. Make sure to mix well after each egg. Then, stir in the vanilla extract for extra flavor.
In another bowl, mix the flour, baking powder, baking soda, and salt. Gradually add this dry mix to your wet batter. Alternate it with the sour cream. Mix until everything is just combined. Avoid overmixing; you want a soft batter.
Adding Apples and Assembling
– Tossing apples with cinnamon and brown sugar
– Layering batter and apples in the baking pan
– Baking the coffee cake and testing for doneness
Now, take your diced apples. Toss them in a bowl with cinnamon and brown sugar. This step adds a sweet and spicy kick to the apples.
Spread half of the batter into your prepared baking pan. Layer half of the cinnamon apple mixture over the batter. Next, pour the remaining batter on top. Smooth it out with a spatula. Finally, add the rest of the apples on top. If you like, sprinkle chopped walnuts for extra crunch.
Bake your coffee cake in the preheated oven for 40-45 minutes. Check for doneness by inserting a toothpick in the center. If it comes out clean, your cake is ready! Let it cool in the pan for about 10 minutes. Then, transfer it to a wire rack to cool completely.
Tips & Tricks
Achieving the Best Texture
For a great texture, use unsalted butter. It gives the cake rich moisture. Butter adds flavor and keeps the cake soft. Oil can work, but it lacks that buttery taste. Also, use room temperature ingredients. Cold eggs or butter may not mix well. This can lead to lumps, affecting texture.
Flavor Enhancements
You can use different types of apples for unique flavors. Granny Smith apples are tart and hold shape well. Try sweet apples like Honeycrisp for a different taste. Adding spices like nutmeg or ginger can enhance the flavor too. Nuts, such as walnuts, add crunch and richness.
Presentation Tips
Dust the cooled cake with powdered sugar for a lovely finish. This small step makes a big difference. Serve each slice with a scoop of vanilla ice cream for an extra treat. Pair your coffee cake with a hot cup of coffee or tea. The warm drink complements the sweet cake perfectly.
Variations
Gluten-Free Version
To make this cake gluten-free, you can swap all-purpose flour with a gluten-free blend. Use a mix that includes xanthan gum for better texture. You may also need to add a bit more liquid, as gluten-free flours can absorb more moisture. Keep an eye on the baking time. It might bake faster than the original recipe.
Vegan Adaptation
For a vegan apple cinnamon coffee cake, replace eggs with flax eggs. Mix one tablespoon of flaxseed meal with three tablespoons of water for each egg. Use plant-based butter instead of regular butter. For sour cream, try using unsweetened applesauce or a non-dairy yogurt. Both will keep your cake moist and tasty.
Additional Flavor Options
To elevate your coffee cake, consider a caramel apple version. Drizzle caramel sauce between layers of apples for a sweet twist. You can also add chocolate chips for a rich flavor. Dried fruits like raisins or cranberries can add a chewy texture. Experiment and have fun with these ideas!
Storage Info
How to Store Leftovers
You can store your apple cinnamon coffee cake in two ways. If you plan to eat it within a day or two, keep it at room temperature. Just wrap it tightly in plastic wrap. For longer storage, place it in the refrigerator. Use an airtight container to keep it fresh. This will also help prevent it from drying out.
Reheating Instructions
To enjoy your coffee cake warm, try these reheating methods. The best way is to use the oven. Preheat it to 350°F (175°C). Place the cake on a baking sheet, cover it with foil, and heat for about 10 to 15 minutes. This keeps the cake moist and tasty. You can also use the microwave. Heat for 10 to 15 seconds. Just be careful not to overdo it, or it may dry out.
Freezing Tips
Freezing is a great option for this cake. Cut it into slices for easy serving. Wrap each slice in plastic wrap, then place them in a freezer bag. This way, you can enjoy a piece anytime! When you want to eat a slice, take it out and thaw it in the fridge overnight. For best texture, let it sit at room temperature for about 30 minutes before serving. This helps the cake regain its softness.
FAQs
How long does apple cinnamon coffee cake last?
Apple cinnamon coffee cake lasts about 3 days at room temperature. Keep it covered with plastic wrap or in an airtight container. If you store it in the fridge, it can last up to a week. Just remember, the cake might become a bit drier over time.
Can I use other types of apples for this recipe?
Yes, you can use other apples! Granny Smith apples work well because they are tart and firm. Other good options are Honeycrisp for sweetness and Fuji for crunch. Each type gives a different taste and texture, so feel free to explore.
What can I substitute for sour cream?
If you don’t have sour cream, yogurt is a great substitute. Greek yogurt gives a similar tang and texture. You can also use buttermilk or cottage cheese, but blend it a little for smoothness. Each option keeps the cake moist and tasty.
Can I make this recipe ahead of time?
You can make this coffee cake ahead! Just bake it and let it cool completely. Cover it tightly and store it at room temperature for up to 3 days. If you want to make it even earlier, you can freeze it. Just thaw it overnight before serving.
This apple cinnamon coffee cake combines simple ingredients and easy steps. You learned how to preheat the oven, mix the batter, and layer the apples. Tips will help you achieve great texture and flavor, while variations allow for personal twists. Store leftovers to enjoy later, and reheating ensures freshness. Overall, this recipe is fun to make and share. Enjoy creating your delicious coffee cake and experimenting with it!