BBQ Chicken Flatbread Pizza Easy and Flavorful Meal

Welcome to my guide on making BBQ Chicken Flatbread Pizza! This easy and tasty meal is perfect for any night. You’ll learn how to gather simple ingredients, use quick steps, and avoid common mistakes. Whether you’re a busy parent or just love pizza, this recipe will delight your taste buds. Get ready to impress your family and friends with this delicious twist on a classic dish!
Ingredients
Essential Ingredients for BBQ Chicken Flatbread Pizza
To make BBQ chicken flatbread pizza, you need these key ingredients:
– 2 large flatbreads or naan
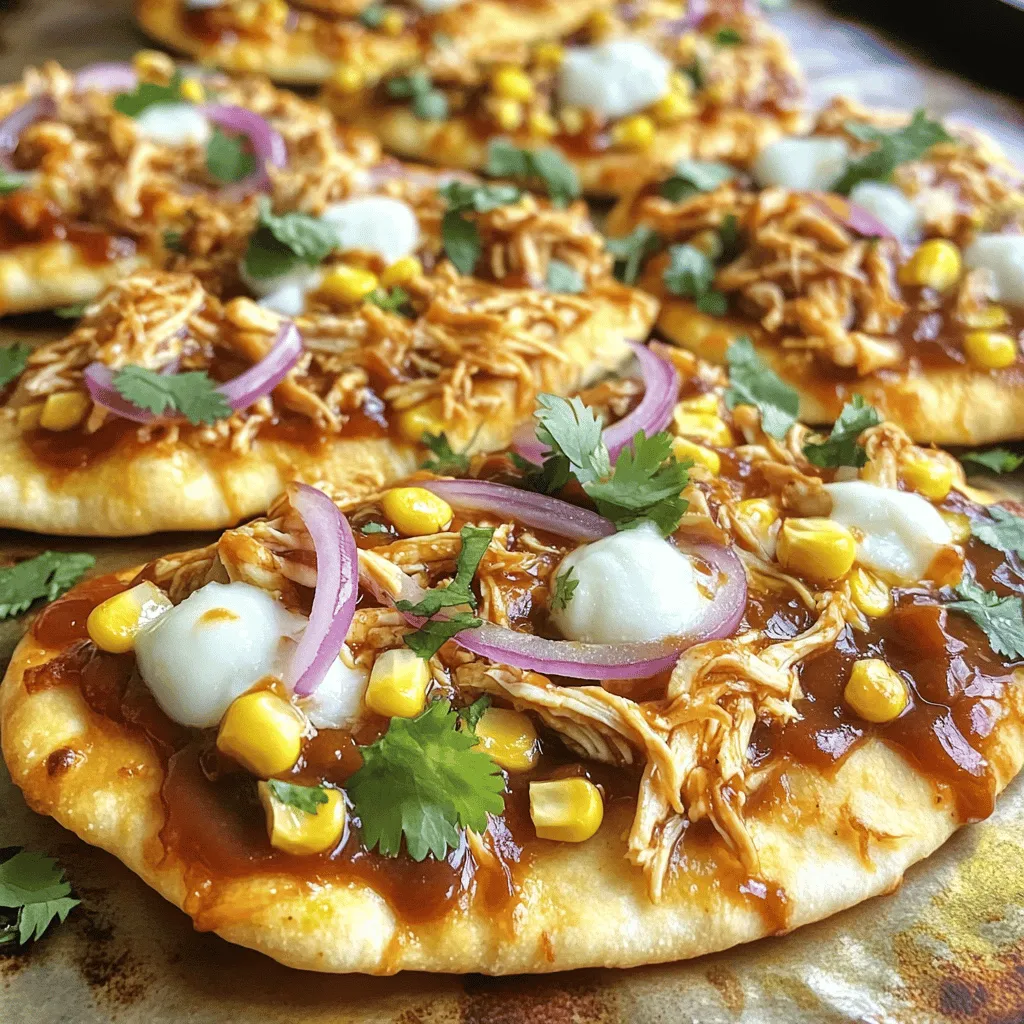
– 1 cup cooked chicken, shredded
– 1/2 cup barbecue sauce
– 1 cup shredded mozzarella cheese
– 1/2 red onion, thinly sliced
– 1/2 cup sweet corn (fresh or canned)
– 1/4 cup fresh cilantro, chopped
– 1/2 teaspoon smoked paprika
– Olive oil for brushing
– Salt and pepper to taste
These ingredients create a tasty pizza packed with flavor. The flatbreads serve as a great base. The shredded chicken covered in barbecue sauce adds a sweet and smoky taste. Mozzarella cheese melts beautifully, making each bite creamy. Fresh cilantro gives a burst of color and flavor that brightens the dish.
Optional Add-Ins for Extra Flavor
You can enhance your flatbread pizza with these optional ingredients:
– Jalapeños for heat
– Avocado slices for creaminess
– Feta cheese for a tangy kick
– Pineapple for sweetness
– Bell peppers for crunch
These add-ins let you customize your pizza. If you love spice, jalapeños work great. Want more creaminess? Add avocado slices. Every extra ingredient adds a new layer of taste, making your meal unique.
Cooking Tools and Equipment Needed
Gather these tools before you start cooking:
– Oven
– Baking sheet
– Parchment paper
– Mixing bowl
– Brush for olive oil
– Knife for slicing
These basic tools make the cooking process easier. The oven helps cook the pizza evenly, while the baking sheet with parchment paper prevents sticking. A mixing bowl is useful for mixing your chicken and sauce. Having the right tools makes all the difference in your cooking experience.
Step-by-Step Instructions
Preparing the Oven and Ingredients
First, preheat your oven to 400°F (200°C). This step is key for a nice, crispy pizza. While the oven heats up, you can prepare your ingredients. In a bowl, mix 1 cup of shredded chicken with 1/2 cup of barbecue sauce. Make sure the chicken is well-coated. This will give your pizza a rich, smoky flavor.
Next, gather your flatbreads. You can use two large flatbreads or naan. Lay them out on a baking sheet lined with parchment paper. This will help with easy cleanup. Lightly brush the tops of the flatbreads with olive oil. This adds flavor and helps them crisp up in the oven.
Assembling the Flatbread Pizza
Now, it’s time to assemble your pizza. Evenly distribute the BBQ chicken mixture over each flatbread. Use a spoon to spread it out well. Then, sprinkle 1 cup of shredded mozzarella cheese over the chicken. This will melt beautifully while baking.
Next, add the thin slices of 1/2 red onion and 1/2 cup of sweet corn on top of the cheese. The onion adds crunch, and the corn brings sweetness. Finally, season your creation with 1/4 teaspoon smoked paprika, salt, and pepper to taste.
Baking and Serving the Pizza
Once your flatbread pizza is fully assembled, it’s time to bake. Place the baking sheet in the preheated oven. Bake for about 12-15 minutes. The cheese should be bubbly, and the edges of the flatbread will get crispy.
Once the pizza is done, carefully take it out of the oven. The aroma will be mouthwatering! Sprinkle 1/4 cup of fresh cilantro over the top for a burst of freshness. Slice it into pieces and serve hot. Enjoy your BBQ chicken flatbread pizza with friends or family!
Tips & Tricks
How to Achieve the Crispy Flatbread Base
To get a crispy flatbread base, start with a good oven. Preheat it to 400°F (200°C). This high heat helps the flatbread crisp up nicely. Brush the flatbreads lightly with olive oil. This adds flavor and helps with browning. Place the flatbreads on a baking sheet lined with parchment paper. This prevents sticking. Bake for 12-15 minutes and watch for golden edges. If you want extra crispiness, bake them for a few more minutes. Just be careful not to burn them!
Flavor Enhancements and Customization Ideas
Want to kick up the flavor? Try adding fresh herbs like basil or parsley. These herbs brighten the dish. You can also add jalapeños for a spicy kick. If you like a tangy twist, use ranch dressing instead of barbecue sauce. For a smoky taste, sprinkle more smoked paprika on top. You could even swap mozzarella for gouda cheese for a richer flavor. Don’t be afraid to mix and match toppings. Sweet bell peppers or black olives are great choices too!
Common Mistakes to Avoid
One common mistake is overloading the flatbread with toppings. Too much can make it soggy. Stick to a balanced amount for the best texture. Make sure your chicken is cooked and shredded well. This helps it blend nicely with the sauce. Avoid using too much barbecue sauce; it can overpower the other flavors. Always taste as you go! Lastly, keep an eye on the baking time. Every oven is different, and you want that cheese to be bubbly but not burnt.

Variations
Vegetarian BBQ Flatbread Option
You can easily swap chicken for veggies. Use bell peppers, mushrooms, and zucchini. Toss them with barbecue sauce. This mix adds great taste without meat. Add some extra cheese for creaminess. Top it with fresh cilantro after baking. This vegetarian version is just as tasty.
Spicy BBQ Chicken Flatbread
If you love heat, add some spice. Mix diced jalapeños or red pepper flakes into the chicken. You can also use spicy barbecue sauce. This will give your flatbread a nice kick. Top with pepper jack cheese for more flavor. The heat balances well with the sweet barbecue sauce.
Gluten-Free Flatbread Alternatives
For a gluten-free option, use gluten-free flatbreads. You can also make your own using almond flour or chickpea flour. Just keep the same toppings and sauce. Always check labels for hidden gluten. This way, everyone can enjoy BBQ chicken flatbread pizza.
Storage Info
How to Store Leftovers Properly
To store your BBQ chicken flatbread pizza, let it cool first. Place it in an airtight container. You can also wrap it in plastic wrap or aluminum foil. This keeps the pizza fresh and prevents it from drying out. Store it in the fridge for up to three days.
Reheating Techniques for Best Results
For reheating, I recommend using an oven. Preheat your oven to 350°F (175°C). Place the pizza on a baking sheet. Heat it for about 10-12 minutes. This method keeps the flatbread crispy and the cheese gooey. You can also use a skillet on medium heat. Cover it with a lid to melt the cheese evenly.
Freezing BBQ Chicken Flatbread Pizza
If you want to freeze your pizza, wrap it tightly in plastic wrap. Then, place it in a freezer-safe bag. This pizza can last up to two months in the freezer. When you’re ready to eat it, thaw it in the fridge overnight. Reheat it in the oven for the best taste and texture.
FAQs
Can I use store-bought BBQ sauce?
Yes, you can use store-bought BBQ sauce. It saves time and still tastes great. Look for flavors you enjoy. A sweet sauce pairs well with the chicken. You can also try spicy BBQ sauce for a kick.
What type of cheese works best?
Mozzarella cheese works best for BBQ chicken flatbread pizza. It melts well and is mild. You can mix it with cheddar for more flavor. Provolone or gouda also add a nice twist. Experiment with your favorites to find the perfect blend.
How long does it take to cook from frozen?
If the flatbread is frozen, it takes about 18-20 minutes to cook. Preheat the oven to 400°F (200°C). Bake until the cheese is bubbly and golden. Check for a crispy edge to know it’s ready.
What is the difference between flatbread and naan for this recipe?
Flatbread is thinner and crisper, while naan is thicker and softer. Naan has a chewy texture, which many find appealing. Both work well for this recipe, but they offer different eating experiences. Choose based on your taste preference!
We explored how to make BBQ Chicken Flatbread Pizza. You learned about key ingredients and cooking tools needed. I shared tips for a crispy base and flavor tweaks. We even discussed fun variations like vegetarian and gluten-free options. Plus, I covered storage and reheating tips. With this guide, you can create a tasty meal easily. Enjoy your pizza-making journey!


![- Chicken breast - Marinade components: - 3 tablespoons olive oil - Zest and juice of 2 lemons - 3 cloves garlic, minced - 1 teaspoon dried oregano - 1 teaspoon dried thyme - Salt and pepper to taste The main star here is chicken breast. It is lean and cooks quickly. It absorbs flavors well, making it perfect for skewers. The marinade combines olive oil, lemon, garlic, and herbs. This mix adds brightness and depth to the chicken. The lemon zest and juice bring a fresh, tangy taste. - 1 bell pepper, cut into 1-inch pieces - 1 red onion, cut into wedges Bell pepper and red onion bring color and sweetness. They also add crunch to each bite. I love alternating them with the chicken on the skewers. This adds variety and makes the skewers look nice. - Wooden or metal skewers - Grill or grill pan You will need skewers for this recipe. If you use wooden skewers, soak them in water for 30 minutes. This prevents burning on the grill. A grill or grill pan is also essential. It gives the skewers that nice char and smoky flavor. For the full recipe, refer to the instructions provided. To begin, mix the marinade ingredients in a large bowl. You will need: - 3 tablespoons olive oil - Zest and juice of 2 lemons - 3 cloves garlic, minced - 1 teaspoon dried oregano - 1 teaspoon dried thyme - Salt and pepper to taste Whisk these items until they blend well. The marinade is vital for flavor. Marinate the chicken for at least 30 minutes. If you have time, let it sit for 2 hours. This helps the chicken absorb all the tasty flavors. Next, prepare the skewers. If you use wooden skewers, soak them in water for 30 minutes. This step helps prevent them from burning while grilling. Now, it’s time to thread the chicken and veggies. Take the marinated chicken and thread it onto the skewer. Add pieces of bell pepper and onion. Alternate between chicken and veggies. This mix not only looks great but also adds flavor. Before grilling, preheat your grill or grill pan to medium-high heat. This ensures even cooking. Grill the skewers for about 10 to 12 minutes. Turn them occasionally to get nice char marks. Use a meat thermometer to check if the chicken has reached 165°F (75°C). This step is crucial for food safety. Once cooked, take the skewers off the grill. Let them rest for a few minutes before serving. You can drizzle them with any leftover marinade for extra flavor. Enjoy your Greek Lemon Chicken Skewers! For the full recipe, check out the details above. To make your chicken full of flavor, marinate it well. I like to mix olive oil, lemon zest, lemon juice, garlic, and herbs. This blend really boosts the taste. Aim to marinate the chicken for at least 30 minutes. For even more flavor, you can go for up to 2 hours. Just don’t leave it in too long, or the acid from the lemon can make it mushy. To get those perfect grill marks, heat your grill to medium-high. This gives the chicken a nice char. Place the skewers on the grill and turn them every few minutes. This helps cook the chicken evenly. Keep an eye on the time; grill them for about 10 to 12 minutes. The chicken should reach an internal temperature of 165°F (75°C). This ensures it’s safe to eat and juicy. For a great presentation, serve the skewers on a nice platter. Add lemon wedges and sprinkle some fresh parsley on top. It looks colorful and inviting. I also suggest serving tzatziki sauce on the side for dipping. It adds a cool, creamy contrast to the warm chicken. Check out the Full Recipe for more detailed instructions! {{image_2}} If you want to switch things up, you can use other proteins. Pork and shrimp are great options. They both soak up the lemony marinade well. For shrimp, just adjust the cooking time to avoid overcooking. You can also change the vegetables on your skewers. Try zucchini, mushrooms, or cherry tomatoes. Each veggie brings its own flavor and texture. Mixing these will keep your dish fresh every time. To boost flavor, add more herbs and spices. Fresh parsley or dill can add a nice touch. You could also sprinkle some paprika for a mild kick. Changing the marinade can also create new flavors. For a spicy twist, add red pepper flakes. You could even try a yogurt-based marinade for a creamy contrast. These tweaks can take your Greek Lemon Chicken Skewers to a new level. You have options for cooking these skewers. Grilling is popular, but broiling works well too. Broiling gives a nice char and cooks the chicken quickly. If you prefer, you can bake the skewers in the oven. Set it to 400°F (200°C) and cook for about 15-20 minutes. This method is great for making skewers indoors, especially on rainy days. For the full recipe, visit the link above. Enjoy exploring these variations! To keep your Greek Lemon Chicken Skewers fresh, store them in the fridge. Place the skewers in an airtight container. This will help keep them from drying out. Consume the leftovers within 3 days for the best taste. If you want to store them longer, consider freezing. Wrap each skewer in plastic wrap, then place them in a freezer bag. This method can keep them good for up to three months. Remember to label the bag with the date. When you're ready to eat your leftovers, reheating is key. I suggest using an oven for the best results. Preheat your oven to 350°F (175°C). Place the skewers on a baking sheet and cover them with foil. This keeps the moisture in while they heat. Bake for about 10-15 minutes or until warm. You can also use a microwave for quick reheating. Place the skewers on a microwave-safe plate. Cover them with a damp paper towel to keep the chicken moist. Heat in short bursts of 30 seconds. Check often to avoid overcooking. Enjoy your Greek Lemon Chicken Skewers warm, just like fresh off the grill! For the full recipe, click [Full Recipe]. I suggest marinating the chicken for at least 30 minutes. This time gives the chicken a nice flavor boost. If you can, try marinating for up to 2 hours. The longer it sits in the marinade, the more the flavors mix in. You will taste the lemon, garlic, and herbs in every bite. To avoid burning, make sure to soak wooden skewers for 30 minutes. This step helps prevent charring. When grilling, keep the heat medium to medium-high. Turn the skewers often to cook evenly. Watch the chicken closely. Cook until the internal temperature reaches 165°F (75°C). This way, you enjoy juicy chicken without burnt bits. Yes, you can prepare Greek Lemon Chicken Skewers ahead of time. Marinate the chicken a few hours before grilling. You can also assemble the skewers in advance. Store them in the fridge until you're ready to grill. This makes meal prep easy and quick, leaving you more time to enjoy your meal. For the complete recipe, check out the Full Recipe. In this post, I shared how to make Greek Lemon Chicken Skewers. We covered the main ingredients like chicken, marinade, and vegetables. I walked you through steps for marinade prep, skewer assembly, and grilling. I also offered tips for flavor and cooking techniques. Lastly, we explored storage and reheat options for leftovers. Now you have all the tools to grill skewers like a pro. Enjoy your tasty creations!](https://dailydishly.com/wp-content/uploads/2025/07/9e2cfe4b-078f-41fe-970c-814b799e8851-768x768.webp)


![- 8 oz rice noodles - 1 cup red bell pepper, julienned - 1 cup yellow bell pepper, julienned - 1 cup cucumber, julienned - 1 cup purple cabbage, shredded - 1 cup carrots, grated - 1 cup edamame (shelled) - 1/4 cup fresh cilantro, chopped - 1/4 cup green onions, sliced For the Peanut Sauce: - 1/2 cup creamy peanut butter - 3 tablespoons soy sauce (or tamari for a gluten-free option) - 2 tablespoons lime juice - 1 tablespoon maple syrup (or honey) - 1 tablespoon sesame oil - 1 garlic clove, minced - 1 teaspoon grated fresh ginger - 1-2 tablespoons water (to thin the sauce, as needed) Each serving has about 250 calories. This salad is packed with nutrients. It offers protein and fiber from the noodles and veggies. The peanut sauce adds healthy fats and flavor. Each bite is both tasty and good for you. If you need gluten-free options, use rice noodles and tamari. For vegan alternatives, swap honey for maple syrup. You can also add tofu for extra protein. This salad can fit many diets while still being delicious. You can find the full recipe for Rainbow Thai Peanut Noodle Salad [Full Recipe]. To start, bring a large pot of water to a boil. Use enough water to let the noodles float freely. Once boiling, add 8 oz of rice noodles. Cook them for about 3 to 5 minutes, or until they are firm but tender. Keep an eye on them! After they are cooked, drain them in a colander. Rinse the noodles with cold water. This stops the cooking and keeps the noodles from sticking together. Set them aside while you prep the veggies. While the noodles cook, wash and cut the vegetables. To make it easy, julienne the red and yellow bell peppers. Use a sharp knife for clean cuts. Slice the cucumber and shred the purple cabbage. Grate the carrots too. Aim for uniform pieces so they mix well. Once cut, place all the veggies in a large mixing bowl. This keeps everything together for the next step. You can also add the edamame for extra protein. Now, let’s make the peanut sauce! In a medium bowl, mix 1/2 cup of creamy peanut butter, 3 tablespoons of soy sauce, and 2 tablespoons of lime juice. Add 1 tablespoon of maple syrup for a touch of sweetness. Next, add 1 tablespoon of sesame oil, 1 minced garlic clove, and 1 teaspoon of grated ginger. Whisk these ingredients together until smooth. If the sauce feels thick, add 1-2 tablespoons of water. This helps thin it out to your liking. Now, pour this yummy sauce over the noodles and veggies. Toss gently to coat everything evenly. The flavors will blend beautifully together. For more details, check the Full Recipe. To cook noodles al dente, bring water to a boil. Add rice noodles and cook for about 4-6 minutes. Stir often to prevent sticking. Once done, drain and rinse under cold water. This stops cooking and keeps noodles firm. For crunchy vegetables, cut them just before serving. This keeps their crispness. Use a sharp knife for even slices. Julienne the peppers and cucumber. Shred the cabbage and grate the carrots. Keep them colorful for a vibrant dish. Boost flavor with spices and condiments. A pinch of red pepper flakes gives heat. Add a splash of fish sauce for depth. If you love citrus, lime zest brightens the dish. Fresh herbs make a big difference. Cilantro adds a fresh taste. You can try mint or basil for a twist. Chop herbs finely and mix them in just before serving. Serving bowls set the stage for a great meal. Use larger bowls for family-style serving. For individual plates, choose clear glass bowls. This shows off the colorful layers. Garnishing techniques can elevate your dish. Sprinkle extra cilantro on top for a pop of green. Add chopped peanuts for crunch. Arrange salad in colorful layers for a beautiful view. A rainbow of colors always catches the eye. {{image_2}} You can make this salad heartier by adding protein. Chicken is a great choice. Just grill or sauté it, then slice it thin. Tofu is another option. It soaks up the peanut sauce well. You can also try shrimp or beans for a different flavor. Each adds a nice touch to the Rainbow Thai Peanut Noodle Salad. Switching up the peanut sauce can give your salad new life. You can try a sesame sauce for a nutty twist. Just blend sesame paste with soy sauce and lime juice. For a sweeter flavor, teriyaki sauce works well too. It brings a rich taste that pairs nicely with the fresh veggies. Using seasonal vegetables can enhance your salad's freshness. In summer, add ripe tomatoes or corn for sweetness. Fall brings squash or roasted peppers for warmth. Winter might call for hearty greens like kale. Each season offers unique flavors. Tailoring your recipe helps keep it exciting all year long. For the full recipe, check out the detailed steps to make this dish shine. To store leftovers of your Rainbow Thai Peanut Noodle Salad, put it in the fridge. Use an airtight container to keep it fresh. Glass containers work great because they don’t hold onto smells. If you use plastic, make sure it’s food-safe and BPA-free. You can freeze the salad, but it is best to freeze only the noodles and sauce. Keep the veggies separate. They don't freeze well and lose their crunch. To thaw, move the noodles and sauce to the fridge overnight. When ready to eat, heat the noodles gently and mix in fresh veggies. This keeps everything bright and tasty. In the fridge, the salad lasts about 3 to 5 days. Check for signs of spoilage before eating. If the veggies look wilted or the sauce smells off, it’s best to toss it. Freshness is key for this vibrant dish! What is the best type of noodles for this salad? The best noodles are rice noodles. They are light and soak up the sauce. You can also use soba or whole grain noodles if you prefer. Just remember to cook them until they are al dente. This keeps them from getting too mushy in the salad. Can I make the salad in advance? Yes, you can make the salad ahead of time. It tastes better after chilling for a bit. Prepare it up to a day in advance and store it in the fridge. Just keep the sauce separate if you want the noodles to stay firm. What to do if the sauce is too thick? If your sauce is too thick, add a tablespoon of water. Mix it well, and check again. You can repeat this until it reaches the right consistency. A smooth sauce coats the salad nicely. How to fix overly soggy noodles? To fix soggy noodles, rinse them in cold water. This stops the cooking process and helps firm them up. If they still seem too soft, use them in soups or stir-fries instead. What can I serve with Rainbow Thai Peanut Noodle Salad? This salad pairs well with grilled chicken or shrimp. You can also serve it with spring rolls for a light meal. Add a side of fresh fruit for a sweet touch. Can this dish be served warm? Yes, you can serve this dish warm. Just toss the salad right after mixing it. However, I recommend chilling it first to enhance the flavors. For the full recipe, check out the details provided above. This blog post covered key ingredients for Rainbow Thai Peanut Noodle Salad, including rice noodles, fresh veggies, and tasty peanut sauce. I shared nutritional info, substitutions for dietary needs, and step-by-step cooking instructions. We also explored tips to enhance texture and flavor, various protein additions, and creative presentation ideas. Overall, this salad is versatile and easy to make, perfect for any occasion. Keep it fresh, store leftovers properly, and don't hesitate to try new variations. Enjoy crafting your delicious, colorful dish!](https://dailydishly.com/wp-content/uploads/2025/07/2e038f5f-8562-408c-ae38-174aa7e62a42-768x768.webp)
