Brown Sugar Garlic Chicken Flavorful and Easy Recipe

Are you ready to make a meal that’s as easy as it is delicious? Brown Sugar Garlic Chicken is the perfect choice! This recipe packs sweet and savory flavors that will impress your family and friends. In this post, I’ll guide you through quick steps using simple ingredients. Get ready to enjoy a mouthwatering dish that brightens up any dinner table! Let’s dive in and get cooking!
Why I Love This Recipe
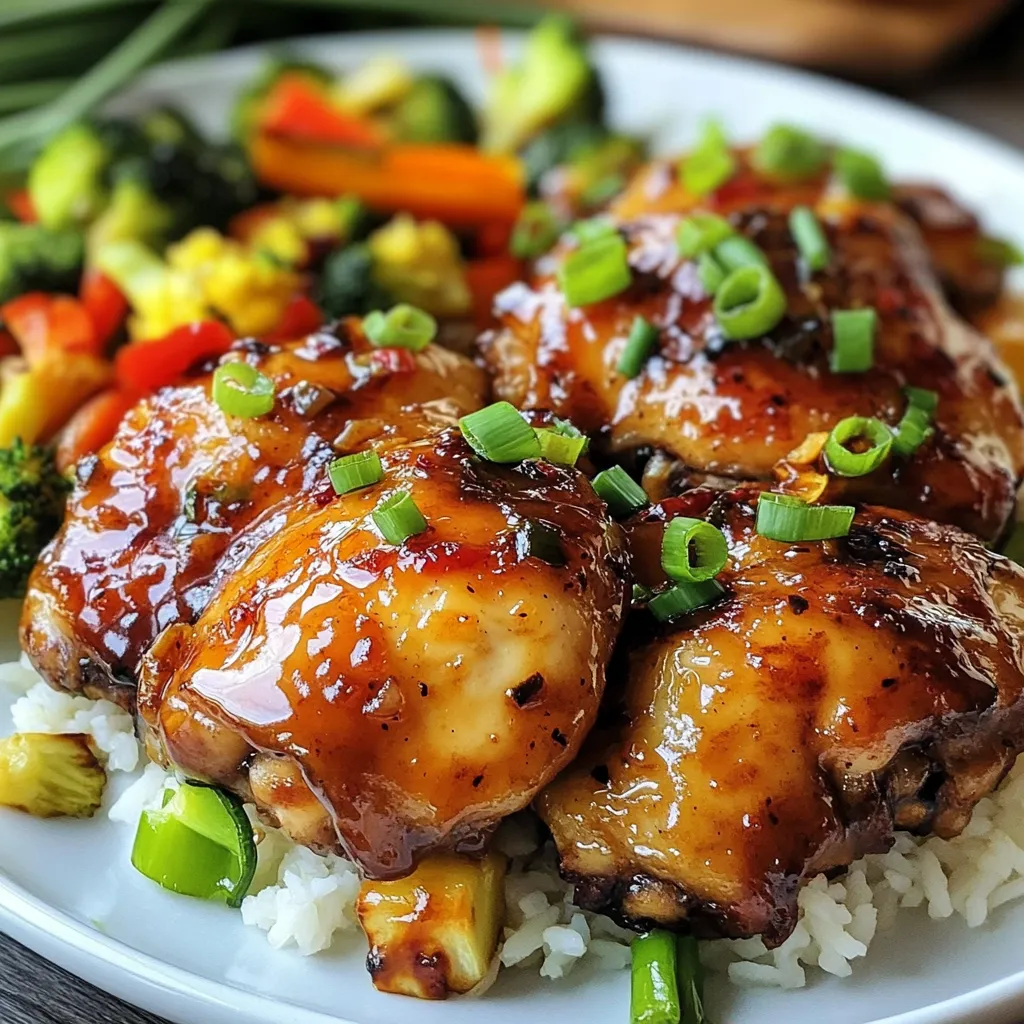
- Amazing Flavor: The combination of brown sugar, garlic, and ginger creates a sweet and savory glaze that is irresistible.
- Easy Preparation: This dish requires minimal prep time and can be marinated ahead, making it perfect for busy weeknights.
- Versatile Serving Options: Serve it with rice, noodles, or vegetables for a complete meal that suits any palate.
- Impressive Presentation: The glossy sauce and fresh green onions make for a stunning dish that’s sure to impress guests.
Ingredients
Main Ingredients for Brown Sugar Garlic Chicken
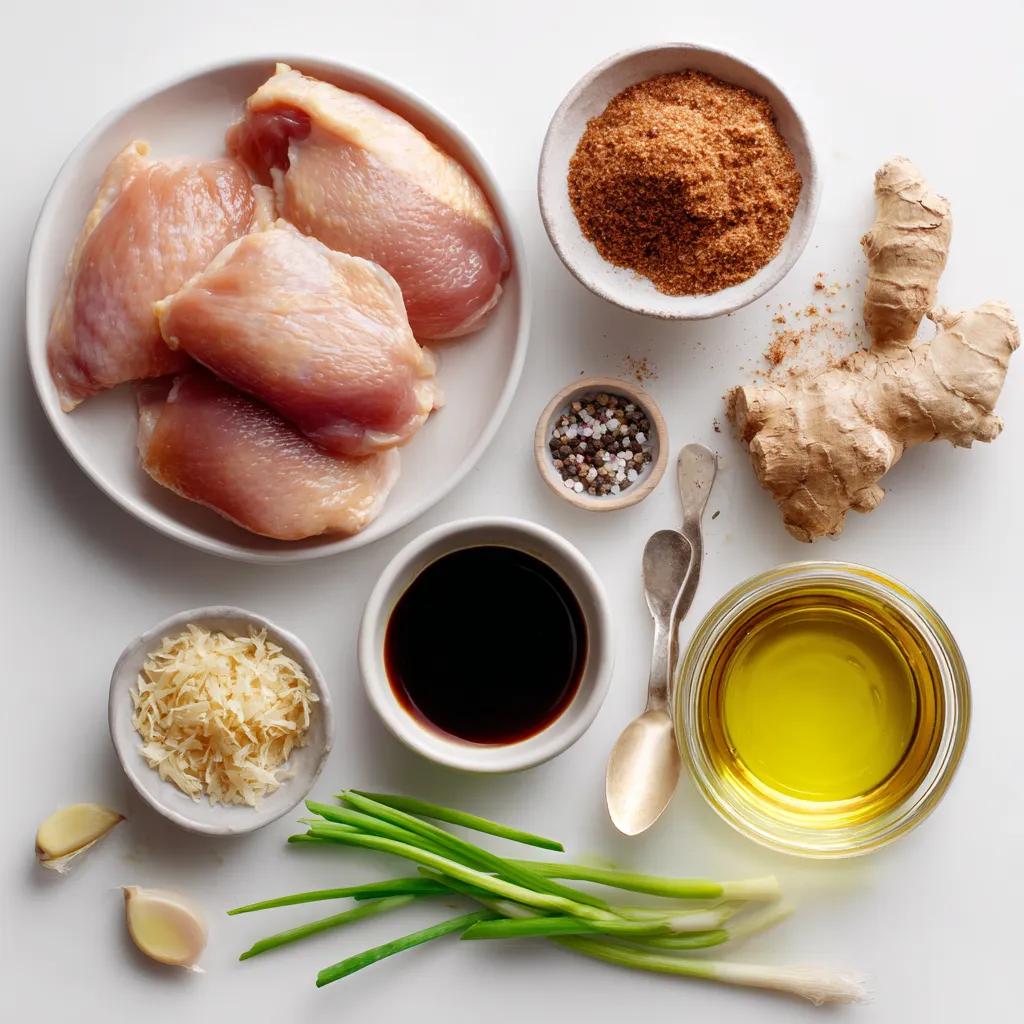
Here’s what you need for this tasty dish:
– 4 boneless, skinless chicken thighs
– 1/2 cup brown sugar
– 1/4 cup soy sauce (low sodium works too)
– 4 cloves garlic, minced
– 1 tablespoon fresh ginger, grated
– 1 tablespoon olive oil
– 1 tablespoon apple cider vinegar
– Salt and pepper to taste
– Green onions, sliced (for garnish)
These ingredients create a sweet and savory blend. The brown sugar gives a rich flavor. The soy sauce adds depth. Garlic and ginger boost the taste even more.
Optional Extras
You can add some extras to enhance the dish:
– Sesame seeds for crunch
– Fresh cilantro for a herb twist
– Sliced bell peppers for color and flavor
These extras can make your meal even more appealing. Feel free to mix and match!
Substitutions and Dietary Modifications
If you have dietary needs, here are some swaps:
– Chicken thighs can be replaced with chicken breasts for a leaner option.
– Use coconut aminos instead of soy sauce for a soy-free version.
– Maple syrup can replace brown sugar for a different sweet note.
These substitutions keep the dish delicious and friendly for various diets. Always taste as you go to find your perfect flavor!

Step-by-Step Instructions
Marinating the Chicken
Start by making a tasty marinade. In a medium bowl, whisk together the brown sugar, soy sauce, minced garlic, grated ginger, olive oil, and apple cider vinegar. Whisk until the sugar dissolves. This mix will make your chicken sweet and sticky. Next, season the chicken thighs with salt and pepper. Place them in a resealable bag or a shallow dish. Pour the marinade over the chicken. Make sure every piece is coated. Seal the bag or cover the dish. Let it chill in the fridge for at least 30 minutes. If you have time, marinate overnight for more flavor.
Searing the Chicken
Preheat your oven to 375°F (190°C). While the oven heats, grab a large oven-safe skillet. Heat it over medium-high heat. Take the chicken out of the marinade, but save the marinade for later. Sear the chicken thighs in the skillet for about 3-4 minutes on each side. Look for a golden-brown crust to form. This step adds great flavor.
Baking and Final Touches
After searing, pour the saved marinade over the chicken in the skillet. Now it’s time to bake! Transfer the skillet to your preheated oven. Bake for 25-30 minutes. You want the chicken to reach an internal temperature of 165°F (75°C). This ensures the chicken is cooked through. Once done, take the skillet out of the oven. Let the chicken rest for a few minutes before slicing. When serving, drizzle some pan sauce over the chicken. Garnish with sliced green onions for extra flavor and color. Enjoy your sweet and sticky brown sugar garlic chicken!
Tips & Tricks
Achieving the Perfect Glaze
To get a great glaze on your chicken, focus on the marinade. The brown sugar adds sweetness and stickiness. Use a mix of soy sauce, garlic, and ginger for depth. After searing, pour the reserved marinade over the chicken. This creates a rich sauce that makes the dish shine. Baking the chicken helps the glaze caramelize nicely.
Marination Time Recommendations
Marinating is key for flavor. I suggest a minimum of 30 minutes. For best results, marinate overnight. This allows the chicken to soak up all the good flavors. If you’re short on time, even 15 minutes can help, but longer is always better.
Cooking Temperature Considerations
Temperature matters for juicy chicken. Preheat your oven to 375°F (190°C). This temperature cooks the chicken evenly. Use a meat thermometer to check doneness. The internal temperature should reach 165°F (75°C). This ensures your chicken is safe and perfectly cooked. Let it rest a few minutes before slicing for the best taste.
Pro Tips
- Marinate Longer for Depth: For a more intense flavor, marinate the chicken overnight. This allows the flavors to penetrate the meat more effectively.
- Use Fresh Ingredients: Using fresh garlic and ginger instead of powdered versions will enhance the aroma and taste of your dish significantly.
- Rest the Chicken: Let the chicken rest for a few minutes after baking. This helps retain its juices, making it more tender and flavorful when sliced.
- Perfectly Cooked Chicken: Always use a meat thermometer to check that your chicken has reached an internal temperature of 165°F (75°C) for safe consumption.

Variations
Brown Sugar Garlic Chicken with Vegetables
You can add veggies to your Brown Sugar Garlic Chicken for extra flavor. Try bell peppers, broccoli, or snap peas. Just chop them up and add them to the skillet with the chicken. The veggies will soak up the delicious sauce. This makes your meal colorful and nutritious.
Spicy Version with Red Pepper Flakes
If you like heat, add red pepper flakes to the marinade. Start with a half teaspoon and taste as you go. This will give your chicken a nice kick. The sweetness of the brown sugar balances the spice well. It’s a fun twist on the classic recipe.
Grilled Brown Sugar Garlic Chicken
Grilling is another great way to cook this dish. Marinate the chicken as usual, then grill it instead of baking. Cook on medium heat for about 6-7 minutes per side. You’ll get a nice char and smoky flavor. This method is perfect for summer barbecues.
Storage Info
Storing Leftovers
After you enjoy your brown sugar garlic chicken, save the leftovers. Place them in an airtight container. Store the chicken in the fridge for up to four days. If you want to keep it longer, consider freezing it.
Reheating Instructions
Reheating is simple. For the best taste, use an oven. Preheat it to 350°F (175°C). Put the chicken in a baking dish, cover with foil, and heat for about 20 minutes. You can also use a microwave. Heat it for one to two minutes, checking often to avoid overcooking.
Freezing for Future Meals
To freeze, first let the chicken cool completely. Wrap it tightly in plastic wrap, then place it in a freezer-safe bag. Remove as much air as possible. This chicken can last for up to three months in the freezer. When you’re ready to eat, thaw it in the fridge overnight before reheating.
FAQs
Can I use chicken breasts instead of thighs?
Yes, you can use chicken breasts. They will cook faster than thighs. The dish may be less juicy since breasts have less fat. For best results, check for doneness early.
How do I know when the chicken is cooked through?
To check if chicken is done, use a meat thermometer. The chicken should reach 165°F (75°C) inside. If you don’t have a thermometer, cut into the thickest part. The meat should be white with no pink inside.
What side dishes pair well with Brown Sugar Garlic Chicken?
Brown Sugar Garlic Chicken goes well with many sides. Here are some tasty choices:
– Steamed jasmine rice
– Sautéed vegetables
– Garlic mashed potatoes
– A fresh green salad
– Stir-fried noodles
These sides will balance the sweetness of the chicken. Enjoy your meal!
Brown Sugar Garlic Chicken is a tasty dish with simple steps. You start with key ingredients and optional extras to make it your own. Marinating and searing the chicken helps build flavor. Don’t forget helpful tips for the best glaze and perfect cooking! Explore fun variations like adding veggies or grilling. Storing leftovers is easy, and reheating keeps it delicious. Whether you want a classic or something spicy, this dish is sure to please. Now, grab your ingredients and enjoy making this flavorful mea

Sweet & Sticky Brown Sugar Garlic Chicken
Ingredients
- 4 pieces boneless, skinless chicken thighs
- 0.5 cup brown sugar
- 0.25 cup soy sauce
- 4 cloves garlic, minced
- 1 tablespoon fresh ginger, grated
- 1 tablespoon olive oil
- 1 tablespoon apple cider vinegar
- to taste salt and pepper
- for garnish green onions, sliced
Instructions
- In a medium bowl, whisk together the brown sugar, soy sauce, minced garlic, grated ginger, olive oil, and apple cider vinegar until the sugar is dissolved and the mixture is well-combined.
- Season the chicken thighs with salt and pepper, then place them in a resealable plastic bag or shallow dish.
- Pour the marinade over the chicken, ensuring each piece is well-coated. Seal the bag or cover the dish and refrigerate for at least 30 minutes (or up to overnight for deeper flavor).
- Preheat your oven to 375°F (190°C).
- Heat a large oven-safe skillet over medium-high heat. Remove the chicken from the marinade (keep the marinade for later) and sear the chicken thighs in the skillet for 3-4 minutes on each side, until they have a golden-brown crust.
- Once seared, pour the reserved marinade over the chicken in the skillet.
- Transfer the skillet to the preheated oven and bake for 25-30 minutes, or until the chicken is cooked through and reaches an internal temperature of 165°F (75°C).
- Remove the skillet from the oven and let the chicken rest for a few minutes before slicing.
- To serve, drizzle some of the pan sauce over the chicken and garnish with sliced green onions.


![- 300g spaghetti - 6 cloves garlic, thinly sliced - 1/2 teaspoon red pepper flakes - 1/4 cup extra-virgin olive oil - Zest and juice of 1 lemon - 1/2 cup fresh parsley, chopped - Salt to taste - Freshly grated Parmesan cheese (optional) - 1 cup cherry tomatoes, halved To make Spaghetti Aglio e Olio, you need simple and fresh ingredients. The garlic is key. It adds depth and flavor. Thinly sliced garlic cooks fast, so watch it closely. Red pepper flakes give the dish a bit of spice. You can add more or less based on your taste. Extra-virgin olive oil is the base for the sauce. It should be high quality for the best flavor. The lemon zest and juice brighten up the dish. Fresh parsley adds color and freshness. Salt enhances all the flavors, so don’t skip it. If you like cheese, sprinkle on some Parmesan at the end. The cherry tomatoes are a fun addition. They bring sweetness and juiciness. You can use them or leave them out. They add a nice twist to the classic recipe. Check out the Full Recipe for more details on how to prepare this dish. - Protein options (shrimp, chicken) - Seasonal vegetables - Other herbs and spices To make the meal heartier, think about adding proteins. Shrimp or chicken cook quickly and add great flavor. Seasonal vegetables like spinach or zucchini can also bring in extra nutrients. Herbs like basil or oregano can enhance the taste too. Feel free to get creative with what you have! To start, boil water in a large pot. Add salt to the water. This step adds flavor to the spaghetti. Once the water reaches a rolling boil, add 300g of spaghetti. Cook according to package instructions until it is al dente. This usually takes around 8 to 10 minutes. After cooking, reserve 1 cup of pasta water. This is key for the sauce. Drain the spaghetti but do not rinse it. In a large skillet, pour in 1/4 cup of extra-virgin olive oil. Heat it over medium heat. Add 6 cloves of sliced garlic. Sauté the garlic until it turns golden, about 2 minutes. Be careful not to burn it. Next, stir in 1/2 teaspoon of red pepper flakes. This adds a nice kick to the dish. Allow the flakes to cook for about 30 seconds. Then, add 1 cup of halved cherry tomatoes. Cook these for 3 to 4 minutes. They should soften and become juicy. Now it’s time to combine! Toss the drained spaghetti into the skillet. Mix it well to coat it with the garlic and oil. Add the zest and juice of 1 lemon. Also, add half of the chopped parsley. If the pasta looks dry, add some reserved pasta water. Keep mixing until you reach your desired creaminess. Finally, season with salt to taste. Remove the skillet from heat. Your delicious Spaghetti Aglio e Olio is ready to enjoy! For the full recipe, check out the detailed guide. To get great flavor, focus on sautéing garlic just right. Use medium heat and watch it closely. Garlic cooks fast and can burn easily. Sauté it for about two minutes until golden, but not brown. This gives a nice, sweet flavor. Next, balance spice and acidity with lemon. The zest adds a fresh burst, while the juice brightens the dish. Add lemon juice right before serving. This keeps the flavor fresh and lively. For al dente pasta, cook spaghetti for 8-10 minutes. Check the package for exact times, as brands vary. You want it to be firm but not hard. Timing is key for adding ingredients. Toss in cherry tomatoes after the garlic. Cook them for 3-4 minutes until they soften. This keeps them fresh and juicy. Don't forget to reserve some pasta water before draining. It helps bind the dish together later. When plating Spaghetti Aglio e Olio, use shallow bowls. This makes the dish look inviting. Add a drizzle of olive oil on top for shine. Garnish with parsley for color. A lemon wedge on the side adds a nice touch. You can also sprinkle freshly grated Parmesan cheese for extra flavor. Enjoy your beautiful, tasty dish! For the full recipe, check out the link provided. {{image_2}} You can easily add proteins like shrimp or chicken to make your dish heartier. This small change can turn a light meal into a filling feast. You can also incorporate seasonal vegetables, like zucchini or asparagus, for a fresh taste. These add color and nutrition to your plate, making your meal even better. To make your dish pop, try infusing extra-virgin olive oil with herbs. You can use rosemary, thyme, or basil. This simple step adds rich flavors without much effort. Another great idea is to use different types of cheese for depth. Pecorino Romano or a tangy goat cheese can bring new taste sensations to your Spaghetti Aglio e Olio. If you want to simplify your cooking, try the one-pot spaghetti method. Cook everything together for a quick meal with less cleanup. Just toss the raw pasta, garlic, and oil into the pot with water and let it cook. You can also make a baked version. This way, your pasta gets crispy edges while remaining soft inside, offering a delightful contrast. For the full recipe, visit [Full Recipe]. To store leftover spaghetti, let it cool first. Place it in an airtight container. Make sure to refrigerate it. Leftovers can last up to three days in the fridge. If you want to keep it longer, you can freeze spaghetti for up to three months. To reheat spaghetti, the stovetop is best. Heat a pan over medium heat. Add a splash of water or olive oil. This helps keep the pasta moist. Stir occasionally until warm. You can also use the microwave. Place the spaghetti in a bowl, cover it, and heat in short bursts. Check often to avoid drying it out. Enjoy your meal! Yes, you can! If you skip the cheese, the dish remains tasty. You might add a splash of cream for a creamy texture. Another option is to use nutritional yeast. It gives a cheesy flavor without dairy. Salads go great with this dish. A simple green salad with lemon dressing works well. Garlic bread is also a fantastic choice. It complements the garlic flavor in the pasta. To serve more people, just multiply the ingredients. For example, double everything for eight servings. Keep the cooking times the same, but check the pasta for doneness. You may need a larger pot for boiling. If you lack olive oil, use avocado oil or sunflower oil. Both have a mild taste that works well. Grapeseed oil is another option, as it has a light flavor too. You can find the full recipe [here](Full Recipe). It has all the steps and tips to make this dish perfect. Spaghetti Aglio e Olio is simple yet delicious. We covered key ingredients, cooking steps, and tips to enhance flavor. You can customize this dish by adding proteins and veggies. Remember to balance the garlic and lemon for taste. If you store leftovers, keep them moist while reheating. Enjoy your cooking adventure and try the variations for a fresh twist. You’ll impress anyone with this dish!](https://dailydishly.com/wp-content/uploads/2025/06/f6e5d00b-504d-4d52-a053-c2bbef60ee08-768x768.webp)


![To make a delicious Margherita pizza, you need the following items: - 2 cups all-purpose flour - 1 teaspoon active dry yeast - ¾ cup warm water (about 110°F) - 1 teaspoon sugar - 1 teaspoon salt - 1 tablespoon olive oil These ingredients create a perfect dough. The flour gives it structure, while the yeast helps it rise. The sugar feeds the yeast, and the salt adds flavor. For the toppings, gather these simple ingredients: - 1 cup canned San Marzano tomatoes, crushed - 1 cup fresh mozzarella cheese, sliced - Fresh basil leaves (about 8-10 leaves) - Salt and pepper to taste - Extra olive oil for drizzling San Marzano tomatoes are sweeter and richer in taste. Fresh mozzarella melts beautifully, and basil adds a fragrant touch. The salt and pepper boost the flavors, while olive oil gives a nice finish. This combination makes the pizza flavorful and fresh, just like you would find in Italy. For the full recipe, check out the details above. - Combine warm water, sugar, and yeast. Let it foam for about 5-10 minutes. - Mix flour and salt in a bowl. Create a well in the center, then add the yeast mixture. - Knead the dough on a floured surface until it's smooth and elastic, about 8-10 minutes. - Shape the dough into a ball. Place it in an oiled bowl and cover it with a damp cloth. - Preheat your oven to its highest setting, usually between 475°F and 500°F. - Prepare the sauce using crushed San Marzano tomatoes. Season it with salt and pepper. - After the dough rises, punch it down. Shape it into a 12-inch round. - Transfer the dough to a pizza peel or baking sheet. Spread the sauce thinly over the dough. - Evenly place slices of fresh mozzarella on top of the sauce. Tear fresh basil leaves and sprinkle them over the cheese. - Bake the pizza in the oven for about 10-12 minutes. Look for a golden crust and bubbling cheese. Use the Full Recipe for detailed steps and measurements to create this classic dish! To make great dough, you want it elastic but not sticky. When you knead, aim for about eight to ten minutes. This builds the right texture. If the dough feels too wet, add a bit more flour. If it’s too dry, a splash of water helps. The goal is a smooth and stretchy dough. For the sauce, use high-quality San Marzano tomatoes. They make a big difference in taste. Crush them gently, and add salt and pepper to enhance the flavor. Be careful not to overload your pizza with toppings. Less is more for a perfect bake. This lets the dough rise and crisp up nicely. A pizza stone is a fantastic tool for a crispier crust. Preheat it in the oven to get it really hot. If you don’t have one, a baking sheet works too. Just keep an eye on your pizza while it bakes. You might need to adjust the baking time based on your oven and your taste. Aim for a golden crust and bubbling cheese for the best results. Using these tips will help you craft a classic Margherita pizza that impresses. For the full recipe, check out our detailed instructions and ingredient list. {{image_2}} You can make your Margherita pizza even better by trying different cheeses. Burrata adds a creamy texture that melts beautifully. Smoked mozzarella brings a rich, savory flavor. Both options will change the taste while keeping it classic. Don’t be afraid to get creative with toppings. Arugula adds a peppery bite that pairs well with the cheese. Prosciutto gives a salty, savory kick. A drizzle of truffle oil can elevate the dish with its earthy aroma. These changes can delight your taste buds while keeping the pizza true to its roots. If you want to mix things up, consider using different sauces. Pesto offers a fresh, herbal twist that complements the cheese. White sauce can add a creamy richness that contrasts nicely with the crust. These variations keep the spirit of Margherita while letting you explore new flavors. For the full recipe, check out the [Full Recipe] section! Store your leftover pizza in the refrigerator. Use an airtight container to keep it fresh. It will stay good for up to 3 days. This way, you can enjoy your pizza a bit longer. Want to save pizza for later? You can freeze unbaked pizza for easy meals. Wrap it tightly in plastic wrap and then in foil. This keeps the flavors intact for future enjoyment. To reheat your pizza, the oven is the best choice. Set it to 375°F and bake for about 10 minutes. This method keeps the crust crispy and the cheese melty. If you're in a hurry, use a skillet. Heat it on medium-low for quicker results. Just cover it with a lid to warm the toppings evenly. Margherita pizza comes from Naples, Italy. It was created in 1889 for Queen Margherita of Savoy. The colors of the pizza match the Italian flag: red tomatoes, white mozzarella, and green basil. This dish is simple but full of flavor. It shows how good food can be made from just a few fresh ingredients. To make gluten-free Margherita pizza, use gluten-free flour. You can mix it with xanthan gum for better texture. Here’s a simple list of gluten-free ingredients: - 2 cups gluten-free flour - 1 teaspoon active dry yeast - ¾ cup warm water - 1 teaspoon sugar - 1 teaspoon salt - 1 tablespoon olive oil Follow the same steps as the regular recipe, and you’ll have a tasty gluten-free pizza. Yes, you can make Margherita pizza without a pizza stone. You can use a baking sheet instead. Just preheat the baking sheet in the oven. It helps to create a nice crust. Place the assembled pizza on the hot sheet and bake as directed. You may also use a cast-iron skillet for a crispy base. An authentic Margherita pizza has key elements. It uses San Marzano tomatoes, fresh mozzarella, and basil. The dough must be hand-stretched and thin. The pizza should be baked at a high temperature for a short time. This method creates a soft inside and crisp outside. This recipe yields 2 to 4 servings. It depends on how big you slice the pizza. If you want more, just double the ingredients. You can also make smaller pizzas for a fun meal with friends or family. The number 19 is special because it refers to the recipe's order in this article. Each recipe is numbered for easy reference. In this case, Margherita pizza is recipe number 19. It highlights the importance of classic dishes in my collection. Classic Margherita pizza combines simple ingredients for a delightful dish. You learned the essential components, from fresh basil to San Marzano tomatoes. Following clear steps, you can create perfect dough and rich toppings. Remember to use quality ingredients for the best taste. Feel free to experiment with variations and storage tips. Making this pizza at home is rewarding and fun. Enjoy the process, and savor the delicious results every time.](https://dailydishly.com/wp-content/uploads/2025/06/379b831d-c22e-427f-bef4-29b7c3a1d548-768x768.webp)