Brussels Sprouts Chips Air Fryer Crispy Snack Recipe

Craving a crispy, healthy snack? Look no further! In this blog post, I’ll show you how to make delicious Brussels Sprouts Chips in your air fryer. These chips are not only crunchy but also packed with nutrients. I’ll share my favorite seasonings, step-by-step instructions, and tips for perfect results. Say goodbye to boring snacks and hello to a flavorful treat that’s easy to make. Get ready to impress your taste buds!
Ingredients
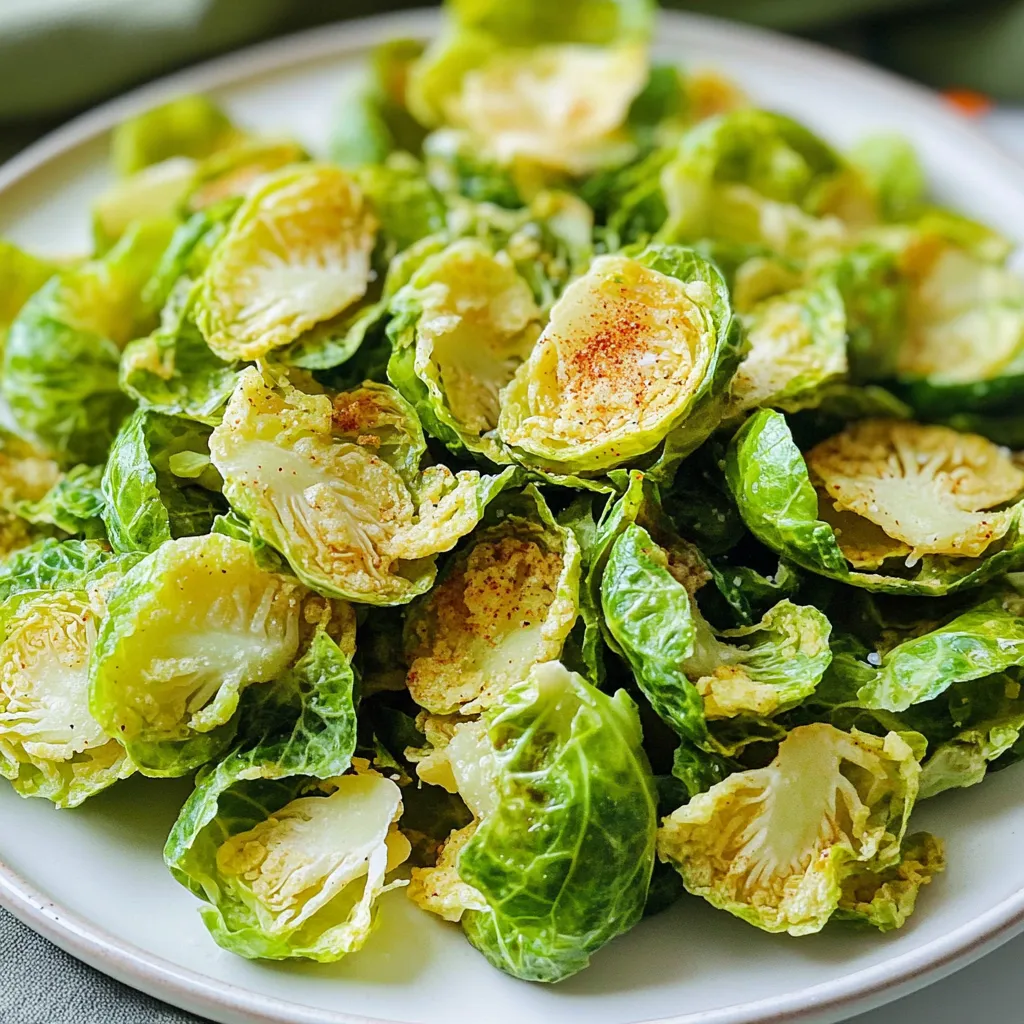
List of Ingredients for Brussels Sprouts Chips
– 1 lb Brussels sprouts
– 2 tablespoons olive oil
– 1 teaspoon garlic powder
– 1 teaspoon smoked paprika
– ½ teaspoon sea salt
– ¼ teaspoon black pepper
– 1 tablespoon nutritional yeast (optional)
These simple ingredients make a tasty snack. I love using fresh Brussels sprouts. They get so crispy and flavorful in the air fryer.
Optional Seasonings for Added Flavor
– Cayenne pepper for heat
– Lemon zest for brightness
– Parmesan cheese for a savory touch
– Italian herbs for a twist
Seasonings add extra fun. Try these options to find your favorite mix. You can easily change the flavor each time.
Nutritional Information Overview
Brussels sprouts are low in calories and high in nutrients. One serving offers:
– Calories: 120
– Protein: 4g
– Fat: 8g
– Carbohydrates: 12g
– Fiber: 4g
These chips are a healthy snack choice. You get good nutrition without the guilt. Enjoy them while feeling great about what you eat!
Step-by-Step Instructions
Preparing the Brussels Sprouts
Start by preheating your air fryer to 375°F (190°C). Rinse the Brussels sprouts under cold water. Trim the ends and look for any yellow or damaged leaves. These need to go. Slice each Brussels sprout in half from top to bottom. This helps them cook evenly and become crispy.
Seasoning the Sprouts
Now, grab a large bowl. Add the halved Brussels sprouts to the bowl. Pour in 2 tablespoons of olive oil. Then, sprinkle in 1 teaspoon of garlic powder, 1 teaspoon of smoked paprika, ½ teaspoon of sea salt, and ¼ teaspoon of black pepper. If you want a cheesy flavor, add 1 tablespoon of nutritional yeast. Toss everything together until the sprouts are well coated. This step boosts the flavor and helps them crisp up.
Air Frying Process and Tips
Next, place the seasoned Brussels sprouts in the air fryer basket in a single layer. If your air fryer is small, you may need to cook in batches. Set the timer for 8-10 minutes. Halfway through, give the basket a good shake. This ensures even cooking. After 10 minutes, check if they are crispy. If you like them crunchier, cook for an extra 2-3 minutes. Keep an eye on them to avoid burning. Once done, take the Brussels sprouts chips out and let them cool for a few minutes. They will get even crispier as they cool. Enjoy your snack!
Tips & Tricks
Achieving the Perfect Crispiness
To make your Brussels sprouts chips crispy, follow these steps. First, slice your sprouts thinly. Thin slices fry better. Use enough oil to coat them lightly. This helps with crisping. Shake the air fryer basket halfway. This ensures even cooking. If you want extra crunch, cook them longer. Keep an eye on them to avoid burning.
Air Fryer Temperature Guide
The best temperature for Brussels sprouts chips is 375°F (190°C). This heat cooks them quickly while crisping the edges. If your chips are not crispy after 10 minutes, cook them for 2-3 more minutes. Each air fryer is different, so check often. Adjust the time as needed. Experiment to find your ideal crunch.
Serving Suggestions for Your Chips
These chips taste great on their own. You can also pair them with dips. Try hummus, ranch, or guacamole for a fun twist. Add them to a salad for crunch. You can also serve them with a sandwich. They add a nice texture. Enjoy your crispy Brussels sprouts chips however you like!

Variations
Alternative Seasoning Ideas
You can change the flavors of your Brussels sprouts chips. Here are some ideas:
– Cajun Spice: Use Cajun seasoning for a kick.
– Italian Herbs: Mix dried oregano and basil for a fresh taste.
– Lemon Zest: Add lemon zest for a bright, zesty flavor.
– Cinnamon: Try a pinch of cinnamon for a sweet twist.
Adding Cheese or Other Toppings
Cheese can make your chips even better. Here are some fun toppings:
– Parmesan Cheese: Sprinkle grated Parmesan on top after cooking.
– Cheddar Cheese: Use shredded cheddar for a rich taste.
– Nutritional Yeast: This gives a cheesy flavor without dairy.
– Chili Flakes: Add chili flakes for a spicy cheese kick.
Substitutions for Ingredients
You don’t need to stick to the listed ingredients. Here are some swaps:
– Olive Oil: Use avocado oil or coconut oil instead.
– Garlic Powder: Fresh garlic works well too; just chop it fine.
– Nutritional Yeast: Skip it if you don’t like the flavor.
– Brussels Sprouts: Try kale or cabbage for a new crispy snack.
Storage Info
Best Practices for Storing Brussels Sprouts Chips
To keep your Brussels sprouts chips fresh, store them in an airtight container. This helps prevent them from getting soft. Make sure the chips are completely cool before sealing them. If you don’t have an airtight container, a resealable plastic bag will work too. Just squeeze out as much air as possible.
Reheating Techniques for Leftovers
If you have leftover chips, you can reheat them in the air fryer. Set the air fryer to 350°F (175°C). Cook for about 3-5 minutes. This will help restore their crunch. Avoid using the microwave, as it makes the chips soggy.
Freezing and Thawing Tips
You can freeze Brussels sprouts chips, but they might lose some crunch. To freeze, place them in a single layer on a baking sheet. Once frozen, transfer them to a freezer-safe bag. When you are ready to eat them, thaw in the fridge overnight. Reheat in the air fryer to regain some crispiness.
FAQs
Can I use frozen Brussels sprouts?
Yes, you can use frozen Brussels sprouts. They will not be as crispy as fresh ones. Thaw them first and pat them dry. This step helps remove moisture. Follow the same steps for seasoning and air frying. Keep in mind that cooking time may vary. Check for crispiness as they cook.
How can I make these chips spicier?
To spice up your Brussels sprouts chips, add more seasoning. Try adding cayenne pepper or chili powder. You can also use hot sauce in the oil mixture. Mix in a bit of crushed red pepper for extra heat. Experiment with different spices to find your favorite blend.
Are Brussels sprouts chips healthy?
Brussels sprouts chips are a healthy snack. They are low in calories and high in fiber. They also provide vitamins C and K. Using olive oil adds healthy fats. This recipe is much better than regular chips. Enjoy these chips guilt-free while satisfying your crunch cravings.
Brussels sprouts chips are a tasty and healthy snack. We covered ingredients, step-by-step instructions, and tips for crispiness. You learned about seasoning options and how to store them well.
In my view, these chips offer a fun twist on a classic veggie. Try your favorite flavors and enjoy a crunchy snack that’s good for you. With a little practice, you’ll master this easy recipe. Enjoy making your own Brussels sprouts chips!


![To make a tasty Zesty Greek Pasta Salad, you need fresh, vibrant ingredients. Here’s what to gather: - 8 oz. farfalle pasta (or your choice of pasta) - 1 cup cherry tomatoes, halved - 1 cucumber, diced - 1/2 red onion, thinly sliced - 1 cup Kalamata olives, pitted and halved - 1 cup feta cheese, crumbled - 1/4 cup fresh parsley, chopped - 1/4 cup olive oil - 2 tablespoons red wine vinegar (or lemon juice) - 1 teaspoon dried oregano - 1 clove garlic, minced - Salt and pepper to taste These ingredients create a bright flavor that makes the salad shine. You can add your own twist to this salad. Here are some options: - Bell peppers for extra crunch - Artichoke hearts for a tangy bite - Spinach or arugula for more greens - Chickpeas for added protein - Avocado for creaminess Feel free to mix in these ingredients based on what you like. If you can’t find some ingredients, don’t worry! Here are some tips: - Use any pasta shape you prefer. Penne or rotini work well too. - Swap Kalamata olives for green olives if desired. - Feta can be replaced with goat cheese for a different flavor. - Use fresh herbs like dill or mint instead of parsley for a unique taste. These swaps help you create a salad that suits your taste. For the complete recipe, check the [Full Recipe]. To make a great Zesty Greek Pasta Salad, start with the pasta. Use 8 oz. of farfalle or your favorite kind. Bring a big pot of salted water to a boil. Add the pasta and cook it until it's al dente. This usually takes about 8 to 10 minutes. Drain the pasta and rinse it with cold water. This stops the cooking and cools the pasta. You want it nice and firm. Next, let’s make the zesty dressing. In a small bowl, add 1/4 cup olive oil. Then, mix in 2 tablespoons of red wine vinegar. You can use lemon juice if you prefer. Now, add 1 clove of minced garlic and 1 teaspoon of dried oregano. Sprinkle in salt and pepper to taste. Whisk everything until it blends well. This dressing brings a bright flavor to the salad. Now, it's time to combine everything! In a large bowl, add the cooled pasta. Then, toss in 1 cup of halved cherry tomatoes, 1 diced cucumber, and 1/2 sliced red onion. Next, add 1 cup of Kalamata olives and 1 cup of crumbled feta cheese. Pour the zesty dressing over the top. Gently toss to coat everything evenly. Finally, sprinkle 1/4 cup of chopped parsley. Give it one last toss. For the best taste, chill the salad for at least 30 minutes. This lets all the flavors mix nicely. Check the seasoning once more, then serve. Enjoy your fresh and tasty Zesty Greek Pasta Salad! For more details, see the Full Recipe. To make your Zesty Greek Pasta Salad shine, use fresh ingredients. Fresh herbs, like parsley, add bright flavor. A squeeze of lemon juice can also boost taste. For a kick, try adding red pepper flakes. They bring heat without overpowering the dish. When mixing, taste as you go. Adjust salt and pepper as needed for balance. The texture of your pasta salad is key. Cook the farfalle pasta just until tender, or al dente. Rinse it under cold water after cooking. This stops the cooking process and keeps it firm. When you mix in the veggies, chop them evenly. This ensures every bite has a bit of everything. Letting the salad chill helps the flavors blend while keeping the crunch. Presentation matters! Serve your Zesty Greek Pasta Salad in a big bowl. This invites guests to help themselves. For a pop of color, add whole olives on top. A sprinkle of fresh parsley brightens it further. Drizzle a bit more olive oil before serving for shine. Pair it with crusty bread or grilled chicken for a full meal. Enjoy the vibrant colors and flavors! {{image_2}} You can easily add a Mediterranean twist to your Zesty Greek Pasta Salad. Try adding artichoke hearts or sun-dried tomatoes for a new flavor. Roasted red peppers bring a sweet touch. You could also toss in some capers for a salty bite. Each addition makes the dish more vibrant and exciting. Boost the nutrition in your salad with healthy add-ins. Consider adding chickpeas for protein and fiber. Spinach or arugula adds a fresh green crunch. You can also mix in some toasted nuts for healthy fats. Each of these options makes your salad not just tasty, but also good for you. While the olive oil dressing is classic, you can try other options too. A lemon-tahini dressing offers a creamy texture and a tangy flavor. Greek yogurt dressing gives a rich taste and adds protein. A balsamic vinaigrette can bring a sweet twist. Each dressing changes the salad's flavor while keeping it fresh and light. For the full recipe, check out the detailed steps to create this delightful dish. After making your Zesty Greek Pasta Salad, store it in an airtight container. This keeps the flavors fresh and prevents spills. Place parchment paper between layers if you stack ingredients. This way, the salad stays crisp and delicious. Your salad stays tasty in the fridge for about 3 to 5 days. The flavors blend well over time, which is a bonus. Just make sure to check for freshness before eating. If any ingredients look off, it’s best to toss them. I don’t recommend freezing this salad. Freezing can change the texture of fresh vegetables and cheese. However, if you must freeze it, leave out the tomatoes and cucumbers. Store it in a freezer-safe container. It can last up to 2 months. When ready to eat, thaw it in the fridge overnight and mix in fresh veggies before serving. For the complete recipe, check out the Full Recipe section. Yes, you can use any pasta you like. I often choose rotini or penne for this salad. These shapes hold the dressing well. You can even try whole wheat or gluten-free pasta for a healthier option. Absolutely! This salad is great for meal prep. It stays fresh in the fridge for about three days. Just store it in an airtight container. Make sure to add fresh herbs right before serving for the best taste. Adding protein boosts this salad nicely. Grilled chicken, shrimp, or chickpeas work well. You can also try diced turkey or even canned tuna. These options make the salad heartier and more filling. For the full recipe, check out the details above. This blog post covered how to make a tasty Zesty Greek Pasta Salad. We explored key ingredients and options for customization. Simple steps guided the cooking and mixing. Tips helped enhance flavor and texture. We also looked at fun variations and storage tips. In conclusion, you can enjoy this salad in many ways. Whether for a meal or a party, it’s a crowd-pleaser. Get creative with your ingredients, and have fun making it!](https://dailydishly.com/wp-content/uploads/2025/07/db2e56f5-892c-4a59-805f-2ecaeb9e2bc5-768x768.webp)
![For this fresh and tasty grilled peach caprese salad, gather these ingredients: - 2 ripe peaches, halved and pitted - 8 ounces fresh mozzarella, sliced - 2 cups mixed greens (like arugula, spinach, or baby kale) - 1 cup cherry tomatoes, halved - 1/4 cup fresh basil leaves, torn To enhance the flavors, use these seasonings and dressings: - 2 tablespoons balsamic glaze - 1 tablespoon olive oil - Salt and pepper to taste You will need some key tools: - A grill or grill pan - A brush for oiling the peaches - A sharp knife for slicing - A large serving platter to arrange the salad This simple list will help you create a vibrant dish. The mix of sweet peaches and creamy mozzarella makes this salad shine. You can find the full recipe in our guide. Start by preheating your grill to medium-high heat. This step is key for good grill marks. Cut the peaches in half and remove the pits. Brush the cut sides with olive oil. This helps the peaches not stick to the grill. Place the peach halves cut side down on the grill. Grill them for about 3-4 minutes. You'll know they are ready when you see nice grill marks and they feel a bit soft. Once done, take them off the grill and let them cool for a minute. Take a large serving platter. Arrange the mixed greens as a nice bed for your salad. Next, place the grilled peach halves on top. Spread them out evenly for a lovely look. Add the fresh mozzarella slices next. Scatter the cherry tomato halves around the peaches. Finally, sprinkle the torn basil leaves over the top. This adds a fresh touch. Drizzle the balsamic glaze over the whole salad. Finish with a sprinkle of salt and pepper to taste. Serve the salad right away for the best flavor. You can also chill it slightly if you prefer. Pair it with grilled chicken or fish for a complete meal. This salad makes a great side dish too. For a fun twist, add some nuts or seeds for extra crunch. Enjoy the balance of sweet peaches and creamy mozzarella! For the full recipe, check out the [Full Recipe]. To get those beautiful grill marks, start with ripe peaches. Choose peaches that are firm but yield slightly to pressure. Brush the cut sides with olive oil. This keeps them from sticking to the grill. Preheat your grill to medium-high heat. Place the peaches cut side down. Grill them for 3-4 minutes. You’ll see lovely marks form, and they will soften just right. Flip them only if needed. Fresh mozzarella is key for this dish. Look for mozzarella packed in water or brine. This keeps it moist and flavorful. The texture should be soft and slightly springy. You can tear it into pieces for a rustic look. Aim for a good balance between peach sweetness and mozzarella creaminess. It enhances the overall taste of the salad. Add depth to your salad with a few simple extras. A sprinkle of salt brings out the peach flavor. Fresh basil adds a nice aroma and taste. For a bit of heat, consider adding sliced jalapeños. Drizzle with balsamic glaze to balance the sweetness. If you want more crunch, toss in some nuts like walnuts or pistachios. These pair well with the soft mozzarella and juicy peaches. For the full recipe, check out the details above. {{image_2}} You can change this salad based on what’s fresh and in season. Try using nectarines instead of peaches for a different taste. In fall, add sliced apples or pears for sweetness. In winter, you might want to use roasted butternut squash. This gives a warm touch to the dish. Each swap brings new flavors and fun to your table. If you want a vegan version, swap the mozzarella with vegan cheese or avocado slices. Both options add creaminess. You can also use a nut-based cheese for a rich flavor. Make sure the balsamic glaze is vegan too, as some contain honey. This way, everyone can enjoy the salad without missing out. Want to add more zest? Try adding prosciutto or crispy bacon for a savory bite. Nuts, like sliced almonds or walnuts, give a nice crunch and healthy fats. A sprinkle of chili flakes can add a kick if you like spice. You can mix and match these options to create your own unique twist on the grilled peach Caprese salad. For the full recipe, check out the entire process above! If you have leftover Grilled Peach Caprese Salad, store it right. First, let the salad cool to room temperature. Then, place it in a container. Keep the dressing separate if possible. This helps keep the greens crisp. You can use this salad within two days for the best taste. Choose an airtight container for storage. Glass containers work well and do not retain odors. Plastic containers are also fine, but make sure they seal tightly. Avoid storing in a bowl covered with plastic wrap. This can let air in and spoil your salad faster. The shelf life of your salad depends on the ingredients. Grilled peaches can last up to three days in the fridge. Fresh mozzarella should be used within two days. Mixed greens are best consumed within one day. Always check for any signs of spoilage before eating. Enjoy your delicious salad while it’s fresh! Yes, you can make the salad ahead of time. I suggest grilling the peaches just before serving. If you grill them too early, they may lose some of their charm. You can prepare the salad base, like mixed greens and tomatoes, and store them in the fridge. Just add the peaches and drizzle the glaze when you are ready to eat. If you do not have balsamic glaze, you can use balsamic vinegar instead. Just drizzle a bit more to get that sweet flavor. Honey or maple syrup can also work in a pinch. Mix them with some olive oil for a tasty dressing. This will add a new twist to your salad. To find ripe peaches, look for a sweet smell and a slight softness. If the peach gives a bit when you press it gently, it is ready. Avoid hard peaches, as they will not grill well. Choose peaches with a golden hue and a bit of redness for the best flavor. In this article, we explored how to make a delicious peach salad. We covered the best fresh ingredients, seasonings, and tools you need for success. You learned step-by-step how to prepare and serve your salad. We also shared tips for perfect grill marks and flavor pairings. Don’t forget to try the variations for a unique touch. Finally, proper storage keeps leftovers fresh and tasty. Enjoy creating this bright dish that anyone can love!](https://dailydishly.com/wp-content/uploads/2025/06/c765deb6-47e2-46b1-bbfc-9b058c8c2a51-768x768.webp)


