Buffalo Chicken Stuffed Peppers Flavorful Dinner Delight
![- 4 large bell peppers - 2 cups cooked chicken, shredded - 1/2 cup buffalo sauce - 1/2 cup cream cheese - 1 cup shredded cheddar cheese - 1/2 cup celery, finely chopped - 1/4 cup green onions, sliced - Fresh parsley for garnish - Salt and pepper to taste The ingredients for Buffalo Chicken Stuffed Peppers are simple and fun to work with. Start with four large bell peppers. These can be any color you like. Next, use two cups of cooked chicken, shredded well. This can be leftover chicken or even rotisserie chicken for ease. Now, for the star of the show: the buffalo sauce. You need half a cup, but feel free to adjust it based on how spicy you want your dish. Then, add half a cup of cream cheese. This makes the filling creamy and rich. Next, grab a cup of shredded cheddar cheese. This cheese will melt beautifully and top off your stuffed peppers. For optional crunch and flavor, consider adding half a cup of finely chopped celery and a quarter cup of sliced green onions. These add freshness and texture to the filling. Finally, don't forget salt and pepper to taste. This enhances all the flavors. If you want to make your dish pop, garnish with fresh parsley before serving. For the full recipe, check out the [Full Recipe]. - Preheat the oven to 375°F (190°C). - Cut the tops off the bell peppers and remove the seeds and membranes. Set them aside. - In a large bowl, combine the shredded chicken with the buffalo sauce. - Add the softened cream cheese and 1 cup of shredded cheddar cheese. - Toss in the finely chopped celery and sliced green onions. - Mix until everything is well combined. Season with salt and pepper to taste. - Spoon the buffalo chicken mixture into each prepared bell pepper. Pack it in generously. - Place the stuffed peppers upright in a baking dish. Cover them with foil. - Bake in the preheated oven for 25 minutes. - After 25 minutes, remove the foil. Sprinkle the remaining cheddar cheese on top. - Bake for an additional 10-15 minutes until the cheese is bubbly and golden. - Let them cool for a few minutes before serving. - If you like, garnish with fresh parsley before serving. For the full recipe, check out the details above. Enjoy your meal! To make the perfect spicy filling, adjust the buffalo sauce. If you want more heat, add more sauce. For milder flavors, use less sauce. The right amount can make or break your dish! Also, think about cheese. You can use different types like mozzarella or pepper jack. They can change the flavor and spice level. Check the doneness of your peppers while cooking. They should be tender but not mushy. A fork can help test them. Covering the peppers with foil keeps them moist and helps cook evenly. After some time, you can remove the foil to let the cheese get bubbly and golden. Garnishing with fresh parsley adds color and a fresh taste. It makes your dish look appealing. You can serve the stuffed peppers on a nice plate or in a bowl for a cozy meal. Pair them with a side salad or some crunchy veggies to round out your dinner. For more details, check the Full Recipe. {{image_2}} You can switch up the protein in your stuffed peppers. Ground turkey works well. It has a mild flavor that blends nicely with buffalo sauce. Use a 1:1 ratio when swapping it in. Rotisserie chicken is another great option. It saves time and adds flavor. Shred the chicken and mix it with the buffalo sauce, just like in the full recipe. This gives your dish a tasty and easy twist. Adding veggies can boost nutrition and flavor. Black beans are a good choice. They add protein and fiber. Just rinse and drain them before mixing. Quinoa can add a nice texture. Cook it according to package instructions and fold it into the filling. This makes your peppers heartier and more satisfying. You can mix and match these options to fit your tastes. Switching sauces can change the whole dish. Try BBQ sauce instead of buffalo sauce for a sweet twist. Just use the same amount so the filling stays creamy. You can also experiment with other hot sauces. If you like it spicy, go for a habanero sauce. For a milder touch, try a sriracha or even a chipotle sauce. Each sauce brings its own flavor, making your stuffed peppers unique every time. To keep your buffalo chicken stuffed peppers fresh, use airtight containers. Glass containers work best, as they do not absorb smells. Plastic containers are good too, but ensure they are BPA-free. Store your leftovers in the fridge. They last for about three days. You can reheat your stuffed peppers in the oven or microwave. The oven gives the best taste. Preheat your oven to 350°F (175°C). Place the peppers in an oven-safe dish and cover with foil. Heat for about 15-20 minutes. If using a microwave, place the stuffed pepper on a microwave-safe plate. Heat for two to three minutes, checking every minute. To freeze stuffed peppers, cool them first. Wrap each pepper in plastic wrap and then in foil. This helps prevent freezer burn. Store them in a freezer bag for extra protection. They can last up to three months. To thaw, place them in the fridge overnight. Reheat as mentioned above. Enjoy your buffalo chicken stuffed peppers fresh out of the oven! For the full recipe, check the earlier section. To make Buffalo Chicken Stuffed Peppers vegan, you can use several substitutes. Instead of chicken, try shredded jackfruit or tofu. For cheese, use vegan cream cheese and shredded vegan cheese. These swaps keep the dish creamy and flavorful while fitting a vegan diet. You can still use buffalo sauce because many brands are vegan-friendly. This way, you enjoy the same spicy kick without animal products. Yes, you can prepare these stuffed peppers ahead of time. Mix the filling and stuff the peppers a day before. Cover them well and store them in the fridge. When ready to cook, take them out and bake as directed. You may need to adjust the baking time if they are cold from the fridge. This makes meal prep easy and quick for busy days. Buffalo Chicken Stuffed Peppers taste great with fresh sides. Here are some ideas: - Simple Green Salad: A mix of greens, tomatoes, and cucumbers. - Veggie Sticks: Carrots and celery with ranch or blue cheese dip. - Rice or Quinoa: A flavorful grain to balance the spice. - Corn on the Cob: Sweet corn adds a nice touch. These sides make your meal complete and delicious! For the full recipe, check out the detailed instructions above. You now know how to make Buffalo Chicken Stuffed Peppers, plus some great tips. Remember to use the right mix of flavors and adjust spices to your taste. Don't forget the fun in trying new ingredients and variations. Enjoy your meal and share it with others! This dish is simple to make, and leftovers can be stored well. Get creative and have fun in the kitchen!](https://dailydishly.com/wp-content/uploads/2025/06/c965f089-28dc-4039-a3b8-814f40f3cab4.webp)
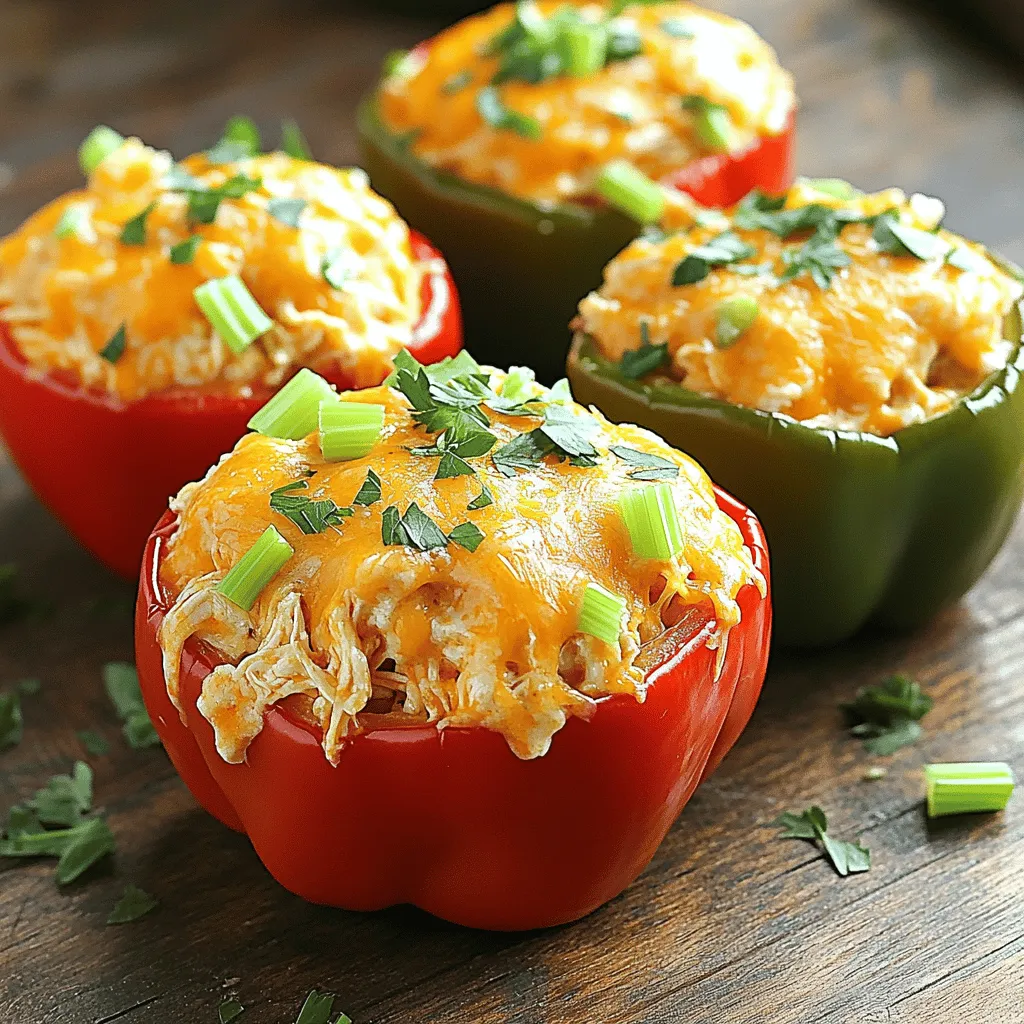
Are you ready to spice up dinner? Buffalo Chicken Stuffed Peppers are the perfect mix of heat and flavor. Made with shredded chicken, creamy cheese, and your favorite hot sauce, these peppers will satisfy anyone’s cravings. In this guide, I’ll break down the simple ingredients and steps to create this tasty dish. Let’s dive in and make a meal that will wow your family and friends!
Ingredients
Required Ingredients
– 4 large bell peppers
– 2 cups cooked chicken, shredded
– 1/2 cup buffalo sauce
– 1/2 cup cream cheese
– 1 cup shredded cheddar cheese
Optional Ingredients
– 1/2 cup celery, finely chopped
– 1/4 cup green onions, sliced
– Fresh parsley for garnish
Seasoning
– Salt and pepper to taste
The ingredients for Buffalo Chicken Stuffed Peppers are simple and fun to work with. Start with four large bell peppers. These can be any color you like. Next, use two cups of cooked chicken, shredded well. This can be leftover chicken or even rotisserie chicken for ease.
Now, for the star of the show: the buffalo sauce. You need half a cup, but feel free to adjust it based on how spicy you want your dish. Then, add half a cup of cream cheese. This makes the filling creamy and rich.
Next, grab a cup of shredded cheddar cheese. This cheese will melt beautifully and top off your stuffed peppers.
For optional crunch and flavor, consider adding half a cup of finely chopped celery and a quarter cup of sliced green onions. These add freshness and texture to the filling.
Finally, don’t forget salt and pepper to taste. This enhances all the flavors. If you want to make your dish pop, garnish with fresh parsley before serving.
Step-by-Step Instructions
Preparation Steps
– Preheat the oven to 375°F (190°C).
– Cut the tops off the bell peppers and remove the seeds and membranes. Set them aside.
Mixing the Filling
– In a large bowl, combine the shredded chicken with the buffalo sauce.
– Add the softened cream cheese and 1 cup of shredded cheddar cheese.
– Toss in the finely chopped celery and sliced green onions.
– Mix until everything is well combined. Season with salt and pepper to taste.
Stuffing and Baking
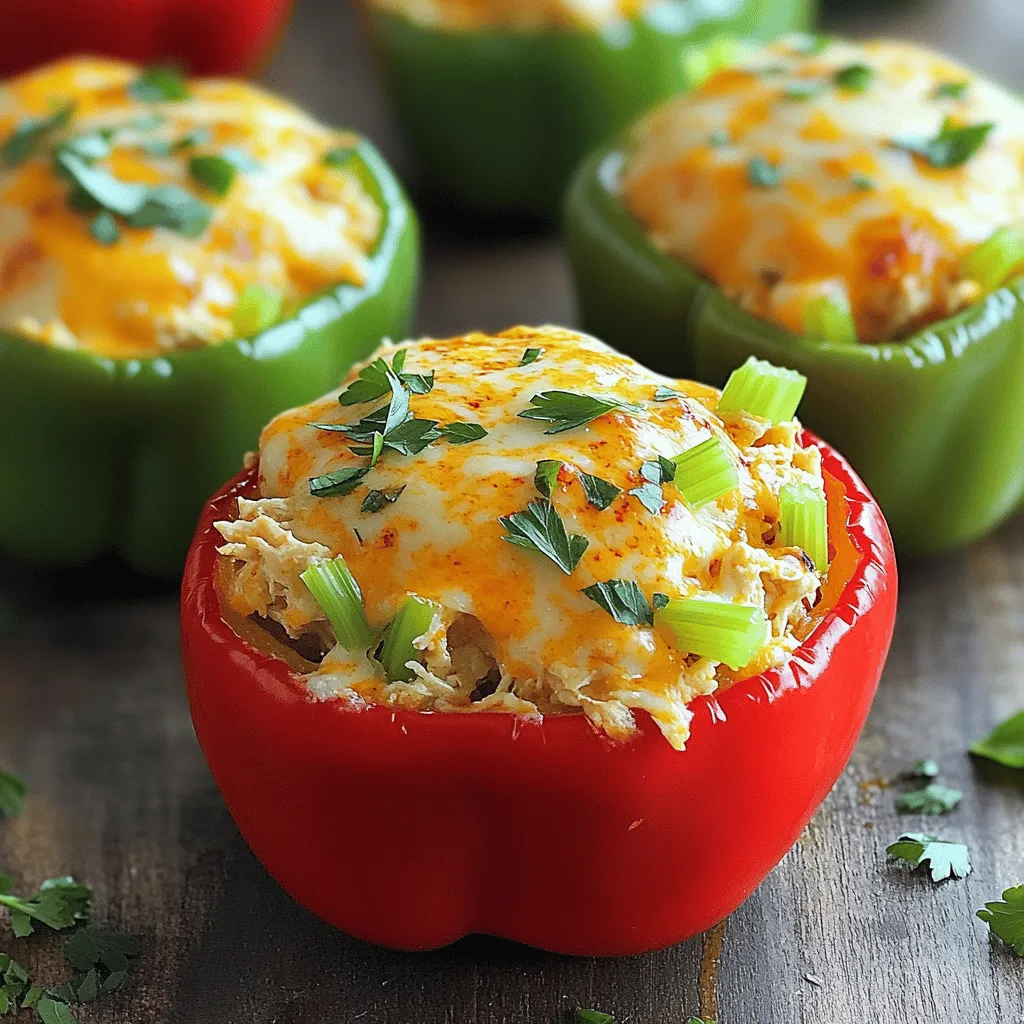
– Spoon the buffalo chicken mixture into each prepared bell pepper. Pack it in generously.
– Place the stuffed peppers upright in a baking dish. Cover them with foil.
– Bake in the preheated oven for 25 minutes.
– After 25 minutes, remove the foil. Sprinkle the remaining cheddar cheese on top.
– Bake for an additional 10-15 minutes until the cheese is bubbly and golden.
– Let them cool for a few minutes before serving.
– If you like, garnish with fresh parsley before serving.Enjoy your meal!
Tips & Tricks
Balancing Spice Levels
To make the perfect spicy filling, adjust the buffalo sauce. If you want more heat, add more sauce. For milder flavors, use less sauce. The right amount can make or break your dish! Also, think about cheese. You can use different types like mozzarella or pepper jack. They can change the flavor and spice level.
Ensuring Perfectly Cooked Peppers
Check the doneness of your peppers while cooking. They should be tender but not mushy. A fork can help test them. Covering the peppers with foil keeps them moist and helps cook evenly. After some time, you can remove the foil to let the cheese get bubbly and golden.
Presentation Ideas
Garnishing with fresh parsley adds color and a fresh taste. It makes your dish look appealing. You can serve the stuffed peppers on a nice plate or in a bowl for a cozy meal. Pair them with a side salad or some crunchy veggies to round out your dinner.

Variations
Protein Substitutes
You can switch up the protein in your stuffed peppers. Ground turkey works well. It has a mild flavor that blends nicely with buffalo sauce. Use a 1:1 ratio when swapping it in. Rotisserie chicken is another great option. It saves time and adds flavor.This gives your dish a tasty and easy twist.
Veggie Options
Adding veggies can boost nutrition and flavor. Black beans are a good choice. They add protein and fiber. Just rinse and drain them before mixing. Quinoa can add a nice texture. Cook it according to package instructions and fold it into the filling. This makes your peppers heartier and more satisfying. You can mix and match these options to fit your tastes.
Different Sauces
Switching sauces can change the whole dish. Try BBQ sauce instead of buffalo sauce for a sweet twist. Just use the same amount so the filling stays creamy. You can also experiment with other hot sauces. If you like it spicy, go for a habanero sauce. For a milder touch, try a sriracha or even a chipotle sauce. Each sauce brings its own flavor, making your stuffed peppers unique every time.
Storage Info
Storing Leftovers
To keep your buffalo chicken stuffed peppers fresh, use airtight containers. Glass containers work best, as they do not absorb smells. Plastic containers are good too, but ensure they are BPA-free. Store your leftovers in the fridge. They last for about three days.
Reheating Instructions
You can reheat your stuffed peppers in the oven or microwave. The oven gives the best taste. Preheat your oven to 350°F (175°C). Place the peppers in an oven-safe dish and cover with foil. Heat for about 15-20 minutes. If using a microwave, place the stuffed pepper on a microwave-safe plate. Heat for two to three minutes, checking every minute.
Freezing Guidelines
To freeze stuffed peppers, cool them first. Wrap each pepper in plastic wrap and then in foil. This helps prevent freezer burn. Store them in a freezer bag for extra protection. They can last up to three months. To thaw, place them in the fridge overnight. Reheat as mentioned above. Enjoy your buffalo chicken stuffed peppers fresh out of the oven!
FAQs
How do I make Buffalo Chicken Stuffed Peppers vegan?
To make Buffalo Chicken Stuffed Peppers vegan, you can use several substitutes. Instead of chicken, try shredded jackfruit or tofu. For cheese, use vegan cream cheese and shredded vegan cheese. These swaps keep the dish creamy and flavorful while fitting a vegan diet. You can still use buffalo sauce because many brands are vegan-friendly. This way, you enjoy the same spicy kick without animal products.
Can I prepare Buffalo Chicken Stuffed Peppers ahead of time?
Yes, you can prepare these stuffed peppers ahead of time. Mix the filling and stuff the peppers a day before. Cover them well and store them in the fridge. When ready to cook, take them out and bake as directed. You may need to adjust the baking time if they are cold from the fridge. This makes meal prep easy and quick for busy days.
What sides pair well with Buffalo Chicken Stuffed Peppers?
Buffalo Chicken Stuffed Peppers taste great with fresh sides. Here are some ideas:
– Simple Green Salad: A mix of greens, tomatoes, and cucumbers.
– Veggie Sticks: Carrots and celery with ranch or blue cheese dip.
– Rice or Quinoa: A flavorful grain to balance the spice.
– Corn on the Cob: Sweet corn adds a nice touch.
These sides make your meal complete and delicious!
You now know how to make Buffalo Chicken Stuffed Peppers, plus some great tips. Remember to use the right mix of flavors and adjust spices to your taste. Don’t forget the fun in trying new ingredients and variations. Enjoy your meal and share it with others! This dish is simple to make, and leftovers can be stored well. Get creative and have fun in the kitchen!
![- 4 large bell peppers - 2 cups cooked chicken, shredded - 1/2 cup buffalo sauce - 1/2 cup cream cheese - 1 cup shredded cheddar cheese - 1/2 cup celery, finely chopped - 1/4 cup green onions, sliced - Fresh parsley for garnish - Salt and pepper to taste The ingredients for Buffalo Chicken Stuffed Peppers are simple and fun to work with. Start with four large bell peppers. These can be any color you like. Next, use two cups of cooked chicken, shredded well. This can be leftover chicken or even rotisserie chicken for ease. Now, for the star of the show: the buffalo sauce. You need half a cup, but feel free to adjust it based on how spicy you want your dish. Then, add half a cup of cream cheese. This makes the filling creamy and rich. Next, grab a cup of shredded cheddar cheese. This cheese will melt beautifully and top off your stuffed peppers. For optional crunch and flavor, consider adding half a cup of finely chopped celery and a quarter cup of sliced green onions. These add freshness and texture to the filling. Finally, don't forget salt and pepper to taste. This enhances all the flavors. If you want to make your dish pop, garnish with fresh parsley before serving. For the full recipe, check out the [Full Recipe]. - Preheat the oven to 375°F (190°C). - Cut the tops off the bell peppers and remove the seeds and membranes. Set them aside. - In a large bowl, combine the shredded chicken with the buffalo sauce. - Add the softened cream cheese and 1 cup of shredded cheddar cheese. - Toss in the finely chopped celery and sliced green onions. - Mix until everything is well combined. Season with salt and pepper to taste. - Spoon the buffalo chicken mixture into each prepared bell pepper. Pack it in generously. - Place the stuffed peppers upright in a baking dish. Cover them with foil. - Bake in the preheated oven for 25 minutes. - After 25 minutes, remove the foil. Sprinkle the remaining cheddar cheese on top. - Bake for an additional 10-15 minutes until the cheese is bubbly and golden. - Let them cool for a few minutes before serving. - If you like, garnish with fresh parsley before serving. For the full recipe, check out the details above. Enjoy your meal! To make the perfect spicy filling, adjust the buffalo sauce. If you want more heat, add more sauce. For milder flavors, use less sauce. The right amount can make or break your dish! Also, think about cheese. You can use different types like mozzarella or pepper jack. They can change the flavor and spice level. Check the doneness of your peppers while cooking. They should be tender but not mushy. A fork can help test them. Covering the peppers with foil keeps them moist and helps cook evenly. After some time, you can remove the foil to let the cheese get bubbly and golden. Garnishing with fresh parsley adds color and a fresh taste. It makes your dish look appealing. You can serve the stuffed peppers on a nice plate or in a bowl for a cozy meal. Pair them with a side salad or some crunchy veggies to round out your dinner. For more details, check the Full Recipe. {{image_2}} You can switch up the protein in your stuffed peppers. Ground turkey works well. It has a mild flavor that blends nicely with buffalo sauce. Use a 1:1 ratio when swapping it in. Rotisserie chicken is another great option. It saves time and adds flavor. Shred the chicken and mix it with the buffalo sauce, just like in the full recipe. This gives your dish a tasty and easy twist. Adding veggies can boost nutrition and flavor. Black beans are a good choice. They add protein and fiber. Just rinse and drain them before mixing. Quinoa can add a nice texture. Cook it according to package instructions and fold it into the filling. This makes your peppers heartier and more satisfying. You can mix and match these options to fit your tastes. Switching sauces can change the whole dish. Try BBQ sauce instead of buffalo sauce for a sweet twist. Just use the same amount so the filling stays creamy. You can also experiment with other hot sauces. If you like it spicy, go for a habanero sauce. For a milder touch, try a sriracha or even a chipotle sauce. Each sauce brings its own flavor, making your stuffed peppers unique every time. To keep your buffalo chicken stuffed peppers fresh, use airtight containers. Glass containers work best, as they do not absorb smells. Plastic containers are good too, but ensure they are BPA-free. Store your leftovers in the fridge. They last for about three days. You can reheat your stuffed peppers in the oven or microwave. The oven gives the best taste. Preheat your oven to 350°F (175°C). Place the peppers in an oven-safe dish and cover with foil. Heat for about 15-20 minutes. If using a microwave, place the stuffed pepper on a microwave-safe plate. Heat for two to three minutes, checking every minute. To freeze stuffed peppers, cool them first. Wrap each pepper in plastic wrap and then in foil. This helps prevent freezer burn. Store them in a freezer bag for extra protection. They can last up to three months. To thaw, place them in the fridge overnight. Reheat as mentioned above. Enjoy your buffalo chicken stuffed peppers fresh out of the oven! For the full recipe, check the earlier section. To make Buffalo Chicken Stuffed Peppers vegan, you can use several substitutes. Instead of chicken, try shredded jackfruit or tofu. For cheese, use vegan cream cheese and shredded vegan cheese. These swaps keep the dish creamy and flavorful while fitting a vegan diet. You can still use buffalo sauce because many brands are vegan-friendly. This way, you enjoy the same spicy kick without animal products. Yes, you can prepare these stuffed peppers ahead of time. Mix the filling and stuff the peppers a day before. Cover them well and store them in the fridge. When ready to cook, take them out and bake as directed. You may need to adjust the baking time if they are cold from the fridge. This makes meal prep easy and quick for busy days. Buffalo Chicken Stuffed Peppers taste great with fresh sides. Here are some ideas: - Simple Green Salad: A mix of greens, tomatoes, and cucumbers. - Veggie Sticks: Carrots and celery with ranch or blue cheese dip. - Rice or Quinoa: A flavorful grain to balance the spice. - Corn on the Cob: Sweet corn adds a nice touch. These sides make your meal complete and delicious! For the full recipe, check out the detailed instructions above. You now know how to make Buffalo Chicken Stuffed Peppers, plus some great tips. Remember to use the right mix of flavors and adjust spices to your taste. Don't forget the fun in trying new ingredients and variations. Enjoy your meal and share it with others! This dish is simple to make, and leftovers can be stored well. Get creative and have fun in the kitchen!](https://dailydishly.com/wp-content/uploads/2025/06/c965f089-28dc-4039-a3b8-814f40f3cab4-300x300.webp)


. First, drain the tofu by placing it on a clean towel. Press it to remove extra water. Cut the tofu into 1-inch cubes. Toss these cubes in cornstarch until they are well-coated. This step makes the tofu crispy when cooked. Next, grab a medium saucepan. Pour in the vegetable broth and bring it to a boil. Add the jasmine rice and stir once. Cover the pot and reduce the heat to low. Cook for about 15 minutes. The rice will be tender when the liquid is absorbed. Fluff it with a fork and set it aside. Now, take a large skillet or wok. Heat the vegetable oil over medium-high heat. Add the cornstarch-coated tofu cubes. Fry them until golden and crispy, about 8 to 10 minutes. Remove the tofu and set it on paper towels to drain excess oil. In the same skillet, add the broccoli, red bell pepper, and carrots. Stir-fry these veggies for 4 to 5 minutes. They should be tender yet still bright in color. Add the green onions and sauté for one more minute. In a small bowl, mix together the Sriracha, soy sauce, sesame oil, and honey or maple syrup. This sauce gives the dish its spicy kick and sweet balance. Pour this mixture over the sautéed vegetables. Stir well to coat everything. Now, it’s time to bring everything together. Add the crispy tofu back into the skillet with the veggies and sauce. Gently toss everything to ensure the tofu is well-coated. Finally, serve this spicy mixture over a bed of jasmine rice in bowls. Garnish with sesame seeds and fresh cilantro for a tasty touch. For the complete recipe, refer to the Full Recipe section. Tofu can be soft if not pressed. Pressing tofu helps remove excess water. This step makes the tofu crispier when cooked. Use a tofu press or wrap it in a clean towel. Place a heavy object on top for about 30 minutes. If you don't have cornstarch, try using rice flour. It also creates a nice crust on the tofu. Sriracha can be spicy. You can adjust it to fit your taste. Start with just one tablespoon, then add more as needed. If you enjoy extra heat, add chili flakes or cayenne pepper. For a milder taste, mix a little honey or maple syrup into the sauce. This will balance out the heat nicely. This bowl pairs well with other side dishes. Try serving it with a simple salad or steamed edamame. For leftovers, keep the tofu and veggies separate from the rice. This keeps everything fresh. You can also wrap the tofu mixture in a tortilla for a tasty lunch. The Spicy Sriracha Tofu Bowl is versatile and fun to enjoy in different ways. {{image_2}} If you want to change the protein, try tempeh or seitan. Both give a nice texture. Tempeh has a nutty flavor and works well with the sauce. Seitan is chewy, making it a great meat substitute. These options are also vegan, so they fit perfectly into plant-based meals. You can swap in other vegetables to mix things up. Snow peas, zucchini, or bell peppers add color and crunch. Seasonal veggies like asparagus or squash can change the dish based on what’s fresh. Feel free to experiment with whatever you have on hand. Different hot sauces can spice things up. Try sriracha alternatives like sambal oelek or chili garlic sauce. You can also add herbs like basil or cilantro for a fresh twist. Mixing in garlic or ginger gives extra flavor too. To keep your Spicy Sriracha Tofu Bowl fresh, store it in an airtight container. Place it in the fridge if you plan to eat it within the next three days. Make sure to separate the tofu and rice from the vegetables to keep everything crisp. You can layer them in the container or use different ones. When reheating, the best method is using a skillet over medium heat. This helps keep the tofu crispy. Add a splash of water to create steam, which warms everything through without drying it out. Stir gently to avoid breaking the tofu. You can also use a microwave, but be aware the texture may change slightly. Heat in short bursts, stirring in between. Yes, you can freeze the Spicy Sriracha Tofu Bowl, but the texture of the tofu may change. For best results, freeze the tofu separately from the vegetables and rice. Spread them out on a baking sheet to freeze individually before transferring to a freezer bag. This method prevents them from sticking together. When ready to eat, thaw in the fridge overnight before reheating. To make this dish vegan, swap out honey for maple syrup. Maple syrup gives a nice sweetness. It works well and keeps the flavors balanced. You can also use agave nectar. Both options will keep your bowl plant-based and tasty. Yes, you can make it gluten-free. Use gluten-free soy sauce instead of regular soy sauce. Brands like Tamari offer great flavor without gluten. Check the label to be sure it's certified gluten-free. To reduce servings, cut the ingredient amounts in half. For example, use half a block of tofu and half a cup of rice. Adjust the sauce ingredients too. This way, you still keep the bold flavors, but you make just enough for a smaller meal. Tofu is a great source of protein. It is low in calories and high in iron. It also contains calcium, which is good for bones. If you are watching your diet, tofu fits well. But be careful if you have soy allergies. Sriracha sauce comes from Thailand. It was created in the 1930s by a woman named Thanom Chakkapak. She made it in the town of Si Racha. Today, Sriracha is popular worldwide, known for its spicy and sweet flavor. This blog post walks you through creating a tasty Spicy Sriracha Tofu Bowl. We covered all the main ingredients, including firm tofu, jasmine rice, and fresh vegetables. You learned step-by-step instructions, useful tips, and ways to customize the dish. As you explore this recipe, feel free to tweak it to fit your taste. Enjoy making this flavorful meal that caters to diverse diets and preferences. Your kitchen is a place for creativity and delicious food!](https://dailydishly.com/wp-content/uploads/2025/07/ee3e23f0-fb80-42df-ace0-60219f206871-768x768.webp)


![- 1 cup quinoa, rinsed - 2 cups water or vegetable broth - 1 large cucumber, diced - 1 red bell pepper, diced - 1 cup cherry tomatoes, halved - 1/4 red onion, finely chopped - 1 cup fresh parsley, chopped - 1/4 cup tahini - 2 tablespoons lemon juice - 1 tablespoon olive oil - 1 clove garlic, minced - Salt and pepper to taste This salad starts with quinoa as the base. Quinoa is a great source of protein and fiber. Rinsing the quinoa helps remove its bitter coating. Use fresh veggies for crunch and color. I love using cucumbers and bell peppers for a fresh bite. Cherry tomatoes bring sweetness and juicy flavor. The red onion adds a nice kick, while parsley gives a fresh touch. The tahini sauce is the star. It adds a creamy texture and nutty flavor. Mix tahini with lemon juice, olive oil, and garlic for a bright dressing. This makes the salad so tasty! - 1/4 cup sunflower seeds or chopped nuts for crunch For extra flavor and texture, you can add sunflower seeds or nuts. They give a nice crunch. Try almonds or walnuts for a rich taste. Fresh herbs like mint or cilantro can also brighten the dish. - Calories per serving: About 250 - Macronutrient breakdown: 10g protein, 12g fats, 30g carbs - Dietary considerations: Gluten-free, vegan, and packed with nutrients This salad is not just tasty; it's also healthy! Each serving has around 250 calories. You get protein from quinoa and tahini. The veggies add vitamins and minerals. Plus, it fits many diets, like vegan and gluten-free. Snack on this salad for a boost of energy! Check the Full Recipe for all the details. 1. Start by rinsing 1 cup of quinoa under cold water. This helps remove any bitter taste. 2. In a medium saucepan, combine the rinsed quinoa and 2 cups of water or vegetable broth. 3. Bring the mixture to a boil over medium-high heat. 4. Once boiling, reduce the heat to low, cover, and let it simmer. Cook for about 15 minutes. 5. The quinoa is done when it is fluffy and the water is absorbed. Remove it from heat and let it cool slightly. 1. In a small bowl, mix together 1/4 cup tahini, 2 tablespoons lemon juice, and 1 tablespoon olive oil. 2. Add 1 clove of minced garlic, salt, and pepper to taste. 3. Whisk until smooth. If the dressing is too thick, add a little water to reach your desired consistency. 1. In a large mixing bowl, combine 1 diced cucumber, 1 diced red bell pepper, 1 cup of halved cherry tomatoes, 1/4 finely chopped red onion, and 1 cup of chopped fresh parsley. 2. Add the cooled quinoa to the vegetable mix and gently toss everything together. 3. Drizzle the tahini dressing over the salad and stir well to coat all the ingredients. 4. For extra crunch, sprinkle 1/4 cup of sunflower seeds or chopped nuts on top before serving. For the full recipe, you can check the details provided above. Enjoy your fresh and flavorful Lemon Tahini Quinoa Salad! To cook quinoa, use a 2:1 ratio of water to quinoa. Rinse the quinoa first. This removes the bitter coating. Bring the water to a boil. Once boiling, lower the heat. Cover the pot and let it simmer for about 15 minutes. Fluff the quinoa with a fork after cooking. This keeps it light and airy, avoiding mushy quinoa. Herbs can change the taste of your salad. Fresh mint or dill works well. Try adding basil for a different twist. For spice, consider adding a pinch of cumin or paprika. These spices bring out the flavors of the vegetables and dressing. Presentation matters! Serve the salad in a large bowl. Garnish with lemon slices and fresh parsley. This adds color and appeal. For a fun twist, use clear glasses. Layer the salad for a stunning visual. Pair this salad with grilled chicken or fish for a complete meal. It’s also great beside roasted veggies. {{image_2}} You can easily add more protein to your Lemon Tahini Quinoa Salad. Chickpeas are a great choice. They add texture and a nutty flavor. Just rinse and drain a can of chickpeas. Then, fold them into the salad for extra protein. Grilled chicken or tofu also works well. Cook the chicken or tofu until it’s golden brown. Then, chop it into bite-sized pieces. Mix it in with the salad for a hearty meal. You can change this salad based on the season. In spring, add fresh peas, radishes, or asparagus. These veggies brighten up the dish and add crunch. In winter, you can use roasted root vegetables. Try carrots or sweet potatoes. They add warmth and depth to the salad while keeping it filling. If you want to switch up the flavor, try other dressings. A simple olive oil and vinegar mix gives a light taste. You can also use yogurt for a creamy twist. Adjust the flavors to suit your taste. Add more lemon juice for tanginess. Or, include herbs like dill or cilantro for freshness. For the complete recipe, check out the [Full Recipe]. To keep your Lemon Tahini Quinoa Salad fresh, store it in the fridge. Use an airtight container. This helps maintain flavor and texture. Before putting it away, let the salad cool. Hot food can raise the fridge temperature, which is not good. Your salad lasts about three to five days in the fridge. Check for any changes in color or smell. If it looks slimy or smells off, toss it out. To reheat, use the microwave. Heat it gently to avoid drying it out. Stir it halfway through to ensure even warming. If you want to serve leftovers, try adding fresh herbs or a squeeze of lemon juice. This can brighten the flavors again. For the full recipe, refer back to the main section. To make this creamy dressing, mix the tahini, lemon juice, olive oil, minced garlic, salt, and pepper in a bowl. Use a whisk for a smooth blend. Adjust the thickness by adding water if needed. This dressing adds a zesty flavor and a creamy texture to your salad. Yes, you can prepare this salad in advance. Store the salad and dressing separately in the fridge. This keeps the vegetables crisp. Combine them just before serving. It tastes even better after the flavors meld together. If you can't find tahini, you can use these alternatives: - Sunflower seed butter - Almond butter - Greek yogurt Each of these options has a unique flavor. Sunflower seed butter is nut-free and creamy. Almond butter adds a nutty taste. Greek yogurt gives a tangy kick. Keep in mind that substituting may change the salad's taste. Adjust the amount of lemon juice to balance flavors. Always taste as you go to find your perfect mix. Enjoy experimenting! This blog post covered how to make a delicious Lemon Tahini Quinoa Salad. You learned about essential and optional ingredients, like quinoa, vegetables, and tahini. I gave you step-by-step instructions, plus tips for cooking and flavoring. We explored salad variations and how to store it properly. This salad is versatile and easy to make. Try adding your favorite ingredients to make it unique. Enjoy a tasty and healthy dish that fits any season!](https://dailydishly.com/wp-content/uploads/2025/07/0131a3b2-a937-48f9-ad75-9f78e7be101a-768x768.webp)