Caprese Pasta Salad Flavorful and Fresh Recipe

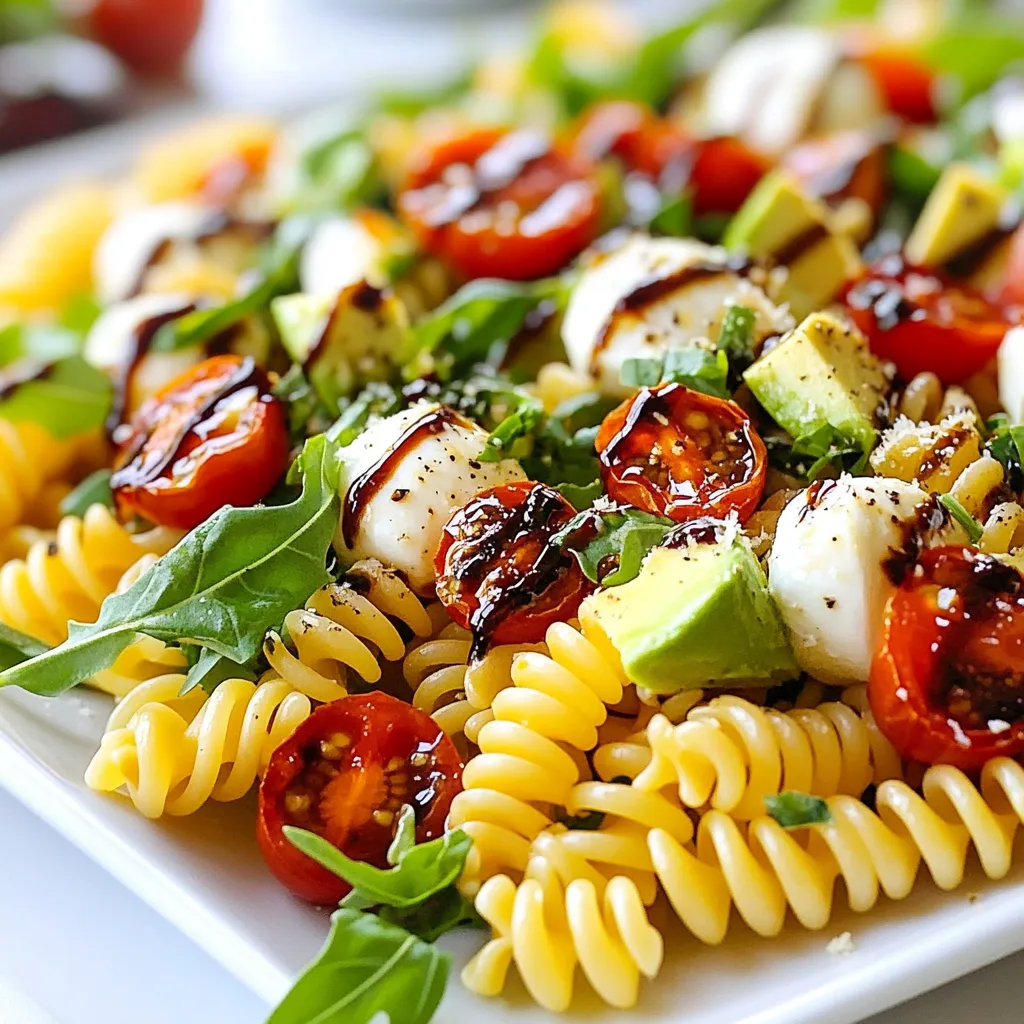
Looking for a fresh, tasty dish that’s easy to make? You’ve found it! My Caprese Pasta Salad combines pasta, juicy tomatoes, creamy mozzarella, and vibrant greens for a burst of flavor. This recipe is perfect for picnics, lunch, or a light dinner. In just a few steps, you can create a salad that’s sure to impress. Let’s dive in and uncover the secrets to this flavorful delight!
Why I Love This Recipe
- Fresh Ingredients: This salad is packed with vibrant, fresh ingredients that not only taste amazing but also offer a burst of color to your table.
- Quick and Easy: With just 30 minutes of prep time, this dish is perfect for busy weeknights or last-minute gatherings.
- Versatile: Feel free to customize the salad with your favorite vegetables or proteins, making it a go-to recipe for any occasion.
- Deliciously Unique: The addition of avocado and sun-dried tomatoes gives a delightful twist to a classic Caprese salad, making it truly special.
Ingredients
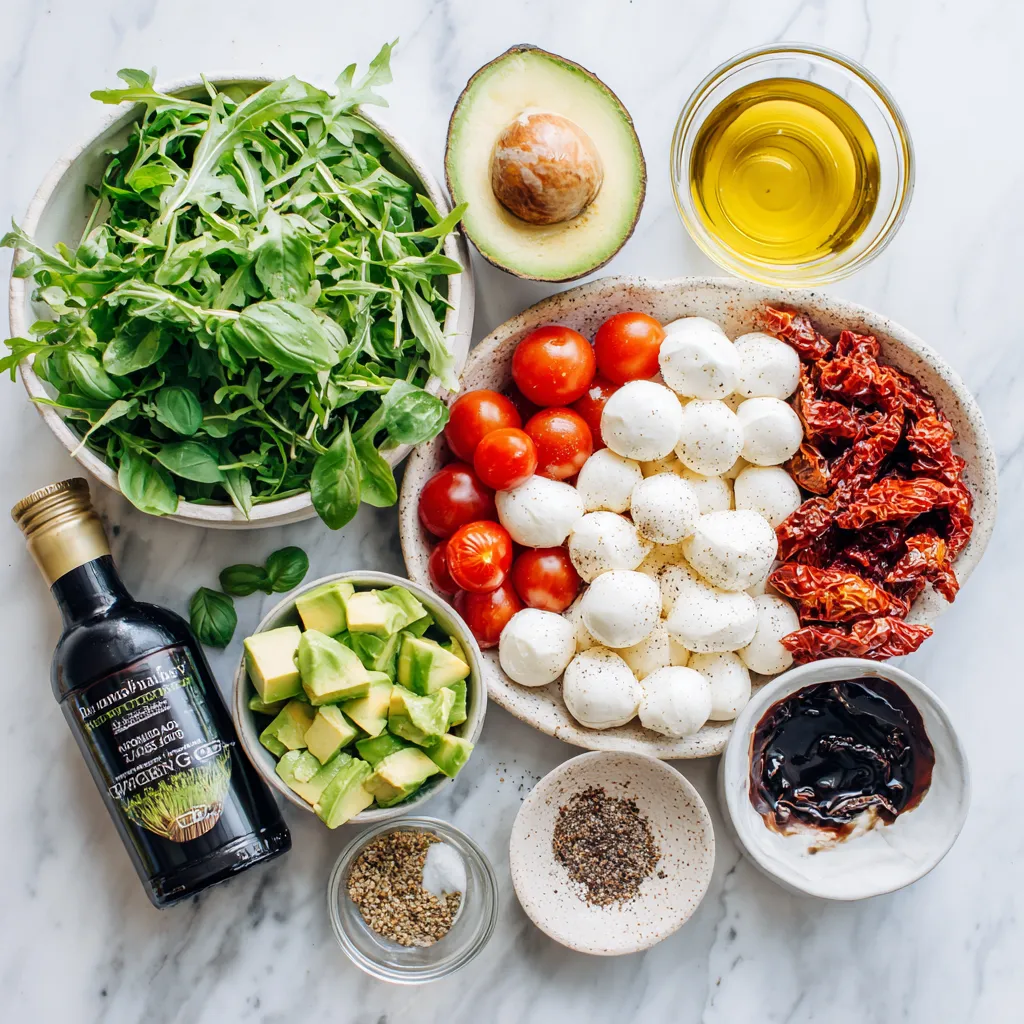
To make a tasty Caprese Pasta Salad, you need simple, fresh ingredients. Here’s what you’ll need:
– 8 oz. fusilli or rotini pasta
– 1 cup cherry tomatoes, halved
– 1 cup fresh mozzarella balls (bocconcini), halved
– 1 cup arugula or fresh basil leaves, roughly chopped
– 1 avocado, diced
– 1/4 cup sun-dried tomatoes, chopped
– 1/4 cup balsamic glaze
– 2 tablespoons extra virgin olive oil
– 1 teaspoon garlic powder
– Salt and pepper to taste
– Optional: Fresh basil leaves for garnish
Each ingredient plays a key role. The pasta serves as a hearty base. Cherry tomatoes add sweetness and color. Fresh mozzarella gives a creamy touch. Arugula or basil offers a peppery flavor. The avocado adds creaminess and healthy fats. Sun-dried tomatoes bring a burst of umami. Balsamic glaze and olive oil create a tangy, rich dressing. Garlic powder gives a hint of spice. Adjust salt and pepper to your taste.
Feel free to customize! You can swap ingredients based on what you like or have on hand. The options are endless. Enjoy your cooking!

Step-by-Step Instructions
Cooking the Pasta
First, fill a large pot with water. Add a pinch of salt and bring it to a boil. Once boiling, add 8 oz. of fusilli or rotini pasta. Cook the pasta according to the package instructions. You want it to be al dente, which means it should still have a firm bite. After cooking, drain the pasta in a colander and rinse it with cold water. This stops the cooking and keeps it from getting mushy.
Preparing the Salad Base
In a large mixing bowl, combine the cooled pasta with fresh ingredients. Add 1 cup of halved cherry tomatoes and 1 cup of halved mozzarella balls. Next, include 1 cup of arugula or roughly chopped fresh basil leaves. Then, dice one avocado and add it to the bowl along with 1/4 cup of chopped sun-dried tomatoes. This mix gives the salad great color and flavor.
Making the Dressing
For the dressing, grab a small bowl. Whisk together 1/4 cup of balsamic glaze and 2 tablespoons of extra virgin olive oil. Add 1 teaspoon of garlic powder, and sprinkle in salt and pepper to taste. Whisk until everything blends well. This dressing adds a sweet and tangy kick to the salad.
Combining the Ingredients
Pour the dressing over the salad base. Use a large spoon to gently toss everything together. Make sure all the pasta and veggies get coated with the dressing. This step is key for a flavorful salad.
Marinating the Salad
Let the salad sit for about 15 minutes. This time allows the flavors to meld together. If you can, cover the bowl with plastic wrap to keep it fresh. The wait is worth it as the taste improves.
Serving Suggestions
When you’re ready to serve, give the salad a gentle toss again. If you like, garnish with extra fresh basil leaves on top. This adds a nice touch. Serve it as a side dish or even a light main course. Enjoy!
Tips & Tricks
How to Cook Pasta Perfectly
To cook pasta just right, start with a big pot. Fill it with water and add a pinch of salt. Bring the water to a boil before adding the pasta. Fusilli or rotini pasta works great for this salad. Follow the package instructions for cooking time. I like to cook it until it’s al dente, which means it should still have a little bite. When it’s done, drain it and rinse it under cold water. This stops the cooking and cools it down fast.
Enhancing Flavor with Fresh Ingredients
Fresh ingredients make this salad shine. Use ripe cherry tomatoes for sweetness and bright color. Fresh mozzarella balls add a creamy touch. I love adding arugula or basil leaves for a peppery, aromatic punch. Diced avocado gives a buttery texture, while sun-dried tomatoes add depth. For dressing, mix balsamic glaze and olive oil for a rich, tangy flavor. A sprinkle of garlic powder brings everything together. Always taste as you go, adjusting salt and pepper to your liking.
Common Mistakes to Avoid
One common mistake is overcooking the pasta. Always check for doneness before draining. Another error is not rinsing the pasta. This step keeps the pasta from sticking together. Some forget to let the salad sit before serving. Allowing it to marinate helps the flavors blend. Lastly, be cautious with the dressing. Too much can drown out the fresh taste of your ingredients. Start with a small amount and add more if needed.
Pro Tips
- Choose the Right Pasta: Fusilli or rotini are ideal for this salad because their shapes hold the dressing well, ensuring every bite is flavorful.
- Fresh Ingredients Matter: Always opt for fresh mozzarella and high-quality olive oil to elevate the taste of your pasta salad.
- Customize Your Greens: Feel free to mix and match greens like spinach or kale with arugula or basil for added texture and flavor.
- Chill Before Serving: Letting the salad chill for at least 30 minutes in the refrigerator allows the flavors to meld beautifully.

Variations
Vegetarian Options
You can keep the Caprese Pasta Salad vegetarian by using plant-based cheese. Try cashew cheese for a creamy texture. You can also add more veggies. Bell peppers, cucumbers, or zucchini work well. Use your favorite greens too. Kale or spinach can make it even more nutritious.
Adding Proteins (e.g. Chicken, Shrimp)
If you want more protein, add grilled chicken or shrimp. Cook the chicken until golden brown. Slice it and toss it in with the salad. For shrimp, sauté them with garlic for flavor. They cook quickly and blend well with the salad. This makes the dish heartier and filling.
Gluten-Free Alternatives
To make this dish gluten-free, swap the pasta for gluten-free options. Look for brown rice or chickpea pasta. These choices provide great texture and flavor. Cook them according to the package. Rinse well to cool before mixing with the other ingredients. Enjoy your fresh Caprese Pasta Salad without gluten worries!
Storage Info
How to Store Leftovers
To keep your Caprese pasta salad fresh, place leftovers in a bowl. Cover it tightly with plastic wrap or a lid. This helps keep the flavors intact and prevents drying out. If you have extra dressing, store it separately to avoid soggy pasta.
Best Containers for Storage
Use airtight containers for the best storage. Glass containers work great as they do not stain or hold odors. You can also use plastic containers with tight-sealing lids. Make sure they are clean and dry before adding the salad.
Shelf Life of the Salad
Your Caprese pasta salad can last three to four days in the fridge. The tomatoes and avocado can make it less fresh over time. If you notice any changes in smell or color, it’s best to discard it. Always trust your senses when it comes to food freshness.
FAQs
Can I make Caprese Pasta Salad in advance?
Yes, you can make Caprese Pasta Salad ahead of time. It tastes even better after chilling. I suggest making it up to a day before you serve it. Just store it in the fridge. The flavors blend nicely when it sits.
What can I substitute for mozzarella?
If you can’t find mozzarella, try using ricotta or feta cheese. You can also use vegan cheese for a dairy-free option. Both choices add unique flavors to the salad. Just keep the texture in mind when you choose.
Is there a low-carb version of Caprese Pasta Salad?
To make a low-carb version, skip the pasta. Use spiralized zucchini or cauliflower rice instead. This keeps the salad fresh and light. You still get the great flavors from the tomatoes and dressing.
How long does the pasta salad last in the fridge?
Caprese Pasta Salad lasts about three days in the fridge. After that, the ingredients may not taste their best. Keep it in an airtight container to maintain freshness. Check for any changes in smell or texture before eating.
What dishes pair well with Caprese Pasta Salad?
Caprese Pasta Salad pairs well with grilled chicken or fish. You can also serve it with garlic bread or a light soup. These sides enhance the fresh flavors of the salad. Enjoy with a crisp white wine for a complete meal.
This article covered how to make a delicious Caprese Pasta Salad. We explored the needed ingredients, each step to prepare it, and tips for success. You now know how to store leftovers and some FAQs about the salad.
Try this easy recipe next time you want a tasty meal. Use fresh ingredients for the best flavor. Enjoy your cooking and impress your family and friend

Caprese Pasta Salad with a Twist
Ingredients
- 8 oz fusilli or rotini pasta
- 1 cup cherry tomatoes, halved
- 1 cup fresh mozzarella balls (bocconcini), halved
- 1 cup arugula or fresh basil leaves, roughly chopped
- 1 each avocado, diced
- 1 4 cup sun-dried tomatoes, chopped
- 1 4 cup balsamic glaze
- 2 tablespoons extra virgin olive oil
- 1 teaspoon garlic powder
- to taste Salt and pepper
- optional Fresh basil leaves for garnish
Instructions
- In a large pot of salted boiling water, cook the fusilli or rotini pasta according to package instructions until al dente. Drain and rinse under cold water to stop the cooking process.
- In a large bowl, combine the cooked pasta, halved cherry tomatoes, mozzarella balls, arugula (or basil), diced avocado, and chopped sun-dried tomatoes.
- In a separate small bowl, whisk together the balsamic glaze, olive oil, garlic powder, salt, and pepper until well combined.
- Pour the dressing over the pasta salad and gently toss everything together until evenly coated.
- For best flavor, let the salad sit for about 15 minutes before serving to allow the ingredients to meld together.
- Give the salad one last gentle toss, and if desired, garnish with extra fresh basil leaves on top before serving.


![To make Chicken and Cheese Enchiladas Casserole, you need the right ingredients. Here they are: - 2 cups cooked chicken, shredded - 1 can (15 oz) black beans, rinsed and drained - 1 cup frozen corn - 1 can (10 oz) enchilada sauce (red or green) - 2 cups shredded cheese (cheddar and Monterey Jack mix) - 8 corn tortillas - 1 small red onion, diced - 1 teaspoon ground cumin - 1 teaspoon chili powder - Salt and pepper to taste - Fresh cilantro, for garnish - Sliced jalapeños, for garnish (optional) Each ingredient serves a purpose. The chicken adds protein, while the beans and corn provide fiber. The enchilada sauce gives a rich flavor. The cheese melts beautifully, creating a creamy texture. Tortillas hold it all together. Don't forget the spices! They bring warmth and depth to the dish. Using fresh ingredients makes a big difference. Fresh cilantro adds color and bright flavor. If you want a kick, sliced jalapeños can spice things up. For a full guide on making this dish, check the Full Recipe. - Preheat the oven to 350°F (175°C). - In a large bowl, mix the cooked chicken, black beans, corn, half the enchilada sauce, cumin, chili powder, diced onion, salt, and pepper. Stir it well. This mix gives your casserole a great flavor. - Take a 9x13 inch baking dish and spread a thin layer of the remaining enchilada sauce on the bottom. - Place 4 corn tortillas over the sauce. Overlap them slightly. This helps keep everything together. - Spoon half of your chicken and bean mix over the tortillas. Then sprinkle half of the cheese on top. - Repeat this with another layer of tortillas, the rest of the chicken mixture, and the remaining cheese. - End with a final layer of tortillas and drizzle any remaining enchilada sauce on top. This keeps the dish moist. - Cover the baking dish with aluminum foil. Bake in the preheated oven for 20 minutes. - After 20 minutes, remove the foil. Bake for an extra 10-15 minutes. This lets the cheese get bubbly and golden brown. - Once done, take it out and let it sit for about 5 minutes before slicing. This helps it hold its shape. - For the full recipe, check the detailed instructions above. To make shredding chicken easy, use two forks. Hold one fork in each hand. Pull the chicken apart in opposite directions. This method works great and saves time. You can also use a stand mixer with a paddle attachment. Just place the cooked chicken in the bowl and mix on low speed. To prevent soggy tortillas, lightly fry them in oil first. This step makes them crisp and adds flavor. You can also warm them in the oven for a few minutes. This keeps them from getting too soft when layered in the casserole. For a great side dish, serve Mexican rice or refried beans. These pair nicely with the creamy casserole. You can also add a fresh green salad on the side. A simple salad with lettuce, tomatoes, and avocado adds freshness. To enhance your casserole's look, garnish with fresh cilantro and jalapeño slices. These colorful toppings add a nice touch. A drizzle of extra enchilada sauce can also make it pop. You can serve the casserole on individual plates for a nice presentation. For the full recipe, check out the Chicken and Cheese Enchiladas Casserole section above. {{image_2}} If you have leftover ingredients, use them! You can swap cooked chicken for shredded beef or even pork. If you have extra veggies, toss in bell peppers or zucchini for added color and nutrients. You can also switch the black beans for pinto beans or kidney beans. They add a nice texture and flavor. For a twist, try chickpeas for a protein boost. Adjust the spice levels to fit your taste. Use mild chili powder for a gentle heat or add cayenne pepper for a kick. You can also mix in diced green chiles for extra flavor without too much heat. If you want a meatless version, skip the chicken and add more beans. You can use lentils or quinoa for protein. Toss in spinach or kale for a healthy touch. Enjoy the variety! For the full recipe, check out the [Full Recipe]. To keep your Chicken and Cheese Enchiladas Casserole fresh, store it in an airtight container in the fridge. It will last for about 3 to 4 days. If you want to keep it longer, freeze it. Wrap it well in plastic wrap and aluminum foil. It can last in the freezer for up to 3 months. Just remember to label it with the date. When you're ready to enjoy leftovers, preheat your oven to 350°F (175°C). Place the casserole in an oven-safe dish. Cover it with aluminum foil to keep it moist. Bake for about 20 minutes. If you prefer to use a microwave, slice a portion and place it on a microwave-safe plate. Heat it for 1-2 minutes, checking often. Make sure it is hot throughout. Avoid overheating, as it can make the dish dry. For the best taste, use the oven when possible. How can I make Chicken and Cheese Enchiladas Casserole gluten-free? To make this casserole gluten-free, use corn tortillas. Check that your enchilada sauce is gluten-free too. Many brands offer gluten-free options. Can I prepare this casserole in advance? Yes, you can prepare it a day ahead. Assemble the casserole, then cover and refrigerate. Bake it just before serving. What are the best sides to serve with Chicken and Cheese Enchiladas Casserole? Some great sides include refried beans, Mexican rice, or a fresh salad. These add color and flavor to your meal. Is it possible to add more vegetables to the recipe? Absolutely! You can add bell peppers, zucchini, or spinach. Just chop them small and mix them in with the chicken. Can I use other types of cheese besides cheddar and Monterey Jack? Yes, feel free to experiment! You can use pepper jack for spice or even queso fresco for a creamy touch. This post covered the tasty Chicken and Cheese Enchiladas Casserole. We looked at the main ingredients, steps to create it, tips to perfect it, and storage methods. You can customize this dish easily with varied ingredients or toppings. Remember, cooking should be fun and creative. I hope you enjoy making this hearty casserole as much as I do. Happy cooking!](https://dailydishly.com/wp-content/uploads/2025/06/88aadb9b-53ae-4392-a371-8958c664e0d2-768x768.webp)
![- 8 oz rice noodles - 1 cup red bell pepper, julienned - 1 cup yellow bell pepper, julienned - 1 cup cucumber, julienned - 1 cup purple cabbage, shredded - 1 cup carrots, grated - 1 cup edamame (shelled) - 1/4 cup fresh cilantro, chopped - 1/4 cup green onions, sliced For the Peanut Sauce: - 1/2 cup creamy peanut butter - 3 tablespoons soy sauce (or tamari for a gluten-free option) - 2 tablespoons lime juice - 1 tablespoon maple syrup (or honey) - 1 tablespoon sesame oil - 1 garlic clove, minced - 1 teaspoon grated fresh ginger - 1-2 tablespoons water (to thin the sauce, as needed) Each serving has about 250 calories. This salad is packed with nutrients. It offers protein and fiber from the noodles and veggies. The peanut sauce adds healthy fats and flavor. Each bite is both tasty and good for you. If you need gluten-free options, use rice noodles and tamari. For vegan alternatives, swap honey for maple syrup. You can also add tofu for extra protein. This salad can fit many diets while still being delicious. You can find the full recipe for Rainbow Thai Peanut Noodle Salad [Full Recipe]. To start, bring a large pot of water to a boil. Use enough water to let the noodles float freely. Once boiling, add 8 oz of rice noodles. Cook them for about 3 to 5 minutes, or until they are firm but tender. Keep an eye on them! After they are cooked, drain them in a colander. Rinse the noodles with cold water. This stops the cooking and keeps the noodles from sticking together. Set them aside while you prep the veggies. While the noodles cook, wash and cut the vegetables. To make it easy, julienne the red and yellow bell peppers. Use a sharp knife for clean cuts. Slice the cucumber and shred the purple cabbage. Grate the carrots too. Aim for uniform pieces so they mix well. Once cut, place all the veggies in a large mixing bowl. This keeps everything together for the next step. You can also add the edamame for extra protein. Now, let’s make the peanut sauce! In a medium bowl, mix 1/2 cup of creamy peanut butter, 3 tablespoons of soy sauce, and 2 tablespoons of lime juice. Add 1 tablespoon of maple syrup for a touch of sweetness. Next, add 1 tablespoon of sesame oil, 1 minced garlic clove, and 1 teaspoon of grated ginger. Whisk these ingredients together until smooth. If the sauce feels thick, add 1-2 tablespoons of water. This helps thin it out to your liking. Now, pour this yummy sauce over the noodles and veggies. Toss gently to coat everything evenly. The flavors will blend beautifully together. For more details, check the Full Recipe. To cook noodles al dente, bring water to a boil. Add rice noodles and cook for about 4-6 minutes. Stir often to prevent sticking. Once done, drain and rinse under cold water. This stops cooking and keeps noodles firm. For crunchy vegetables, cut them just before serving. This keeps their crispness. Use a sharp knife for even slices. Julienne the peppers and cucumber. Shred the cabbage and grate the carrots. Keep them colorful for a vibrant dish. Boost flavor with spices and condiments. A pinch of red pepper flakes gives heat. Add a splash of fish sauce for depth. If you love citrus, lime zest brightens the dish. Fresh herbs make a big difference. Cilantro adds a fresh taste. You can try mint or basil for a twist. Chop herbs finely and mix them in just before serving. Serving bowls set the stage for a great meal. Use larger bowls for family-style serving. For individual plates, choose clear glass bowls. This shows off the colorful layers. Garnishing techniques can elevate your dish. Sprinkle extra cilantro on top for a pop of green. Add chopped peanuts for crunch. Arrange salad in colorful layers for a beautiful view. A rainbow of colors always catches the eye. {{image_2}} You can make this salad heartier by adding protein. Chicken is a great choice. Just grill or sauté it, then slice it thin. Tofu is another option. It soaks up the peanut sauce well. You can also try shrimp or beans for a different flavor. Each adds a nice touch to the Rainbow Thai Peanut Noodle Salad. Switching up the peanut sauce can give your salad new life. You can try a sesame sauce for a nutty twist. Just blend sesame paste with soy sauce and lime juice. For a sweeter flavor, teriyaki sauce works well too. It brings a rich taste that pairs nicely with the fresh veggies. Using seasonal vegetables can enhance your salad's freshness. In summer, add ripe tomatoes or corn for sweetness. Fall brings squash or roasted peppers for warmth. Winter might call for hearty greens like kale. Each season offers unique flavors. Tailoring your recipe helps keep it exciting all year long. For the full recipe, check out the detailed steps to make this dish shine. To store leftovers of your Rainbow Thai Peanut Noodle Salad, put it in the fridge. Use an airtight container to keep it fresh. Glass containers work great because they don’t hold onto smells. If you use plastic, make sure it’s food-safe and BPA-free. You can freeze the salad, but it is best to freeze only the noodles and sauce. Keep the veggies separate. They don't freeze well and lose their crunch. To thaw, move the noodles and sauce to the fridge overnight. When ready to eat, heat the noodles gently and mix in fresh veggies. This keeps everything bright and tasty. In the fridge, the salad lasts about 3 to 5 days. Check for signs of spoilage before eating. If the veggies look wilted or the sauce smells off, it’s best to toss it. Freshness is key for this vibrant dish! What is the best type of noodles for this salad? The best noodles are rice noodles. They are light and soak up the sauce. You can also use soba or whole grain noodles if you prefer. Just remember to cook them until they are al dente. This keeps them from getting too mushy in the salad. Can I make the salad in advance? Yes, you can make the salad ahead of time. It tastes better after chilling for a bit. Prepare it up to a day in advance and store it in the fridge. Just keep the sauce separate if you want the noodles to stay firm. What to do if the sauce is too thick? If your sauce is too thick, add a tablespoon of water. Mix it well, and check again. You can repeat this until it reaches the right consistency. A smooth sauce coats the salad nicely. How to fix overly soggy noodles? To fix soggy noodles, rinse them in cold water. This stops the cooking process and helps firm them up. If they still seem too soft, use them in soups or stir-fries instead. What can I serve with Rainbow Thai Peanut Noodle Salad? This salad pairs well with grilled chicken or shrimp. You can also serve it with spring rolls for a light meal. Add a side of fresh fruit for a sweet touch. Can this dish be served warm? Yes, you can serve this dish warm. Just toss the salad right after mixing it. However, I recommend chilling it first to enhance the flavors. For the full recipe, check out the details provided above. This blog post covered key ingredients for Rainbow Thai Peanut Noodle Salad, including rice noodles, fresh veggies, and tasty peanut sauce. I shared nutritional info, substitutions for dietary needs, and step-by-step cooking instructions. We also explored tips to enhance texture and flavor, various protein additions, and creative presentation ideas. Overall, this salad is versatile and easy to make, perfect for any occasion. Keep it fresh, store leftovers properly, and don't hesitate to try new variations. Enjoy crafting your delicious, colorful dish!](https://dailydishly.com/wp-content/uploads/2025/07/2e038f5f-8562-408c-ae38-174aa7e62a42-768x768.webp)
