Are you ready to impress your friends and family with a delicious dish? Caprese Stuffed Portobellos are easy to make and bursting with flavor. This dish combines juicy mushrooms, fresh tomatoes, mozzarella, and basil for a taste that sings summer. In this article, I’ll give you all the details on ingredients, cooking steps, and tips to make these stuffed delights perfect every time. Let’s dive in and cook up something amazing!
Why I Love This Recipe
- Fresh Ingredients: This recipe highlights the vibrant flavors of fresh tomatoes, basil, and mozzarella, making it a perfect summer dish.
- Easy to Prepare: With just a few simple steps, you can quickly whip up a delicious and visually appealing meal.
- Vegetarian Delight: These stuffed portobello mushrooms are a hearty vegetarian option that even meat lovers will enjoy.
- Perfect for Entertaining: They make a stunning appetizer or main course for gatherings, sure to impress your guests.
Ingredients
List of Ingredients for Caprese Stuffed Portobellos
For this dish, gather these fresh ingredients:
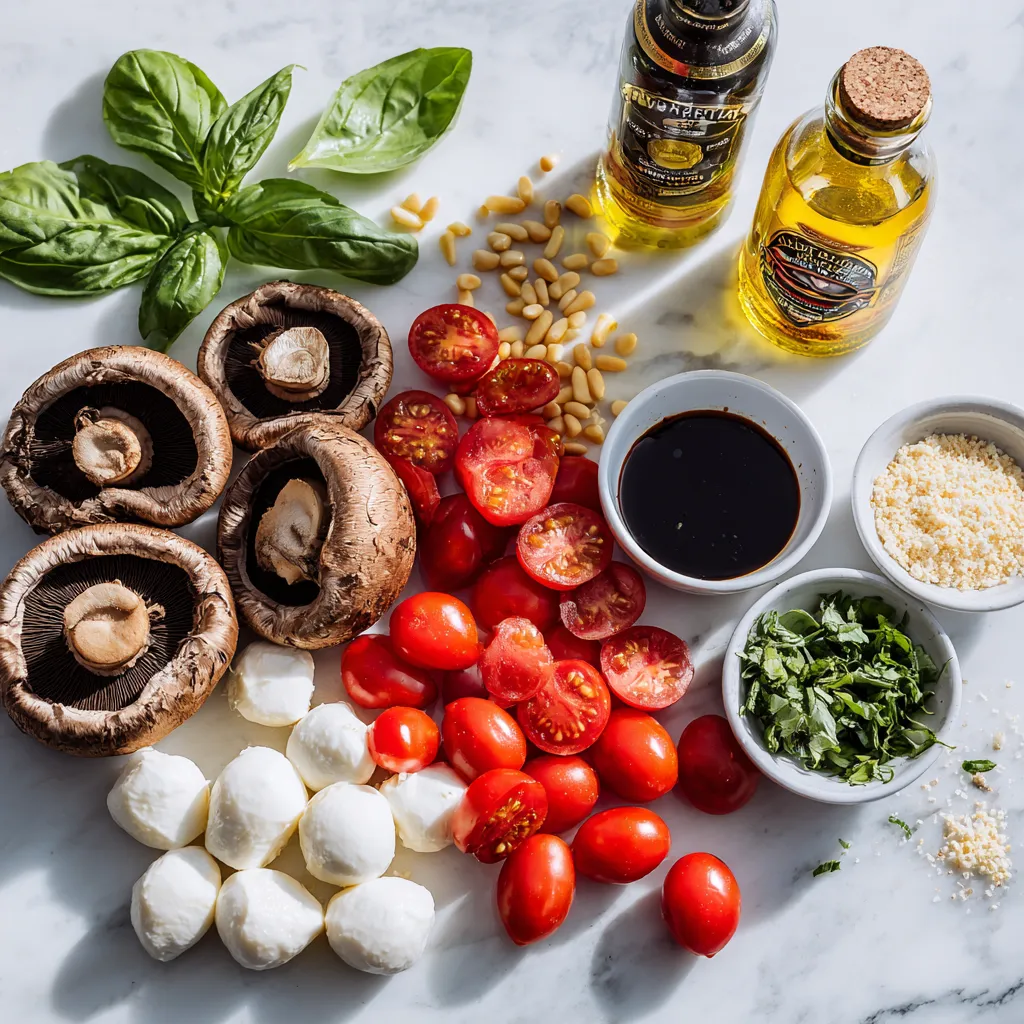
– 4 large portobello mushrooms, stems removed
– 2 cups cherry tomatoes, halved
– 1 cup fresh mozzarella balls (bocconcini), halved
– 1 cup fresh basil leaves, chopped (plus whole leaves for garnish)
– 3 tablespoons balsamic glaze
– 2 tablespoons olive oil
– 1 teaspoon garlic powder
– Salt and pepper to taste
– 1/4 cup pine nuts, toasted
Importance of Fresh Ingredients
Using fresh ingredients makes a big difference. They bring out the best flavors. Fresh mushrooms have a rich, earthy taste. Fresh tomatoes are sweet and juicy. Quality mozzarella makes the dish creamy and delicious. Fresh basil adds a bright note. When you use good ingredients, your Caprese stuffed portobellos shine.
Recommended Brands or Types
I recommend using specific brands for the best results. For mozzarella, try BelGioioso or Galbani. They have great flavor and texture. Look for organic cherry tomatoes. They taste better and are often sweeter. For balsamic glaze, consider Colavita or Napa Valley Naturals. They have a nice balance of sweetness and acidity. When you choose high-quality ingredients, your meal becomes a true delight.
Step-by-Step Instructions
Preparing the Portobello Mushrooms
First, preheat your oven to 375°F (190°C). This helps cook our mushrooms just right. Next, take 4 large portobello mushrooms. Clean them with a damp cloth to remove dirt. Remove the stems and place each cap on a parchment-lined baking sheet. This keeps them from sticking to the pan.
Making the Caprese Filling
In a large bowl, mix 2 cups of halved cherry tomatoes, 1 cup of halved fresh mozzarella balls, and 1 cup of chopped fresh basil. Add 2 tablespoons of olive oil, 1 teaspoon of garlic powder, salt, and pepper to taste. Stir gently to combine all the ingredients. This filling should be colorful and fresh.
Baking the Stuffed Portobellos
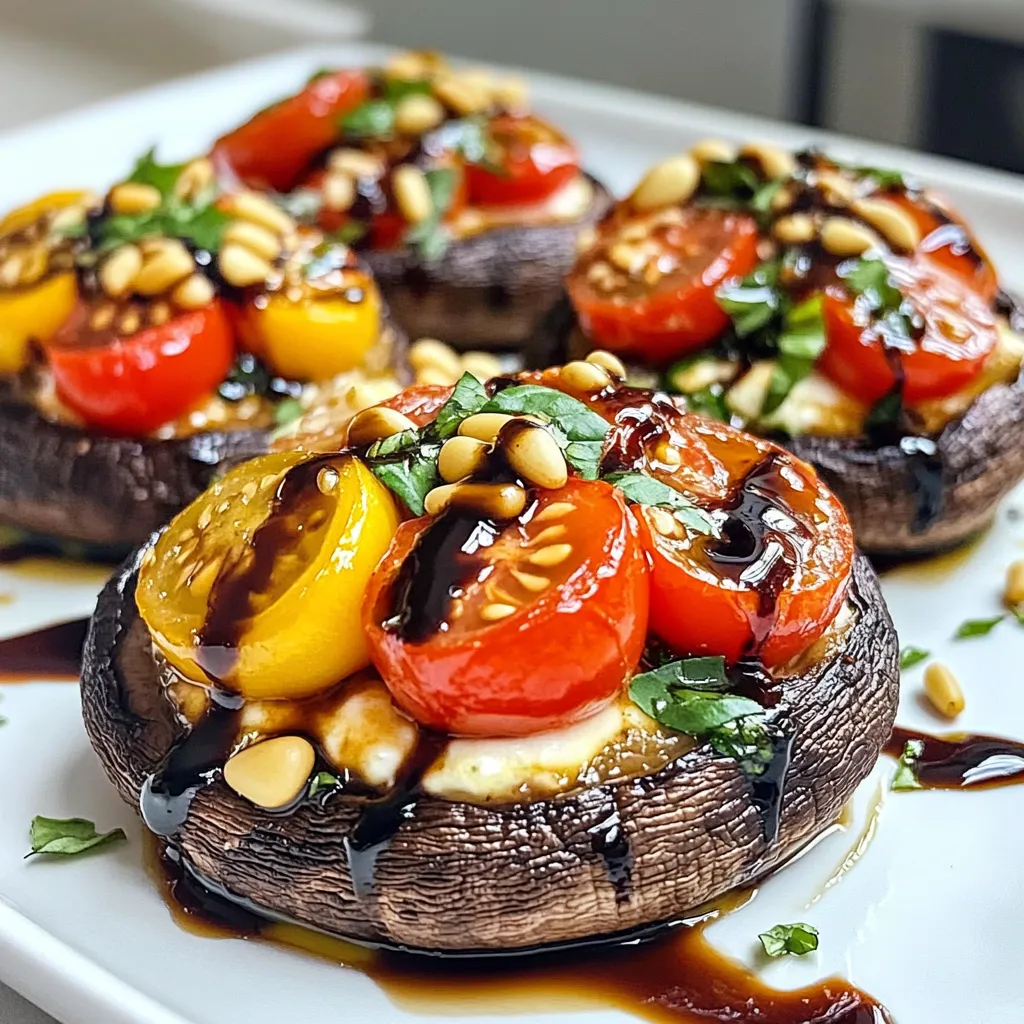
Now, it’s time to fill the mushrooms. Stuff each portobello cap with the tomato and mozzarella mixture. Press down lightly to pack it well. Drizzle 3 tablespoons of balsamic glaze over the stuffed mushrooms for added flavor. Bake them in the oven for 20-25 minutes. You want the cheese to melt and the mushrooms to be tender.
While they bake, toast 1/4 cup of pine nuts in a dry skillet over medium heat for 3-4 minutes. Stir them often to avoid burning. Once the mushrooms are done, sprinkle the toasted pine nuts on top. Add whole basil leaves as a garnish before serving. Enjoy your tasty dish!
Tips & Tricks
Best Practices for Stuffing Mushrooms
Stuffing portobello mushrooms is fun and easy. First, you need to clean the mushrooms well. I use a damp cloth to wipe them down. Next, remove the stems carefully. This creates a nice cup to hold the filling.
When you mix your stuffing, be gentle. You want to combine the cherry tomatoes, mozzarella, basil, olive oil, garlic powder, salt, and pepper well. Make sure each portobello gets a good amount of filling. Press down lightly to pack it in. This helps the flavors come together.
How to Achieve Perfectly Tender Portobellos
To get tender portobellos, start by baking them at the right temperature. I preheat the oven to 375°F (190°C). This heat helps the mushrooms cook evenly.
Baking for 20-25 minutes works well. Keep an eye on them. You want the cheese melted and the mushrooms soft. If you bake them too long, they can get dry.
Drizzling balsamic glaze on top adds flavor. It also gives a nice shine to the dish.
Serving Suggestions and Pairings
These stuffed mushrooms shine as a main dish or a side. I love serving them with a fresh salad. A simple green salad pairs nicely.
You can also serve them with crusty bread. This way, you can scoop up any leftover filling.
For a drink, a light white wine works great. You can also serve sparkling water with lemon. Both options enhance the fresh flavors of the dish.
Pro Tips
- Choose Fresh Ingredients: Always opt for fresh mozzarella and ripe cherry tomatoes for the best flavor in your Caprese stuffed portobellos.
- Adjust Balsamic Glaze: For a sweeter taste, increase the balsamic glaze; for a tangy kick, use less. Adjust to your personal preference!
- Perfectly Toasted Pine Nuts: Keep a close eye on the pine nuts while toasting; they can go from golden to burnt in seconds!
- Experiment with Herbs: Feel free to add other fresh herbs like oregano or thyme to enhance the flavors of the stuffing.
Variations
Vegan Caprese Stuffed Portobellos
You can easily make this dish vegan. Swap the mozzarella for vegan cheese. Look for brands that melt well. Nutritional yeast can add a cheesy flavor too. Use cashew cream or almond ricotta for extra creaminess. Don’t forget to check your balsamic glaze. Some brands contain dairy. Making these changes keeps the same fresh taste.
Gluten-Free Options
This recipe is naturally gluten-free. Portobello mushrooms are gluten-free and safe for all. Just make sure your balsamic glaze has no gluten. Most brands are safe, but it’s wise to read labels. Use gluten-free bread crumbs if you like a crunchy topping. This way, you will enjoy a tasty meal without worries.
Adding Extra Ingredients for Flavor
Want to make your dish even better? Try adding extra ingredients. Chopped sun-dried tomatoes add a rich taste. You might like olives for a salty kick. Capers can also add a nice zing. If you prefer some heat, add sliced jalapeños. Experimenting gives you a new twist on a classic dish.
Storage Info
How to Store Leftover Stuffed Portobellos
To store your leftover stuffed portobellos, let them cool first. Place them in an airtight container. You can keep them in the fridge for up to three days. Be sure to cover them well to keep them fresh.
Reheating Instructions
When you want to enjoy your leftovers, preheat your oven to 350°F (175°C). Place the stuffed portobellos on a baking sheet. Heat them for about 10-15 minutes. This will warm them up without drying them out. You can also use a microwave. Heat them for 1-2 minutes, but the oven is best for taste.
Freezing for Future Meals
If you want to freeze the stuffed portobellos, let them cool completely. Wrap each one in plastic wrap, then store them in a freezer-safe bag. They can last in the freezer for up to three months. When you are ready to eat, thaw them in the fridge overnight. Reheat as mentioned above. Enjoy a tasty meal without the fuss!
FAQs
What are Caprese Stuffed Portobellos?
Caprese stuffed portobellos are a delicious dish made from large portobello mushrooms. I fill these mushrooms with a mix of cherry tomatoes, fresh mozzarella, and basil. The flavors blend well, creating a fresh, vibrant meal. The balsamic glaze adds a sweet touch. This dish is simple yet fancy enough for any occasion.
Can I use different types of cheese?
Yes, you can use different cheeses! While fresh mozzarella gives a soft texture, feel free to try goat cheese or feta. You can also use shredded mozzarella for a melted, gooey finish. Each cheese adds its own flavor. Experiment and find your favorite cheese for this dish.
How long do Caprese Stuffed Portobellos last in the fridge?
Caprese stuffed portobellos last about 3 days in the fridge. Store them in an airtight container. Before eating, simply reheat them in the oven or microwave. They may lose some texture but will still taste great. Enjoy your leftovers!
Caprese stuffed portobellos offer a tasty treat for any meal. We explored key ingredients, showed how to prepare them, and shared great tips. Freshness shines in this dish, so always choose quality items. You can make it vegan or gluten-free too. Lastly, proper storage helps keep leftovers yummy. Enjoy creating your new favorite dis


