Caramel Pumpkin Cheesecake Dip Delightful Fall Treat

Get ready to savor fall with my Caramel Pumpkin Cheesecake Dip! This treat combines creamy goodness, sweet pumpkin, and rich caramel for a perfect snack. Whether you’re hosting a party or enjoying a cozy night in, this dip stands out. Plus, it’s simple to make and can be customized to your taste. Stick around, and I’ll guide you through easy steps and tasty tips for this delightful fall favorite!
Ingredients
To make the Caramel Pumpkin Cheesecake Dip, you will need the following key ingredients:
– 8 oz cream cheese, softened
– 1 cup pumpkin puree (not pumpkin pie filling)
– 1/2 cup powdered sugar
– 1/4 cup brown sugar
– 1 teaspoon vanilla extract
– 1 teaspoon ground cinnamon
– 1/2 teaspoon ground nutmeg
– 1/4 teaspoon ground ginger
– 1/4 cup caramel sauce (plus extra for drizzling)
– Optional dippers: graham crackers, apple slices, pretzel sticks, or vanilla wafers
Each ingredient plays a role in creating a creamy, sweet, and spiced dip. The cream cheese gives the dip its rich texture. Pumpkin puree adds warmth and a lovely color, while the sweeteners balance the flavors. The spices bring out the cozy fall vibes. Caramel sauce adds a luscious sweetness that makes it truly special.
You can choose your dippers based on what you like. Graham crackers add crunch, while apple slices provide a fresh taste. Pretzel sticks bring a salty twist, and vanilla wafers offer a sweet touch. Enjoy mixing and matching!
Step-by-Step Instructions
Preparation Steps
1. Mixing cream cheese and pumpkin: Start by placing 8 oz of softened cream cheese and 1 cup of pumpkin puree in a medium bowl. Use a hand mixer to beat them together. Aim for a smooth, creamy texture. This base gives your dip a rich, delicious flavor.
2. Incorporating sugars: Next, add 1/2 cup of powdered sugar and 1/4 cup of brown sugar. Mix until there are no lumps left. The sugars bring sweetness and help balance the pumpkin’s natural earthiness.
3. Adding spices and vanilla: Now, add 1 teaspoon of vanilla extract, 1 teaspoon of ground cinnamon, 1/2 teaspoon of ground nutmeg, and 1/4 teaspoon of ground ginger. Mix again until everything blends well. These spices add warmth and that cozy fall taste.
4. Folding in caramel sauce: Gently fold in 1/4 cup of caramel sauce. Save a bit for drizzling later. Mix just enough to swirl the caramel through the dip. This step gives your dip a sweet, sticky finish that enhances its flavor.
Serving Suggestions
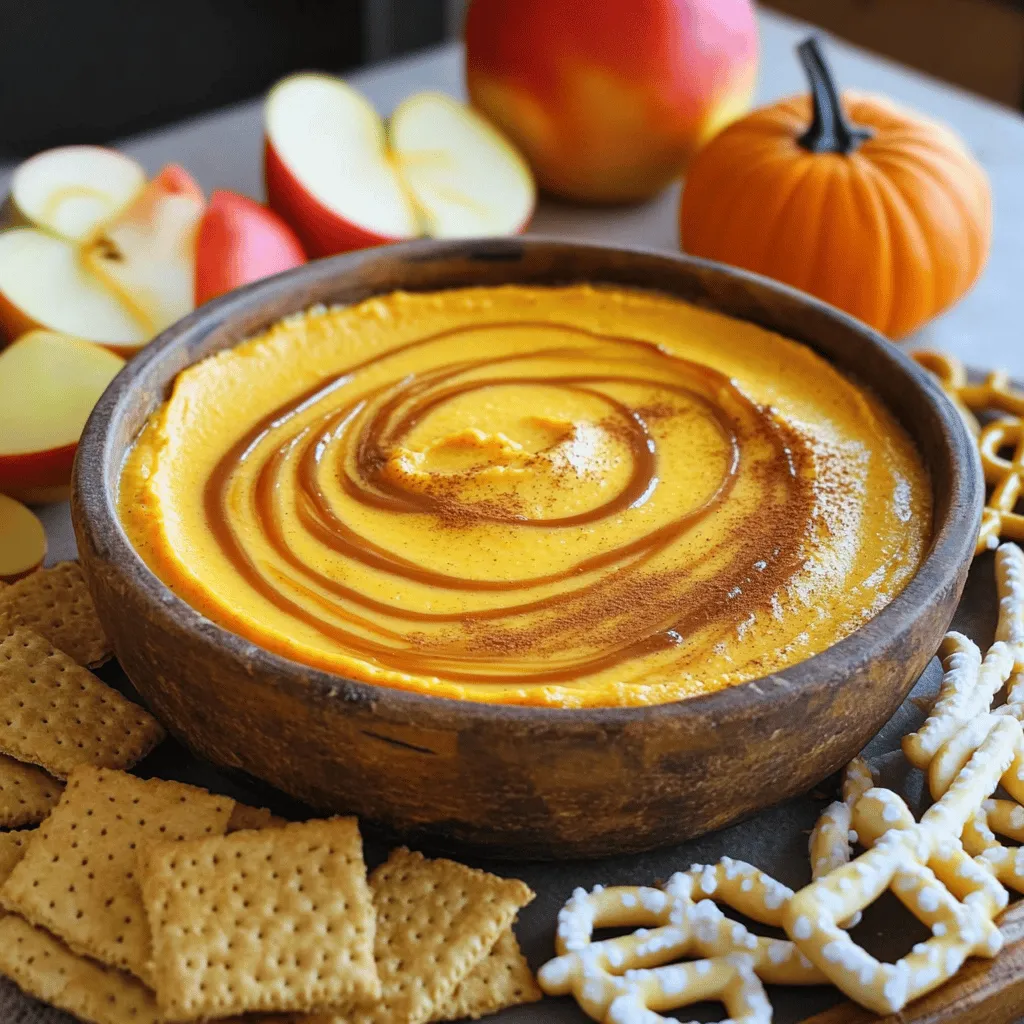
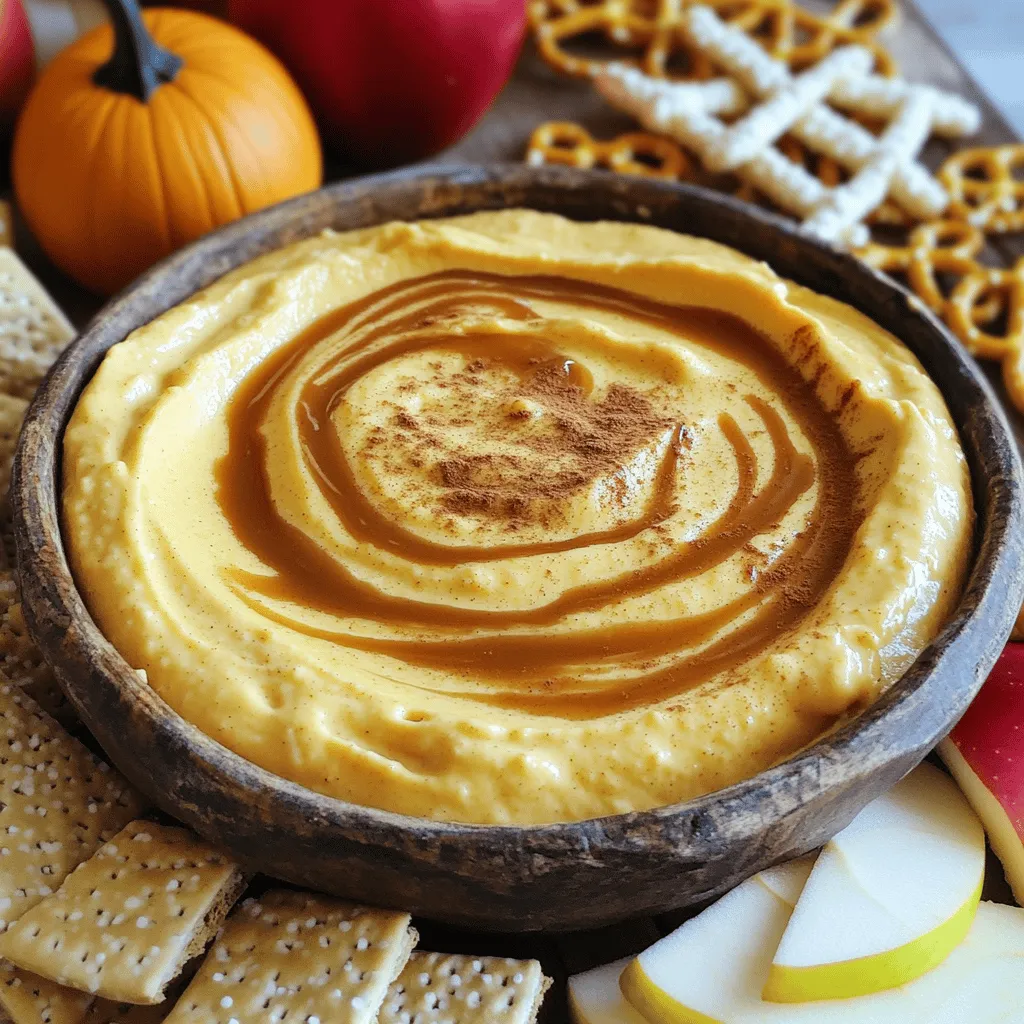
– Presentation tips: Serve the dip in a rustic bowl. Arrange a variety of dippers around it. This makes it look inviting and fun. You can even place a small pumpkin or extra caramel sauce in the center for added flair.
– Recommended dippers: For dipping, try graham crackers, apple slices, pretzel sticks, or vanilla wafers. Each option brings its own unique flavor and texture.
– Garnishing options: Drizzle the reserved caramel sauce on top. Sprinkle a little extra cinnamon for a pop of color. This adds a nice touch to your dip, making it even more appealing.
Tips & Tricks
Making the Dip Smooth
To make your dip smooth, first use softened cream cheese. Cold cream cheese can create lumps. Let it sit at room temperature for about 30 minutes before mixing.
Next, blend the cream cheese and pumpkin puree well. I suggest using a hand mixer for this. It helps to break down any lumps. Mix until the blend is creamy and smooth.
When you add the sugars, do it slowly. This way, they mix in better. Ensure you beat the mixture until each grain dissolves. You want no gritty texture in your dip.
Flavor Enhancements
Spices can really boost the flavor of your dip. I love adding ground cinnamon, nutmeg, and ginger. Each spice brings its own warmth. Feel free to adjust the amounts to suit your taste.
You can also customize the sweetness. If you prefer a sweeter dip, add more powdered sugar. For a less sweet option, cut down on the sugar. Taste as you mix to find your perfect balance.

Variations
Healthier Alternatives
You can enjoy this dip with healthier options. Start with low-fat cream cheese. It cuts calories but keeps the creaminess. You can also use Greek yogurt for a protein boost.
Next, think about sweeteners. You can swap powdered sugar for a sugar substitute. Stevia or monk fruit sweetener both work well. These options keep your dip tasty without the extra sugar.
Seasonal Twists
Add a splash of maple syrup for a sweet twist. It enhances the flavor and gives a cozy feel. You can also try other fall spices. Cardamom or allspice can bring new tastes to the dip.
Mix in some chopped pecans or walnuts for crunch. This addition adds texture and a nutty flavor. Each variation makes the dip a unique treat for your fall gatherings.
Storage Info
Storing Leftovers
To keep your caramel pumpkin cheesecake dip fresh, store it in an airtight container. Make sure to cover it tightly. This helps seal in flavors and moisture. The dip lasts up to five days in the fridge. After that, it may lose its taste and texture.
Reheating and Serving Later
When you’re ready to serve, take the dip out of the fridge. You can enjoy it cold or let it sit at room temperature for about 30 minutes. This will soften it a bit, making it easier to dip. If you want it warm, microwave it in short bursts. Heat it for about 10-15 seconds at a time. Stir in between to ensure even heating. Drizzle with extra caramel sauce before serving for that extra touch.
FAQs
What is the best way to serve Caramel Pumpkin Cheesecake Dip?
To serve this dip, use a rustic bowl. Place it in the center of a platter. Arrange your dippers around the bowl. This makes it look inviting. Drizzle extra caramel sauce on top. You can also sprinkle a bit of cinnamon for flair.
Can I make this dip ahead of time?
Yes, you can make this dip ahead of time. It tastes even better after resting. Just store it in the fridge. Cover it well to keep it fresh. When you are ready to serve, give it a quick stir. Drizzle some fresh caramel on top before serving.
How do I make it gluten-free?
To make this dip gluten-free, choose gluten-free dippers. Use graham crackers that are labeled gluten-free. Apple slices and pretzel sticks are naturally gluten-free. This way, everyone can enjoy the dip without worry.
What dippers pair best with this dip?
Many dippers work well with this dip. Some great options include:
– Graham crackers
– Apple slices
– Pretzel sticks
– Vanilla wafers
Each adds a nice texture and flavor. You can mix and match for fun!
This blog post covered a tasty Caramel Pumpkin Cheesecake Dip. We explored simple ingredients, like cream cheese and pumpkin puree. I shared step-by-step instructions for mixing and serving. You learned tips for making the dip smooth and ways to customize flavors. Seasonal twists and healthier options add variety. Storing tips ensure leftovers stay fresh.
I hope you feel ready to try this easy recipe. Craft your perfect dip, share with friends, and enjoy every bite!


![To make a No-Bake Oreo Cheesecake, you need a few key items. Here’s what you’ll need: - 24 Oreo cookies (plus extra for garnish) - 4 tablespoons unsalted butter, melted - 16 oz cream cheese, softened - 1 cup powdered sugar - 1 teaspoon vanilla extract - 1 cup heavy whipping cream - 1/2 cup mini chocolate chips (optional) These ingredients create a rich and creamy dessert that everyone loves. You can amp up the taste with a few fun additions. Consider these options: - Crushed peppermint candies for a minty twist - A splash of coffee or espresso for depth - Different flavored cookies, like peanut butter Oreos These extras can give your cheesecake a unique flair. If you’re missing an item, don’t worry! Here are some swaps you can use: - Use gluten-free cookies if you need a gluten-free option. - For a lighter version, try low-fat cream cheese. - Sour cream can replace some cream cheese for tanginess. These substitutions help you customize the recipe to suit your taste or dietary needs. Always remember to check for allergies when serving to others. For the full recipe, you can refer to the details shared above. Enjoy creating this delightful dessert! To start, gather your ingredients. You need 24 Oreo cookies and 4 tablespoons of melted butter. Place the cookies in a food processor. Crush them into fine crumbs. Once you have crumbs, add the melted butter. Pulse the mixture until it's well combined. This should look like wet sand. Next, take a 9-inch springform pan. Press the Oreo mixture firmly into the bottom. Make sure it is even and compact. This crust will hold everything together. Now, put the pan in the refrigerator. Let it chill while you make the filling. Now, let’s focus on the cheesecake filling. You’ll need 16 oz of softened cream cheese, 1 cup of powdered sugar, and 1 teaspoon of vanilla extract. In a large bowl, beat the cream cheese until smooth with an electric mixer. Gradually add the powdered sugar and vanilla. Mix until fully combined. In another bowl, pour in 1 cup of heavy whipping cream. Whip it until stiff peaks form. This will make your cheesecake light and fluffy. Gently fold the whipped cream into the cream cheese mixture. If you like, fold in 1/2 cup of mini chocolate chips for extra flavor. Now, let’s bring it all together. Take the chilled Oreo crust from the refrigerator. Spoon the cheesecake filling over the crust. Smooth the top with a spatula for a nice finish. Cover the pan with plastic wrap. Place it back in the refrigerator and let it chill for at least 4 hours. For the best results, let it chill overnight. This helps the cheesecake set firmly. Once set, remove the cheesecake from the springform pan. Garnish with crushed Oreo cookies on top. Now, slice it into wedges and serve. Enjoy your creamy, delicious no-bake Oreo cheesecake! For the complete recipe, check out the [Full Recipe]. When making a no-bake Oreo cheesecake, avoid overmixing your cream cheese. This can make it too runny. Also, don’t forget to chill the crust before adding the filling. A warm crust can melt the filling. Lastly, use softened cream cheese. Cold cream cheese does not mix well and can cause lumps. To get a smooth texture, beat the cream cheese until creamy before adding sugar. Mix slowly when adding the whipped cream. This keeps the air in the mixture, making it light. If you want a firmer cheesecake, chill it longer. I recommend overnight for the best results. You can make your cheesecake even better. Try adding mini chocolate chips for a fun crunch. You might also mix in crushed Oreos for extra flavor. If you like a hint of coffee, add a teaspoon of espresso powder. This adds depth without overpowering the Oreo flavor. For a fruity twist, use a layer of fruit puree on top. It looks great and tastes amazing! For more details, check out the Full Recipe. {{image_2}} You can have fun with flavors! Instead of Oreos, try using other cookies. For a classic taste, use graham crackers. If you love chocolate, use chocolate sandwich cookies. You can even mix in fruit flavors. Adding lemon or strawberry can brighten your cheesecake. Just swap the cookie crust and adjust the filling to match your new flavor. Want a lighter version? You can use low-fat cream cheese. It still tastes great! Substitute Greek yogurt for some of the cream cheese. This adds protein and cuts fat. You can also use a sugar substitute if you want fewer calories. For the crust, replace regular cookies with whole grain options. These swaps help make a lighter cheesecake without losing the taste. Toppings can change the whole dessert! Besides crushed Oreos, think about fresh fruit. Strawberries and raspberries add color and flavor. You can drizzle chocolate or caramel sauce on top. Whipped cream is always a hit too. For a fun crunch, sprinkle nuts or toffee bits on each slice. Get creative and mix different toppings for a unique look and taste! For the full recipe, check out the details above. Enjoy making your own variations! To keep your No-Bake Oreo Cheesecake fresh, cover it tightly with plastic wrap. You can also use an airtight container. Store it in the refrigerator. It will stay good for up to five days. Make sure it is fully set before covering it. This will help keep the texture perfect. If you want to keep your cheesecake longer, freezing is a great option. First, let the cheesecake chill completely in the fridge. Then, wrap it in plastic wrap, and follow with aluminum foil. This double layer helps prevent freezer burn. It can last up to three months in the freezer. To enjoy it, move the cheesecake to the fridge to thaw overnight. When serving leftovers, use a sharp knife to cut clean slices. Wipe the knife after each cut for neat edges. If you have extra toppings, like whipped cream or chocolate sauce, add them right before serving. This keeps them fresh and tasty. Enjoy your leftovers within three days for the best flavor! It takes about 4 hours for the cheesecake to set. For the best results, chill it overnight. This gives the filling time to firm up. You want it to hold its shape when you slice it. If you rush this step, the cheesecake may be too soft. You need both cream cheese and whipped cream for this recipe. Cream cheese adds the rich flavor. The whipped cream makes the cheesecake light and fluffy. If you only use cream cheese, it will be too dense. Stick to the recipe for the best taste. To cut a no-bake cheesecake, use a sharp knife. Dip the knife in hot water and wipe it dry before cutting. This method helps create clean slices. You can also use a thin spatula to lift out each piece. Enjoy serving this beautiful dessert! This blog covered how to make a no-bake Oreo cheesecake step by step. We explored essential and optional ingredients, plus tips for perfect texture. I also shared variations to make this dessert fit your taste and healthier choices. Finally, I included storage methods and answers to common questions. You now have the tools to create a delicious cheesecake and impress everyone. Enjoy making this tasty treat!](https://dailydishly.com/wp-content/uploads/2025/07/9651beeb-141b-494d-95f3-40869f463a5c-768x768.webp)
