Skip to content
About
Contact
Cookie Policy
Copyright Policy
Disclaimer
Search
Home
Dinner
Appetizer
Desserts
Drinks
About
Contact
Privacy Policy
Toggle Menu
Home
/
Dinner
- Page 38
Dinner
31. Stuffed Bell Peppers with Quinoa Simple Delight
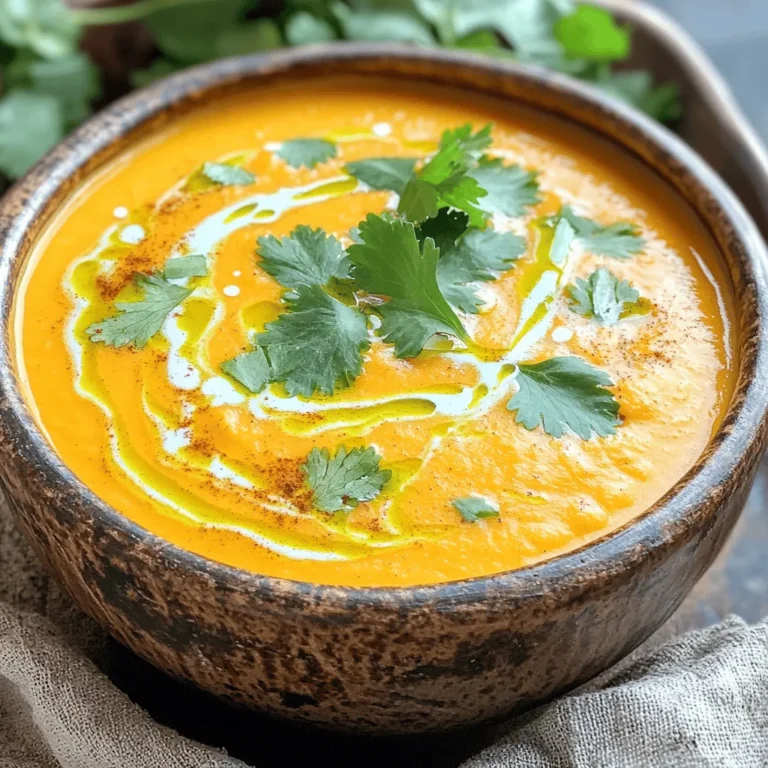
30. Moroccan Spiced Carrot Soup Savory and Warm Dish
27. Spaghetti Aglio e Olio Simple and Tasty Recipe
26. Teriyaki Grilled Tofu Skewers Tasty and Healthy Meal
Classic French Onion Soup Savory and Heartwarming Bowl
22. Indian-Spiced Chickpea Stew Flavorful and Satisfying
21. Zucchini Noodles with Pesto Flavorful and Fresh Dish
Garlic Butter Shrimp and Asparagus Tasty Weeknight Dish
Garlic Butter Shrimp Scampi Simple and Tasty Recipe
63. Spiced Lentil Soup Flavorful and Nourishing Recipe
Page navigation
Previous Page
Previous
1
…
36
37
38
39
40
…
44
Next Page
Next
Home
Dinner
Appetizer
Desserts
Drinks
About
Contact
Privacy Policy
Toggle Menu Close
Search for:
Search


![To make Indian-spiced chickpea stew, you need a few key ingredients: - 2 cups canned chickpeas, drained and rinsed - 1 onion, finely chopped - 2 cloves garlic, minced - 1 tablespoon ginger, grated - 1 can (14 oz) diced tomatoes - 1 can (14 oz) coconut milk - 2 cups vegetable broth - 1 tablespoon curry powder - 1 teaspoon ground cumin - 1 teaspoon turmeric powder - 1/2 teaspoon red chili powder (adjust to taste) - 1 tablespoon olive oil - Salt and pepper to taste These ingredients blend together to create a hearty and flavorful stew. The chickpeas add protein, while the spices give it warmth and depth. For added flavor and color, consider these garnishes: - Fresh cilantro, chopped - A squeeze of lime juice - Sliced green chilies These garnishes not only enhance the stew's look but also add fresh notes to each bite. To prepare this stew, you will need: - A large pot or Dutch oven - A wooden spoon for stirring - A cutting board and knife for chopping Having the right tools makes cooking easier. You can focus on enjoying the process and the final dish. For the complete list of ingredients and detailed instructions, refer to the Full Recipe. Start by heating olive oil in a large pot over medium heat. When the oil is warm, add the chopped onion. Cook the onion for about five minutes until it becomes soft and clear. This step builds the base of flavor. Next, stir in the minced garlic and grated ginger. Cook for one more minute until it smells great. Now, it’s time to add the spices. Toss in the curry powder, ground cumin, turmeric powder, and red chili powder. Stir them into the onions, garlic, and ginger. Cook the spices for two minutes. This helps them release their rich flavors. After that, pour in the diced tomatoes with their juice and the can of coconut milk. Mix it all together, then add the vegetable broth. Add in the rinsed chickpeas next. They will add protein and texture to the stew. Season with salt and pepper to taste. Bring the stew to a gentle simmer. Once it simmers, reduce the heat to low. Cover the pot and let it cook for 20 to 25 minutes. Stir occasionally to blend the flavors. If you want a thicker stew, mash some chickpeas with the back of a spoon. This complete cooking process creates a dish that is flavorful and satisfying. For the full recipe, refer to the section above. Serve the stew hot, topped with fresh cilantro for a nice touch. To boost the taste of your Indian-spiced chickpea stew, try these tips: - Use fresh spices: Always check your spice shelf. Old spices lose flavor. - Add acidity: A splash of lemon juice can brighten the dish. - Experiment with herbs: Fresh cilantro adds a nice touch at the end. - Toast spices: Briefly cook your spices in oil to bring out their flavor. These steps help layers of flavor shine through. You will taste the difference in every bite. Here are some common errors to steer clear of: - Skipping the sauté: Don’t rush the onion and garlic stage. This builds a solid base. - Overcooking chickpeas: If you use dried chickpeas, soak and cook them properly. They should be tender but not mushy. - Ignoring seasoning: Taste as you go. Adjust salt and pepper to your liking. - Not letting it simmer: Allowing the stew to simmer helps meld all the flavors. By avoiding these mistakes, your stew will be more delicious and satisfying. When it's time to serve, consider these ideas: - Serve with rice: White or brown rice pairs well and soaks up the stew. - Add bread: Naan or crusty bread makes a great side. - Top with yogurt: A dollop of plain yogurt can add creaminess and balance spice. - Garnish: Fresh cilantro is a must for color and taste. Feel free to explore and create your own serving style. Enjoy your meal! For the full recipe, check out the details above. {{image_2}} You can easily boost this stew’s protein. Try adding cooked chicken, beef, or tofu. Each option brings a different taste. For chicken, use shredded pieces. For beef, try ground or diced. Tofu works well when cubed and pan-fried. This adds texture and flavor. You can mix and match to your liking. This Indian-spiced chickpea stew is already vegan. It’s packed with plant-based goodness. If you want to switch it up, add more veggies. Spinach, kale, or sweet potatoes work great. These veggies add nutrients and color. You can also serve it over rice or quinoa for a complete meal. You can swap ingredients based on what you have. For instance, use lentils if you don’t have chickpeas. They cook faster and soak up flavors well. If you lack coconut milk, try almond or soy milk. Just remember, this will change the taste slightly. You can also use any vegetable broth you like. The stew remains flexible and tasty no matter the changes. For the full recipe, check out the [Full Recipe]. I love saving leftovers from my Indian-spiced chickpea stew. To store them, let the stew cool first. Use an airtight container for best results. You can keep it in the fridge for up to three days. If you want to save it longer, freezing is a good option. Reheating is simple. Pour the stew into a pot. Heat it over medium heat on the stove. Stir occasionally to avoid burning. You can also use a microwave. Place the stew in a microwave-safe bowl. Heat it for one to two minutes, stirring halfway through. Make sure it’s hot all the way through before you eat. To freeze the stew, use a freezer-safe container. Leave some space at the top for expansion. This stew can last up to three months in the freezer. When you’re ready to eat, thaw it in the fridge overnight. Then, reheat it using the steps above. Enjoy your delicious meal again! For the full recipe, check out the link provided. To make your Indian-Spiced Chickpea Stew spicier, add more red chili powder. Start with an extra 1/2 teaspoon. If you want more heat, add some chopped green chilies. You can also use fresh ginger or a dash of cayenne pepper. Keep tasting as you go. Adjust the spice level to your liking. Remember, you can always add more, but you can't take it out! Yes, you can use dried chickpeas! Just soak them overnight in water. After soaking, cook them until soft before adding to your stew. This may take about 1 to 2 hours. Be sure to adjust the cooking time in the recipe. Dried chickpeas have a great texture and flavor that can enhance your dish. This stew pairs well with many sides. Serve it with rice or warm naan bread. You can also enjoy it with a fresh salad for a light touch. Consider adding yogurt or raita for creaminess. This balance will elevate your meal. For more ideas, check the Full Recipe for suggestions! This article covered how to make Indian-Spiced Chickpea Stew, from main ingredients to cooking steps. We explored tips for enhancing flavors, avoiding common mistakes, and serving suggestions. You learned about variations, storage, and answering common questions. Enjoying this stew is a delightful experience. Remember, feel free to adjust the spices and toppings to make it your own. Cooking should be fun and creative!](https://dailydishly.com/wp-content/uploads/2025/06/561fcdd4-13bb-4dd2-b7b4-b44f6a9d9028-768x768.webp)
![To make zucchini noodles with pesto, gather these main ingredients: - 3 medium zucchinis, spiralized into noodles - 1 cup fresh basil leaves - 1/4 cup pine nuts (toasted) - 1/4 cup grated Parmesan cheese (or nutritional yeast for a vegan option) - 2 garlic cloves, minced - 1/3 cup extra-virgin olive oil - Salt and pepper to taste These ingredients create a fresh and bright dish that is full of flavor. The zucchini noodles serve as a light base, while the pesto adds richness. You can enhance the dish with these optional ingredients: - 1/2 cup sun-dried tomatoes, chopped (in oil for extra flavor) - 1/4 teaspoon crushed red pepper flakes (optional) Adding sun-dried tomatoes gives a nice tang and sweetness. The red pepper flakes can add a bit of heat if you like spice. This dish is not just tasty; it also packs a healthy punch. Here’s a quick look at the nutritional benefits: - Zucchini: Low in calories, high in fiber, and rich in vitamins A and C. - Basil: Contains antioxidants and supports heart health. - Pine Nuts: Offer healthy fats and protein. - Parmesan Cheese: Adds calcium and flavor. - Olive Oil: A good source of healthy fats and antioxidants. Each serving is light yet filling, making it a great choice for lunch or dinner. You can find the full recipe [here]. To make fresh pesto, gather your ingredients. You will need basil leaves, toasted pine nuts, Parmesan cheese, minced garlic, and olive oil. Place these in a food processor. First, pulse the basil, pine nuts, cheese, and garlic together. Add a pinch of salt and pepper. While the processor runs, slowly pour in the olive oil. This helps achieve a smooth and creamy texture. After blending, taste your pesto. Adjust the seasoning to your liking. Set it aside for now. Next, grab your zucchinis. Spiralize them into noodle shapes. In a large skillet, heat a tablespoon of olive oil over medium heat. Add the zucchini noodles once the oil is hot. Sauté for about 2-3 minutes. Keep them slightly crunchy, or al dente. This step is key, as overcooking can make them mushy. Once cooked, remove the skillet from heat. Now, it’s time to mix everything together. Add the pesto to the skillet with the zucchini noodles. Stir well to coat the noodles evenly. This is where the magic happens! Next, add chopped sun-dried tomatoes for extra flavor. If you like spice, sprinkle in crushed red pepper flakes. Toss all the ingredients together until well mixed. Serve your dish right away. Presentation matters, so use a large bowl. Create a nest of zucchini noodles and drizzle extra pesto on top. Garnish with toasted pine nuts for a beautiful finish. Enjoy your flavorful and fresh Zucchini Noodles with Pesto! For the full recipe, check [Full Recipe]. When picking zucchini, look for firm ones that are bright in color. Avoid any with soft spots or wrinkles. Smaller zucchinis taste better and are less watery. Aim for ones about six to eight inches long. This ensures a nice, crisp bite in your dish. You can also check the stem; it should be fresh and green. To make your pesto extra creamy, use a good blender or food processor. Start by blending the basil, pine nuts, and garlic first. Then, slowly add the olive oil while blending. This helps to emulsify the oil, making it smooth. You can add a bit more cheese or even a splash of lemon juice. This brightens the flavor and keeps it fresh. One common mistake is cooking zucchini for too long. Zucchini cooks quickly, so aim for just 2-3 minutes. This keeps it al dente and tasty. Also, avoid adding too much salt at the start. Salt pulls out moisture, making your noodles soggy. Instead, season them lightly before adding your pesto. Finally, don’t overcrowd the pan; cook in batches if needed. For the full recipe, check out the [Full Recipe]. {{image_2}} You can easily make this dish vegan. Instead of Parmesan cheese, use nutritional yeast. This swap gives a cheesy flavor without dairy. You still get a creamy pesto. Blend the rest of the ingredients as usual. This keeps the dish rich and tasty. If you have other dietary needs, don't worry. You can switch out ingredients. For gluten-free options, use gluten-free pasta or spiralized veggies. If you need a nut-free recipe, skip the pine nuts. Use sunflower seeds instead. These simple swaps keep the dish enjoyable for everyone. Zucchini is great, but you can change things up. Try adding fresh herbs like parsley or mint. They give a new twist to the flavor. You can also mix in seasonal veggies. In summer, add cherry tomatoes for sweetness. In fall, try roasted butternut squash for warmth. Each season brings fresh options. Enjoy the tasty variety! Store any leftover zucchini noodles with pesto in an airtight container. You want to keep them fresh and tasty. Place the container in the fridge. They will stay good for about two days. Add a few drops of olive oil to prevent sticking. This keeps the noodles from clumping together. If you used sun-dried tomatoes, they can add extra moisture. So, check for sogginess before storing. To reheat your zucchini noodles, use a skillet. Heat it on low to medium heat. Add a little olive oil to the pan, then toss in the noodles. Stir for about two to three minutes. This warms them up without making them mushy. You can also use a microwave. Put the noodles in a bowl and cover it. Heat on medium for about a minute or two. Check and stir halfway through to ensure even heating. Freezing zucchini noodles is not ideal. They can become watery when thawed. However, you can freeze pesto easily. Put it in ice cube trays for easy use later. Once frozen, pop the cubes into a bag. You can use frozen pesto straight from the freezer. Just add it to hot noodles, and it will melt right in. This way, you can enjoy homemade flavor anytime! For the full recipe, check out the details above. Yes, you can use other veggies. Carrots, bell peppers, or squash work well. Spiralize them just like zucchini. They add nice colors and flavors too. Each will give a new twist to your dish. Just remember to cook them until tender, but not mushy. To make nut-free pesto, skip the pine nuts. Use sunflower seeds instead. They blend nicely and add a good texture. You can also use hemp seeds for a different taste. The rest of the pesto stays the same. Use fresh basil and garlic for that classic flavor. Zucchini noodles with pesto pair well with many sides. A fresh salad adds crunch and brightness. Garlic bread is a great choice for dipping. You could also serve grilled chicken or shrimp on top for protein. Enjoy this dish with a light white wine for a special touch. For more ideas, check the Full Recipe for inspiration. Zucchini noodles with pesto offer a tasty and healthy meal. We covered the key ingredients and how to make them. I shared steps for cooking, tips for selecting fresh zucchini, and variations to suit diets. Proper storage and reheating tips will keep leftovers tasty. Remember, experimenting with flavors makes cooking fun. Enjoy your meal, and don’t hesitate to try new things in the kitchen.](https://dailydishly.com/wp-content/uploads/2025/06/e06d07df-0eee-433f-a13f-76c167ac26ec-768x768.webp)
![To make Garlic Butter Shrimp and Asparagus, you need just a few simple ingredients. Each one adds flavor and texture to the dish. Here’s what you’ll need: - 1 pound large shrimp, peeled and deveined - 1 bunch asparagus, trimmed and cut into 2-inch pieces - 4 tablespoons unsalted butter - 4 cloves garlic, minced - 1 teaspoon red pepper flakes (optional) - Zest of 1 lemon - 2 tablespoons fresh lemon juice - Salt and pepper, to taste - Fresh parsley, chopped (for garnish) These ingredients come together to create a tasty weeknight meal. The shrimp provides protein, and asparagus adds crunch. The garlic and butter give it a rich flavor. Lemon zest and juice brighten the dish, while parsley adds a fresh touch. When you gather these ingredients, think about the freshness. Fresh shrimp and asparagus make a big difference. Use good quality butter for the best taste. You can find the full recipe in the section above. - Melt butter and sauté garlic. - Cook shrimp until pink. - Add asparagus and remaining butter. To start, I melt two tablespoons of butter in a large skillet over medium heat. Once the butter is hot, I add minced garlic. I sauté it for about one minute until it smells great. Next, I add the shrimp to the skillet in a single layer. I season them with salt, pepper, and red pepper flakes if I want some heat. I cook the shrimp for 2-3 minutes, flipping them halfway, until they turn pink. After the shrimp nearly cooks through, I push them to one side of the skillet. I then add asparagus to the other side. I add the last two tablespoons of butter to the asparagus. I stir it to coat the pieces in butter. I let it cook for 4-5 minutes until the asparagus is tender but still crisp. I stir occasionally to make sure everything cooks evenly. - Mix shrimp with asparagus. - Incorporate lemon zest and juice. - Adjust seasoning to taste. Once the shrimp and asparagus are both cooked, I mix them together in the skillet. I then add lemon zest and lemon juice for brightness. This step makes the dish pop with flavor. I toss everything to combine well and cook for another minute until heated through. Finally, I taste the dish and adjust the seasoning with more salt and pepper if needed. - Recommended heat levels. - Cooking times for optimal texture. For best results, I keep the heat at medium to cook the shrimp and asparagus evenly. Cooking shrimp takes about 2-3 minutes until it turns pink. For asparagus, I recommend around 4-5 minutes. This timing keeps the vegetables crisp-tender. If you follow these steps, your Garlic Butter Shrimp and Asparagus will be a tasty weeknight dish that everyone loves. You can find the Full Recipe for more details. To know when shrimp is done, look for a pink color. The shrimp should curl into a C shape. If it’s straight, it is overcooked. Aim for 2-3 minutes on each side. This keeps shrimp juicy and tender. Use a timer to avoid guesswork. For crisp-tender asparagus, cook for about 4-5 minutes. It should be bright green and still firm. Start with fresh asparagus. Trim the ends for better texture. You can snap them off using your hands. This method removes the tough part easily. Try adding fresh herbs like basil or thyme for extra taste. You can also sprinkle some lemon zest on top for brightness. Serve the dish on a colorful plate. Garnish with parsley for a pop of color. This makes your meal more appealing and fun to eat. For the full recipe, check the link above. {{image_2}} You can switch shrimp for chicken or tofu. Chicken gives a hearty feel. Tofu is great for a meatless meal. If using chicken, cut it into bite-sized pieces. Cook it for about 6-8 minutes until fully cooked. If using tofu, use firm tofu and cook it for about 5-7 minutes. This keeps it crispy and delicious. Feel free to add other veggies to your dish. Bell peppers and snap peas work well. They add color and crunch. You can also use mushrooms or zucchini. Just remember to adjust cooking times. For bell peppers, add them with the shrimp. Cook for about 3-4 minutes. For snap peas, toss them in with the asparagus. Cook for 2-3 minutes for a nice bite. Try adding different herbs or spices for a new flavor. Basil or thyme can give a nice twist. You can also add some lemon pepper for extra zing. Using flavored oils or butters can change the taste too. Garlic-infused oil adds depth, while lemon butter gives a fresh touch. Experimenting can make this dish exciting every time you cook it! For the complete recipe, check out the [Full Recipe]. To keep Garlic Butter Shrimp and Asparagus fresh, place leftovers in an airtight container. This helps lock in moisture and flavor. Store the dish in the fridge, where it will last for 2-3 days. If you want to enjoy it later, make sure to refrigerate it as soon as possible after cooking. You can freeze this dish, but keep in mind that shrimp can change texture. To freeze, place the cooled dish in a freezer-safe container. Be sure to remove as much air as possible. It will keep well for about 2-3 months. When you are ready to eat it, thaw it overnight in the fridge. When reheating your Garlic Butter Shrimp and Asparagus, I recommend these methods: - Microwave: Place it in a microwave-safe dish. Heat in short bursts, stirring in between, to avoid uneven cooking. - Stovetop: Heat in a skillet over low heat. Stir gently until warmed through. - Oven: Preheat the oven to 350°F. Place the dish in an oven-safe pan and cover with foil. Heat for about 15-20 minutes. These methods help keep your shrimp and asparagus tasty and enjoyable! Yes, you can use frozen shrimp. In fact, frozen shrimp can be just as good as fresh! To use frozen shrimp, you’ll want to thaw them first. Place them in the fridge overnight or run them under cold water for a quick thaw. After thawing, pat them dry. This helps the shrimp cook evenly and avoids excess water in your dish. Fresh shrimp should look moist and glossy. Look for a slight sheen on the shells. The flesh should be firm and not slimy. If you notice a strong fishy smell, it’s best to avoid that shrimp. Fresh shrimp should smell mild and sweet, like the ocean. You have many tasty options! Garlic Butter Shrimp and Asparagus pairs well with: - Rice - Quinoa - Pasta - Crusty bread You can also serve it with a fresh salad or steamed vegetables for a healthy side. Yes, this dish is perfect for meal prep. You can cook a big batch and store it in the fridge. Just keep the shrimp and asparagus in an airtight container. They will stay fresh for about three days. When you're ready to eat, reheat it in the microwave or on the stove. This dish also tastes great warm or at room temperature. For the full recipe, check out the details above! This blog post covered the essentials for making Garlic Butter Shrimp and Asparagus. You learned about the ingredients, step-by-step prep, and cooking tips. I provided variations to customize your dish and storage guidelines for leftovers. Remember, cooking shrimp is all about timing, and fresh ingredients make a big difference. I hope these tips help you create a meal that's tasty and memorable. Enjoy your cooking adventure!](https://dailydishly.com/wp-content/uploads/2025/06/c728854f-8c75-4a77-a1c9-2cca00683957-768x768.webp)

![To make a tasty spiced lentil soup, gather these key ingredients: - 1 cup green or brown lentils, rinsed - 1 tablespoon olive oil - 1 medium onion, diced - 2 cloves garlic, minced - 2 medium carrots, diced - 2 celery stalks, diced - 1 teaspoon ground cumin - 1 teaspoon ground coriander - 1/2 teaspoon smoked paprika - 1/4 teaspoon cayenne pepper (adjust to taste) - 1 can (14 oz) diced tomatoes - 6 cups vegetable broth - 1 bay leaf - Salt and pepper to taste - Fresh cilantro, chopped (for garnish) - Lemon wedges (for serving) These ingredients create a warm and filling soup. The lentils are the star, giving protein and fiber. The spices add a nice kick and depth of flavor. You can make your soup even better with extra touches. Here are some fun ideas: - Avocado slices for creaminess - Chopped green onions for a fresh crunch - A dollop of yogurt for richness - A sprinkle of feta cheese for a tangy twist These add-ins not only add flavor but also make the soup look pretty. If you need to change the amounts, here are some quick tips: - 1 cup equals 240 ml - 1 tablespoon equals 15 ml - 1 teaspoon equals 5 ml If you want to double the recipe, just multiply each amount by two. This way, you can share the joy of this soup with more people! For the full recipe, check out the complete guide. Start by heating the olive oil in a large pot over medium heat. This oil adds great flavor. Add the diced onion and sauté it for about 5 minutes. You want it to turn soft and clear. Next, stir in the minced garlic, diced carrots, and diced celery. Cook these for another 5 minutes. Stir them often until the veggies soften. This mix of aromatics forms the base of your soup. Once your aromatics are ready, it's time to add the lentils. Pour in the rinsed green or brown lentils. Then, add the canned diced tomatoes with their juice. Next, pour in the vegetable broth and add the bay leaf. This broth gives your soup deep taste. Bring the mix to a boil, and then reduce the heat. Let it simmer uncovered for about 30 to 35 minutes. Stir occasionally until the lentils are tender. After the lentils cook, remove the bay leaf. This step is important, as the leaf does not taste good. Season your soup with salt and pepper. If it seems too thick, you can add more broth. Adjust it to your liking. Finally, serve the soup hot. Garnish with fresh cilantro and a squeeze of lemon juice for added flavor. Enjoy your warm, spiced lentil soup! You can find the full recipe [here]. To get the richest taste, use fresh spices. Ground spices lose their kick over time. I recommend buying whole spices and grinding them. This adds a nice depth to your soup. Also, let your spices toast for a minute before adding liquid. This step brings out their natural oils and flavors. Cooking lentils is easy. Rinse them well to remove dirt. I prefer green or brown lentils for this soup. They hold their shape better. Always check the cooking time on the package. Most lentils need 20 to 30 minutes. If you overcook them, they can turn mushy. Serve the soup hot for the best experience. A dollop of yogurt or sour cream adds creaminess. Fresh cilantro brightens the dish and adds flavor. You can also squeeze some lemon juice on top. For a complete meal, pair it with crusty bread or a salad. This soup is filling and perfect for any day. Try the [Full Recipe] for more details! {{image_2}} This spiced lentil soup is naturally vegetarian and vegan. You can keep it plant-based by using vegetable broth. If you want creaminess, add a dollop of coconut milk. It gives the soup a rich taste without losing its core flavors. You can also add more veggies, like spinach or kale, for added nutrition. If you want to boost the protein, there are great options. You can add cooked chickpeas or diced tofu. Both mix well with the flavors. If you enjoy meat, try adding shredded chicken or turkey. This addition can make the soup heartier and more filling. You can change the soup's flavor by using different spices. Try adding turmeric for a warm, earthy taste. A splash of soy sauce or a bit of ginger can bring a new twist. Experiment with fresh herbs like thyme or rosemary. Each change adds a unique flavor to your bowl. To store leftover spiced lentil soup, let it cool first. Then, pour the soup into an airtight container. Make sure to seal it tightly. You can keep it in the fridge for up to five days. Label the container with the date so you remember when you made it. When you're ready to enjoy your soup again, take it out of the fridge. Pour the soup into a pot. Heat it over medium heat, stirring often. If the soup seems too thick, add a bit of water or broth to thin it out. You can also microwave it. Place it in a microwave-safe bowl and cover it loosely. Heat for one to two minutes, stirring halfway through. If you want to save your spiced lentil soup for later, freezing is a great option. Use freezer-safe containers or bags. Leave some space at the top, as soup expands when frozen. It will stay fresh for up to three months. When you're ready to eat it, thaw it overnight in the fridge. Then, reheat as mentioned before. Enjoy the flavors of your delicious soup again! For the full recipe, check out the details above. Yes, you can use various lentils in this soup. Green and brown lentils work best. They hold their shape well during cooking. Red lentils cook faster and become soft, creating a creamier texture. If you use red lentils, reduce the cooking time by about 10 minutes. Mixing lentils can also add unique flavors and textures. This spiced lentil soup is naturally gluten-free! The ingredients, like lentils and vegetables, do not contain gluten. Always check your vegetable broth to ensure it is gluten-free. Some broths may have added ingredients that contain gluten. As long as you select the right broth, you can enjoy this soup worry-free. Here are a few common mistakes to watch out for: - Not rinsing lentils: Rinse them well before cooking to remove dust and debris. - Overcooking the lentils: Keep an eye on them to avoid mushiness. - Skipping the spices: The spices add depth, so don’t skip them! - Not seasoning enough: Taste as you go and adjust the salt and pepper. By avoiding these mistakes, you’ll create a flavorful and nourishing soup. For the full recipe, check the section above. This blog post walks you through making spiced lentil soup, from essential ingredients to cooking tips. You learned how to prepare the soup with aromatics, finish it with flavorful seasonings, and serve it perfectly. With variations for different diets and easy storage tips, you'll enjoy this dish anytime. Remember, cooking is about exploring flavors, so have fun with it. Enjoy your warm, hearty bowl of spiced lentil soup!](https://dailydishly.com/wp-content/uploads/2025/06/8505bcbc-e76d-49ee-a85a-9fa1b9dff162-768x768.webp)