Cheddar Jalapeño Drop Biscuits Simple and Tasty Treat

Welcome to the world of Cheddar Jalapeño Drop Biscuits! If you crave a warm, cheesy snack with a kick, you’ve come to the right place. These biscuits are easy to make and perfect for any occasion. You’ll find simple steps to create a tasty treat that your friends and family will love. Let’s dive into the ingredients and start your baking adventure!
Why I Love This Recipe
- Bold Flavor: The combination of sharp cheddar and fresh jalapeños creates a deliciously bold flavor that elevates these biscuits beyond the ordinary.
- Easy Preparation: These drop biscuits come together quickly and don’t require any rolling or cutting, making them a perfect choice for a busy day.
- Versatile Serving: They can be enjoyed as a side with soups and salads, or on their own as a tasty snack. Perfect for any occasion!
- Warm and Comforting: Baked to golden perfection, these biscuits are warm and comforting, making them an irresistible treat straight from the oven.
Ingredients
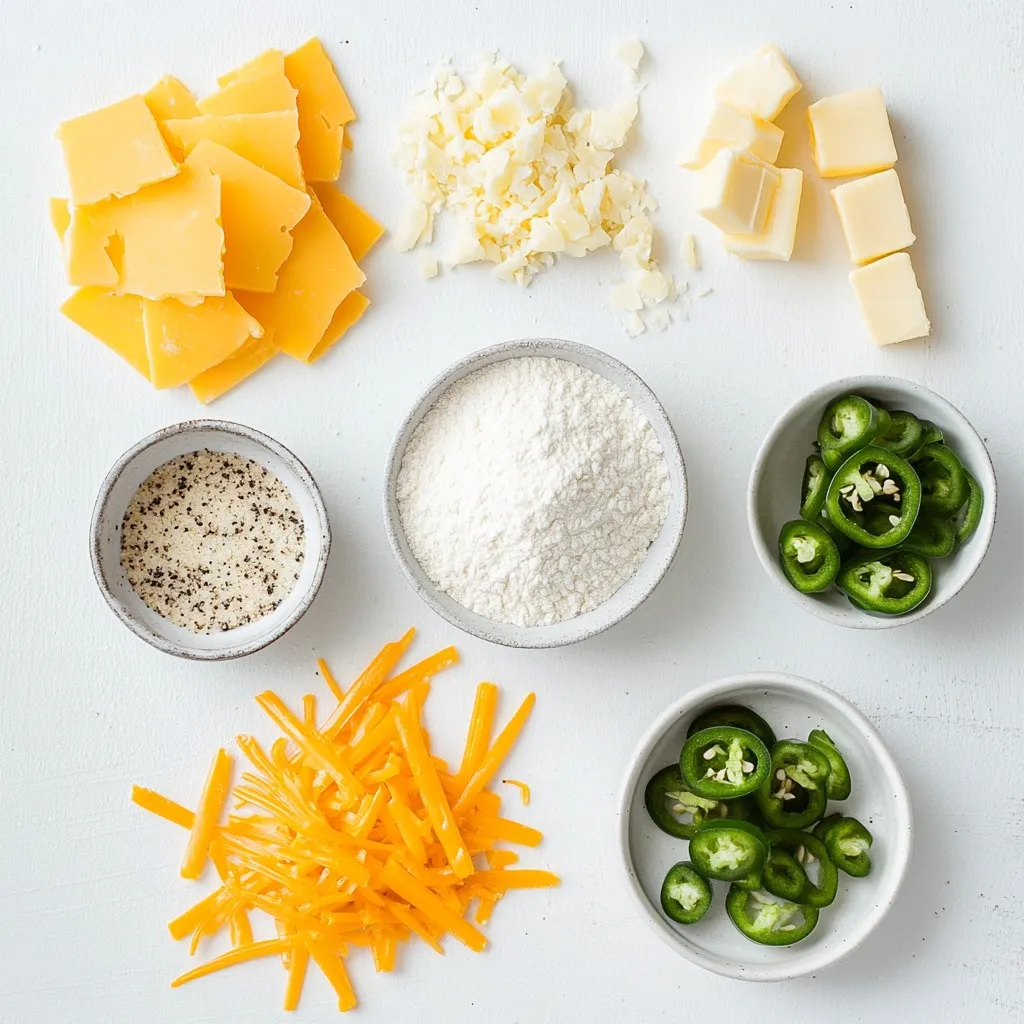
Creating Cheddar Jalapeño Drop Biscuits is easy when you have the right ingredients. Below is a complete list to get you started:
– 2 cups all-purpose flour
– 1 tablespoon baking powder
– 1 teaspoon salt
– 1/2 teaspoon garlic powder
– 1/4 teaspoon black pepper
– 1/2 cup cold unsalted butter, cubed
– 1 cup shredded sharp cheddar cheese
– 1-2 fresh jalapeños, finely chopped
– 3/4 cup buttermilk
– 1/4 cup green onions, sliced (optional)
Each ingredient plays a key role. The all-purpose flour forms the base. Baking powder helps the biscuits rise. Salt adds flavor. Garlic powder and black pepper provide depth. Cold butter keeps the biscuits flaky. Sharp cheddar cheese delivers rich taste. Jalapeños add spice. Buttermilk gives moisture and tang. Green onions can enhance flavor but are not necessary.
Gather everything before you start. This will make the process smooth and fun. Remember, fresh jalapeños can make your biscuits spicy. Adjust the amount based on your heat preference. Enjoy the journey of making these tasty treats!

Step-by-Step Instructions
Preheat and Prepare the Baking Sheet
First, preheat your oven to 425°F (220°C). This hot oven helps the biscuits rise well. While it heats, line a baking sheet with parchment paper. This step makes cleanup easy and prevents sticking.
Mixing Dry Ingredients
In a large bowl, combine 2 cups of all-purpose flour, 1 tablespoon of baking powder, 1 teaspoon of salt, 1/2 teaspoon of garlic powder, and 1/4 teaspoon of black pepper. Whisk these dry ingredients together. This mix gives your biscuits great flavor and helps them rise.
Incorporating Butter into Mixture
Next, add 1/2 cup of cold, cubed unsalted butter to the dry mix. Use your fingers or a pastry cutter to blend it in. Keep working until the mix looks like coarse crumbs. This step makes your biscuits flaky and tender.
Adding Cheese and Jalapeños
Now, stir in 1 cup of shredded sharp cheddar cheese and 1-2 finely chopped fresh jalapeños. Adjust the jalapeño amount based on how spicy you want your biscuits. Mix until the cheese and jalapeños are evenly spread throughout.
Combining with Buttermilk
Pour in 3/4 cup of buttermilk. If you’d like, add 1/4 cup of sliced green onions for extra flavor. Gently mix until just combined. Be careful not to overmix; the dough should feel slightly sticky.
Forming and Baking the Biscuits
Use a spoon or an ice cream scoop to drop heaping tablespoons of dough onto your prepared baking sheet. Leave about 2 inches between each biscuit. Bake them in the oven for 12-15 minutes. They should turn golden brown on top and be cooked through. Let them cool for a few minutes before serving warm. Enjoy!
Tips & Tricks
Achieving the Perfect Biscuit Texture
To get the best texture, use cold butter. It helps keep the biscuits flaky. When mixing, use your fingers or a pastry cutter. This method prevents the butter from melting too soon. The dough should feel slightly sticky but not wet. Avoid overmixing; this keeps your biscuits light and airy.
Spiciness Adjustment with Jalapeños
Adjust the spiciness by changing the amount of jalapeños. If you like it mild, use one jalapeño. For more heat, add two. Remember to remove the seeds and ribs for less heat. You can also try pickled jalapeños for a different flavor.
Best Storage Practices for Leftover Biscuits
Store leftover biscuits in an airtight container. They stay fresh for about two days at room temperature. For longer storage, freeze them. Wrap each biscuit tightly in plastic wrap. Place them in a freezer bag for easy access. To reheat, pop them in the oven at 350°F for about 10 minutes. Enjoy your biscuits warm!
Pro Tips
- Chill the Butter: Keep the butter very cold for flakier biscuits. You can even freeze it for a few minutes before using.
- Adjust the Spice: For milder biscuits, remove the seeds from the jalapeños. For extra heat, add more jalapeños or even a pinch of cayenne pepper.
- Mixing Technique: Be careful not to overmix the dough. Gentle folding helps maintain the light and fluffy texture of the biscuits.
- Storage Tips: Store leftover biscuits in an airtight container. Reheat them in the oven to bring back their original texture.

Variations
Cheese Alternatives
You can switch up the cheese in these biscuits. Try using pepper jack for a bolder kick. Mozzarella gives a milder taste and a gooey texture. You can also use a blend of cheeses. Just make sure to shred them for even melting.
Herb & Spice Additions
Adding herbs and spices can change the flavor. Try mixing in chopped fresh cilantro or parsley. A pinch of cumin adds warmth. For a touch of sweetness, add a dash of smoked paprika. These flavors can enhance the jalapeño heat and cheese richness.
Gluten-Free Adaptation
To make these biscuits gluten-free, use a gluten-free flour mix. Look for one that has a good binding agent, like xanthan gum. You may need to adjust the amount of buttermilk. Start with less and add more as needed. This keeps the dough from being too wet.
Storage Information
How to Store Unbaked Biscuits
To store unbaked biscuits, place them on a baking sheet. Cover the sheet with plastic wrap. You can keep them in the fridge for up to 1 hour. For longer storage, freeze them for up to 3 months. Just make sure they are not touching each other on the sheet. Once frozen, move them to a freezer bag. Label the bag with the date so you can keep track.
Best Method for Storing Baked Biscuits
For baked biscuits, let them cool completely. Once cooled, place them in an airtight container. You can store them at room temperature for 2 to 3 days. If you want to keep them longer, freeze them. Wrap each biscuit in plastic wrap and place them in a freezer bag. They can last for up to 3 months in the freezer without losing taste or texture.
Reheating Tips for Leftovers
To reheat leftover biscuits, preheat your oven to 350°F (175°C). Place the biscuits on a baking sheet. Heat them for about 10 minutes, or until warm. You can also use a microwave, but they may not be as crispy. If using the microwave, place a damp paper towel over the biscuits. Heat in 15-second increments until warm. Enjoy your biscuits fresh and tasty again!
FAQs
Can I make Cheddar Jalapeño Drop Biscuits ahead of time?
Yes, you can make these biscuits ahead of time. Prepare the dough and drop it onto the baking sheet. Then, cover the sheet with plastic wrap. You can store it in the fridge for up to 24 hours. When you are ready to bake, just pop them in the oven. This saves time and gets you fresh biscuits fast.
How can I freeze the biscuits?
To freeze the biscuits, you should first bake them. Let the biscuits cool completely. Once cool, place them in a single layer on a baking sheet. Freeze for about an hour. After that, transfer them to a freezer bag. This way, they will not stick together. You can freeze them for up to three months. When you want to enjoy them, just reheat in the oven.
What can I serve with these biscuits?
These biscuits pair well with many dishes. You can serve them with soups, stews, or chili. They also go great with salad. For a fun twist, try them with honey or butter. You can even use them as a base for a breakfast sandwich. Enjoying these biscuits is easy since they add flavor to any meal.
You’ve learned how to make delicious cheddar jalapeño drop biscuits. We covered essential ingredients, straightforward steps, and useful tips. Remember, you can tweak the spice level, change cheeses, or even go gluten-free. Keep leftovers fresh and enjoy them later. With this guide, you’ll impress everyone with your baking skills. Now, it’s time to gather your ingredients and whip up a batch! Enjoy the warm, cheesy goodnes

Cheddar Jalapeño Drop Biscuits
Ingredients
- 2 cups all-purpose flour
- 1 tablespoon baking powder
- 1 teaspoon salt
- 0.5 teaspoon garlic powder
- 0.25 teaspoon black pepper
- 0.5 cup cold unsalted butter, cubed
- 1 cup shredded sharp cheddar cheese
- 1-2 pieces fresh jalapeños, finely chopped
- 0.75 cup buttermilk
- 0.25 cup green onions, sliced (optional)
Instructions
- Preheat your oven to 425°F (220°C) and line a baking sheet with parchment paper.
- In a large mixing bowl, whisk together the flour, baking powder, salt, garlic powder, and black pepper.
- Add the cold cubed butter into the flour mixture. Using your fingers or a pastry cutter, work the butter into the flour until the mixture resembles coarse crumbs.
- Stir in the shredded cheddar cheese and chopped jalapeños until evenly distributed.
- Pour in the buttermilk and add the green onions, if using. Mix gently until just combined; do not overmix. The dough should be slightly sticky.
- Using a spoon or an ice cream scoop, drop heaping tablespoons of dough onto the prepared baking sheet, leaving about 2 inches between each biscuit.
- Bake in the preheated oven for 12-15 minutes, or until the tops are golden and the biscuits are cooked through.
- Remove from the oven and let cool for a few minutes before serving.


![- 2 pounds chicken wings - 1/2 cup honey - 1/4 cup low-sodium soy sauce - 3 tablespoons minced garlic - 1 tablespoon fresh ginger, grated - 1 tablespoon rice vinegar - 1 teaspoon sesame oil - 1/2 teaspoon black pepper - 1 tablespoon cornstarch (optional for thickening) - 2 tablespoons green onions (for garnish) - Sesame seeds (for garnish) Let's dive into why these ingredients make Honey Garlic Chicken Wings so special. First, the chicken wings give a great base. They are juicy and perfect for absorbing flavors. Next, honey adds sweetness and a sticky texture. It caramelizes beautifully when cooked. The low-sodium soy sauce brings a savory taste that balances the honey. This mix creates a flavor that will make your taste buds dance. Now, let's talk about the flavor enhancers. Minced garlic gives a strong, aromatic kick. Fresh ginger adds warmth and depth. Rice vinegar brightens the sauce, cutting through the sweetness. Together, they create a rich, well-rounded flavor profile. For the additional ingredients, sesame oil adds a nutty note. Black pepper gives a subtle heat. If you want a thicker sauce, cornstarch can help. Finally, the green onions and sesame seeds make a lovely garnish. They add color and a fresh crunch. You can find the full recipe here, and you'll see how easy it is to make these tasty wings. - Preheat the oven to 400°F (200°C). - Rinse and dry the chicken wings thoroughly. This helps them get crispy. - In a bowl, whisk together: - 1/2 cup honey - 1/4 cup soy sauce - 3 tablespoons minced garlic - 1 tablespoon fresh ginger, grated - 1 tablespoon rice vinegar - 1 teaspoon sesame oil - 1/2 teaspoon black pepper - Optionally, add 1 tablespoon of cornstarch for thickening. - Place the wings in a bowl, then pour the marinade over them. - Make sure each wing is fully coated. Cover and refrigerate for 30 minutes to 2 hours. - Arrange wings on a wire rack over a baking sheet. Bake for 25-30 minutes, flipping halfway. - In the last 5 minutes, pour remaining marinade into a saucepan. Heat it until boiling, then simmer for 3-5 minutes until thickened. - Brush the baked wings with the glaze for extra flavor. - Garnish with chopped green onions and sesame seeds before serving. Enjoy your sticky honey garlic chicken wings! For the full recipe, see above. - Choose the right type of chicken wings: Look for fresh or frozen wings that are meaty and plump. Split wings or whole wings work well. Both have their charm. - Importance of drying wings for crispness: After rinsing, pat the wings dry with paper towels. This helps them get crispy when cooked. Moisture is the enemy of crispiness. - Marination time tips for optimal taste: Marinate your wings for at least 30 minutes. For the best flavor, aim for 2 hours. This allows the honey garlic mix to soak in well. - How to balance sweetness and savoriness in the sauce: Use the right amount of soy sauce and honey. A half-cup of honey balances with a quarter-cup of soy sauce. This mix gives you both sweet and salty. - Alternative cooking methods: You can grill or fry the wings. Grilling gives a nice smokey flavor. Frying makes them extra crispy. Both options are tasty. - Tips for monitoring doneness and crispiness: Use a meat thermometer for doneness. The wings should reach 165°F. Keep an eye on the color. They should be golden brown and crispy. For the full recipe, check out the [Full Recipe]. {{image_2}} You can easily change up the taste of your honey garlic chicken wings. One option is to add chili flakes for a spicy kick. This addition pairs well with the sweet honey. If you want an Asian twist, add some sesame oil and chopped green onions. These flavors make the wings even more special and delicious. You can cook wings in different ways. Oven-baking is a popular method. It gives the wings a nice crispness. You can also use an air fryer. This method cooks wings faster while keeping them juicy. For an easier prep, try slow cooking. Just set it and forget it while the flavors blend together. When serving these wings, think about side dishes. Coleslaw adds a crunchy texture. Potato wedges are another great choice for a hearty meal. For dipping, offer a variety of sauces. Ranch or blue cheese can balance the sweetness of the wings. You can find the full recipe for these tasty wings [Full Recipe]. After you enjoy your honey garlic chicken wings, store any leftovers. First, let them cool to room temperature. This helps keep them fresh. Use an airtight container for storage. These containers keep air out and prevent the wings from drying. You can refrigerate cooked wings for up to three days. If you want them to last longer, freezing is a great option. To reheat your wings, you want them crispy again. The oven is the best method for this. Preheat your oven to 375°F (190°C). Place the wings on a baking sheet lined with foil. Heat them for about 10-15 minutes, flipping halfway through. This helps them crisp up nicely. If you are in a hurry, you can use the microwave. But be careful; it may make them a bit soggy. Heat them in a microwave-safe dish for 1-2 minutes. Check them often to avoid overcooking. You can freeze both raw and cooked chicken wings. If freezing raw wings, keep them in their original packaging. Wrap them well in plastic wrap or foil. This helps prevent freezer burn. You can store them this way for up to six months. For cooked wings, let them cool first. Place them in an airtight container or freezer bag. You can freeze cooked wings for up to three months. When you are ready to eat, just thaw them in the fridge overnight before reheating. For the full recipe, check out the Sticky Honey Garlic Chicken Wings. Honey garlic chicken wings are not spicy. They have a sweet and savory flavor. However, you can add heat if you like spice. Just stir in some red pepper flakes or a dash of hot sauce into the marinade. Start with a small amount. You can always add more heat later. Yes, you can use frozen chicken wings. Make sure to thaw them before cooking. To thaw, place the wings in the fridge overnight. If you're short on time, you can use the cold water method. Seal the wings in a bag and submerge them in cold water for about an hour. Once thawed, follow the recipe as normal. Check the internal temperature of the wings. They should reach 165°F (74°C). You can use a meat thermometer for this. Look for a nice golden brown color on the outside. The juices should run clear when you cut into them. If they're still pink, they need more time. These wings pair well with several side dishes. Consider serving coleslaw for crunch and freshness. Potato wedges also work great. You can try a simple salad for balance. If you want something fun, serve with crispy onion rings. Each of these sides adds a tasty touch to your meal. Yes, you can bake the wings in advance. Cook them, then let them cool completely. Store them in an airtight container in the fridge. To reheat, place them on a baking sheet. Bake at 350°F (175°C) for about 10-15 minutes. This keeps them crispy and tasty. For the best flavor, brush them with extra glaze before serving. For the full recipe, check out the sticky honey garlic chicken wings section. This blog post detailed how to make Honey Garlic Chicken Wings from start to finish. You learned about the key ingredients and steps needed to create the perfect marinade. I also shared tips to enhance flavor and achieve that ideal crispiness. Remember, you can easily alter recipes to suit your taste. Serve these wings with your favorite sides for a complete meal. Enjoy the process and have fun experimenting with different flavors!](https://dailydishly.com/wp-content/uploads/2025/06/2feb3bb2-4133-459b-bb32-a04192496237-768x768.webp)